Page is loading ...

COOPER BIKES
BICYCLE OWNER’S MANUAL
IMPORTANT
KEEP FOR FUTURE REFERENCE
2nd edition, 2013
This manual meets EN Standards
14764 and 14766
MANUAL 20.11.12 2/7/13 00:00 Page 2

Welcome to Cooper Bicycles
The Cooper name is synonymous with great design, quality, affordability and, above all, fun. A lot of time and effort goes into
every Cooper Bike to make it special. At Cooper we try to utilize the engineering and technical knowledge that has been
synonymous with our British Company for 50 years, whilst giving a nod to our F1 & Rally racing heritage. We develop our bikes
to be unobtrusive, innovative, aesthetically pleasing, and to bring joy to you and others. We hope you share our philosophy and
enjoy your new bike.
IMPORTANT
Read CHAPTER 1 before riding your new bicycle!
Even if you are an experienced cyclist, please take a moment to read through CHAPTER 1 of this manual before you ride.
This manual contains important safety, performance and service information. Some maintenance should only be performed
by your dealer, and the manual indicates these tasks.
About this Owner’s Manual
This manual explains how to ride your new bike safely. Read CHAPTER 1 before riding your new bicycle!
Parents should explain CHAPTER 1 to a child or anyone else who might not otherwise understand this information.
MANUAL 20.11.12 2/7/13 00:00 Page 3

Like any sport, bicycling involves risk of injury and damage. By choosing to ride a bicycle, you assume the responsibility
for that risk, so you need to know — and to practise — the rules of safe and responsible riding and of proper use and
maintenance. Proper use and maintenance of your bicycle reduces risk of injury.
This manual contains many “Warnings” and “Cautions” concerning the consequences of failure to maintain or inspect your
bicycle and of failure to follow safe cycling practices.
WARNING: In this manual, the WARNING sign indicates a hazardous situation which,
if not avoided,could result in death or serious injury.
CAUTION: In this manual, the CAUTION sign indicates a potentially hazardous situation which,
if not avoided, may result in minor or moderate injury, or is an alert against unsafe practices.
The word CAUTION used without the safety alert symbol indicates a situation which, if not avoided, could result in serious
damage to the bicycle or the voiding of your warranty.
Many of the Warnings and Cautions say “you may lose control and fall”. Because any fall can result in serious
injury or even death, we do not always repeat the warning of possible injury or death.
Because it is impossible to anticipate every situation or condition which can occur while riding, this Manual makes no
representation about the safe use of the bicycle under all conditions. There are risks associated with the use of any
bicycle which cannot be predicted or avoided, and which are the sole responsibility of the rider.
MANUAL 20.11.12 2/7/13 00:00 Page 4

Assembly of your new bicycle:
Assembly and the first adjustment of your bicycle take special tools and skills, so this should only be done by an
authorized dealer.
If you have questions:
There are many models, with a variety of equipment, so this manual may contain some information that does not apply to your
bike. Some illustrations may vary from the actual bicycles.
If you have any questions after reading the information in this manual, consult your dealer. If you have a question or problem
that your dealer can’t handle, contact us: [email protected]
MANUAL 20.11.12 2/7/13 00:00 Page 5

Cooper Bicycle Owners Manual 1
Register your bicycle:
Bicycle registration is the only record we have of who owns this bike. If there is ever a need to
communicate with the owner, such as providing updated safety information, your registration is crucial.
• Go to www.cooperbikes.com and follow the links.
The website also provides a link to updated safety information.
If you choose not to register, make sure you check the website often.
KEEP FOR FUTURE RECORDS
BICYCLE MODEL:
SERIAL NUMBER:
LOCK KEY NUMBER:
THE SHOP OF PURCHASE:
MY SHOP PHONE NUMBER:
MANUAL 20.11.12 2/7/13 00:00 Page 6

2 Cooper Bicycle Owners Manual
MANUAL 20.11.12 2/7/13 00:00 Page 7

Cooper Bicycle Owners Manual 3
TABLE OF CONTENTS
Chapter 1
Guide to Safe On-and-Off Road Operation
1.1 Bicycle type and use classification
1.1.1 Condition 1
1.1.2 Condition 2
1.1.3 Condition 3
1.2 Before a first ride
1.2.1 Make sure the bicycle fits
1.2.2 Know how the bicycle performs
1.3 Before every ride checklist
1.4 Rules for safe riding
1.4.1 Know and observe local bicycle riding laws
1.4.2 Watch for cars, pedestrians, and other obstacles
1.4.3 Wear a helmet and proper cycling clothes
1.4.4 Change your riding to be safe in variable conditions
1.4.5 Use your brakes carefully
1.4.6 Use good shifting techniques
1.5 Take care of your bike
1.5.1 Protect your bike from theft
1.5.2 Protect your bike when parking, storing or shipping
1.5.3 Carry repair items
1.5.4 Only install and use approved accessories
1.5.5 Keep the bike clean
1.5.6 Avoid clamping the frame during transportation or repair
Chapter 2
Maintenance
2.1 Maintenance schedule
2.2 Recommended tools for proper bicycle maintenance
MANUAL 20.11.12 2/7/13 00:00 Page 8

Chapter 4 – Lubrication and Servicing
4.1 Stem
4.2 Seat post
4.3 Pedals
4.4 Headset
4.5 Brakes and brake levers
4.6 Wheels
4.7 Chain
4.8 Control Cables
4.9 Tyres
4.10 Tubes
More information
Limited Warranty
4 Cooper Bicycle Owners Manual
Chapter 3
Adjustment
3.1 Torque specifications
3.2 Handlebar
3.3 Stem
3.4 Headset
3.5 Saddle
3.6 Pedals
3.7 Chainset & bottom bracket
3.8 Chain
3.9 Cables
3.10 3 & 5 speed Sturmey Archer Internal Hub Gear systems
3.11 8 & 11 speed Shimano Afline Internal Hub Gear systems
3.12 Multi-speed derailleur systems
3.13 Brake levers
3.14 Brakes
3.15 Wheels
3.16 Accessories
MANUAL 20.11.12 2/7/13 00:00 Page 9

Cooper Bicycle Owners Manual 5
Chapter 1 – Guide to Safe On-and-Off Road Operation
1.1 BICYCLE TYPE AND USE CLASSIFICATION
Intended use of your bicycle:
Riding a bicycle in a manner beyond, or more severe than, its intended use can cause the bicycle or part of the bicycle
to fail. The following information explains the type of riding intended for different types of bikes. Read the safety
information in Chapter 1 for further details.
WARNING
Bicycles, or their parts, can be broken or damaged by riding in a manner more stressful than the intended use of
the bike. If the bike is damaged, you could lose control and fall. Do not ride beyond the design limits of the bike.
If you are unsure of the limits of the bike, consult your dealer.
Ride within the design guidelines for the Classification for your bicycle at all times. All Cooper Bicycles are designed
and tested for a maximum combined rider /cargo /bike weights listed in each condition classification.
1
MANUAL 20.11.12 2/7/13 00:00 Page 10

1.1.1 CONDITION 1
High-Performance Road
These bikes are designed for riding on a paved surface where the tires do not lose ground contact.
• INTENDED: To be ridden on paved roads only.
• NOT INTENDED: For off-road, cyclocross, or touring with racks or panniers.
On this type of bike, steel alloy selection is optimized to deliver both light weight and "feel".
All frames that are very light need frequent inspection. These frames are not designed to take abuse
or be a rugged workhorse.
• Weight limit: 275 lbs (125 kg); Tandems: 550 lb (250 kg)
1.1.2 CONDITION 2
General Purpose Riding
These bikes are designed for riding Condition 1, plus smooth gravel roads and improved trails
with moderate grades where the tyres do not lose ground contact.
• INTENDED: For paved roads, gravel or dirt roads that are in good condition, and bike paths.
• NOT INTENDED: For off-road or mountain bike use, or for any kind of jumping.
Wider tyres suit gravel or dirt paths. Narrow tyres that are best suited to faster riding on pavement.
If you ride on gravel or dirt paths, carry heavier loads or want more tyre durability talk to your shop about wider tyres.
• Weight limit: 300 lbs (136 kg)
6 Cooper Bicycle Owners Manual
1
CONDITION
2
CONDITION
MANUAL 20.11.12 2/7/13 00:00 Page 11

1.1.3 CONDITION 3
Cross-Country, Marathon, Mountain bikes
These bikes are designed for riding Conditions 1 and 2, plus rough trails, small obstacles, and smooth technical
areas, including areas where momentary loss of tyre contact with the ground may occur. NOT jumping.
• INTENDED: For cross-country riding and racing which ranges from mild to aggressive over intermediate terrain.
Cross-country and marathon components are light-weight, favoring nimble speed over brute force.
• NOT INTENDED: For very aggressive or extreme riding. No spending time in the air landing hard and
hammering through obstacles.
Cross-Country and Marathon bikes are light and fast for pedaling efficiency and uphill speed.
• Weight limit: 300 lbs (136 kg)
For more information refer to www.cooperbikes.com to find out what catagory your bike is in.
Cooper Bicycle Owners Manual 7
3
CONDITION
MANUAL 20.11.12 2/7/13 00:00 Page 12

1.2 BEFORE A FIRST RIDE
1.2.1 Make sure the bicycle fits
Your dealer should fit you with the proper size of bicycle. There should be at
least 1” (25 mm) clearance between the top tube and the rider when standing
over the bicycle. For further information visit www.cooperbikes.com
The seat and handlebar may be adjusted to offer the best comfort
and performance. Before making these adjustments, refer to Chapter 3.
1.2.2 Know how the bicycle performs
The features of your bicycle, if misused, may cause you to lose control of
the bike. Before riding fast or in more difficult conditions, learn the function
and performance of all the mechanisms of your bike by riding at slower
speeds in a flat, empty parking lot. If you want your bicycle to perform
differently, or if you have special needs that require different parts for
the safe operation of your bike, consult your dealer.
•
Learn the power of your brakes
The stopping power on bikes varies according to the intended use of the bike. If you would like your bike to have more,
or less, stopping power, consult your dealer about brake adjustments or other brake options for your bicycle.
WARNING
Misuse of the braking system, including over-use of the front brake, can cause you to lose control and fall. Avoid
improper braking by understanding and practicing proper application of your brakes as explained in this manual.
8 Cooper Bicycle Owners Manual
Bicycle Fit
Stand - over Height
MANUAL 20.11.12 2/7/13 00:00 Page 13

•
Avoid toe clip overlap
Avoid toe-clip overlap
When riding slowly, do not pedal if the handlebar is turned. It may be possible,
at very slow speeds, when the handlebar is turned, for your foot or toe-clips to
contact the front wheel or mudguard.
At normal riding speeds, the handlebar does not turn enough for this to occur.
WARNING
Contact between your foot or toe-clip and the front wheel or fender can cause
you to lose control and fall. Avoid pedalling when turning at slow speed.
•
Stop riding if you experience problems
Occasionally riders experience problems with their frame or fork,
or other component. If a frame, fork or any component has any problem,
do not ride the bicycle.
If you experience an unusual vibration, noise, or behaviour, slow down
and stop immediately. Take your bicycle directly to a dealer for inspection and repair.
WARNING
A vibration, or steering wobble, can cause you to lose control and fall. If you experience any unusual behaviour of your
bicycle, slow down immediately. Take your bicycle to your dealer for inspection and repair.
Cooper Bicycle Owners Manual 9
Toe clip overlap
MANUAL 20.11.12 2/7/13 00:00 Page 14

CHECK THE BIKE BEFORE EVERY RIDE
Before every ride, inspect the bike with the following check list. If any part of the bicycle fails the inspection, repair the
bicycle by following the information provided by this manual, or take the bike to your dealer for service. Never ride a
bike with a damaged part; have it replaced.
1.3 BEFORE EVERY RIDE CHECKLIST
NOTE: This is not a comprehensive maintenance program.
•
Wheels
•
Tyre inflation
•
Brakes
•
Handlebar and stem
•
Seat and seat post
•
Lights and reflectors
•
Frame, fork, and components
•
Check the wheels
CAUTION
A bicycle that does not work properly can cause you to lose control and fall. Inspect the entire bicycle thoroughly before
every ride, and do not ride it until any problem has been corrected. Check that the wheels are straight. Spin each wheel
and watch the rim as it passes through the brake pads or the frame. If the rim wobbles up and down or from side to side,
repair the wheel.
10 Cooper Bicycle Owners Manual
MANUAL 20.11.12 2/7/13 00:00 Page 15

WARNING
A wheel attachment device that is not properly adjusted and closed
may allow the wheel to be loose or come off unexpectedly, causing
you to lose control and fall.
Make sure the wheels are properly attached before riding the bike.
Your bicycle may be equipped with a different securing method for
the front wheel than for the rear wheel. It is very important that you
understand the type of wheel securing method on your bicycle,
that you know how to secure the wheels correctly, and that you know
how to apply the correct clamping force that safely secures the wheel.
Ask your dealer to instruct you in correct wheel removal and installation,
and ask him to give you any available manufacturer’s instructions.
Bicycle wheels are designed to be removable for easier transportation
and for repair of a tire puncture. In most cases, the wheel axles are
inserted into slots, called “dropouts” in the fork and frame.
Wheels are secured in one of two ways: Cooper
use Quick release or Wheel Axle nuts.
Quick release wheels have a hollow axle shaft (“skewer”) running through
it has adjustable tension nut on one end and an over-centre cam on the other (quick release,
cam action system) Wheel Axle nuts which are threaded on to or into the hub axle and
need to be tightened with a spanner or 15mm Socket.
Cooper Bicycle Owners Manual 11
The Nutted wheel
Quick release wheel
MANUAL 20.11.12 2/7/13 00:00 Page 16

•
Check the tire inflation
Inflate the tires to the air pressure recommended
on the tire sidewalls.
•
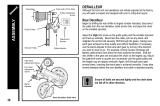
Check the brakes
Follow the inspection instructions
for the type of brake on your bike:
A hand lever connected to the brake by a cable
allows the brake pads to squeeze the rim.
When the brakes are not applied, the brake pads
should be 1 to 2 mm from the rim. Squeeze each
brake lever toward the handlebar to make sure the
brake moves freely and stops the bike. If the brake
lever can be pulled to the handlebar, the brake is too loose.
If the brake pads are too close to the rim, the brake is too tight.
Brake pads should be aligned with the rim surface.
WARNING
Never ride a bike if you are not certain the brakes are working properly, or you if suspect a problem
with the brake cables or hydraulic hose. Malfunctioning brakes can cause you to lose control and fall.
Inspect the brakes thoroughly before every ride. If your brakes are not working properly, re-adjust
them or take the bike to your dealer for service.
12 Cooper Bicycle Owners Manual
The Brakes
A - Brake pad alignment with wheel rim surface
B - Brake pad set parallel to rim
C - Direction of wheel rotation
D - 0.5 - 1.0mm toe out
MANUAL 20.11.12 2/7/13 00:00 Page 17

WARNING
If your bike has only a coaster brake, ride conservatively. A single rear brake
does not have the stopping power of front-and-rear brake systems.
•
Check the handlebar and stem
Make sure the stem is in alignment with the front wheel. Test the stem connection
to the fork by attempting to turn the handlebar from side to side with the front wheel
locked between your knees (Figure 3). Test the security of the handlebar by attempting
to rotate it in the stem. It should not move or be loose. Make sure that no cables are
stretched or pinched by rotating the handlebar. Check that the handlebar plugs are
properly inserted into both ends of the handlebar (if fitted).
•
Check the seat and seat post
Make sure the seat is secure by attempting to turn the seat and seat post in
the frame, and attempt to move the front of the seat up and down. It should not
move or be loose.
•
Check the lights and reflectors
Make sure the lights are functioning correctly and that any batteries are charged. If the lights use a dynamo,
make sure it is mounted correctly and all attachment hardware is tight. Make sure reflectors are clean and in position.
•
Check frame, fork, and components
Carefully inspect your frame, fork, and components for signs of fatigue before and
after each ride. Regularly inspect your entire bicycle for signs of fatigue stress:
Cooper Bicycle Owners Manual 13
Handlebar & Stem
Checking the Handlebar
and stem
MANUAL 20.11.12 2/7/13 00:00 Page 18

•
Dents
•
Cracks
•
Scratches
•
Deformation
•
Discoloration
•
Unusual noises
Even if you perform regular inspections, if you exceed the limit of strength of your bicycle or a given part, it may fail if
overloaded. After any high force load, thoroughly inspect all the parts of your bike. High force loads include crashes, but
you don't have to crash to put a high force load on your bike. For example, hitting a hole in the road or a sharp bump
can put large forces on your bike.
WARNING
As with all mechanical components, the bicycle is subjected to wear and high stresses. Different materials and
components may react to wear or stress fatigue in different ways. If the design life of a component has been
exceeded, it may suddenly fail possibly causing injuries to the rider. Any form of crack, scratches or change of
colouring in highly stressed areas indicate that the life of the component has been reached and it should be replaced.
14 Cooper Bicycle Owners Manual
MANUAL 20.11.12 2/7/13 00:00 Page 19

1.4 RULES FOR SAFE RIDING
1.4.1 Know and observe local bicycle riding laws
Most countries and states and local areas have specific laws for cyclists, and you should follow them. Local cycling
clubs or your country or states Department of Transportation (or equivalent) should be able to supply this information to
you. The requirements for items such as lights and reflectors change between areas, so check ahead.
These are a few of the more important rules of riding:
•
Use proper hand signals.
•
Ride single file when riding with other cyclists.
•
Ride on the correct side of the road; never go against traffic.
•
Ride defensively; expect the unexpected. A cyclist is hard to see, and many drivers simply
are not trained to recognize the rights and special considerations of a bicycle rider.
1.4.2 Watch for cars, pedestrians, and other obstacles
Watch for and avoid potholes, drain grates, soft or low kerbs, and other deviations which could impact your wheels or
cause them to slip. If you are not sure of riding surface conditions, walk your bike. If a car suddenly enters your lane,
or someone unexpectedly opens the door of a parked car, you could be involved in a serious accident. Mount a horn
or bell on your bicycle and use it to alert others of your approach.
Cooper Bicycle Owners Manual 15
MANUAL 20.11.12 2/7/13 00:00 Page 20

1.4.3 Wear a helmet and proper cycling clothes
Wear a helmet that meets safety testing standards it may help prevent injury. Helmets should be removed when not
riding the bicycle. If the helmet is caught, stuck on, or stuck between objects, the wearer could choke.
Wear protective clothing including helmet, eye protection, and gloves. Avoid loose-fitting trousers that could get caught
in the chain.
Also wear light, bright, and reflective clothing to make yourself more visible, especially at night.
1.4.4 Change your riding to be safe in variable conditions
•
Ride carefully in wet weather
No brakes, whatever their design, work as effectively in wet weather as they do in dry. Even properly aligned,
lubricated and maintained brakes require greater lever pressure and longer stopping distances in wet weather.
Anticipate the extra distance it will take to stop.
Wet weather causes reduced traction. Use slower cornering when traction is reduced, such as when riding over wet leaves,
painted pelican crossings, or manhole covers. When wet weather cools to below freezing, traction is reduced even
further. In addition, brakes may not work as well. Adjust your riding speed accordingly, or use other forms of transportation.
When riding in wet weather, a dynamo (generator light) may not work properly.
Avoid riding in wet weather when visibility is reduced.
Strong winds can make a bicycle steer or turn unexpectedly. In windy conditions, slow down or use other forms of
transportation.
16 Cooper Bicycle Owners Manual
MANUAL 20.11.12 2/7/13 00:00 Page 21
/