Page is loading ...
2
ENGLISH
(Original instructions)
3
2
1
4
8
15
16
9
5
6
7
10
11
12
13
14

3
ENGLISH
(Original instructions)
6
1
12 11 9 8 6
1
5
6
7
5
12 13 15 6
6
12 14
16
6
6
A B
C D
E1
E2
F1
F2

4
ENGLISH
(Original instructions)
Intended use
Your BLACK+DECKER™ FM3000 Meat Mincer has been
designed for grinding meat. With the attachments provided,
it can also be used to make kebbe and sausages. This
product is
intended for household use only.
This appliance is not intended to be used in:
• Staff kitchen areas in shops, offices and other working
environments;
• Farm houses;
• By clients in hotels, motels and other residential type
environments;
• Bed and breakfast type environments;
Thank you for choosing BLACK+DECKER. We hope that
you will enjoy using this product for many years. For indoor
and domestic use only.
In order to avoid a hazard due to inadvertent resetting of the
thermal cut-out, this appliance must not be supplied through
an external switching device, such as a timer, or connected
to a circuit that is regularly switched on and off by the utility.
Safety instructions
• Warning! When using mains-powered appliances, basic
safety precautions, including the following, should
always be followed to reduce the risk of fire, electric
shock and personal injury.
• Read all of this manual carefully before using the
appliance.
• The intended use is described in this manual. The use of
any accessory or attachment or the performance of any
operation with this appliance other than those
recommended in this instruction manual may present a
risk of personal injury.
• Misuse could cause injury.
• Retain this manual for future reference.
Using your appliance
• Always take care when using the appliance.
• Do not use the appliance outdoors.
• Do not operate the appliance if your hands are wet. Do
not operate the appliance if you are barefoot.
• Always route the power supply cord neatly so it does not
hang over the edge of a worktop and cannot be caught
accidentally or tripped over.
• Never pull the power supply cord to disconnect the plug
from the socket. Keep the power supply cord away from
heat, oil and sharp edges.
• If the supply cord is damaged, it must be replaced by the
manufacturer, its service agent or similarly qualified
persons in order to avoid a hazard.
• Switch off and disconnect the appliance from the power
supply when not in use, before fitting or removing parts
and before cleaning.
• Always protect the motor unit from water or excessive
humidity.
• Never let the appliance operate unattended.
• Keep any loose clothing, long hair or jewellery away from
any moving parts.
• Do not immerse the appliance, cord set or plug in liquids.
• Care shall be taken when handling the sharp cutting
blades, emptying the bowl and during cleaning.
Safety of others
• This appliance is not intended for use by persons
(including children) with reduced physical, sensory or
mental capabilities, or lack of experience and knowledge,
unless they have been given supervision or instruction
concerning use of the appliance by a person responsible
for their safety.
• Children should be supervised to ensure that they do not
play with the appliance.
After use
• Switch off, remove the plug from the socket and let the
appliance cool down before leaving it unattended and
before changing, cleaning or inspecting any parts of the
appliance.
• When not in use, the appliance should be stored in a dry
place. Children should not have access to stored
appliances.
Inspection and repairs
• Before use, check the appliance for damaged or
defective parts. Check for breakage of parts, damage to
switches and any other conditions that may affect its
operation.
• Do not use the appliance if any part is damaged or
defective.
• Have any damaged or defective parts repaired or
replaced by an authorised repair agent.
• Before use, check the power supply cord for signs of
damage, ageing and wear.
• Do not use the appliance if the power supply cord or
mains plug is damaged or defective.
• If the power supply cord or mains plug is damaged or
defective it must be repaired by an authorised repair
agent in order to avoid a hazard. Do not cut the power
supply cord and do not attempt to repair it yourself.
• Never attempt to remove or replace any parts other than
those specified in this manual.
Additional safety instructions for Mincers
Warning! Do not place near a hot gas or electric oven.
• Use the original components only.

5
ENGLISH
(Original instructions)
Caution: Ensure that the appliance is switched off before
performing any maintenance or cleaning.
• If an extension lead is used, it must be earthed.
• Only use with the accessories provided.
• Leave adequate space around the appliance for
ventilation.
• Disconnect the appliance from the electrical supply
before cleaning or carrying out any maintenance.
• Keep children and animals away from the appliance and
cord set.
• Close supervision is required when using the appliance
near children.
• This appliance is not intended to be operated by means
of an external timer or a separate remote control
system.
Electrical safety
This product must be earthed. Always
check that the mains voltage corresponds
to the voltage on the rating plate
• Appliance plugs must match the outlet. Never modify
the plug in any way.
• Do not use any adapter plugs with earthed (Class 1)
appliances. Unmodified plugs and matching outlets will
reduce the risk of electric shock.
• To avoid the risk of electric shock, do not immerse the
cord, plug or motor unit in water or other liquid.
Extension cables & class 1 product
• A 3 core cable must be used as your tool is earthed and
of class 1 construction.
• Up to 30m (100 ft) can be used without loss of power.
• If the supply cord is damaged, it must be replaced by the
manufacturer or an authorised BLACK + DECKER
Service Centre in order to avoid a hazard.
Symbols on appliance
The following symbols may be shown on the tool along with
the date code:
Do not approach moving parts
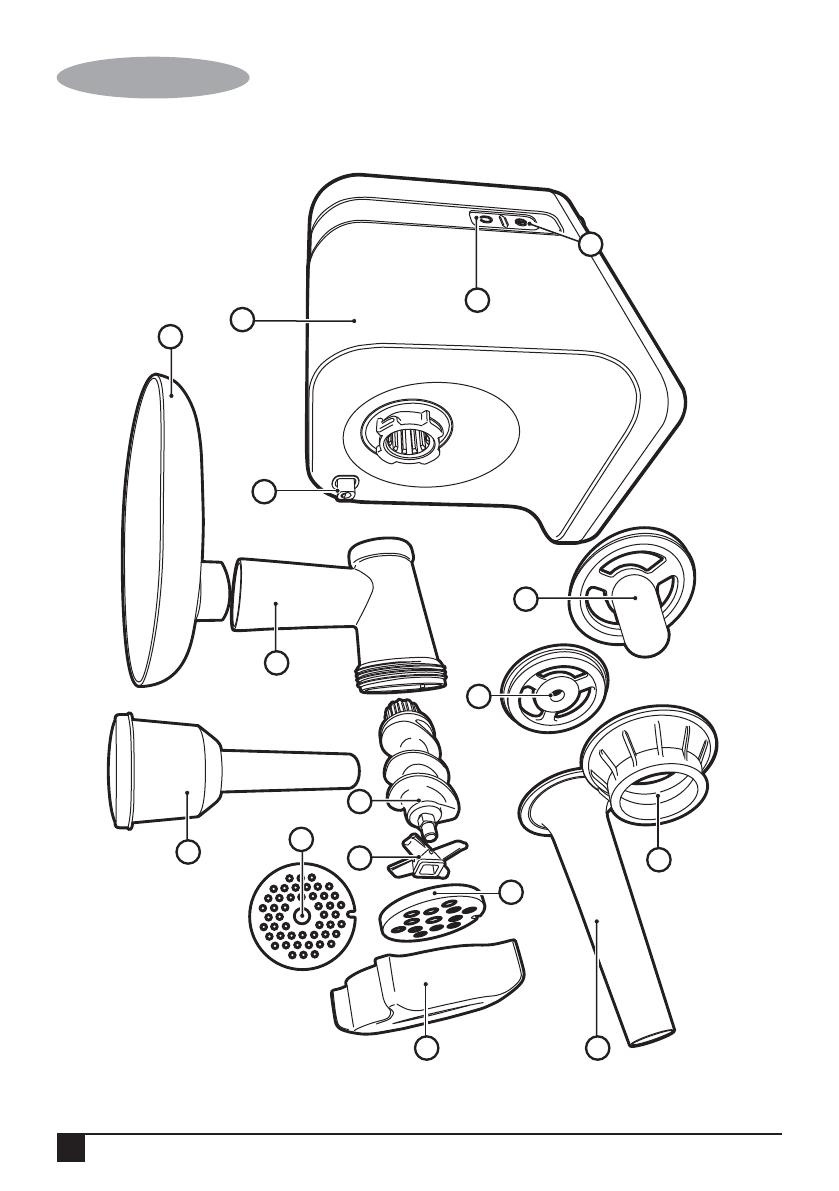
Features
1. Motor unit
2. On/Off button
3. Reverse button
4. Release button
5. Tray
6. Cutter housing
7. Pusher
8. Worm shaft
9. Cutter blade
10. Fine Mincing disc
11. Coarse Mincing disc
12. Screw ring
13. Sausage horn
14. Cone
15. Separator
16. Former
Use
• This appliance requires minimum assembly & only
requires parts to be cleaned before use. See “Cleaning”
for details.
• Leave a space of at least 50mm all around the appliance.
• Connect the appliance to a suitable electrical supply.
Mincing (Fig. A - D)
• Insert the worm shaft (8) into the cutter housing (6), the
plastic end first.
• Place the cutter blade (9) onto the worm shaft (8). The
cutting edges should be at the front. According to your
requirement, place the mincing disc (10 or 11) onto the
worm shaft.
Note: Make sure the notch of the mincing disc fits onto the
projections of the cutter housing.
• Screw the screw ring (12) clockwise onto the cutter
housing (6) until it is properly fastened.
• Attach the cutter housing (6) to the motor unit (1) as
shown in figure B.
• Place the tray (5) on the upright part of the cutter housing
(6) as shown in figure C.
• Now the appliance is ready for mincing.
• Cut the meat into 10cm-long, 2cm - thick strips. Remove
bones, pieces of gristle and sinews.
Warning! Never use frozen meat!
• Put the meat in the tray (5). Use the pusher (7) to gently
push the meat into the cutter housing (6). For steak
tartare, mince the meat with the coarse mincing disc
twice.
Making sausages (Fig. E1 - E2)
• Mince and season the meat.
• Insert the worm shaft (8) into the cutter housing (6), the
plastic end first.
• Place the separator (15) in the cutter housing (6). Place
the sausage horn (13) in the cutter housing (6) and screw
the screw ring (12) clockwise onto the cutter housing (6).
Note: Make sure the notches of the separator 15) fit onto the
projections of the cutter housing (6).
• Attach the cutter housing (6) to the motor unit (1) as
shown in figure B.
• Place the tray (5) on the upright part of the cutter housing
(6) as shown in figure C.
• Now the appliance is ready for making sausages.

6
ENGLISH
(Original instructions)
• Put the ingredients in the tray (5). Use the pusher (7) to
gently push the meat into the cutter housing.
• Put the sausage skin in lukewarm water for 10 minutes.
Then slide the wet skin onto the sausage horn (13).
Push the (seasoned) minced meat into the cutter
housing.
Making Kebbe (Fig. F1 - F2)
• Insert the worm shaft (8) into the cutter housing (6), the
plastic end first.
• Place the former (16) into the cutter housing.
• Place the cone (14) into the cutter housing and screw
the screw ring (12) clockwise onto the cutter housing (6).
• Attach the cutter housing (6) to the motor unit (1).
• Place the tray (5) on the upright part of the cutter
housing (6).
• Now the appliance is ready for making kebbe.
• Feed the prepared kebbe mixture through the kebbe
maker.
• Cut the continuous hollow cylinder into the desired
lengths and use as required.
Kebbe is a traditional Middle Eastern dish made primarily of
lamb and bulgur wheat which are minced together to form a
paste the mixture is extruded through the kebbe maker and
cut into short lengths. The tubes can then be stuffed with a
minced meat mixture, the ends pinched together and then
deep fried.
Recipe for stuffed Kebbe
Outer Casing
• 500g/1lb 2oz lamb, cut into strips.
• 500g/1lb 2oz washed and drained bulgur wheat.
• small onion.
Pass alternate batches of lamb and bulgur wheat through
the mincer fitted with the fine mincing disc (11), adding the
onion before all the lamb and wheat are minced. Mix the
minced lamb, onion and wheat together then pass back
through the mincer a second time. Mince the mixture for a
third time. The mixture is now ready to extrude through the
kebab maker attachment.
Filling
• 400 g/14 oz lamb, cut into strips
• 15 ml/1 tbsp oil
• 2 medium onions, finely chopped
• 5-10 ml/ 1-2 tsp allspice
• 15 ml/1 tbsp plain flour
• Salt and pepper
To make the filling, mince the lamb using the fine mincing
disc, fry the onion in the oil until golden brown, add the lamb
and allow to brown and cook.
Add the remaining ingredients and cook for 1-2 minutes.
Drain off any excess fat if necessary and allow to cool.
Extrude the casing mixture through the kebab maker and cut
into approximately 7 1/2cm lengths. Pinch one end of the
tube together, and then carefully fill with the stuffing mixture
leaving a small gap at the open end which can be pinched
together to seal. Deep fry the kebab in batches in hot oil
190C/375F for approximately 6 minutes of until golden brown
and the filling piping hot
Cleaning and maintenance
Warning! Before cleaning and maintenance, switch the
appliance off and remove the plug from the socket.
Warning! Allow the unit to thoroughly cool down before
attempting to clean it.
Warning! Do not immerse motor housing in water or any
other liquid. Motor must always be kept dry.
• The appliance is easier to clean if you do so immediately
after use.
• Do not use abrasive cleaning agents, scourers, acetone,
alcohol etc. to clean the appliance.
• All detachable plastic parts are dishwasher-safe.
• Place the detachable plastic parts on the top tray of the
dishwasher. Make sure they are placed well away from
the heating element.
• Clean the motor unit with a damp cloth.
• Never immerse the motor unit in water nor rinse it under
the tap.
Mains plug replacement
If a new mains plug needs to be fitted:
• Safely dispose of the old plug.
• Connect the brown lead to the live terminal in the new
plug.
• Connect the blue lead to the neutral terminal.
• If the product is class I (earthed), connect the
green/yellow lead to the earth terminal
Note: If your product is class II double insulated (only 2 wires
in the cord set), no connection is to be made to the earth
terminal.
Follow the fitting instructions supplied with good quality plugs.
Any replacement fuse must be of the same rating as the
original fuse supplied with the product.
Warning! The above section on mains plug replacement is
for authorized service centre persons.
7
ENGLISH
(Original instructions)
Protecting the environment
Separate collection. This product must not be
disposed of with normal household waste.
Should you find one day that your BLACK+DECKER
product needs replacement, or if it is of no further use to
you, do not dispose of it with other household waste. Make
this product available for separate collection.
• BLACK+DECKER provides a facility for recycling
BLACK+DECKER products once they have reached the
end of their working life. This service is provided free of
charge. To take advantage of this service please return
your product to any authorised repair agent who will
collect them on our behalf.
• You can check the location of your nearest authorised
repair agent by contacting your local BLACK+DECKER
office at the address indicated in this manual.
Alternatively, a list of authorized BLACK+DECKER
repair agents and full details of our after-sales service
and contact are available on the Internet at:
www.2helpU.com.
Warranty
BLACK+DECKER is confident of the quality of its products
and offers an outstanding warranty.
This warranty statement is in addition to and in no way
prejudices your statutory rights.
If a BLACK+DECKER product becomes defective due to
faulty materials, workmanship or lack of conformity, within 24
months from the date of purchase, BLACK+DECKER
warranty to replace defective parts, repair products
subjected to fair wear and tear or replace such products to
ensure minimum inconvenience to the customer unless:
The product has been used for trade, professional or
hire purposes;
The product has been subjected to misuse or neglect;
The product has sustained damage through foreign
objects, substances or accidents;
Repairs have been attempted by persons other than
authorised repair agents or BLACK+DECKER service
staff.
To claim on the warranty, you will need to submit proof of
purchase to the seller or an authorised repair agent. You can
check the location of your nearest authorised repair agent by
contacting your local BLACK+DECKER office at the address
indicated in this manual.
Alternatively, a list of authorised BLACK+DECKER repair
agents and full details of our after-sales service and contacts
are available on the Internet at: www.2helpU.com.
Technical data
FM3000
Input voltage V
AC
220 - 240
Supply Hz 50/60
Power W 600
Net weight Kg 4.15

COUNTRY NAME ADDRESS TELEPHONE NO. EMAIL
N a m e s & A d d r e s s e s f o r B L A C K + D E C K E R S e r v i c e C o n c e s s i o n a r i e s
BAHRAIN Alfouz Services Co. WLL P.O. Box 26562, Tubli, Manama (00973) 17783562 / 17879987 [email protected]
BAHRAIN Kewalram & Sons Co. WLL P.O. Box 84, Manama, (00973) 17213110 [email protected]
EGYPT Anasia Egypt for Trading P.O. Box 2443, 9, Mostafa Refaat Street, (00202) 22684159 [email protected]
JORDAN Mega Hardware - 93 King Abdullah II St., (009626) 5349098 [email protected]
(Sami Bashiti & Partners Co.) P.O.BOX 3005 AMMAN 11953 www.mega-hardware.com
KSA Fawaz Ebrahim Al Zayani P.O. Box 76026, Al Raka : 31952 (009663) 8140914 [email protected]
Trading Est. www.fawazalzayanigroup.com
KSA United Trading & Marketing Co; #15, Khamis Mushait 62411, Abha, (00966) 172500378 [email protected]
(U-MARK) Military city road – Near City max
and Ghunaim Market
KSA United Trading & Marketing Co; #116, Prince Fahad Ibn Ibrahim (00966) 11473-3258 [email protected]
(U-MARK) Al Saud Street - Near Nawan Hotel
KSA United Trading & Marketing Co; Ash Shiqah, Al Hamr, Buraydah (00966) 16-3694969 [email protected]
(U-MARK) 52371 Al Hamr Road near Jaryat
Al Umran & Khub Ath Thinayan
KSA United Trading & Marketing Co; King Abdulaziz St, Al Aziziyah (00966) 138179319 [email protected]
(U-MARK) Dammam 32424 near Dat AS 138172654
Sihha Medical Center
KSA United Trading & Marketing Co; Jabal Ar-Rubabah, Misrifah, (00966) 126612552 [email protected]
(U-MARK) Jeddah 23331 Falastin Road Near
New Jeddah National Hospital
KSA United Trading & Marketing Co; (U-MARK) #356, Al Talah Medina 42322 (00966) 148423339 [email protected]
KUWAIT Al Omar Technical Co. P.O. Box 4062, Safat 13041, Kuwait (00965) 24848595 / 24840039 [email protected]
KUWAIT The Sultan Centre P.O. Box 26567-13126 Safat, Kuwait (00965) 24343155 allina@sultan-center.com
LEBANON Aces Service Centre P.O. Box 90-102, Nahr El Mot, (009611) 898989 / 262626 [email protected]
Building, Beirut
LIBYA Homeworld Co. Senidal St. Amr Ibn Elaas Road, (0021861) 9094183 [email protected]
Benghazi, Libya (P.O. Box 18182 Salmany) ext. 103
LIBYA North Africa Trading P.O. Box 348, 7 October (00218061) 3383994 [email protected]
( El Ghoul Brothers) Street 11, Benghazi
LIBYA North Africa Trading AlBarniq Dewalt Center, (00218021) 3606430 [email protected]
MAURITIUS The Brandhouse Ltd. Rogers Industrial Park 1, Riche (00230) 2069450 claims([email protected]
MOROCCO Electronia Bd, Sidi Abdelrahman- Gr ceinture (00212) 618532680 r[email protected]
residence Rio - Ain Diab - 20050.
Casa Blanca
OMAN Oman Marketing & Service Co. P.O. Box 2734,Behind Honda (00968) 24560232 [email protected]
OMAN Oman Marketing & Service Co. (Omasco) Al Ohi, Sohar,Oman (00968) 26846379 [email protected]
OMAN Oman Marketing & Service Co. (Omasco) Sanaya, Salalah,Oman (00968) 23212290 [email protected]
PAKISTAN Ammar Service & Spares Office No 6068 6th Floor Central (009221) 32775252 [email protected]
Plaza Behind Gul Plaza Marston
Road.KARACHI
QATAR Al Muftah Service Centre Al Wakrah Road, P.O. Box 875, (00974) 44650880 [email protected]
SRI LANKA Delmege Forsyth & Co. Ltd Delmege Forsyth & Co. Ltd (009477) 2211111 [email protected]
Mawatha Colombo 10 Sri Lanka
TUNISIA Societe Tunisienne De RUE DE LA PHYSIQUE. NOUVELLE (0021679) 389687 [email protected]
Maintenance(STM) ZONE INDUSTRIELLE BEN AROUS.
2013 BEN AROUS, TUNISIA.
UAE Light House Electrical P.O. Box 120, Abu Dhabi (009712) 6726131 [email protected]
UAE Light House Electrical P.O. Box 120, Abu Dhabi (009712) 5548315 [email protected]
UAE Black & Decker (Overseas) GmbH P.O. Box 5420, Dubai (009714) 8127400 / 8127406 [email protected]
UAE Zillion Equipment and P.O. Box 10584, Ras Al Khaimah (009717) 2277095 [email protected]
UAE Zillion Equipment and Spare Parts P.O. Box 19740, Opp. Bin Sadal / (009713) 7216690 [email protected]
Trading LLC Trimix Redymix Sanaiya, Al Ain
YEMEN Middle East Trading Co. (METCO) 5th Flr.Hayel Saeed Anam (009674) 213455 [email protected]
YEMEN Middle East Trading Co. (METCO) Mualla Dakka, Aden (009672) 222670 [email protected]
YEMEN Middle East Trading Co. (METCO) Hayel st.,Sana'a,Yemen (009671) 204201 [email protected]

PRODUCT MODEL NO.
FM3000
WARRANTY REGISTRATION CARD
YOUR NAME/ VOTRE NOM/
YOUR ADDRESS/ VOTRE ADRESSE/
POSTCODE/ CODE POSTAL/
DATE OF PURCHASE/ JOUR D’ACHAT/
DEALER'S NAME & ADDRESS/ NOM ET ADRESSE DU VENDEUR/
«ùßr
«∞FMu«Ê
«∞d±e «∞∂d¥bÍ
¢U¸¥a «∞Ad«¡
≈ßr Ë ´Mu«Ê «∞∂Uzl
/