Bosch HSB745156E/03 Owner's manual
- Category
- Cookers
- Type
- Owner's manual

BOSCH
EDELSTAHL GAS-ELEKTRO-HERD
MODELL: HSB745.5.E
STAINLESS STEEL GAS-ELECTRIC COOKER
MODEL: HSB745.5.E
CUISINIERE MIXTE INOX
MODELE : HSB745.5.E
HINWEISE ZUM BETRIEB UND ZUR INSTALLATION
NOTES ON OPERATION AND INSTALLATION
MANUEL D’INSTALLATION ET D’UTILISATION
Page is loading ...
Page is loading ...
Page is loading ...
Page is loading ...
Page is loading ...
Page is loading ...
Page is loading ...
Page is loading ...
Page is loading ...
Page is loading ...
Page is loading ...
Page is loading ...
Page is loading ...
Page is loading ...
Page is loading ...
Page is loading ...
Page is loading ...
Page is loading ...
Page is loading ...
Page is loading ...
Page is loading ...
Page is loading ...

GB
24
TABLE OF CONTENTS
Page
Important notes . . . . . . . . . . . . . . . . . . . . . . . . . . . . . . . . . . . . . . . . . . . . . . . . . . . . . . . 25
Description of the cooker . . . . . . . . . . . . . . . . . . . . . . . . . . . . . . . . . . . . . . . . . . . . . . . . 27
Operating instructions . . . . . . . . . . . . . . . . . . . . . . . . . . . . . . . . . . . . . . . . . . . . . . . . . . 28
How the hobs work . . . . . . . . . . . . . . . . . . . . . . . . . . . . . . . . . . . . . . . . . . . . . . . . . . . . 28
Igniting the gas burners . . . . . . . . . . . . . . . . . . . . . . . . . . . . . . . . . . . . . . . . . . . . . . . . . 28
Practical advice on using the burners . . . . . . . . . . . . . . . . . . . . . . . . . . . . . . . . . . . . . . 28
Electronic clock . . . . . . . . . . . . . . . . . . . . . . . . . . . . . . . . . . . . . . . . . . . . . . . . . . . . . . . 29
Minute counter . . . . . . . . . . . . . . . . . . . . . . . . . . . . . . . . . . . . . . . . . . . . . . . . . . . . . . . . 31
How the electric oven works . . . . . . . . . . . . . . . . . . . . . . . . . . . . . . . . . . . . . . . . . . . . . 34
Oven lighting . . . . . . . . . . . . . . . . . . . . . . . . . . . . . . . . . . . . . . . . . . . . . . . . . . . . . . . . . 35
Indicator lamp . . . . . . . . . . . . . . . . . . . . . . . . . . . . . . . . . . . . . . . . . . . . . . . . . . . . . . . . 35
Cleaning and care . . . . . . . . . . . . . . . . . . . . . . . . . . . . . . . . . . . . . . . . . . . . . . . . . . . . . 35
Replacing the oven light . . . . . . . . . . . . . . . . . . . . . . . . . . . . . . . . . . . . . . . . . . . . . . . . 36
Advice on baking and roasting . . . . . . . . . . . . . . . . . . . . . . . . . . . . . . . . . . . . . . . . 37 - 38
Installation instructions . . . . . . . . . . . . . . . . . . . . . . . . . . . . . . . . . . . . . . . . . . . . . . . . . 39
Connection to the gas supply. . . . . . . . . . . . . . . . . . . . . . . . . . . . . . . . . . . . . . . . . . . . . 40
Converting the cooker to another type of gas . . . . . . . . . . . . . . . . . . . . . . . . . . . . . . . 42
Minimum setting . . . . . . . . . . . . . . . . . . . . . . . . . . . . . . . . . . . . . . . . . . . . . . . . . . . . . . 42
Electrical connection . . . . . . . . . . . . . . . . . . . . . . . . . . . . . . . . . . . . . . . . . . . . . . . . . . . 44
These instructions apply exclusively to those countries whose symbol is shown in the
operating instructions and on the cooker’s rating plate.
ENVIRONMENT PROTECTION
Packing disposal
Sort packing into different materials (cardboard, polystyrene
etc.) and dispose of them in accordance with local waste
disposal laws.

25
GB
This cooker is intended for domestic use only.
Please read the warning notes contained in
these operating instructions carefully, since
they contain important information regard-
ing safety during installation, operation and
maintenance. Keep these operating instruc-
tions in a safe place so that you can consult
them at a later date.
The instructions for use apply to several
versions of this appliance. Accordingly, you
may find descriptions of individual features
that do not apply to your specific appliance.
For your safety.
• You must not operate the appliance if it is
damaged. When connecting electrical appli-
ances in the proximity of the appliance, make
sure that connecting leads do not come into
contact with hot cooking surfaces!
• As the user, you yourself are responsible for
maintenance and proper use in the house-
hold.
• Only ever operate the appliance under
supervision.
• Do not operate the appliance without pots
and pans placed on it. Make sure that all the
burner parts are correctly fitted.
• Important: the appliance heats up during
operation. Keep children away.
• Do not clean the appliance with a steam
cleaning apparatus or with water pressure –
risk of short-circuits.
• Isolate the appliance from the mains during
every maintenance operation. To do this,
remove the mains plug or the corresponding
fuse. Close the gas supply.
• Repairs must be carried out by authorised
specialists, thus ensuring electrical safety.
• The power supply cable and the gas sup-
ply piping must not be replaced by the
user. In the event of any damage or if
replacements are necessary, work should
only be carried out by one of our autho-
rised after-sales service technicians.
Warming cabinet
You must not place inflammable materials
or plastic utensils in the warming cabinet
(placed below the oven).
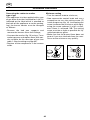
• Observe caution with oils and fats. They
may overheat and burn easily. Foodstuffs
that are prepared in fat and oil must only be
prepared under constant supervision!
• Do not use flammable liquids near the
cooker while it is in use.
• No warranty claims can be lodged for any
damage resulting from failure to observe
these instructions.
Operating for the first time
Before operating the appliance for the first
time, please pay attention to the following
notes:
• Remove the packaging from the appliance
and dispose of it properly.
• Keep packaging elements away from chil-
dren. Thoroughly clean the appliance and
accessories before using them for the first
time. This will eliminate any "newness"
smells and soiling (see chapter entitled "
Cleaning and care ").
• Once the packaging has been removed,
check that the cooker is not damaged. If
you are in any doubt in this respect, do
not use the cooker. Contact the supplier.
• Some components are covered with a
protective film to prevent them from
being scratched. This film must be
removed before the cooker is started up
and the protected component should be
cleaned using a cloth and a non-abrasive
household cleaner. Before using the cook-
er for the first time, we recommend that
you heat up the empty oven for around 30
minutes at the maximum temperature.
•
The appliance must only be connected by an
authorised specialist.
• All gas installation and set up work must
be carried out by an approved fitter in
accor-dance with the relevant safety regu-
lations. Specific information relating to
this is given in the fitter’s instructions.
Important notes

• The gas supply piping should be inspect-
ed at regular intervals. In the event of any
defects, the piping should be replaced by
an approved fitter.
• Before connecting the cooker, ensure that
the data given on the rating plate (on the
inside of the front appliance drawer) cor-
responds with that of the electricity and
gas mains.
• Check that the power capacity of the sys-
tem and the sockets corresponds to the
maximum output indicated on the rating
plate. Contact a specialist if you have any
questions.
About use
•
The appliances is intended solely for use in
the household and must not be put to any
other uses.
•
Use the appliance to prepare meals only. it
must not be used to heat up the room in
which it is installed.
•
Use of a gas cooker generates heat and
humidity in the room where it is installed.
This is why attention must be paid to good
kitchen ventilation. The natural ventilation
openings must be kept unobstructed. Pro-
longed use of the appliance with several or
all rings may call for additional ventilation
such as opening a window or a door,or
stronger air extraction by an extractor hood.
•
Only ever use the burners after placing pots
and pans on them. Do not heat up any
empty pots or pans, this may result in build-
up of heat. Use pots pans with thicker bot-
toms because heat distribution is particular-
ly improved in the low setting. The better
the size of pots and pans is adapted to the
burner size, the better the heat of the gas
flame will be exploited and the more costs
will be saved. Cooking vessels with curved
bottoms, must not be used.
• Pots with a diameter of less than 80 mm or
more than 260 mm should not be used.
When using larger pots, pay attention to
keeping to a minimum distance of 50 mm
between the cooking vessel and com-
bustible surroundings. A minimum dis-
tance of 15 mm must be observed between
the control knob and the pot or pan.
•
Switch the burners to the low setting when-
ever you remove pots or pans briefly. In this
way, you reduce the risk of burns when
working next to naked flames; you also save
gas and reduce pollution.
•
Whenever the gas hob is fitted under a
vapour extractor hood, always cover the
rings with pots or pans. Otherwise, parts of
the vapour extractor hood may become
damaged by the extreme heat development
or grease residues in the filter may ignite.
Ensure an adequate supply of air when
using a vapour exstractor operating in the
exhaust air mode.
• Some parts of the cooker will remain hot
for some time after use. Make sure that
you don’t touch them.
• When baking and grilling, the glass panel
in the oven door and the surrounding
oven door components become hot to the
touch. You should therefore ensure that
children do not play near the oven.
• Unstable or misshapen pans must not be
placed on the gas burners. This helps to
avoid accidents caused by pans toppling
over.
In the event of malfunctions, contact your
specialist dealer or your responsible after-
sales service.
GB
26
Important notes

27
GB
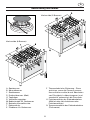
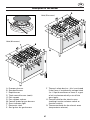
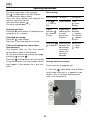
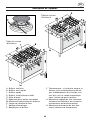
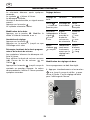
A Economy burner
B Standard burner
C Rapid burner
DTriple central burner (work)
G Pan support
R Pan support reducer
M Control knobs for gas burners
S Oven indicator light
T Electronic clock
E Gas igniter for gas burners
F Thermal safety device – this is activated
if the flame is accidentally extinguished
(i.e. if liquid overflows or there is a gust
of air) and automatically cuts off the
gas supply.
H Control knob for the electric oven
(cooking function selector switch or
function switch)
N Thermostat knob for the electric oven
(temperature selector)
Description of the cooker
Hob (6 burners)
E
F
C
C
A
A
S
S
895
895
615
615
40
40
R
R
B
B
G
G
D
D
H
H
T
T
M
M
N
N
B
B
B
B
890
890
0
0
÷
÷
60
60
890
890
0
0
÷
÷
60
60
C
C
A
A
S
S
895
895
615
615
40
40
B
B
R
R
B
B
G
G
D
D
H
H
T
T
M
M
N
N
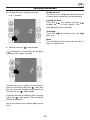
Hob (5 burners)

Operating instructions
GB
28
How the hob works
The gas burners have different sizes and
capacities. Select the burner most appro-
priate to the size of the pan to be used.
The burner selected can be regulated as
follows using the appropriate knob ( M ):
Regulator closed ●
Maximum
Minimum
The symbols next to the knobs indi-
cate the position of the gas burner select-ed
on the hob.
Only on certain models
The gas burners are equipped with a ther-
mocouple safety device to prevent gas
from leaking out. This device ensures that
the gas supply is shut off if the flame on the
gas burner is extinguished while the burner
is in use.
Igniting the gas burners
Proceed as follows to light one of the
burners:
• Turn the appropriate knob anti-clockwise
to the large flame symbol;
• Press in the knob firmly to activate the
automatic gas igniter
• Hold the knob in for around 10 seconds
once the flame has ignited to allow the
thermocouple to heat up.
• Then release the control knob and ensure
that the gas has ignited properly. If it has
not, repeat the process.
To set the burner to minimum capacity, turn
the knob to the small flame symbol. It is
also possible to make intermediate settings
by turning the knob to points between the
large and small flames.
To switch off the burner, turn the knob
clockwise to the " ● " OFF position.
Important:
• Do not operate the automatic gas igniter
continuously for longer than 15 seconds.
• In some cases, problems with ignition can
be traced back to air in the gas pipes.
• If the flame should unexpectedly go out,
gas will continue to leak out for a short
while until the thermal safety device cuts
in. Turn the control knob to " ● " OFF and
wait for at least 1 minute before trying to
ignite the flame again. This gives the
leaked gas time to disperse.
• If the cooker is not being used, check that
the control knobs are in the " ● " OFF posi-
tion. We also recommend that you close
the main gas tap.
Cooling fan
In order to reduce the surface tempera-
tures, the appliance is equipped with a tan-
gential cooling fan, which is activated auto-
matically when the oven is warm.
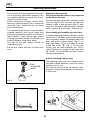
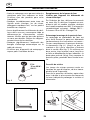
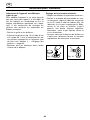
Practical advice on using the burners
To use the burners to their full, we recom-
mend that you only use pans of a suitable
size for the burner to be used. This pre-
vents the flame from extending beyond the
base of the pan (see the table below).
It is further recommended that once the
food has been brought to the boil, the flame
is reduced for the remainder of the boiling
process.
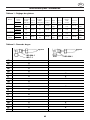
Burner Pan diameter (mm)
A Economy burner 80 – 160
B Standard burner 120 – 200
C Rapid burner 200 – 230
D Triple ring 230 – 260
burner (wok)

GB
29
Operating instructions
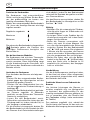
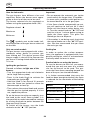
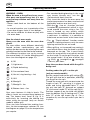
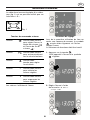
The hob is equipped with a pan support
reducer (fig. 1) which should only be used
on the economy burner (A).
Fig. 1
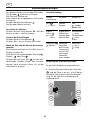
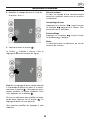
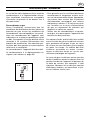
Control buttons and display panel
Clock button Use this button to set
the time of day, the
cooking time
and the completion
time .
Key button Use this button to
switch childproof lock
on and off.
Timer button Use this button to set
the timer.
Minus button
– Use this button to
reduce the values set.
Plus button
+ Use this button to
increase the values set.
The values set can be seen in the display
panel.
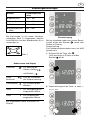
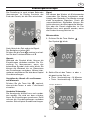
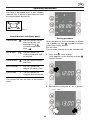
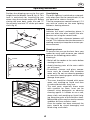
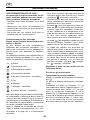
Setting procedure
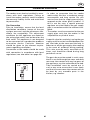
When the oven is first connected, or follow-
ing a power cut, the symbol and three
zeros flash in the display.
Set the time.
The function selector must be switched off.
1. Press the clock button.
12.00 appears in the display and the
symbol flashes.
2. Set the time using the + or – button.
example: 13:00

GB
30
Operating instructions
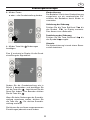
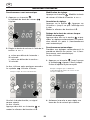
Semi-automatic use.
1. Press the clock button.
The cooking time symbol will flash.
2. Set the cooking time using the
+ or – button.
+ button default value = 30 minutes.
– button default value = 10 minutes.
The oven switches on after a few seconds.
The symbol lights up in the display.
example: Cooking time of 45 minutes.
Example: Imagine – it’s 10.45 a.m. The meal will take
45 minutes to cook and must be ready at 12.45 pm
Once this time has elapsed, an acoustic
signal will sound.
The oven switches off.
Press the button twice and set the
function knob to
0.
Changing the setting.
Press the clock button. Change the cook-
ing time using the
+ or – button.
Cancelling the setting.
Press the clock button. Press the
– button
until the dislay is at zero.
Set the function knob to
0.
Setting the cooking time when the clock
time is hidden.
Press the clock button twice and perform
the setting as described in item 2 (Semi-auto-
matic use).
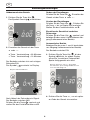
Automatic use.
Perform the settings as described in items
1 and 2 (Semi-automatic use).
The oven starts.
3. Press the clock button until the
end symbol flashes. In the dislay you
will see the time when the meal will
be ready.
4. Use the + button to set a later end time.

GB
3131
Operating instructions
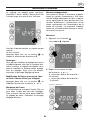
Example: 20 minutes
The setting is adopted after a few seconds.
The display will show the end time until the
oven switches on.
Once this time has elapsed, an acoustic sig-
nal will sound.
The oven switches off.
Press the button twice and set the func-
tion knob to
0.
Note:
You can change the setting while the sym-
bol is flashing. The setting has been adopt-
ed if the symbol lights up permanently. You
may change the waiting time that elapses
before the setting is adopted. See the Basic
settingsection for more details.
Changing the time e.g. from summer to
winter time.
Press the clock button twice and change
the time with the
+ or – button.
Hiding the time.
You can hide the time. It will then only be
visible when you are performing settings.
To do this, you must change the basic set-
ting. See the Basic settings section.
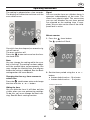
Signal
You can use the timer as a kitchen timer. It
operates independently of the oven. The
timer has a special signal. This means that
you can tell whether the set timer period
has elapsed or the cooking time is com-
plete. You can also set the timer if the child-
proof lock is active.
Minute counter
1. Press the timer button.
The symbol will flash.
2. Set the timer period using the + or –
button.
+ button default value = 10 minutes
– button default value = 5 minutes

GB
3232
Operating instructions
The timer starts after a few seconds.
The symbol lights up in the display.
The time counts down visibly.
Once the timer period has elapsed, an
acoustic signal will sound.
Press the timer button .
The timer symbol goes out.
Changing the timer
Press the timer button. Change the time
using the
+ or – button.
Cancelling the setting.
Press the timer button.
Press the
– until the display is at zero.
If time and cooking time count down
simultaneously.
The symbols light up. The time period
counts down visibly in the display.
To call up the remaining cooking time ,
end time or time :
Press the clock button until the symbol
in question flashes. The value called up will
then appear in the display for a few sec-
onds.
Basic setting
Time
= Time in
the
Signal
duration
= approx.
2 mins.
reset time
= medium
Function
Timer display
Signal after
cooking time
or timer
period has
elapsed
Waiting time
between the
adjustment
increments
before the
setting is
adopted
Change to
Time
= time
hidden
Signal
duration
= approx
10 seconds
= approx.
5 mins.
Reset time
= short
= long
Changin the basic settings.
There must be no program set
1. Press the clock button and
+ button
at the same time until a appears in the
display. This is the basic setting for the
time in the foreground.
Basic setting.

GB
3333
Operating instructions
2. Change the basic setting using the
+ or – button.
3. Confirm with the clock button.
A will appear in the display for the basic
setting for the signal duration.
Change the basic setting as described in
step 2 and confirm with the clock but-
ton. You can now change the reset time. to
finish press the clock button.
If you do not wish to change a basic setting,
press the clock button. The next basic
setting will appear.
You may change your settings again at any
time.
Childproof lock.
The oven has a childproof lock to prevent
children from switching it on accidentally.
Locking the oven.
Press the key button until the
symbol appears in the display. This will
take approximately 4 seconds.
Unlocking.
Press the key button until the
goes out.
Notes
The childproof lock setting will be lost if
there is a power cut.

GB
34
WARNING – OVEN:
When the oven or the grill are in use, acces-
sible parts can become very hot; it is nec-
essary to keep children well away from the
appliance.
– Never cook food on the bottom of the
oven.
– In case of careless use, in proximity of the
oven door hinges, there is hurt danger.
– Do not let children sit down or play with
the oven door.
How the electric oven works
Always use the oven with the oven door
closed.
The oven offers seven different electrically
heated resistor combinations; you will
achieve the best results by selecting the most
suitable function for the food to be cooked.
The different functions are set by turning
the control knob ( H ) to the following posi-
tions (see the diagram on page 27):
0) Off
1) Light oven
2) Rapid defrosting
3) Conventional heat
4) Hot air (ring heating + fan)
5) Grill
6) Maxigrill
7) Maxigrill + fan
8) Bottom heat + fan
Your oven features 6 slide-in levels. The
slide-in levels are counted from bottom to
top. The lowest level (level B, fig. 3) is
exclusively for inserting the baking tray
when using the turnspit (only on certain
models) and/or grill.
Once you have selected the cooking func-
tion, set the temperature selector (N) (see
the diagram on page 27) to the temperature
you require.
• For standard baking/roasting in the usual
way (roasts, biscuits etc.), use the
(Conventional heat) function.
• Only insert the food in the oven once the
preset temperature has been reached and
preferably cook on one level only.
• With the ( hot air ) function, the food
is cooked by preheated air which is circu-
lat-ed around the oven using a fan. The
oven is heated up very quickly, which
means that the food can also be placed in
a cold oven. In addition, it is possible to
bake/roast on two levels at the same time.
• The "Rapid defrost" function works
without a heating element; only the oven
lighting and the hot air are used.
• When grilling , an increased heat setting is
used which means that the food is quickly
browned on the top. This is par-ticularly
useful for meat which must remain tender
on the inside. To set the grill function, turn
the control knob ( H) to one of either the
(Grill), (maxigrill) or (maxigrill
+ hot air) posi-tions.
Keep the oven door closed while the grill is
being used.
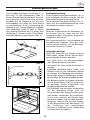
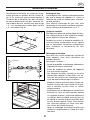
Cooking under the grill + on the spit
(only on certain models)
Set the control knob to the grill setting ;
The grill will also be in operation, allowing
you to grill on the spit.
Thread the meat you wish to roast onto the
length of spit "S", securing it in place at
either end using adjustable forks "F"; slot
the spit into hole "E" featured on support
"A" and screw handle "D" off the spit (fig. 2).
Position support A on the third rack height
from the bottom (fig. 3) slotting rod "C" into
hole "G" of the spit motor (fig. 4). For a
smoother fit, turn the spit rod as you slot it
in place.
34
Operating instructions

GB
35
Position the dripping pan on the first rack
height from the bottom (level B, fig. 3). This
level is exclusively for inserting the pan
when using the turnspit and/or grill. Before
closing the oven door, make sure rod "C"
fits correctly into hole "G" of the spit motor
shaft (fig. 4).
Oven lighting
The oven lighting is switched on automati-
cally when you turn the control knob ( H ) to
any position to select a function.
Turn the temperature control knob to 0 °C if
you wish to switch on the oven lighting
without a heating element.
Indicator lamp
Indicates the oven’s preheating phase; it
goes out when the oven reaches the tem-
perature set using the control knob.
The light will then alternate between off
and on. This indicates that the thermostat is
working correctly to keep the oven tem-per-
ature constant.
Cleaning and care
To ensure that you get the best from your
cooker for many years to come, you should
observe the following points when
cleaning it:
• Switch off the cooker at the mains before
starting to clean it.
• Avoid cleaning parts of the oven which
are still warm.
• Enamelled, chrome and glass compo-
nents must be cleaned with lukewarm
water only. Do not use abrasive powders
or corrosive cleaning agents which might
damage these parts.
• The oven should be cleaned with warm
water and washing-up liquid and then
rinsed and dried after every use.
• The steel parts, especially those areas
with symbols on them, must not be
cleaned using detergents or abrasive
cleaning agents. It is better to use a soft,
damp cloth and washing-up liquid (wip-
ing along the grain of the stainless steel).
Methylated spirits may be used to remove
stubborn dirt from stainless steel.
Once the cooker has been removed, the
parts should be rinsed thoroughly and
dried using a soft cloth.
35
Operating instructions
F
S
E
A
D
C
G
Fig. 2
Fig. 3
Fig. 4
Level

• The surfaces may be treated to retain their
shine once they have been cleaned. Only
use products which are specifically formu-
lated for stainless steel.
• Acidic substances (vinegar, lemon juice,
abrasive cleaning agents etc.) should be
removed from enamelled or varnished
parts immediately.
• The removable gas burner rings should be
cleaned regularly with warm water and
washing-up liquid to remove any dried-on
food residues. Check that the gas outlets
have not become blocked. Dry the burners
carefully before using them again.
• The tips of the gas igniter should be
cleaned regularly.
• Do not use steam cleaners to clean your
oven.
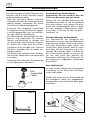
Replacing the oven light
First ensure that the cooker is not connected
to the electricity mains.
Unscrew the glass protection cap from inside
the oven (fig. 5), then unscrew the bulb and
replace it with a heat-resistant (300 °C) bulb
with the following specifications: Voltage
230V – Power 15 or 25 watts – Thread E 14.
Disassembling/assembling the oven door
In-depth cleaning of the oven becomes more
convenient if the door is removed following
the instructions below: Completely open the
door and press it down gently (fig. 6 ) to
allow the hooks "A" of the hinge to locate
inside the cavity "B" (fig. 7). Using both
hands, pull the door towards you until it
comes off the oven (weight of the oven door
kg. 13.920). To reassemble the door, reverse
the above procedure.
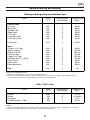
Advice on baking and roasting
The cooking times can vary depending on
the type of food, whether it must be evenly
cooked, and its size.
You should initially select the shorter cook-
ing time of those listed below, and extend it
if necessary.
GB
3636
Operating instructions
B
A
A
Fig. 5
E 14
15 or 25 W -
230 V~
A
Fig. 6
Fig. 7

GB
3737
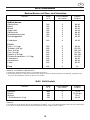
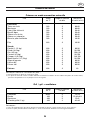
Advice on baking and roasting
Baking/roasting using conventional heat
Grill / Grill + Fan
Meal
Pastries/cake
Fruit tart
Meringue
Sponge cake
Angel cake
Fruit cake
Chocolate cake
Puff pastry cake
Pita bread
Meat
Chicken (1-1,5 kg)
Turkey (4-8 kg)
Goose (4-5 kg)
Duck (2-4 kg)
Capon (2,5-3 kg)
Beef pot roast (1-1,5 kg)
Leg of lamp
Roast hare
Roast pheasant
Fish
Shelf position
from bottom
3
3
4
3
2
3
3
3
3
3
3
3
3
3
3
3
3
3
Temp.
in °C
180
130
160
180
180
180
180
220
200
200
200
200
200
200
200
200
200
200
Cooking time
(Min.)
60-80
60-80
30-40
30-40
60-80
30-40
20-30
20-30
60-90
90-150
150-210
90-150
120-150
90-150
60-90
60-90
60-90
20
Meal
Cutlets
Steaks
Sausages
*Grilled chicken (1 kg)
Shelf position
from bottom
5
5
5
2
Temp.
in °C
Max
250
250
250
Cooking time
(Min.)
12+12
15-20+6-9
15+5
40+20
Notes for using baking tins:
1) Always place baking tins in the centre of the baking grill
2) Dark-coloured baking tins made of metal yield the best results. If you use light-coloured baking tins we
recommend to place them on the baking tray instead of the baking grill.
Notes:
1) Always place the dripping pan on level 1 when using the grill in order to collect cooking juices and grease.
2) For meals marked with * we recommend to use the function grill+fan.

GB
38
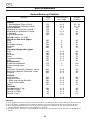
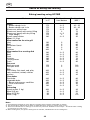
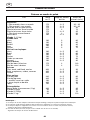
Advice on baking and roasting
Notes:
1) Cook without preheating the oven, with the exception of those dishes marked with an asterisk
2) The shelf positions indicated in the table are applicable when cooking on several levels at once.
3) The times indicated refer to cooking on one level only. The times should be increased by 5 – 10 minutes when cooking
on more than one level at once.
4) When roasting beef, veal, pork or turkey joints or roulades, add 20 minutes to the cooking time.
Meal
Pastry
* Beaten dough in tin
* Beaten dough not in tin
Shortcrust pastry base
Shortcrust pastry with moist filling
Shortcrust pastry with dry filling
* Yeast dough
Small sweet dishes
Meat (1-1,5 kg)
Meat cooked on the wire grill
Veal
Beef
Roast beef (rare)
Pork
Chicken
Meat cooked in a roasting dish
Veal
Beef
Pork
Chicken
Turkey pieces
Duck
Pot roast
Beef pot roast
Veal pot roast
Fish
Fish filleta, fish steak, cod, pike,
sole, mackerel, turbot, salmon
oysters
Oven bakes
Past bake
Vegetable bake
* Sweet and savoury soufflées
* Pizza und calzone
Toast
Defrosting
Ready-meals (1 kg)
Meat (0,5 kg)
Meat (0,75 kg)
Meat (1 kg)
Baking/roasting using HOTAIR
Shelf position
from bottom
2 + 5
2 + 5
2 + 5
2
2 + 5
2
2 + 5
3
3
3
3
3
2 + 5
2 + 5
2 + 5
2 + 5
2 + 5
2 + 5
2
2
2 + 5
2 + 5
2 + 5
2 + 5
2 + 5
2 + 5
2 + 5
2 + 5
2 + 5
2 + 5
2 + 5
2 + 5
Temp.
in °C
175
175
175
175
175
175
160
180
180
220
180
200
160
160
160
180
180
180
175
175
200
200
200
220
200
180
200
190
200
50
50
50
Cooking time
(Min.)
20 – 25
20 – 25
30
70
45
50
30
60
60
40
40
70
60
60
50
70
80
80
120
110
30
45
20
60
50
50
30
15
45
50
70
110

The appliance is in class 1 or class 2
subclass 1
Instructions for the installer
The appliance shall be fitted with a stability
device secured to the fabric of the building,
conforming to local regulations.
Stability device installation
After having connected the appliance to the
gas mains, attach the safety chain to the
rigid pipe section by means of the round
fixing supplied with the chain.
Then secure the other end of the chain to
the rear wall.
The following notes are intended for the
approved gas or electrical appliance fitters
so that they are able to install, adjust and
technically maintain the appliances in
accordance with current regulations and
standards.
Important: The cooker must be disconnected
from the mains before any adjustment or
maintenance work is carried out.
For the appliance technical features, refer
to the rating plate stiked on the inside of the
front appliance drawer.
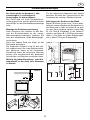
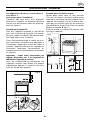
Securing the cooker to the wall
Drill two holes in the wall approximately
710 mm above the lower edge of the sides
of the cooker (as shown in fig. A position F,
so that they are concealed by the cooker
itself (see fig. B). Insert part R (rawlplug) into
holes F and screw hook G in part R (fig. C).
Secure the chain to hook G as shown in fig.
D position C.
GB
39
Installation instructions
OK NO
Fig. 8
Fig. 9
G
R
G F
Fig. A
Position F
= hole
ø 6 mm
60 mm +/- 3
Position
2
wall
wall
position C
Position
1
H -
adjustable
foot
710 mm ± 10
710 mm ± 10
Fig. B
Fig. C
Fig. D

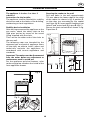
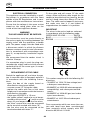
The cooker’s external measurements can
be seen on the diagram on page 27. The
minimum distances shown in fig. 8 must
be observed to guarantee correct operation
of the cooker. In addition, adjacent furniture
components must be able to withstand a
heat of 85 °C.
The cooker’s support feet must be secured
in the holes provided on the bottom of the
cooker before the cooker is installed fig. 9.
The height of these feet is adjustable and
they can therefore be used to level the
cooker if necessary.
GAS CONNECTING
This appliance shall be installed in accor-
dance whit the regulations in force and only
in a well-ventilated space. Read the instruc-
tions before installing or using this appli-
ance.
IMPORTANT
We recommend to check wether the appli-
ance has been foreseen for the kind of gas
distributed.
Conversion for use other gases must only
be undertaken by a qualified person. For
information for use on other gases contact
your local Service Centre.
The cooker must be installed by a qualified
person, conforming to local regulations.
Failure to install the appliance correctly
could invalidate any manufacturers warran-
ty and lead to prosecution under the above
quoted regulations.
Provision for Ventilation
The room containing the cooker should
have an air supply in accordance with local
regulations.
Remember that the quantity of air neces-
sary for combustion must never be less
than 2m
3
/h for each kW of power (see total
power in kW on the appliance data plate).
Gas Safety (Installation & Use)
Regulations
It is the law that all gas appliances are
installed by competent persons in accor-
dance with the current edition of the Instal-
lation & Use Regulations. It is in your inter-
est and that of safety to ensure compliance
with the law.
Installation instructions
GB
40

The cooker must also be installed in accor-
dance with local regulations. Failure to
install the cooker correctly could invalidate
the warranty liability claims and could lead
to prosecution.
Gas Connection
Prior to installation, ensure that the local
distribution conditions (nature of the gas
and gas pressure) and the adjustment con-
ditions are compatible. The adjustment
conditions for this appliance are stated on
the rating plate which can be found on the
back cover. This appliance is not designed
to be connected to a combustion products
evacuation device. Particular attention
should be given to the relevant require-
ments regarding ventilation.
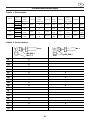
Connection to the cooker should be made
with connection in accordance with local
regulations (see also table 2 on page 43).
• In order to guarantee that the cooker
works safely and has a moderate energy
consumption and long service life, you
must ensure that the supply pressure cor-
responds to the values given in table 1. If
this is not the case, a special pressure
regulator must be fitted to the gas supply
pipe in accordance with the relevant stan-
dards.
• The cooker must be connected to the gas
supply pipe such that the cooker is not
subjected to any kind of stress.
A special valve for routinely turning the gas
supply on/off must be installed between the
gas inlet tube to the room end the hob, in
order to cut off the gas supply after cooking
in the event of accidents during cooking.
This valve must be easily accessible at all
times, end should be closed during long
periods of no use.
The gas tube must be routed in such a way
that it is not fed through hot areas and does
not come into contact with any hot parts of
the appliance, e.g. the underside of the hob.
Tube installation must be carried out in
such a way as to ensure that it runs freely
and that it cannot come into contact with or
be bent by any movable parts in the
kitchen, e.g. drawers.
GB
Installation instructions
41
1-2”

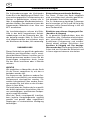
Converting the cooker to another
type of gas
If the appliance is to be supplied with a type
of gas other than that intended for it (this is
indicated on the label which is attached to
the back of the appliance or to the packag-
ing), the burner nozzles must be changed
as follows:
• Remove the hob pan supports and
remove the burners from their fittings;
• Unscrew the nozzles (fig. 13) using a 7 mm
socket spanner and replace them with noz-
zles suitable for the new type of gas (see
table 1: Nozzle setting on page 43).
• Replace all the components in the reverse
order.
Minimum setting
• Turn the control knob to minimum;
• Now remove the control knob and use a
screwdriver to turn the setting screw (Z)
inside the gas tap (fig. 14) (unscrewing the
screw increases the minimum, while tight-
ening the screw reduces it) until a small,
even flame is achieved. NB: The setting
screw must be as tight as possible for liq-
uefied petroleum gases.
• Make sure that the burner flame does not
go out if you turn the knob from the max-
imum to the minimum very quickly.
Installation instructions
GB
42
A
A
Z
Fig. 13
Fig. 14
Page is loading ...
Page is loading ...
Page is loading ...
Page is loading ...
Page is loading ...
Page is loading ...
Page is loading ...
Page is loading ...
Page is loading ...
Page is loading ...
Page is loading ...
Page is loading ...
Page is loading ...
Page is loading ...
Page is loading ...
Page is loading ...
Page is loading ...
Page is loading ...
Page is loading ...
Page is loading ...
Page is loading ...
Page is loading ...
Page is loading ...
Page is loading ...
Page is loading ...
Page is loading ...
-
 1
1
-
 2
2
-
 3
3
-
 4
4
-
 5
5
-
 6
6
-
 7
7
-
 8
8
-
 9
9
-
 10
10
-
 11
11
-
 12
12
-
 13
13
-
 14
14
-
 15
15
-
 16
16
-
 17
17
-
 18
18
-
 19
19
-
 20
20
-
 21
21
-
 22
22
-
 23
23
-
 24
24
-
 25
25
-
 26
26
-
 27
27
-
 28
28
-
 29
29
-
 30
30
-
 31
31
-
 32
32
-
 33
33
-
 34
34
-
 35
35
-
 36
36
-
 37
37
-
 38
38
-
 39
39
-
 40
40
-
 41
41
-
 42
42
-
 43
43
-
 44
44
-
 45
45
-
 46
46
-
 47
47
-
 48
48
-
 49
49
-
 50
50
-
 51
51
-
 52
52
-
 53
53
-
 54
54
-
 55
55
-
 56
56
-
 57
57
-
 58
58
-
 59
59
-
 60
60
-
 61
61
-
 62
62
-
 63
63
-
 64
64
-
 65
65
-
 66
66
-
 67
67
-
 68
68


Bosch HSB745156E/03 Owner's manual
- Category
- Cookers
- Type
- Owner's manual
Ask a question and I''ll find the answer in the document
Finding information in a document is now easier with AI
in other languages
Related papers
-
Bosch PPP622M90E/01 User manual
-
-
-
-
Bosch PPY616B80E/01 Owner's manual
-
-
-
Bosch HSB738155Z/01 Operating instructions
-
-
Other documents
-
Siemens HQ745525E User manual
-
Siemens EP718QV20N/01 User manual
-
Whirlpool KP 59 MS.C(X)/G (T) User guide
-
-
Siemens ER326BB90L/01 Owner's manual
-
CONSTRUCTA CH17751 Operating Instructions Manual
-
Indesit KP 9507 E.B User manual
-
Whirlpool ACM 808 WH User guide
-
-