GE Appliances GTD42EASJWW Owner's manual

Category
Tumble dryers
Type
Owner's manual
Owner’s Manual
Dryers
Safety Instructions ........ 24
Operating Instructions
Control Panel ................. 4, 5
Control Settings .................. 5
Features ......................... 6
Loading and Using
the Dryer ........................6
Reversing the Door ............... 7
Venting the Dryer ................8
Troubleshooting Tips .... 9, 10
Consumer Support
Consumer Support .............. 12
Warranty ....................... 11
GEAppliances.com
Write the model and serial
numbers here:
Model # ________________
Serial # _________________
You can find them on a label
on the front of the dryer behind
the door.
234D2431P002
49-90543 02-15 GE Printed in Mexico
2
IMPORTANT SAFETY INFORMATION.
READ ALL INSTRUCTIONS BEFORE USING.
This is the safety alert symbol. This symbol alerts you to potential hazards that can kill you or hurt you and others.
All safety messages will follow the safety alert symbol and the word “DANGER”, “WARNING”, or “CAUTION”. These
words are defined as:
Indicates a hazardous situation which, if not avoided, will result in death or serious injury.
Indicates a hazardous situation which, if not avoided, could result in death or serious injury.
Indicates a hazardous situation which, if not avoided, could result in minor or moderate injury.
DANGER
WARNING
CAUTION
IMPORTANT SAFETY INSTRUCTIONS
To reduce the risk of fire, explosion, electric shock, or injury to persons when using your appliance, follow
basic precautions, including the following:
Read all instructions before using the appliance.
DO NOT dry articles that have been previously cleaned in, washed in, soaked in or spotted with gasoline, dry-cleaning
solvents, or other flammable or explosive substances, as they give off vapors that could ignite or explode.
DO NOT place items exposed to cooking oils in your dryer. Items contaminated with cooking oils may contribute to a
chemical reaction that could cause a load to catch fire.
DO NOT allow children to play on or in this appliance. Close supervision of children is necessary when this appliance
is used near children. Before the appliance is removed from service or discarded, remove the door to the drying
compartment.
DO NOT reach into the appliance if the drum is moving.
DO NOT install or store this appliance where it will be exposed to the weather.
DO NOT tamper with controls,
repair or replace any part of this appliance or attempt any servicing unless specifically
recommended in the user maintenance instructions or in published user repair instructions that you understand and
have the skills to carry out.
DO NOT use fabric softeners or products to eliminate static unless recommended by the manufacturer of the fabric
softener or product.
DO NOT use heat to dry articles containing foam rubber or similarly textured rubber-like materials.
Clean lint screen before or after each load. DO NOT operate the dryer without the lint filter in place.
Do not store combustible materials, gasoline or other flammable liquids near the dryer.
Keep area around the exhaust
opening and adjacent surrounding areas free from the accumulation of lint, dust and dirt. Keep dryer area clear and free
from items that would obstruct the flow of combustion and ventilation air.
The interior of the appliance and exhaust duct should be cleaned periodically by qualified service personnel.
Unplug the appliance or turn off the circuit breaker before servicing. Pressing the Power or Start/Pause button DOES NOT
disconnect power.
DO NOT operate this appliance if it is damaged, malfunctioning, partially disassembled, or has missing or broken parts,
including a damaged cord or plug.
DO NOT spray any type of aerosol into, on or near dryer at any time. Do not use any type of spray cleaner when cleaning dryer
interior. Hazardous fumes or electrical shock could occur
.
See “Electrical Connection” located in the Installation Instructions for grounding instructions.
SAVE THESE INSTRUCTIONS
WARNING
3
GEAppliances.com
ADDITIONAL GAS DRYER WARNINGS
For your safety, the information in this manual must be followed to minimize the risk of fire or explosion
or to prevent damage, personal injury, or death.
- DO NOT store or use gasoline or other flammable vapors and liquids in the vicinity of this or any other appliance.
- WHAT TO DO IF YOU SMELL GAS:
DO NOT try to light any appliance.
DO NOT touch any electrical switch; DO NOT use any phone in your building.
Clear the room, building, or area of any occupants.
Immediately call your gas supplier from a neighbor’s phone. Follow the gas supplier’s instructions.
If you cannot reach your gas supplier, call the fire department.
- Installation and service must be performed by a qualified installer, service agency, or the gas supplier.
WARNING
State of California Proposition 65 Warnings:
The California Safe Drinking Water and Toxic Enforcement Act requires the governor of California to publish a list of substances
known to the state to cause cancer, birth defects or other reproductive harm and requires businesses to warn of potential
exposure to such substances.
This product contains one or more chemicals known to the State of California to cause cancer, birth defects
or other reproductive harm.
Gas appliances can cause low-level exposure to some of these substances, including benzene, carbon monoxide, formaldehyde
and soot, caused primarily by the incomplete combustion of natural gas or LP fuels. Exposure to these substances can be
minimized by properly venting the dryer to the outdoors.
SAVE THESE INSTRUCTIONS
WARNING
Throughout this manual, features and appearance may vary from your model.
4
About the dryer control panel.
To reduce the risk of fire, electric shock, or injury to persons, read the IMPORTANT SAFETY INSTRUCTIONS before
operating this appliance.
WARNING!
WARNING
WARNING
Explosion Hazard
Fire Hazard
Keep flammable materials and vapors, such as gasoline,
away from dryer.
DO NOT dry anything that has ever had anything flammable
on it (even after washing).
Failure to do so can result in death, explosion, or fire.
No washer can completely remove oil.
Do not dry anything that has ever had any type of oil on it
(including cooking oils).
Items containing foam, rubber, or plastic must be dried on a
clothesline or by using an air dry cycle.
Failure to follow these instructions can result in death or fire.
D B EA C
B EA C
GEAppliances.com
IMPORTANT: Clean the lint filter each time you use the dryer.
Temperature
(Not all features are on all models)
Cottons For regular to heavy cottons.
Regular
Casuals For synthetics, blends, delicates and items labeled permanent press.
Medium
Delicates On some models. For delicates, synthetics and items labeled tumble dry low.
Low
Air Fluff For fluffing items without heat. Use the Time Dry cycle.
No Heat
Drying Cycles (Not all features are on all models)
Cottons For cottons and most linens. For most loads, select Optimum Dry (on some models).
Casuals For wrinkle-free, permanent press and delicate items, and knits.
Delicates For delicate items, special-care fabrics and knits.
Time Dry Set the Cycle Selector at the desired drying time.
Dewrinkle For removing wrinkles from items that are clean and dry or that are very lightly damp.
Quick Fluff For freshening or fluffing up already dry clothing, fabrics, linens and pillows. Use with Air Fluff No Heat.
Provides 10 minutes of no heat tumbling.
Sensor cycles automatically determine fabric dryness. Select Less Dry if you want your clothes slightly damp at the end of the
drying cycle. Select More Dry if you want them to feel drier.
Timed cycles run for a selected time.
Start³&ORVHWKHGU\HUGRRU6HOHFWStart. Opening the door during operation will stop the dryer.
To restart the dryer, close the door and select Start to complete the cycle.
A
B
C
NOTE: Drying times will vary according to the type of heat used (Electric, Natural or LP gas), size of load, types of fabrics,
wetness of clothes and condition of exhaust ducts.
Extended Tumble Option (on some models)
Use this option to minimize the wrinkles in clothes. It provides approximately 15 minutes of no-heat tumbling after the clothes
are dry.
This option can only be used with the Cottons and Casuals/Easy Care cycles.
If you are using the cycle Signal knob and you select the Extended Tumble option, a signal will sound at the end of the drying
time and several times during the Extended Tumble cycle. This will remind you that it is time to remove the clothes.
If Extended Tumble is not on, the dryer will stop once the timer reaches the Extended Tumble mark on the cycle dial.
Cycle Signal Option (on some models)
This signal will sound just before the end of the cycle to remind you to remove the clothes. On some models, the signal sound
level cannot be adjusted.
If you selected the Extended Tumble option, the signal will sound at the end of the drying time and will sound several times
during the Extended Tumble cycle. This will remind you that it is time to remove the clothes.
NOTE:
Remove garments promptly at the sound of the signal. Place clothes on hangers so wrinkles won’t set in.
Use the cycle Signal especially when drying fabrics like polyester knits and permanent press. These fabrics should
be removed so wrinkles won’t set in.
Automatic Cycle Signal (on some models)
At the end of each cycle, there is approximately 15 minutes of no-heat tumbling after the laundry is dry. A reminder signal will
sound periodically during this time to remind you to remove the laundry.
D
E
5
The stainless steel used to make the dryer drum
provides the highest reliability available in a GE dryer.
If the dryer drum should be scratched or dented
during normal use, the drum will not rust or corrode.
These surface blemishes will not affect the function or
durability of the drum.
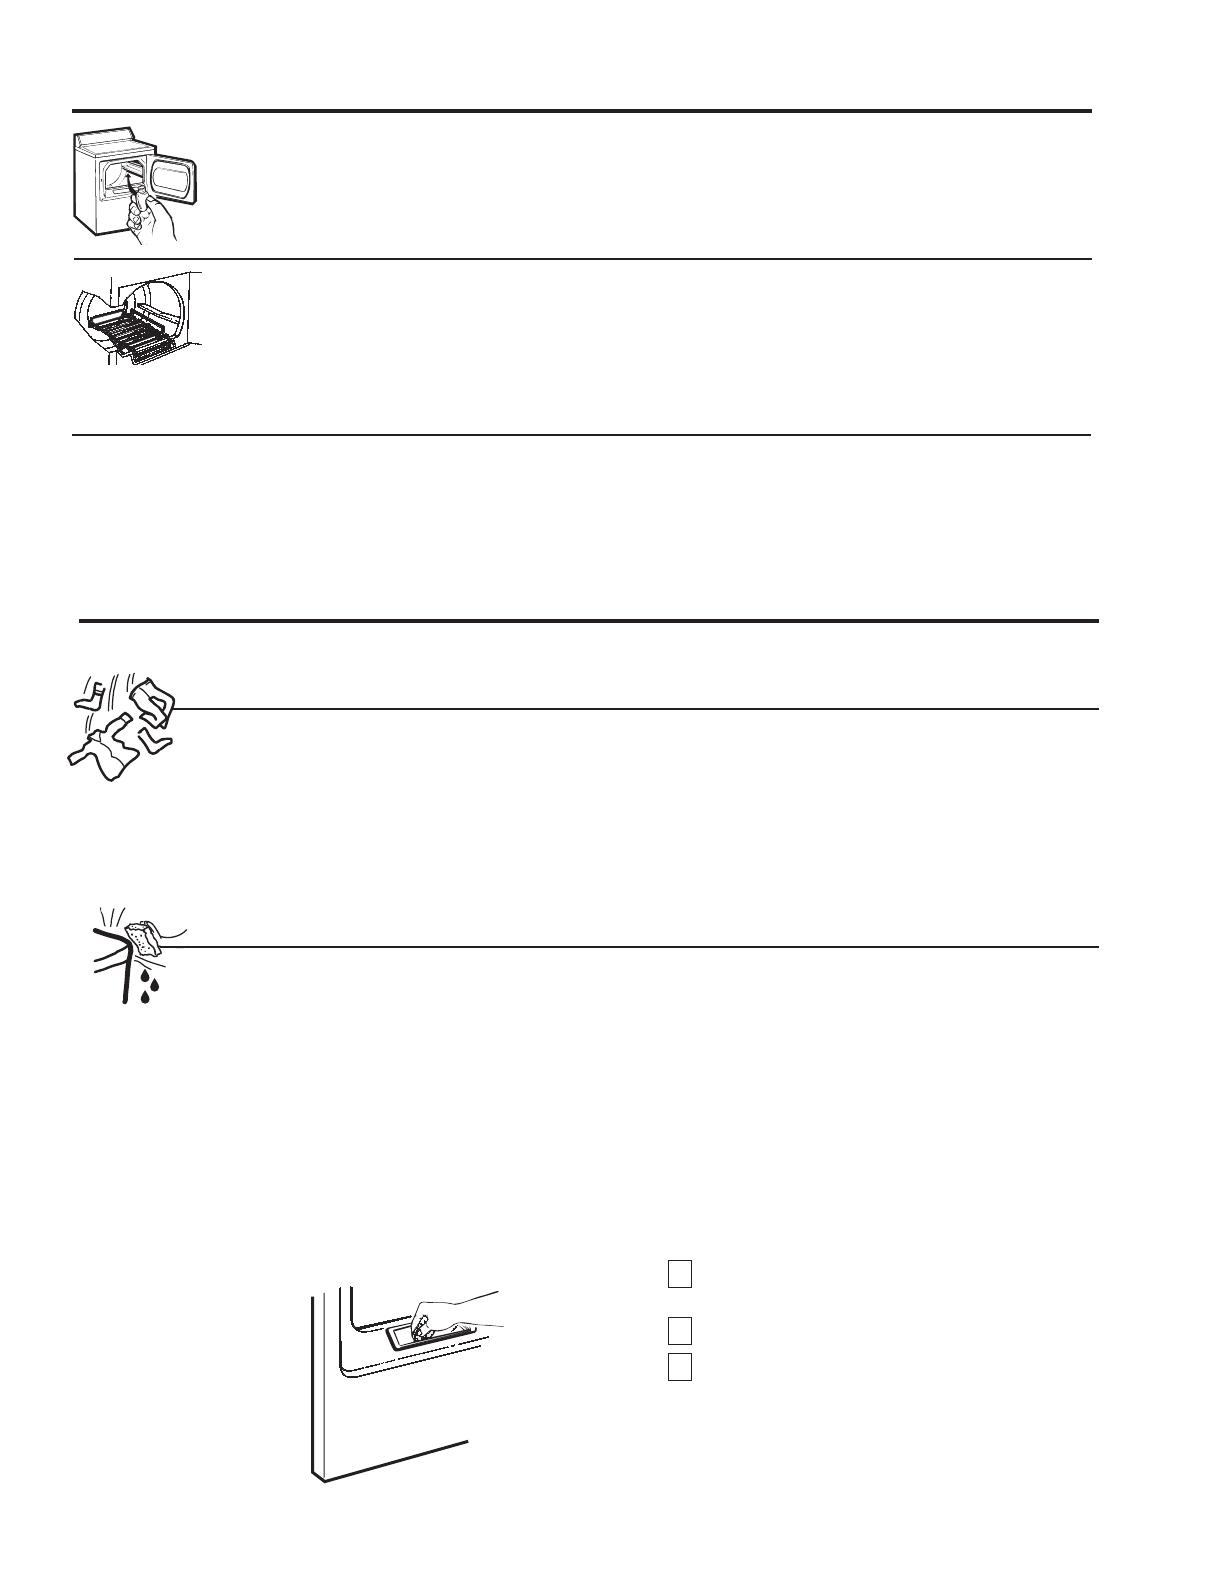
Drum Lamp (on some models)
Before replacing the light bulb, be sure to unplug
the dryer power cord or disconnect the dryer at the
household distribution panel by removing the fuse or
switching off the circuit breaker.
Reach above dryer
opening from inside the drum.
Remove the
bulb and replace with the same size bulb.
Drying Rack (on some models)
A handy drying rack may be used for drying delicate
items such as washable sweaters.
Hook the rack over the lint filter so the rack extends
into the dryer drum.
NOTE:
The drying rack must be used with the Time Dry
cycle.
Do not use this drying rack when there
are other clothes in the dryer.
About the dryer features.
6
Sorting and Loading Hints
As a general rule, if clothes are sorted properly for the
washer, they are sorted properly for the dryer.
Do not add fabric softener sheets once the load has
become warm. They may cause fabric softener stains.
Bounce
®
Fabric Conditioner Dryer Sheets have been
approved for use in all GE Dryers when used in
accordance with the manufacturer’s instructions.
Do not overload. This wastes energy and causes
wrinkling.
Do not dry the following items: fiberglass items,
woolens, rubber-coated items, plastics, items with
plastic trim and foam-filled items.
The Exterior: Wipe or dust any spills or washing
compounds with a damp cloth. Dryer control
panel and finishes may be damaged by some laundry
pretreatment soil and stain remover products. Apply
these products away from the dryer. The fabric may
then be washed and dried normally. Damage to your
dryer caused by these products is not covered by
your warranty.
The Lint Filter: Clean the lint filter before each
use. Moisten your fingers and reach into the filter
opening. Run your fingers
across the filter. Have a
qualified
technician vacuum the lint from the dryer
once a year.
Stainless Steel: To clean stainless steel surfaces,
use a damp cloth with a mild, non-abrasive cleaner
suitable for stainless steel surfaces. Remove the
cleaner residue, and then dry with a clean cloth.
Dryer Interior and Duct: The interior of the
appliance and exhaust duct should be cleaned once
a year by qualified service personnel.
The Exhaust Duct: Inspect and clean the exhaust
ducting at least once a year to prevent clogging.
A partially clogged exhaust can lengthen the
drying time.
Follow these steps:
1
Turn off electrical supply by disconnecting the
plug from the wall socket.
2
Disconnect the duct from the dryer.
3
Vacuum the duct with the hose attachment and
reconnect the duct.
The Exhaust Hood: Check from the outside that the
flaps of the hood move freely when operating. Make
sure that there is not wildlife (birds, insects, etc.) nesting
inside the duct or hood.
Care and Cleaning of the Dryer
Stainless Steel Drum (on some models)
Loading and using the dryer.
Always follow the fabric manufacturer’s care label when laundering.
About reversing the door.
GEAppliances.com
Reversing the Door
Tools needed:
Standard #2 Tape-tipped
Phillips screwdriver putty knife
1
Open the door and remove the filler plugs opposite the
hinges. With the door completely open, remove the bottom
screw from each hinge on the dryer face. Insert these
screws about half way into the TOP holes, for each hinge,
on the opposite side (where you removed the filler plugs).
Apply firm pressure to get the screw started in new holes.
2
Loosen top screw from each hinge on the dryer face half
way. With one hand holding the top of the door and the
other hand holding the bottom, remove the door from the
dryer by lifting it UP and OUT.
3
Remove the blind plate from the hinge side of the dryer by
removing its two screws. Remove the strike plate from the
opposite side of the dryer by removing its two screws.
Reinstall the plates, on the opposite sides, using two screws
in each plate.
4
Rotate the door 180°. Insert it on the opposite side of the
opening by moving the door IN and DOWN until the top
hinge and the bottom hinge are resting on the top screws
inserted in step 1.
5
Remove the remaining screws from the side of the opening
from which the door was removed. With these screws,
secure each hinge at the bottom. Tighten the two top screws
of each hinge. Reinsert the plastic plugs on the side from
which the door was removed.
INSTALL AND TIGHTEN BOTTOM
SCREWS AND TIGHTEN TOP
SCREWS
INSERT PLUGS
INTO HOLES ON
OPPOSITE SIDE
REMOVE BOTTOM SCREW FROM EACH HINGE
AND INSTALL HALF WAY INTO EACH TOP OF
OPPOSITE HINGE HOLES
REMOVE 4 PLUGS AND KEEP
FOR INSERTION INTO
THE OPPOSITE SIDE
LOOSEN EACH TOP HINGE
SCREW HALF WAY AND LIFT
THE DOOR UP AND OFF
FRONT PANEL
SWITCH
STRIKE
PLATE
BLIND
PLATE
ROTATE DOOR 180º AND HANG
IT ON TOP HINGE SCREWS
7
For the best drying performance, the dryer needs to be properly vented. The dryer will use more energy
and run longer if it is not vented to the below specifications. Carefully follow the details on Exhausting in
the Installation Instructions.
Use only rigid metal 4” diameter ductwork inside the dryer cabinet. Use only rigid metal or UL listed
flexible metal 4” diameter ductwork for exhausting to the outside.
Do not use plastic or other combustible ductwork.
Use the shortest length possible.
Do not crush or collapse.
Avoid resting the duct on sharp objects.
Venting must conform to local building codes.
Venting the Dryer
Correct
Venting
Incorrect
Venting
About venting the dryer.
8
- Fire Hazard
WARNING
This dryer MUST be exhausted to the outdoors.
Use only 4” rigid metal ducting for the home exhaust duct.
Use only 4” rigid metal or UL-listed dryer transition duct to connect the dryer
to the home exhaust.
DO NOT use a plastic vent.
DO NOT exhaust into a chimney, kitchen exhaust, gas vent, wall, ceiling,
attic, crawl space, or concealed space of a building.
DO NOT install a screen in or over the exhaust duct.
DO NOT use duct longer than specified in the exhaust length table.
Failure to follow these instructions can result in death or fire.
Problem Possible Causes What To Do
Dryer doesn’t start Dryer is unplugged Make sure the dryer plug is pushed completely into
the outlet.
Fuse is blown/circuit breaker Check the house fuse/circuit breaker box and replace
is tripped fuse or reset breaker. NOTE: Most electric dryers use
2 fuses/breakers.
Dryer doesn’t heat Fuse is blown/circuit breaker is Check the house fuse/circuit breaker box and replace
tripped; the dryer may tumble both fuses or reset both breakers. Your dryer may tumble
but not heat if only one fuse is blown or one breaker tripped.
Gas service is off Make sure gas shutoff at dryer and main shutoff are
fully open.
Dryer shakes or Some shaking/noise is normal. Move dryer to an even floor space, or adjust leveling legs
makes noise Dryer may be sitting unevenly as necessary until even.
Greasy spots on clothes Improper use of fabric softener Follow directions on fabric softener package.
Drying dirty items with Use your dryer to dry only clean items. Dirty items can
clean ones stain clean items and the dryer.
Clothes were not Sometimes stains which cannot be seen when the
completely clean clothes are wet appear after drying. Use proper washing
procedures before drying.
Lint on clothes Lint filter is full Clean lint screen before each load.
Improper sorting Sort lint producers (like chenille) from lint collectors
(like corduroy).
Static electricity can attract lint See suggestions in this section under Static occurs.
Overloading Separate large loads into smaller ones.
Paper, tissue, etc. left in pockets Empty all pockets before laundering clothes.
Static occurs No fabric softener was used Try a fabric softener.
Bounce
®
Fabric Conditioner Dryer Sheets have been
approved for use in all GE Dryers when used in
accordance with the manufacturer’s instructions.
Overdrying Try a fabric softener.
Adjust setting to Less Dry or Damp Dry.
Synthetics, permanent press Try a fabric softener.
and blends can cause static
Inconsistent Type of heat Automatic drying times will vary according to the type
drying times of heat used (electric, natural or LP gas), size of load,
types of fabrics, wetness of clothes and condition of
exhaust ducts.
Troubleshooting Tips
Save time and money! Review the charts on the following pages, or visit
GEAppliances.com. You may not need to call for service.
Before you call for service…
GEAppliances.com
9
Problem Possible Causes What To Do
Clothes take too long Improper sorting Separate heavy items from lightweight items (generally,
to dry a well-sorted washer load is a well-sorted dryer load).
Large loads of heavy fabrics Large, heavy fabrics contain more moisture and take
(like beach towels) longer to dry. Separate large, heavy fabrics into smaller
loads to speed drying time.
Controls improperly set Match control settings to the load you are drying.
Lint filter is full Clean lint filter before every load.
Improper or obstructed Check installation instructions for proper
ducting ducting/venting.
Make sure ducting is clean, free of kinks and
unobstructed.
Check to see if outside wall damper operates easily.
Check the Installation Instructions to make sure the
dryer venting is correct.
Blown fuses or tripped Replace fuses or reset circuit breakers. Since most dryers
circuit breaker use 2 fuses/breakers, make sure both are operating.
Overloading/combining loads Do not put more than one washer load in the dryer
at a time.
Underloading If you are drying only one or two items, add a few items
to ensure proper tumbling.
Clothes are wrinkled Overdrying Select a shorter drying time.
Remove items while they still hold a slight amount of
moisture. Select a Less Dry or Damp Dry setting.
Letting items sit in dryer • Remove items when cycle ends and fold or hang
after cycle ends immediately.
Overloading Separate large loads into smaller ones.
Clothes shrink Some fabrics will naturally shrink To avoid shrinkage, follow garment care labels exactly.
when washed. Others can be
safely washed, but will shrink
Some items may be pressed back into shape after drying.
in the dryer
If you are concerned about shrinkage in a particular
item, do not machine wash or tumble dry it.
Before you call for service…
10
For The Period Of: GE Will Replace:
One Year Any part of the dryer which fails due to a defect in materials or workmanship. During this
From the date of the limited one-year warranty, GE will also provide, free of charge, all labor and related service costs
original purchase to replace the defective part.
What GE Will Not Cover:
Service trips to your home to teach you how to
use the product.
Improper installation, delivery or maintenance.
Failure of the product if it is abused, misused, or
used for other than the intended purpose or used
commercially.
Replacement of the light bulb.
Products which are not defective or broken, or which
are working as described in the Owner’s Manual.
Replacement of house fuses or resetting of circuit
breakers.
Damage to the product caused by accident, fire, floods
or acts of God.
Incidental or consequential damage caused by possible
defects with this appliance.
Defects or damage due to operation in freezing
temperatures.
Damage caused after delivery.
Product not accessible to provide required service.
This warranty is extended to the original purchaser and any succeeding owner for products purchased
for home use within the USA. If the product is located in an area where service by a GE Authorized Servicer is not
available, you may be responsible for a trip charge or you may be required to bring the product to an Authorized
GE Service location. In Alaska, the warranty excludes the cost of shipping or service calls to your home.
Some states do not allow the exclusion or limitation of incidental or consequential damages. This warranty
gives you specific legal rights, and you may also have other rights which vary from state to state. To know
what your legal rights are, consult your local or state consumer affairs office or your state’s Attorney General.
Warrantor: General Electric Company. Louisville, KY 40225
All warranty service provided by our Factory Service Centers,
or an authorized Customer Care
®
technician. To schedule service,
on-line, 24 hours a day, visit us at GEAppliances.com, or call 800.
GE.CARES (800.432.2737). Please have serial number and model
number available when calling for service.
Staple your receipt here.
Proof of the original purchase
date is needed to obtain
support under the warranty.
GE Dryer Warranty.
GEAppliances.com
(;&/86,212),03/,(':$55$17,(6³<RXUVROHDQGH[FOXVLYHUHPHG\LVSURGXFWUHSDLUDVSURYLGHGLQWKLV/LPLWHG
Warranty. Any implied warranties, including the implied warranties of merchantability or fitness for a particular
purpose, are limited to one year or the shortest period allowed by law.
11
GE Appliances Website GEAppliances.com
Have a question or need assistance with your appliance? Try the GE Appliances Website 24 hours a day,
any day of the year! For greater convenience and faster service, you can now download Owner’s Manuals,
order parts or even schedule service on-line.
Schedule Service GEAppliances.com
Expert GE repair service is only one step away from your door. Get on-line and schedule your service
at your convenience 24 hours any day of the year! Or call 800.GE.CARES (800.432.2737) during normal business
hours.
Real Life Design Studio GEAppliances.com
*(VXSSRUWVWKH8QLYHUVDO'HVLJQFRQFHSW³SURGXFWVVHUYLFHVDQGHQYLURQPHQWVWKDWFDQEHXVHGE\
people of all ages, sizes and capabilities. We recognize the need to design for a wide range of physical and
mental abilities and impairments. For details of GE’s Universal Design applications, including kitchen design
ideas for people with disabilities, check out our Website today. For the hearing impaired, please call 800.TDD.
GEAC (800.833.4322).
Extended Warranties GEAppliances.com
Purchase a GE extended warranty and learn about special discounts that are available while your warranty
is still in effect. You can purchase it on-line anytime, or call 800.626.2224 during normal business hours.
GE Consumer Home Services will still be there after your warranty expires.
Parts and Accessories GEAppliances.com
Individuals qualified to service their own appliances can have parts or accessories sent directly to their homes
(VISA, MasterCard and Discover cards are accepted). Order on-line today, 24 hours every day or
by phone at 800.626.2002 during normal business hours.
Instructions contained in this manual cover procedures to be performed by any user. Other servicing
generally should be referred to qualified service personnel. Caution must be exercised, since improper
servicing may cause unsafe operation.
Contact Us GEAppliances.com
If you are not satisfied with the service you receive from GE, contact us on our Website with all the details
including your phone number, or write to: General Manager, Customer Relations
GE Appliances, Appliance Park
Louisville, KY 40225
Register Your Appliance GEAppliances.com
5HJLVWHU\RXUQHZDSSOLDQFHRQOLQH³DW\RXUFRQYHQLHQFHTimely product registration will allow for enhanced
communication and prompt service under the terms of your warranty, should the need arise.
You may also mail in the pre-printed registration card included in the packing material.
Consumer Support.
12
  • Page 1 1
  • Page 2 2
  • Page 3 3
  • Page 4 4
  • Page 5 5
  • Page 6 6
  • Page 7 7
  • Page 8 8
  • Page 9 9
  • Page 10 10
  • Page 11 11
  • Page 12 12

GE Appliances GTD42EASJWW Owner's manual

Category
Tumble dryers
Type
Owner's manual

Ask a question and I''ll find the answer in the document

Finding information in a document is now easier with AI