6
E
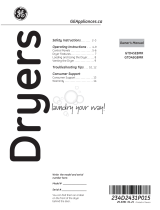
Operating instructions
Settings
Individual settings for Timed Dry cycle minutes (Time), dryness level (Level), and temperature (Temp) can be set from
the minimum (lowest in column) to maximum (highest in column). In general, the higher up the column, the more
energy will be used.
Time - Selection only for Timed cycles.
Each “setting” allows you to specify a lower (1 tap) or an upper (2 taps) time working your way from a
minimum 10 minute to a maximum 99 minute dry time (10, 20, 30, 40, . . . 80, 90, 99, 10 . . .)
Dryness Level - Selection only used for Sensor cycles. Timed cycles run for the selected time.
Extra Dry Use for heavy-duty fabrics or items that should be very dry, such as towels.
More Dry Use for heavy-duty or mixed type fabrics.
Dry Use for a normal dryness level suitable for most loads. This is the preferred cycle for energy savings.
Less Dry Use for lighter fabrics.
Damp
For leaving items partially damp.
Drying Cycles-Sensor cycles automatically determine fabric dryness.
Timed cycles run for the selected time.
Timed Dry
Set the Cycle Selector at the desired drying time.
Quick Fluff/ For freshening or fluffing up already dry clothing, fabric, linens and pillows. Use with No Heat.
No Heat Provides 10 minutes of no-heat tumbling.
Quick Dry For small loads that are needed in a hurry, such as sport or school uniforms. Can also be used if the
previous cycle left some items damp, such as collars or waistbands. NOTE: On some models, the time
remaining in the cycle will show counting down in the display.
Bulky Items For large coats, bed spreads, mattress covers, sleeping bags and similar large/bulky items such as
blankets, comforters, jackets, and small rugs.
Towels/Sheets* For most towels and linens.
Cottons* For cottons and most linens.
Normal/Mixed
For loads consisting of cottons and poly-blends.
Loads*
Jeans* For jeans.
Casuals
/
For wrinkle-free, permanent press, delicate items and knits.
Permanent Press*
Active Wear For sports and exercise wear.
Delicates For delicate items, special-care fabrics and knits.
Steam Refresh For slightly wrinkled dry garments. Significantly reduces wrinkles.
NOTE: A single extremely light fabric item may need to have an additional item included in
the Steam Refresh cycle to achieve optimum results.
Steam Dewrinkle For use with larger loads than Steam Refresh. Ideal for loads left in the dryer for an extended time.
STEAMselect The STEAMselect button is used in conjunction with Steam Refresh and Steam Dewrinkle. As you
press the button, it defines how many articles are in the dryer and adjusts the steam and cool down
times accordingly.
Steam Cycle ( & ) Notes:
• Important - The temperature setting must be set to HIGH and water must be turned on before running the steam cycles.
• The Extended Tumble option will be turned on.
• After the steam cycle, the unit will beep (if Variable Signal is on) and display “00”.
• Do not use a steam cycle with items such as wool, leather, silk, lingerie, foam products or electric blankets.
• Do not use steam cycles on new clothes without first washing.
• Steam cycles are not intended for use with towels.
Sanitize This option reduces certain types of bacteria by 99.9%, including: Staphylococcus aureus, Pseudomonas
aeruginosa and Klebsiella pneumoniae. The anti-bacterial process occurs when high heat is used during a portion of the
drying cycle.
NOTE: Do not use this cycle on delicate fabrics.
*Cycles available with Sanitize option.
D
ESTIMATED TOTAL CYCLE TIME
DELAY
DRY
DAMP
CLEAN
LINT FILTER
DRYING
COOL
DOWN
Energy Smart
50 ~ 60
Extra Dry
Less Dry
70 ~ 80
90 ~ 99
30 ~ 40
10 ~ 20
More Dry
Dry
Damp
No Heat
High
Low
Medium
Extra Low
TimeTempLevel
Damp
Alert
Delay
Dry
Extended
Tumble
Rack
Dry
Dry
Mixed Loads
No Heat
Permanent Press
Use Timed Dry
Cycles Only
Hold 3 seconds
to CANCEL
Quick Dry
Active Wear
Casuals
Quick Fluff
Delicates
Jeans
Bulky Items
Timed Dry
Normal
Cottons
Sanitized
STEAMselect
Towels / Sheets
Select Steam Cycle and PUSH “STEAMselect” for garment amount
1 to 23 to 5 6 to 7 8 to13
Steam Refresh
Steam Dewrinkle
Good Best
monitor
e
Drum