19
UNDER CABINET HOOD INSTALLATION
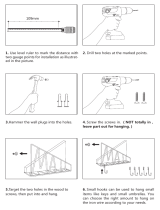
STEP 2
Hang & Secure the Range Hood and Connect:
• Carefully hang the hood on the mounting screws in place from
Step 1. Tighten the mounting screws to secure the hood. The bottom
of the hood should match up with the the horizontal line marked on
the wall.
• Using the knockouts in the top of the hood, screw the top of the
hood in to the bottom of the cabinet above
• Drill holes in the back of the hood lining up with the wall studs that
have been previously marked,*(If the knockouts in the back of the hood
do not match up).
• Secure the hood to the wall studs using the screws included in the
hardware bag. Additionally, you may use the knockouts in the back of
the hood to add more screws
• Attach the previously installed ductwork to the hood’s blowers,
taping it in place using aluminum or HVAC tape.
• Power the hood by connecting the three pronged plug to a nearby
electrical outlet or by hardwiring the hood to a power source**.
2
* Use an appropriate drill bit for the mounting screws included in the hardware bag.
**Always consult an electrician before directly wiring a hood to a power source.
This concludes the installation of an undercabinet hood. If
you have any questions about the installation process please
call Proline Customer Service at 877.901.5530
or visit prolinerangehoods.com.