Feather River Doors MQ2E94 Installation guide

Type
Installation guide
DOC1INSF 10/18 | © 2018 Trinity Glass International, Inc.
- 1 -
BEFORE YOU BEGIN:
1. Do not remove the plastic door plug until instructed to do so.
It keeps the door closed and aligned during shipping. The door plug
is in the hole for the door lock set. If the door unit has handles on the
latch and hinge jambs, remove them.
2. Make sure that the new door will properly fit in your frame
opening. The recommended frame opening is 3/4" wider and 1/2"
higher than the door unit. Resize the opening if needed. It is important
that the floor is level without any bumps. Use the two foot long level
to make sure floor is within 1/16" of perfectly flat. Use a carpenter’s
square and six foot long level to check the frame opening for square
and plumb. Minor (less than 1/4") out of plumb and square conditions
at the sides and top can be corrected by using shims. Larger
misalignments must be corrected before installation. Diagonal
measurements must be equal to within 1/4" (as shown in Figure B).
WEATHER BARRIER INSTALLATION
An installation that is resistant to air and water leaks depends
upon properly flashing the frame opening and installing a sill pan
before installing the door unit. Building codes vary as to actual
requirements. Also, different siding types require different flashing
details. Please check with local building professionals for best
flashing practices and regional code requirements.
STORM DOORS
Non-Vented Storm Doors will void the Feather River Door warranty.
A Non-Vented Storm Door will build up enough heat to permanently
warp the door. Our doors are energy efficient and storm door
protection is not necessary. If installing a storm door, it must be
ventilated to reduce the amount of heat buildup. Installing a
Non-Vented storm door in an area with sun exposure will cause
issues due to extreme heat (UV deterioration, color fading, warping,
caulk/sealant oozing).
FIBERGLASS DOOR SYSTEM
Installation Instructions
Thank you and congratulations! You have just purchased a premier fiberglass entry door system. If you have an unfinished door
system, we recommend that you paint/stain before installation. Refer to the Finishing Instructions section. Please read all the
instructions before beginning installation. CAUTION: Some door units are heavy and may require two people to lift and install.
Use proper lifting techniques and follow safe working practices.
Visite nuestra página web para esta información en español.
TOOLS AND MATERIALS NEEDED:
• Tape Measure
• Hammer
• Carpenter Square
• Two and Six foot long Levels
• Wooden Shims
• #2 Phillips Screwdriver
• #10 (#8 minimum) x 3"
Exterior Grade Flathead
Screws For #2 Phillips
• Power Drill With 3/16" (0.188")
Diameter Drill Bit
• Safety Glasses
• Caulking Gun
• Quality Clear Exterior Sealant
• Putty
Equal
Equal
Figure B
Figure A
PARTS OF A DOOR SYSTEM
Latch
Jamb
Latch
Brickmould
Square
Door Sill
Door Sweep
Head Jamb
Head Brickmould
Hinge
Brickmould
Hinge
Jamb
Plumb
Level
DOC1INSF 10/18 | © 2018 Trinity Glass International, Inc.
- 2 -
INSTALLATION:
IMPORTANT: Before setting the door unit into the rough opening, apply
generous beads (1/2" minimum diameter) of caulk to the underside of
the door sill at locations shown in Figure 1a/1b, including the bottom of jambs
(or plastic jamb adapters as shown) and brickmoulds. Apply at least four lines
of bead along the full length of the sill. If Brickmould is already attached to the
jamb, apply a 1/2" bead of caulk around the entire perimeter. This caulk
bead should be within 1/2" of outside edge of the Brickmould as shown
in Figure 1a/1b.
1
2
3
Figure 2a
Figure 3a
(Exterior)
(Interior)
For a single door, remove the bolt from the plastic door plug.
For a double door, remove the screws from the head jamb that
secure doors during shipping. For a multiple panel door system, get
help when lifting, setting and aligning. From the outside, center and
tip the door unit into the opening per Figure 2a. To keep the sealant
beads from smearing, avoid sliding the door into place. Make sure
the backside of the brickmould is against the outside sheathing.
The inside wall should be within 1/8" of the inside jamb surfaces.
Use the two foot long level to make sure sill is less than 1/16" out
of level. Fix any problems before moving onto next step.
NOTE: Cover the door sill to protect against scratches during
installation or between building construction and occupation.
Any contact with wet cement or cement powder will damage
the sill finish.
NOTE: These instructions minimize the number of fasteners
an installer must cover before finishing the door installation.
Therefore, it is important to use help and shims to stabilize the
door unit during installation.
PLUMB HINGE JAMB: From the inside, place shims
between both jambs and frame opening at the same
levels per Figure 3a. Locate shims at the top of the door unit
and near the bottom hinge. Use a six foot long level to plumb
the hinge jamb both left to right and inside to outside. For a
Sidelite Unit, plumb the jamb closest to the hinges. For a Double
Door Unit, plumb the passive side jamb. (The passive side is
the normally closed side). Adjust shims so they are tight before
opening door.
Figure 1b
(outswing)
Figure 1a
(inswing)
Bead
Bead
Caulk
Caulk
Shims
DOC1INSF 10/18 | © 2018 Trinity Glass International, Inc.
- 3 -
Installation screw locations change depending upon configuration
and finish. Sidelite jambs are different than Hinge or Latch Jambs.
PVC jambs are different than wood jambs. Use the table to choose
a method depending upon jamb type and jamb finish.
METHOD ONE: Open Door and remove jamb weatherstrip to
minimize damage. For each hinge or latch jamb next to a frame
opening, drill two 3/16" holes. Locate one 8" from the top and
one 8" from the bottom. Drill the holes 1/4" from the jamb stop
(Figure 3b). Drive #10 x 3" screws through holes in hinge jamb,
leaving screw heads 1/4" above jamb surface. Place additional
shims directly above screws (Figure 3c). Make sure new shims
are tight but do not bow the jamb. Recheck hinge jamb to make
sure it is still plumb. Finish driving screw heads 1/16" below jamb
surface to avoid damaging door.
METHOD TWO: Open Door and remove jamb weatherstrip to
minimize damage. For each hinge or latch jamb next to a frame
opening, drill two 3/16" holes. Locate one at 8" from the top and
one at 8" from the bottom. Drill the holes 1/4" from the jamb stop
(Figure 3b). Drive #10 x 3" screws through holes in hinge jamb,
leaving screw heads a 1/4" above jamb surface. Place additional
shims directly above screws (Figure 3c). Make sure new shims
are tight but do not bow the jamb. Recheck hinge jamb to make
sure it is still plumb. Finish driving screw heads flush to jamb
surface to avoid damaging door (Figure 3d).
METHOD THREE: For each sidelite jamb next to a frame opening,
drill four 3/16" holes. Locate first at 8" from the top and second
at 8" from the bottom. Space holes 1-1/4" from sidelite surface
(Figure 3e). Equally space additional two holes between first two
holes. On hinge side only, drive #10 x 3" screws through holes.
Place additional shims directly above screws. Make sure new
shims are tight but do not bow the jamb (Figure 3c). Recheck
sidelite jamb to make sure it is still plumb. Finish driving screw
heads slightly (1/16") below jamb surface.
METHOD FOUR: For each sidelite jamb next to a frame opening,
drill four 3/16" holes. Locate one at 8" from the top and one at 8"
from the bottom. Space holes 1-1/4" from sidelite surface
(Figure 3e). Equally space additional two holes between first two
holes. On hinge side only, drive #10 x 3" screws through holes.
Place additional shims directly above screws (Figure 3c).
Make sure new shims are tight but do not bow the jamb.
Recheck sidelite jamb to make sure it is still plumb. Adjust shims
if necessary. Finish driving screw heads flush to jamb surface.
METHOD FIVE: These jambs have pre-drilled counterbores. Drill
3/16" holes through the counterbores per Figure 3f. On hinge side
only, drive #10 x 3" screws through holes. Place additional shims
directly above screws (Figure 3c). Make sure new shims are tight
but do not bow the jamb. Recheck sidelite jamb to make sure it
is still plumb. Drive screw heads 1/4" below the jamb surface to
allow room for hole plug (Figure 3f).
Figure 3b
Figure 3c
Figure 3d
Figure 3e Figure 3f
METHOD JAMB TYPE JAMB FINISH
Method One Hinge, Latch Wood
Method Two Hinge, Latch
Unfinished PVC,
Pre-Colored PVC,
Hand Stained PVC
Method Three Sidelite Wood
Method Four Sidelite
Unfinished PVC,
Pre-Colored PVC
Method Five Sidelite Hand Stained PVC
Shims
Hole
1/4"
1-1/4"
1-1/4"
DOC1INSF 10/18 | © 2018 Trinity Glass International, Inc.
- 4 -
ALL HINGE JAMBS: Place additional shims at top of middle hinge (6/8)
or hinges (8/0). Install two #9 x 2-1/4" screws (included in installation kit)
through the top hinge at the locations shown in Figure 3g. Install one
screw through each of the lower two (6/8) or three (8/0) hinges (Figure 3h).
Install in holes closest to weatherstrip groove. If there is a screw already
in the hole, replace it with a 2-1/4" screw. Use the shorter screw in any
other empty hinge hole.
SQUARE LATCH JAMB AND LEVEL HEAD JAMB:
Close the door until the interior face of the door is flush with the
jamb (Figure 4a). Align latch jamb until the latch and head jambs are flush
with the door along their entire length. Adjust shims between latch jamb
and frame for snug contact. Stand where you can see the gap for the
weatherstrip when the door is closed. Verify there is an equal 3/8" gap
along the head and latch jambs and door (Figure 4a).
ALL LATCH JAMBS: Stand where you can see the hinges after the door is
closed. Close door and inspect for equal margins along entire length of
head and latch jambs (Figure 4b). Make sure margin between Head Jamb
and Door equals margin between Latch Jamb and Door. Adjust shims until
margins are equal.
4
Figure 3g
Figure 4a Figure 4b
Figure 3h
(Exterior)
(Top hinge)
(Middle hinge)
Screws
3/8"
Equal margins
DOC1INSF 10/18 | © 2018 Trinity Glass International, Inc.
- 5 -
Additional shims may be used to keep
the jamb aligned (Figure 4c). Open
and close door to find any points
where door hits jamb. Adjust shims
to eliminate hitting points. When
adjustments are complete, drive
#10 x 3" screws through previously
drilled holes in the latch jamb.
If there is a sidelite on the latch
side, drive #10 x 3" screws through
previously drilled holes in the
sidelite jamb:
• Hand Stained PVC Jamb:
Fully seat screws into bottom
of counterbores
• Wood Jamb: 1/16" below
jamb surface
• Unfinished and Pre-Colored
PVC Jambs:
Flush to jamb surface
Figure 4e
Figure 4c
Figure 4d
Figure 4f
(Interior)
(Interior)
Shim
Shims
Screws
Mullion
Screws (2)
Inside
Inside
ADDITIONAL ANCHORING FOR SINGLE DOOR
WITH SIDELITES:
Shim above mullion per Figure 4e. Remove head
weatherstrip. Drill one 3/16" hole per sidelite.
Locate holes 1-1/2" away from mullion, 1/4" from
weatherstrip kerf. Install #10 x 3" exterior grade
screws through the holes. Cover the screws and
screw holes with the same method used on the
Hinge/Latch Jamb.
ADDITIONAL ANCHORING AND DRILLING
FOR DOUBLE DOOR UNITS:
Drill two 3/16" holes. Locate holes 18" away from
each jamb, 1/4" away from weatherstrip kerf, per
Figure 4f. Install #10 x 3" exterior grade screws
through the head jamb. Take care not to overtighten
the screws. Close both doors and check for
consistent margin along head jamb. Adjust screws
until margin is correct. Cover the screws and screw
holes with the same method used on the Latch
or Hinge Jamb. Do not shim above head jamb.
DOC1INSF 10/18 | © 2018 Trinity Glass International, Inc.
- 6 -
INSTALLING ASTRAGAL RETAINING PLATE
& GROMMET FOR DOUBLE DOOR UNITS:
After the double door is properly aligned, use the astragal
bolts to mark and drill 3/8" diameter x 1-3/8" min. deep hole
through the head jamb and 5/8" diameter x 1-3/8" min. deep
hole through the sill, per Figures 4g, 4h, and 4i. Pre-drill
(2) 1/16" pilot holes for the mounting screws for the head
jamb. Install the retaining plate in the head jamb using the
included hardware and insert the grommet into the 5/8"
diameter hole in the sill.
POSITION STRIKE/DEADBOLT PLATES
FOR DOUBLE DOOR UNITS:
Close both doors. Mark desired positions for strike and
deadbolt plates. Loosen the retainer screws (do not
completely remove screws). Place the strike and deadbolt
plates into position (left image of Figure 4j) and tighten the
screws. Only use the screws that came in the retainers.
Do not use other screws as this may cause a malfunction
in the operation of the doors. Check positions and adjust
as needed.
INSTALL TRIM COVERS FOR DOUBLE DOOR UNITS:
Cut the Trim Covers so that the ends fit under both the
strike and deadbolt plates and butt up against the strike
and deadbolt retainers (as shown in the right side of
Figure 4j [1,2,3]). Loosen the screws on the strike and
deadbolt plates and slip the Trim Cover underneath.
Snap the Trim Covers into place and tighten screws.
For more detailed instructions on astragal installation and
adjustment please visit: https://www.enduraproducts.com/
resources/instructions-technical-resources/
Cover screws and screw holes on Sidelite Jambs
with one of the following (Figure 5a):
• Wood with putty
• Unfinished or Pre-Colored PVC with Screw Caps
• Hand Stained PVC with Hole Plugs
Cover screws and screw holes on Latch and Hinge Jambs
with one of the following:
• Wood with putty
• Unfinished or Pre-Colored PVC with Screw Caps
• Hand Stained PVC with Screw Caps
Test for ideal contact between the door sweep and the
threshold (inswing only). Put a sheet of paper above
a screw on the threshold, close the door and pull. The
correct adjustment has a slight tension, if the paper tears,
the tension is too high. Adjust the threshold as shown
in Figure 5b. Turn screw clockwise to reduce tension or
counter clockwise to increase tension. Repeat the test
above each threshold screw.
5
Figure 4g
Figure 4i
(outswing sill)
Figure 4h
Figure 5a
1
2
3
Figure 4j
#3 Phillips
screwdriver
Threshold
Figure 5b
(inswing)
DOC1INSF 10/18 | © 2018 Trinity Glass International, Inc.
- 7 -
IMPORTANT: Reinstall weatherstrip. Remove excess shims.
Do not shim or screw through the head jamb of the single door unit.
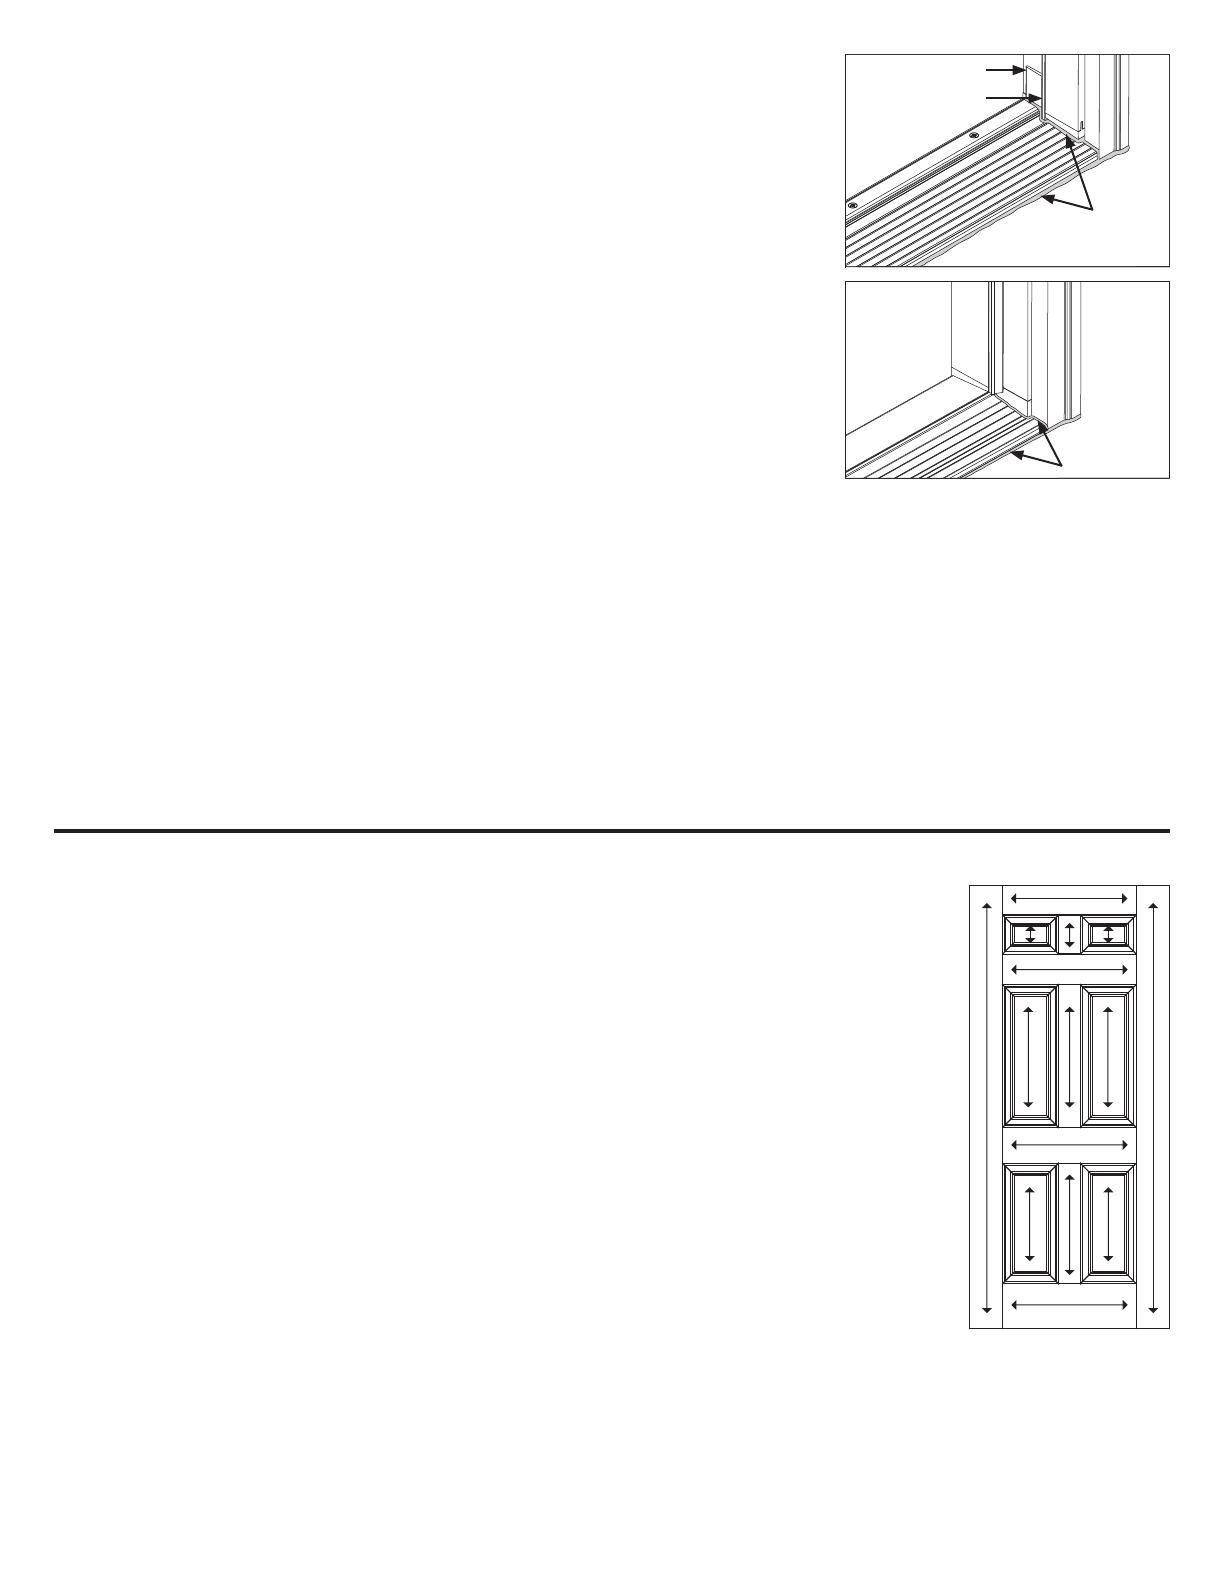
For in-swing doors, install a corner seal pad (included in the installation kit)
at each bottom corner of a hinge or latch jamb per Figure 6a. For a double
door system, verify that a corner seal pad is installed at the bottom of the
astragal. The corner seal pad should be tucked underneath the weatherstrip.
Caulk at the intersection of the jambs, mullion base, brickmoulds, threshold and
floor. For out-swing doors, also caulk at the intersection of the jambs, mullion base,
brickmoulds, threshold and floor per Figure 6b.
FINAL INSTALLATION NOTES:
DEADBOLT STRIKE: Place shims both above and below the deadbolt strike
(not included). Be careful not to bow the jamb. Use long screws through the
deadbolt strike to anchor the strike into the frame opening. If the strike prep
must be larger, use standard woodworking tools on both wood and PVC jambs.
PLASTIC DOOR PLUG: Remove the plastic door plug completely.
DOOR LITE PLUGS: Every door with a lite comes with enough plugs to fill all screw holes. All screw plugs should have a tight
fit when installing to keep them from falling out. To install a screw plug, line it up with a hole. Align contours on the screw plug
with the lite frame contour. Start at a slight angle. In some cases you may be able to push the plug into place with your hand.
In most cases, you will need to use a tool to lightly tap the plug into place. If it seems that the screw plugs are too tight, slightly
sanding or filing the edge of the bottom side of the plug will allow the plug to fit easier.
INTERIOR TRIM INSTALLATION: Use a standard finishing nail (2d, 1", 16 gauge) to install interior trim. Drill a 1/16" pilot hole to
guide direction of finish nail.
BRICKMOULD KIT APPLICATION: Apply wood or PVC Composite Brickmould in a similar fashion. Put a 1/2" bead of sealant on
backside of Brickmould. Use an exterior grade finish nail (6d, 2", 13 gauge). Drill a 1/16" pilot hole to guide direction of finish
nail. Cover nail holes using provided putty stick or wood putty depending on finish of trim.
STORM DOOR INSTALLATION: Drill pilot holes for any fasteners used to install a storm door.
FINISHING INSTRUCTIONS:
Staining or painting an unfinished Feather River fiberglass door has never been easier. Our fiberglass
door does not require special stain kits or primer. Use the same exterior stain or paint you would use
for finishing your home’s other trims. When finishing, remove the door from the frame and place door
in a flat level surface off the floor. Do not remove sidelites from the door frame for finishing. Leave
sidelites in their original installed position.
CAUTION: PAINT OR STAIN IN A WELL VENTILATED AREA. KEEP COMBUSTIBLE PAINT, STAIN
AND TOPCOAT AWAY FROM HEAT AND FLAME. KEEP OUT OF REACH OF CHILDREN.
STAIN FINISH:
All surfaces of a tan woodgrain door are stainable. Our patented textured fiberglass door surface
yields superior stain adhesion without sanding. Select a high quality water-based stain, or a high
quality gel stain. Or, select a high quality oil-based stain. Before applying a stain, wipe the fiberglass
door and door lite frame with a damp cloth to remove any dirt, oil, or debris. Allow the surface to fully
dry before staining. Apply an even amount of stain with a brush or lint-free cloth in the direction of the
wood grain as shown in Figure 6. Work the stain into the surface. Lighten stain and remove excess
through wiping with a clean rag before stain dries completely. For a darker appearance, apply a second
coat after first coat dries. Follow the application instructions on the stain container label. After stain has
dried for at least 24 hours, apply three coats of high quality exterior grade satin or low gloss polyurethane
in the direction of the wood grain. Follow the label’s drying time between coats.
IMPORTANT: Use polyurethane with ultraviolet (UV) inhibitors.
6
Figure 6
Figure 6a
(inswing)
Figure 6b
(outswing)
Corner seal pad
Caulk
Caulk
Weatherstrip
DOC1INSF 10/18 | © 2018 Trinity Glass International, Inc.
- 8 -
PAINT FINISH:
Tan woodgrain or unpainted/pre-painted smooth fiberglass doors are paintable with most high quality oil or water based
exterior paints. For the unpainted smooth doors, we recommend lightly sanding with 220-grit sandpaper for the best results.
Before applying a paint, wipe the fiberglass door and door lite frame with a damp cloth to remove any dirt, oil, or debris.
Allow the surface to fully dry before painting. Paint the door in the directions shown in Figure 6 (previous page). Apply at least
two coats of paint. Follow the brand’s recommended drying time between coats.
FINISHING WOOD AND UNFINISHED PVC COMPONENTS:
Clear Pine Components: We recommend staining the jambs, brickmould and other clear wood components per above stain
finish instructions. Apply 2 or 3 coats of exterior grade polyurethane with ultraviolet (UV) inhibitors. Lightly sand with 220-grit
sandpaper between coats for smoother finish.
Painting Primed Wood and Unfinished PVC: Use a quality exterior grade acrylic latex or oil-base paint. Use wood filler to
putty the nail marks on the wood components before staining or painting and a PVC filler or caulk on PVC components. All
unfinished doors and components must be finished within 2 weeks of installation or 6 months from the date of purchase,
whichever is sooner.
CARE AND MAINTENANCE:
HAND STAINED JAMBS, BRICKMOULD AND DOORS: Over time, harsh weathering will degrade even the best finish. We
recommend reapplying a UV topcoat over the existing topcoat every 2-5 years. We do not recommend stripping the factory
finish topcoat. In locations of severe weather exposure, more frequent maintenance may be required. Fading, minor cracking
and peeling are some initial signs of UV topcoat deterioration.
PAINTED FIBERGLASS DOORS, PVC COMPONENTS, AND WOOD COMPONENTS: Repaint your doors, jambs and brickmoulds
as soon as deterioration occurs. Initial signs of wear are fading, cracking, bubbling, and peeling.
WEATHERSTRIP: Replace compression weatherstrip, door sweep, and seal pads when worn or torn.
CAULKING: Just as with the finish, it is imperative to maintain caulking and sealants. Any areas of deterioration should be
re-caulked based on the areas pointed out in the installation instructions (Exterior Trim to Jamb, Jamb Base to Threshold/Sill).
Note: All Feather River fiberglass door lite frames come pre-caulked from the factory. The excess sealant on the door lite is
normal and does not indicate a defective glazing. In some cases over time, you may experience excess caulking/sealant ooze
around the lite frame. In most cases this happens during extreme heat buildup or when the door is exposed to direct sunlight.
The excess sealant on the glass can be removed by carefully scoring the excess sealant with a razor blade and peeling it off.
The excess sealant on the glass side may be better removed with the blade after scoring. Take care to avoid nicking the finish
on the door or lite frame.
THERMAL BOWING: In some areas with temperature fluctuations, your door may bow over a period of days. This is typically
due to the temperature difference between the exterior and interior part of the home. In most cases, the door will return back
to its normal position. Bowing is also common during the first couple of weeks after door installation until the door becomes
acclimated. However, in conditions of extreme temperature exposure, some permanent bowing can occur. In applications
with extreme temperature exposure, following the recommendations below will lessen the effect.
DOOR EXPOSURE AND PROTECTION: Protected Doors need less maintenance and re-finishing vs. doors fully exposed to the
elements. Overhangs provide long lasting protection to your entryway along with reduced maintenance.
COLOR CHOICE: Door colors affect the need for periodic maintenance and the overall door performance, especially in areas
where doors receive an extreme amount of sun. Dark colors will absorb more heat than light colors. If a door is absorbing
a lot of heat or has constant sun exposure, it is more likely to have UV topcoat deterioration, color fading, and even warping
issues. Light colors will reduce the amount of heat absorption and reduce maintenance needs.
  • Page 1 1
  • Page 2 2
  • Page 3 3
  • Page 4 4
  • Page 5 5
  • Page 6 6
  • Page 7 7
  • Page 8 8

Feather River Doors MQ2E94 Installation guide

Type
Installation guide

Ask a question and I''ll find the answer in the document

Finding information in a document is now easier with AI