Page is loading ...

ProductionNumber:XXXXXXXX MadeInChina 1/3
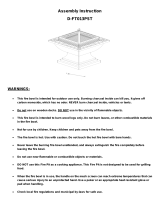
ASSEMBLY INTRUCTION
ITEM#:L-FT563PST
WARNINGS:
This fire bowl is intended for outdoor use only. Do NOT use on wooden decks. DO NOT use in the vicinity of
flammable objects.
This fire bowl is intended to burn wood logs only. Do not burn leaves, or other combustible materials in the
fire bowl.
Not for use by children. Keep children and pets away from the fire bowl.
The fire bowl is hot. Use with caution. Do not touch the hot fire bowl with bare hands.
Never leave the burning fire bowl unattended, and always extinguish the fire completely before leaving the fire
bowl.
Do not use near flammable or combustible objects or materials.
DO NOT use this Fire Pit as a cooking appliance. This Fire Pit is not designed to be used for grilling food.
When the fire bowl is in use, the handle on the mesh screen can reach extreme temperatures that can cause
serious injury to an unprotected hand. Use a poker or an appropriate heat resistant glove or pad when handling.
Check local fire regulations and municipal by-laws for safe use.
Important: For technical assistance on assembly or replacement parts, please call Sunjoy Industries at 1(866)
578-6569 from 8:00 AM EST to 8:00 PM PST. You may email to [email protected]om or visit
www.sunjoyonline.com to place your order or fax your parts replacement order form (which is included in the
packaging) together with your purchase receipt to
1 (740) 283-3549 for assistance.

ProductionNumber:XXXXXXXX MadeInChina 2/3
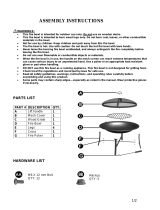
Assembly Steps
Parts List
Part# Description QTY
A Handle 1
B Mesh wire cover 1
C Grate 1
D Fire Bowl 1
E Ash catcher 1
F Up-coupling ring 1
G Leg 4
H Down-coupling ring 1
I Poker 1
Parts List
Part# Description QTY
AA M6x15 Bolt 8
BB M6x10 Bolt 4
CC M5x10 Bolt 3
DD M6 Nut 9
EE M5 Nut 3
FF Wrench 1
Step 1:Attach handle (A) to Mesh wire
cover (B) and secure it with 1 M6 nut (DD),
as shown in Fi
g
. 1.
Step 2: Attach Ash catcher (E) to Fire bowl (D)
and secure it with 3 M5 x 10 mm bolts (CC) and
3 M5 nuts (EE), as shown in Fig. 2.
A
B
C
D
E
F
H
I
G
B
Fig.1
A
DD
CC
EE
D
E
Fig.2

ProductionNumber:XXXXXXXX MadeInChina 3/3
Care & Cleaning
Before using, clean the fire pit completely with a soft dry towel.
When not in use, store in a cool, dry area.
Limited Warranty: The item is warranted to be free from defects in material or workmanship for a period of six (6)
months. However, we do no reimburse for transportation or delivery costs, nor compensate the individual or any outside
party for assembling or disassembling the product. This limited warranty is extended to the original purchaser and
applies to defects in materials and workmanship of your item, provided the item is maintained with care and used only
for personal residential purposes.
Exclusions:Items used for commercial, contract, or other non-residential purposes, or items damaged due to acts of
nature, vandalism, misuse, or improper assembly are not covered. Corrosion or rusting of hardware is not covered.
Proof of purchase (dated register receipt) is required for warranty claims. Warranty is to the original purchaser and is
non-transferable. Any replacement of warranted items will be in the original style and color, or a similar style and color
if the original is unavailable or has been discontinued. As some states do not allow exclusions or limitations on an
implied warranty, the above exclusions and limitations may not apply. This warranty gives you specific rights, and you
may also have other rights, which vary from state to state.
WARNING: Fuels used in wood or charcoal burning appliances, and the products of combustion of such fuels, contain
chemicals known to cause cancer, birth defects or other reproductive harm.
Step 4: Place the Fire bowl (D) on the leg/ring
assembly. Place the Grate (C) into the Fire bowl and
put the Mesh wire cover (B) on the (D) as shown in
Fig. 4.
Step 3:Attach 4 Legs (G) to Up-coupling ring
(F) with 8 M6 x 15 mm bolts (AA) and 8 (DD)
and tighten slightly. Connect Down-coupling
ring (H) and (G) with 4 M6 x 10 mm bolts (BB),
and then tighten all the connections. As shown in
Fig. 3.
DD
BB
A
A
F
G
H
Fig.3
I
F
D
C
B
Fig.
/