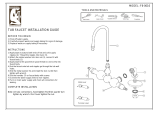
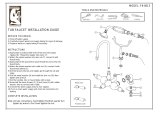
Assembly Instructions for 3V3LSA
NOTE: USE TEFLON TAPE ON ALL THREADED CONNECTIONS
1. Shut off the water supply valves before installation.
2. According to your requirement, connect the riser or swivel arm connector kit to the faucet body.
3. Attach the diverter lever onto diverter valve and tighten the diverter screw.
3. Install handles. After installation is completed. Turn on the water supply valves and allow both hot
and cold water to run at least one minute each. While water is running. Check for leaks,
especially at hook-ups to supply lines. Tightening nuts slightly will stop any minor leaks.
Diverter lever
Diverter screw
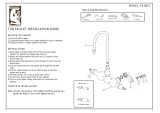
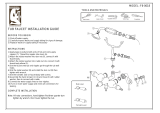
Lever Handles:
1. Be sure that the broach screws are tightened installing the lever handles.
2. Install the lever handles on the broaches and tighten the set screws using the allen
wrench provided.
before
Cross Handles:
1. Remove the screws from the top of the broaches.
2. Remove the insert caps from the cross handles.
3. Put the cross handles on the broaches and then tighten the screws. Insert the caps on the
cross handles.
Broach
Broach
Screw
Set
Screw
Allen
Wrench
Assembly Instructions for Handles
Rev.D
Elizabethan
Classics
R
NOTE: TO BE INSTALLED ONLY BY QUALIFIED, LICENSED PLUMBER
CAUTION: DO NOT OVER TIGHTEN NUTS AND SCREWS - THIS CAN LEAD TO
STRIPPING OR CRACKING AND WILL VOID YOUR WARRANTY.
RM11-15