Drive Medical RTLBP1000 Owner's manual
- Category
- Breast pumps
- Type
- Owner's manual
This manual is also suitable for

SPEEDSUCTION
min
EXPRESSION
STIMULATION
ELECTRIC BREAST PUMP
P
ure
™
SINGLE CHANNEL
expressions
Item # RTLBP1000
INSTRUCTION
MANUAL
ADJUSTABLE SUCTION LEVELS
and suction cycles


1
Congratulations on your new bundle
of joy!
Thank you for choosing the Pure Expressions Single Channel
Electric Breast Pump. It has been known that the breast milk is the
best natural food for your baby. With our collaboration with the
breastfeeding experts and research with the lovely breastfeeding
mothers who are determined to give the best to their babies, just
like you, our products fulfill the breastfeeding mother’s needs
where the circumstance do not make breastfeeding possible.
Indications For Use
The electric breast pump RTLBP1000 is to express and collect
milk from the mother’s breast, to alleviate engorgement of the
breast, maintain the ability of lactation, and provide mother’s milk
for future feedings when separation of mother and baby occurs.
The device is intended for a single user, not for hospital use.
All parts that have direct contact with the milk and breast are
BPA free.
Features of Electric Breast Pump
RTLBP1000
• Automatic breast pump is controlled by a microcomputer chip. It
has 2-phase suction which mimics the sucking of a baby.
• Stimulation Phase: fast and fixed sucking rhythm to stimulate
milk flow, 9 levels for adjustment.
• Expression Phase: slow sucking rhythm to express your milk
eciently.
• Air and milk are separated by structure for milk backflow
protection.
• Quiet motor for discretion
• Small and lightweight, for easy portability ·2 power options to fit
your needs:

2
• AC/DC Adapter
• 4 AA Alkaline batteries
• With bottle adaptor, transferable for wide or standard neck bottle
• LCD Display shows the working state.
• All parts that have direct contact with the milk and breast are
BPA free.
Warnings and Precautions
Basic safety precautions should be taken when using electrical
products, especially around children.
WARNING: If you are a mother who is infected with Hepatitis B,
Hepatitis C or Human Immunodeficiency Virus (HIV), pumping
breast milk will not reduce or remove the risk of transmitting the
virus to your baby through your breast milk.
Read all instructions before using. When using any electrical
appliance, basic safety precautions should always be followed,
including the following:
WARNING:
• The power adaptor is a part of the breast pump.
• Always unplug electrical device immediately after use.
• Do not use while bathing.
• Do not place or store device where it can be submerged in water.
• Do not reach for device if it has fallen into water. Immediately
unplug from the electrical outlet.
• Do not leave device unattended when plugged into electrical
outlet.
• Do not position the breast pump such that it is dicult to
disconnect the adapter plug from the main power supply.
• Close supervision is necessary when used near children or
people with disabilities.
• Use product only for its intended use. Do not use attachments

3
not recommended by the manufacturer.
• Keep cord away from heated surface.
• Never use while sleepy or drowsy.
• Never drop or insert objects into any opening or tubing.
• Do not use outdoors or operate where aerosol products are
being used, or where oxygen is being administered.
• Always inspect power adapter and batteries prior to use for
damage and exposed wires. If damage is found, immediately
discontinue use of power adapter.
• Do not operate during transportation.
WARNING: To avoid health risk and reduce the risk of injury:
• This device is intended for single user only and should not be
shared between users.
• Do not drive while pumping.
• Never use while pregnant, as pumping can induce labor.
• Clean and sanitize all parts that come in contact with your breast
and breast milk prior to first use. Wash all parts that come in
contact with your breast and breast milk after every use.
• Inspect all appropriate pump components before each use.
• Do NOT continue pumping for more than 2 consecutive
pumping sessions if no results are achieved.
• Do not thaw frozen breast milk in a microwave or in a pan of
boiling water.
• If tubing becomes moldy, discontinue use and replace tubing.
• If breast milk backup occurs, clean the tubing before your next
pumping session.
WARNING: Avoid the following, which could lead to minor injury:
• DO NOT wrap cord around the adapter body.
• Use only the power adapter that comes with the Single Electric

4
Pure Expressions breast pump.
• Pump only with the breast pump in the upright position.
• DO NOT shorten the tubing.
• Make sure the voltage of the power adapter is compatible with
the power source.
• Plug the adapter into the breast pump first, then into the power
source.
• DO NOT use antibacterial or abrasive cleaners/detergents when
cleaning breast pump or breast pump parts.
• Never put the breast pump motor in water or sterilizer, as
permanent damage can result to the device.
• DO NOT attempt to remove the breast shield from your breast
while pumping. Turn the breast pump o and break the seal
between your breast and the breast shield with your finger,
then remove the breast shield from your breast.
• If pumping is uncomfortable or causing pain, turn the unit o,
break the seal between the breast and breast shield with your
finger and remove the breast shield from your breast.
NOTES:
Plastic bottles and component parts become brittle when frozen
and may break when dropped.
Take appropriate care in handling bottles and components.
Do not use the breast milk if bottles or components become
damaged.
When the breast pump is working, it won’t cause any electrical
problems on household appliances. But, high power household
appliances (such as food processing machines) and kitchen
appliances (such as microwave ovens) may aect the breast
pump’s normal working.
SAVE THIS INSTRUCTION MANUAL

5
PARTS GUIDE
Additional parts:
Membrane x 2
Drawstring bag x 1
01 Dust Cover x 1
02 Silicone Cushion x 1
03 Breast Shield body x 1
04 Cap Plug x 1
05 Cap x 1
06 Seal Ring x 1
07 Damper x 1
08 Grid x 1
09 Tubing Connector x 2
10 Adapter x 1
11 Tubing x 1
12 Pump unit x 1
13 Membrane x 1
14 Valve Body x 1
15 Bottle Stand x 1
16 Wide Neck Bottle 4oz x 1
17 Bottle Adapter x 1
18 Nipple x 1
19 Disc Collar x 1
20 Nipple Dust cover x 1
21 Bottle Lid x 1

6
Additional Accessories and Parts sold separately:
BP001 Breast Pump Carry Bag
BP002 Insulated Cooler Bag
BP004 6oz wide neck storage bole with cap
BP005 27MM Pump Kit w/out Insert
BP006 24MM Silicone Insert
BP007 Valve Set - pair w/membrane
BP008 Membrane (4pcs per bag)
BP009 Tubing set (2pcs)
BP0010 6V Power Adaptor for RTLBP1000
BP0013 31MM Pump Kit w/out Insert
BP0014 27MM Silicone Insert
BP0015 Feeding Nipple Set
BP0016 Base (base to hold boles)

7
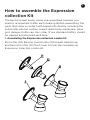
How to assemble the Expression
collection Kit
The electric breast pump comes pre-assembled; however you
need to re-assemble it after each cleaning. Before assembling, the
parts that come in contact with breast milk directly, including the
milk bottle, silicone cushion, breast shield body, membrane, valve,
grid, damper, bottle cap, disc collar (if use standard bottle), should
be cleaned and sterilized each time.
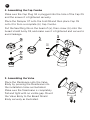
1. Assembling the Expression collection combo kit
Slot in the (02) Silicone Cushion into (03) breast shield body
and then slot in the (01) Dust Cover to form the complete (a)
Expression collection combo kit.

8
2. Assembling the Cap Combo
Make sure the Cap Plug 04 is plugged into the hole of the Cap 05
and the ensure it is tightened securely.
Place the Damper 07 onto the Grid 08 and then place Cap 05
onto it to form a complete (b) Cap Combo.
Put the Seal Ring 06 on the head of (a), then screw (b) onto the
breast shield body 03, and make sure it is tightened and secure to
avoid leakage.
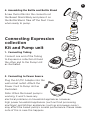
3. Assembling the Valve
Place the Membrane onto the Valve
Body by pressing the Membrane into
the installation holes as illustrated.
Make sure the Membrane is completely
flat and tight with no visible gap. Mount
the Valve Body to the Breast Shield
Body securely as illustrated.
a
03
06

9
4. Assembling the Bottle and Bottle Stand
Screw the bottle into the connector at
the Breast Shield Body and place it on
the Bottle Stand. Take o the Dust Cover
when ready to pump.
Connecting Expression
collection
Kit and Pump unit
1. Connecting Tubing
Connect one end of the Tubing
to Expression collection Kit and
the other end to the Pump Unit
as illustrated.
2. Connecting to Power Source
Plug the AC/DC Adapter into the
wall socket outlet. Attach the
Power Cord to Pump Unit as
illustrated.
Note: When the breast pump is
working, it won’t cause any
electrical problems on household appliances. However,
high power household appliances (such as food processing
machines) and kitchen appliances (such as microwave ovens)
may aect the breast pump’s normal performance. Please make
note of this in case this happens.

10
3. Using 4AA alkaline batteries (not included).
• Always replace all 4 AA Batteries at the same time.
• Remove all batteries if you are not going to use the breast pump
for a period of time.
• Properly dispose of all batteries, according to regulations for
environmental protection and recycling.
• Alkaline Batteries may present a risk of fire or chemical burn
if mistreated. Do Not disassemble any battery. Do not place
batteries near heat source or fire. Dispose of used batteries
properly. Do not dispose of batteries in fire. Keep away from
children.
Picture 1. Open the Battery Cover
Picture 2. Insert 4 new AA Alkaline Batteries in the correct
position as illustrated .The batteries should be placed above on
the silk ribbon, which is easy for removing the batteries if pulled
lightly.
Picture 3. Close and snap the cover back to the place.
Note: Batteries are not included. High capacity alkaline batteries
can be used for 2 to 3 cycles, each cycle time is 30min.

11
Pumping Instructions
1. Control Panel Description
1. Place the breast shield over your breast so that your nipple is
properly centered in the tunnel.
2. Take care not to kink the Tubing while pumping.
3. While the pump unit is connected to power source, press the
On/O Button to switch on the device.
4. The eective single breast pump operates in two modes:
Stimulation and Expression. Once the device is turned on, the
timer will start and the pump will begin. Simultaneously, the
30 minute timer will start and the pump will begin with the
Stimulation Phase Level 1 vacuum for 2 minutes before entering
into the Expression Phase at level 3 vacuum (factory default).
5. If your milk starts to flow earlier, press the Phase Button to
toggle between stimulation and expression. Make sure the milk
is flowing into the bottle properly. If you do not press the Phase
Button the pump will automatically switch to Expression Phase
after 2 minutes.

12
6. Press the Phase Button to toggle between stimulation and
expression.
7. To adjust the suction level to your comfort during pumping,
press the increase “+” button to increase suction or the “–“
button to decrease suction.
• In Expression Phase, the vacuum can be adjusted to the
desired level.
8. If you want to stop pumping, simply press On/O Button and
whatever Phase that the pump is working in, the pump will stop
working.
9. Timer – 30mins countdown to 0, then the pump will stop
working automatically.
NOTE: Once finished pumping, switch the breast pump o,
unplug it, and disassemble the pump kit items. Close the bottle
and store it for later use. Use bottle stand to prevent it from
tipping over.

13
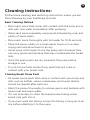
Cleaning Instructions:
Follow these cleaning and sanitizing instructions unless you are
told otherwise by your healthcare provider.
Basic Cleaning Method
• Rinse each piece that comes into contact with the body and or
milk with cool water immediately after pumping.
• Wash each piece separately using liquid dishwashing soap and
plenty of warm water.
• Rinse each piece thoroughly with hot water for 10-15 seconds.
• Place the pieces neatly on a clean paper towel or in a clean
drying rack and allow them to air dry.
• Avoid using cloth towels to dry the pump parts because they
can carry germs and bacteria that may contaminate the breast
milk.
• Once the pump parts are dry, assemble the pump before
storage or use.
• Try not to touch the inside of any parts that will come in
contact with your breast milk.
Cleaning Breast Pump Parts
• All breast pump parts that come in contact with your body and
milk, such as bottles, valves, membranes and breast shields,
should be cleaned after each use.
• Wash the pieces thoroughly to remove germs and bacteria with
liquid soap and warm water.
• It is not necessary to clean the breast pump tubing unless
breast milk gets into it.
• If you must wash the tubing, ensure the tubing is hung up to air
dry before attaching it to the pump.

14
Cleaning the Electrical Pump Unit:
• Electrical units, which house the motor and batteries, should be
wiped with a clean paper towel or soft cloth after each use.
• The electrical unit should never be put into water or other
liquids for cleaning. It should also never be sterilized in a
microwave sterilizer.
Tubing Care Instructions:
• Inspect tubing after each pumping session for condensation
and/or milk.
• Do not boil the Tubing and/or the Tubing connector.
• Wipe the outside of the Tubing with a clean, damp (not wet)
cloth. Avoid getting water or other liquid inside the Tubing.
• If liquids are found inside Tubing, rinse the Tubing with clean
hot water. Hang up to AIR DRY COMPLETELY BEFORE USING.
• Do Not insert any object into the Tubing.
Note: Before each use, visually inspect the individual
components for cracks, chips, tears, discoloration or
deterioration as they may aect the eciency of the Electric
Breast Pump RTLBP1000. In the event that damage to the device
is observed, please discontinue use till the parts have been
replaced.

15
Guidelines for Storing and Thawing
Breast milk
You should store and thaw your breast milk correctly. This is the
only way you can be sure that all the important nutrients are
preserved and bacterial contamination is minimized.
Check with your hospital for specific instructions.
Breast Milk Storage (For Healthy Term Babies)*
Freshly Expressed
Breast Milk
Thawed Breast Milk
(Previously Frozen)
Room Temperature
Up to 77°F or 25°C;
6-8 hours
6-8 hours; Do not
refreeze after thawing
Insulated Cooler
Bag (Keep ice packs
in contact with milk
containers at all times;
limit opening the
cooler bag)
5-39°F or -15-4°C; up
to 24 hours
24 hours; Do not
refreeze after thawing
Refrigerator
(Store milk towards
back of the
refrigerator, where
temperature is most
constant)
39°F or 4°C; up to
5 days
10 hours; Do not refreeze
after thawing
Freezer
(Store milk towards
back of the freezer,
where temperature is
most constant)
-4°F or -20°C; 6-12
months
Do not refreeze
after thawing!
*This information is for use as a guideline only. For more information on proper
handling and storage of breastmilk, visit www.fda.gov, www.aap.org, or
www.cdc.gov, or consult your lactation consultant.

16
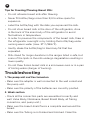
Tips for Freezing/Thawing Breast Milk:
• Do not refreeze breast milk after thawing.
• Never fill bottles/bags more than 3/4 to allow space for
expansion.
• Label the bottle/bag with the date you expressed the milk.
• Do not store breast milk in the door of the refrigerator, store
in the back of the main body of the refrigerator to avoid
fluctuations in temperature.
• In order to preserve the components of the breast milk, thaw in
the refrigerator overnight or by holding the bottle/bag under
running warm water (max. 37°C/98.6°F).
• Gently shake the bottle/bag to blend any fat that has
separated.
• Milk stored for longer durations in the ranges listed is safe, but
some of the lipids in the milk undergo degradation resulting in
lower quality.
• Do not thaw frozen breast milk in a microwave oven or in a pan
of boiling water (danger of burning).
Troubleshooting
1. The pump unit can’t be turned on
• Make sure the adapter is well connected to the wall socket and
the pump unit.
• Make sure the polarity of the batteries are correctly posited.
2. Weak suction
• Check all the connection parts are assembled correctly and
well: Valve Body, Membrane, Breast Shield Body, all Tubing
connectors, and pump unit.)
• Make sure the breast shield forms a complete seal around the
breast.
• Make sure the Tubing is not kinked and blocked. Clean the

17
Tubing if there is something small inside, and make the Tubing
dry before using.
• Make sure the Cap Plug is installed correctly.
• Make sure the Seal Ring is assembled.
3. No suction
• Replace the distorted membrane for a new one.
• Make sure the Cap Plug is installed correctly.
• Make sure the Seal Ring is assembled correctly, if damaged,
replace with a new one.
• Make sure all the plastic parts are not damaged by high
temperature sterilizing.
4. Milk overflow
• If milk gets into the Tubing, Damper or Grid, turn o the pump
and unplug from the power source immediately, clean the Tubing,
Damper or Grid according to the cleaning instructions.
• If Damper or Grid is damaged, replace with a new one.
• Make sure your sitting position is appropriate for pumping.
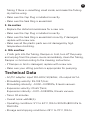
Technical Data
• AC/DC adapter: input 100-240V, 50/60Hz, .2A output 6V 1A.
• Stimulating velocity: 95~105 T/min;
Stimulating intensity: -0.002~-0.019MPa, 9 levels vacuum.
• Expression velocity: 20~65 T/min;
Expression intensity: -0.011~-0.033MPa, 9 levels vacuum.
• Timer: 30 minutes.
• Overall noise: ≤60dB(A).
• Operating conditions: 5°C to 40°C ,15% to 90% RH,800 hPa to
1060 hPa.
• Storage and shipping conditions:-25°C to 70°C ,15% to

18
93% RH,700 hPa to 1060 hPa.
• Classification: type BF applied part; IP32; intermittent operating.
• Electric shock protection: Class II
Key to Box Symbol:
Class II equipment
Type BF applied part
IP32 Protected against access to hazardous parts with
a tool and against vertically falling water drops when
enclosure tilted up to 15°
Polarity of d.c. power connector
Direct current
Warning: Do not immerse in water
Refer to instruction manual / booklet
Disposal: Do not dispose this product as unsorted
municipal waste. Collection of such waste separately
for special treatment is necessary.
Manufactured For:
Medical Depot (dba Drive Medical)
99 Seaview Blvd.
Port Washington, NY11050
(877) 224-0946
www.drivemedical.com
Made in China
IP32
Page is loading ...
Page is loading ...
Page is loading ...
Page is loading ...
Page is loading ...
Page is loading ...
-
 1
1
-
 2
2
-
 3
3
-
 4
4
-
 5
5
-
 6
6
-
 7
7
-
 8
8
-
 9
9
-
 10
10
-
 11
11
-
 12
12
-
 13
13
-
 14
14
-
 15
15
-
 16
16
-
 17
17
-
 18
18
-
 19
19
-
 20
20
-
 21
21
-
 22
22
-
 23
23
-
 24
24
-
 25
25
-
 26
26


Drive Medical RTLBP1000 Owner's manual
- Category
- Breast pumps
- Type
- Owner's manual
- This manual is also suitable for
Ask a question and I''ll find the answer in the document
Finding information in a document is now easier with AI
Related papers
Other documents
-
Crane EE-9002 Owner's manual
-
-
Medela Symphony/Lactina Double Breastpump Kit User manual
-
-
-
-
-
Medela 67186 User manual
-
-
Chicco Duo Bottle User manual