
Caution! Federal (USA) law restricts this device
to sale by or on the order of a dentist.
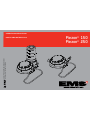
Piezon
®
150
Piezon
®
250
NAUDOJIMO INSTRUKCIJOS
OPERATION INSTRUCTIONS

1A
1B
2
3
9
12
13
14
15 16
4
6
5
6
7
7
5
8
Piezon 250Piezon 150
10
11
17
Y
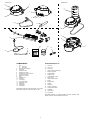
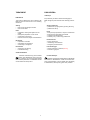
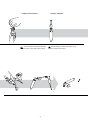
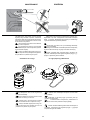
1 Prietaisas
1A Piezon 150
1B Piezon 250
2 Vandens tėkmės reguliavimas
3 Maitinimo mygtukas
4 Antgalio laikiklis
5 Antgalio jungtis
6 Išorinė maitinimo jungtis
7 Pedalo jungtis
8 Vandens žarnos jungtis
9 Butelis
10 Antgalio laidas
11 Antgalis
12 Maitinimas
13 Pedalas (2 žingsniai)
14 Vandens tiekimo žarna
15 Antgaliukai
16 CombiTorque
17 I šorinis filtras
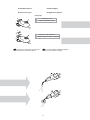
EMS tiekia įrenginius su įvairiais priedais. Pakuotės sudėtinių dalių
sąraše nurodytos visos konkretaus paketo dalys.
COMPONENTS
1 Unit
1A Piezon 150
1B Piezon 250
2 Water ow rate adjustment
3 Power knob
4 Handpiece holder
5 Handpiece connection
6 External power supply connection
7 Foot pedal connection
8 Water hose connection
9 Bottle
10 Handpiece cord
11 Handpiece
12 Power supply
13 Foot pedal (2 steps)
14 Water supply hose
15 Scaling tips
16 CombiTorque
17 External lter
EMS supplies units with various accessories. The "Packing
list" shows exactly what is included with your unit.
1

,
Dėkojame, kad įsigijote naują EMS produktą. Jis
atitinka aukščiausius kokybės ir saugumo reikalav-
imus.
Norint gauti geriausią naudą iš šio aukštos
klasės odontologinio produkto ir užtikrinti kad jis
tarnautų ilgai, prieš pradedant naudoti arba ek-
sploauojant, atidžiai perskaitykite šį vadovą.
s
Šis produktas naudojimas skirtas tik kvalifikuo-
tam vartotojui odontologijoje pagal galiojančius
sveikatos ir saugos taisykles, avarijų prevencijos
priemones ir laikantis šių naudojimo instrukcijų.
Produktas turi būti paruoštas ir prižiūrimas, tik tų
asmenų, kurie buvo instruktuoti apie infekcijų
apsaugą, asmens apsaugą ir pacientų saugą.
Netinkamai naudojant (pvz., nesilaikant higienos
ar priežiūros), nesilaikant mūsų nurodymų ar
naudojant kitus priedus ir atsargines dalis, kurios
nėra patvirtintos EMS, garantija bei kitos pre-
tenzijos negalios.
Produktas buvo sukurtas ir skirtas tikslinei grupei
“odontologai, dantų higienistai, odontologijos
darbuotojai (profilaktika) ir dantų padėjėjai”.
Daugiau informacijos apie įvairius instru-
mentus ir jų naudojimą žr. naudojimo instrukci-
jas, kurios pateikiamos su “Piezon” sistemomis
arba gali būti gaunamos iš jūsų šalies produktų
platintojo.
DEAR CUSTOMERS,
Thank you for buying a new EMS product. This
device meets the highest quality and safety
standards.
In order to get the best out of this high-end
dental product and ensure the longest working
life possible, please read this manual carefully
before using or maintaining the product.
This product is only intended for qualied use
in dental medicine according to the applicable
health and safety regulations, accident prevention
measures and in observance of these instructions
for use. The product must only be prepared and
maintained by persons who have been instructed
in infection protection, personal protection and
patient safety. Improper use (e.g. due to lack of
hygiene or maintenance), non-compliance with
our instructions or the use of accessories and
spare parts not approved by EMS invalidates all
claims under warranty and any other claims.
The product has been developed and designed for
the target group “dentists, dental hygienists, dental
employees (prophylaxis) and dental assistants”.
For further details on the various instru-
ments and their scopes of application, please refer
to the operation instructions supplied with your
Piezon system or available from the distributor in
your country.
ŠĮ Ą
Šių instrukcijų iliustracijos atvaizduoja
Piezon 150 (nebent nurodyta kitaip), tačiau
šios instrukcijos taip pat taikomos Piezon
250.
Ši naudojimo instrukcija privalo užtikrinti teis-
ingą montavimą ir naudojimą mūsų produkto.
Visada laikykite šį dokumentą po ranka.
Prašome atidžiai perskaityti šią naudojimo in-
strukciją, nes ji paaiškina svarbiausias detales
ir procedūras. Atkreipkite ypatingą dėmesį į
saugos priemones.
Netinkamas naudojimas gali sugadinti gaminį ir
taip sukelti grėsmę ir pavojų pacientams, varto-
tojams ir tretiesiems asmenims.
Instrukcijos apie sistemos komponentus
yra pateikiamos atskirai atitinkamose naudo-
jimo instrukcijose. Prieš naudojant šį produktą
iš pradžių perskaitykite naudojimo instrukcijas
esančias priei kiekvieno iš komponentų.
Nedvejodami kreipkitės į vietinį platintoją EMS
dėl papildomos informacijos.
Šiam produktui reikia ypatingų atsargumo
priemonių, susijusių su elektromagnetiniu sud-
erinamumu, ir turi būti įdiegtas ir pradėtas ek-
sploatuoti pagal “Elektromagnetinio suderina-
mumo” vadovą.
ABOUT ThIS MANUAL
The illustrations in these instructions
represent the Piezon 150 (unless otherwise
specied); however, these instructions also apply
to the Piezon 250.
These operating instructions are to ensure the
correct installation and use of this product. Always
keep this document close at hand.
Please read these operating instructions carefully
as they explain the most important details and
procedures. Please pay special attention to the
safety precautions.
Misuse can damage the product and hence cause
risks and hazards for patients, users and third
parties.
Instructions concerning the components of
the system are provided separately in the relative
instructions for use. Read the instruction manuals
originally delivered with each of the components
before using this product. Do not hesitate to
contact your local EMS dealer for further in-
formation.
This product needs special precautions
regarding electromagnetic compatibility and needs
to be installed and put into service according to
the "Electromagnetic compatibility" manual.
2

Norint išvengti žmonių sužalojimo bei Piezon150 ir
250 sugadinimo,
reikia atsižvelgti į perspėjimus ir pastabas:
Sužalojimo pavojus pacientui arba var-
totojui
sės
Turto sugadinimo ar žalos aplinkai pa-
vo-jus
ėsį
Naudinga informacija ir patarimai
ž
ž
Atkreipkite dėmesį, kad šio vadovo angliška
versi-ja yra pagrindinė, kurios pagrindu yra
paruoštos išverstos versijos. Esant neatitikimų,
pirmenybė
teikiama angliškam tekstui.
Mes mielai atsakysime į jūsų klausimus ir
išklausysime pasiūlymų. Iškilus techninėms
problemoms, mes teikiame paramą. Prašome
skambinti savo patvirtintam EMS remonto centrui
arba savo platintojui.
Linkime jums didžiausios sėkmės!
EMS
To prevent possible patient or user injury or
damage to the Piezon150 and 250, please note
the corresponding directives:
Danger
Risk of patient or user injury
Risk of damage to the device or envi-
ronmental harm
Useful additional information and hints
Note that the English version of this manual is
the master from which the translations derive. In
case of any discrepancy, the binding version is
the English text.
We would be pleased to answer your questions
or listen to your suggestions. We do, of course,
provide support in case of technical problems.
Please call your approved EMS repair center or
your dealer directly.
We wish you lots of success!
EMS
TURINYS
Procedūra .................................................... 4
Indikacijos ................................................... 4
Kontraindikacija . ........................................ 4
Montavimas ir prijungimas ........................ 5
Siurblio diegimas ( Piezon 250 ) . ............ 5
Įrenginio prijungimas................................... 6
Elektros saugos priemonės . ..................... 7
Pasiruošimas procedūrai ........................... 8
Režimas ir instrumentai ............................. 8
Antgalio prijungimas.................................... 8
Instrumentų pritvirtinimas . ........................ 9
Butelio prijungimas ( Piezon 250 ) ........ 10
Leistinų skysčių sąrašas. ......................... 11
Darbas su prietaisu .................................. 12
Ultragarso galios nustatymas.................. 13
“ Perio “ režimas ....................................... 14
“ Scaling “ režimas ................................... 15
Skysčio tekėjimo srauto nustatymas . ... 16
Piezon antgalis LED ( Papildomai užsakant) . ....17
Pedalo funkcijos . ...................................... 18
Pasibaigus procedūrai ............................. 19
Grandinės plovimas................................... 20
Antgalio išardymas ................................... 21
Valymas ir sterilizavimas ........................ 22
Valymas . ........................................................ . ......... 22
Pakavimas sterilizacijai ........................... 22
Sterilizacija ................................................ 22
Butelio ir prietaiso valymas .................... 22
Grandinės dezinfekavimas . .................... 24
Priežiūra . ................................................ .. 25
O- rings (tarpinių) patikrinimas .............. 26
Pakeitus siurblį ( Piezon 250 ) ............... 26
Saugumo priemonės ................................ 26
Laikymas . ................................................... 27
Utilizavimas ................................................... ........... 28
Garantija ........................................................ . ......... 28
Priedai .................................................... ... 28
EMS paslaugos .................................... ... 29
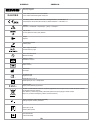
Simboliai ........................................................ . ......... 66
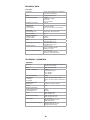
Techniniai duomenys ............................... 30
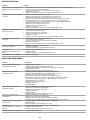
Problemų sprendimas .............................. 31
CONTENTS
Treatment 2
Indications ..........................................................
Contraindication .......................................................................................................
Installation and connection
Installing the pump (Piezon 250) .......................
Connecting the unit . ..........................................
Electrical safety precautions ..............................
Preparing for treatment . ............................................................................................................................................
Mode and instruments .......................................
Connecting the handpiece .................................
Attaching the instruments ..................................
Installing the bottle (Piezon 250) .......................
Solutions compatible with the circuit .................
Operating the unit . ......................................................
Setting the ultrasound power .............................
"Perio" mode . .....................................................
"Scaling" mode ...................................................
Setting the liquid flow rate .................................
Piezon handpiece LED (Option) ........................
Foot pedal functions . ..........................................
End of treatment .................................................
Circuit washing . ..................................................
Handpiece disassembly .....................................
Cleaning and sterilizing . .....................................
Cleaning . ............................................................
Packaging for sterilization . .................................
Sterilization . ........................................................
Cleaning the bottle and the unit .........................
Disinfecting the circuit . .......................................
Maintenance. ......................................................
Verification of O-rings .
Replacing the pump (Piezon 250) ......................
Safety precautions . ............................................
Storing the product . ...........................................
Disposal . ............................................................
Warranty . ............................................................
Accessories. .......................................................
EMS Service . .....................................................
Symbols . ............................................................
Technical data . ...................................................
Troubleshooting . ......................................................
3

Ū
Šis produktas yra skirtas naudoti odontologijoje su
EMS ultragarso priemones dėl toliau išvardytų indikaci-
jų:
ųš
• pašalinimas supragingivalinių apnašų (akmenų)
• pašalinimas dėmių
• šaknų kanalų apruošimas, valymas ir drėkinimas
• šaknų kanalų retrogrdinis paruošimas
• gutaperčos kondensavimas
• vainikėlių, tiltų ir restauracijų pašalinimas
• ertmių paruošimas
• restauracijų cementavimas
• amalgamų kondensavimas
• Akmenų šalinimas ir šaknies planing
• Periodonto gydymas
Ultragarso virpesiai gali trukdyti tinkamai veikti širdies
stimuliatoriui ir defibriliatoriui. Todėl mes rekomenduo-
jame, kad pacientams, kurie turi širdies ritmo reguliatorių
ar defibriliatorių neturėtų būti gydomi šiuo produktu.
TREATMENT
This product is designed for use in dentistry with
EMS ultrasound instruments for the following
indications:
Scaling
• Removal of supragingival calculus
• Removal of stains
• Preparation, cleaning and irrigation of root
canals
• Retrograde preparation of root canals
• Condensing gutta-percha
• Removal of crowns, bridges and restorations
• Preparation of cavities
• Cementation of restorations
• Condensing of amalgams
• Scaling and root planing
• Periodontal therapy
Ultrasonic oscillations may prevent cardiac
pacemakers and debrillators from functioning
properly. Therefore, we recommend that patients
with a cardiac pacemaker or a debrillator should
not be treated with this product.
4

J
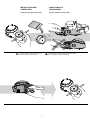
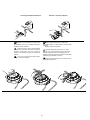
Prieš naudojant įrenginį užtikrinkite, kad siurblio
pagrindinis dangtis yra tinkamai uždarytas.
INSTALLATION AND
CONNECTION
Ensure that the pump head cover is
correctly closed, before using the device.
5

Visada patikrinkite, ar įrenginys yra įrengtas saugioje ir
stabilioje padėtyje. Staiga patraukus už laido ar antgalio, galimas
kritimas gali sužaloti pacientą ir vartotoją, ir gali pažeisti įrenginį.
Kad išvengtumėte įrenginio sugadinimo, įsitikinkite, kad elek-
tros energijos tiekimo įtampa atitinka vietinę tinklo įtampą.
Naudokite prietaisą tik FI apsaugotame elektros tinkle (FI =
liekamosios srovės apsauga).
JAV ar Kanadoje: prisijunkite tik prie ligoninės lizdo.
Prieš prijungdami žarną prie vandentiekio įdiegti išorinį vanden
filtrą.
Prijunkite įrenginį prie vandens tiekimo su originalia EMS vandens
žarna tiekiama su produktu.
Rekomenduojama naudoti nepriklausomą vandens tiekimą.
Įrengini riungimas
Always check that the unit is installed in a safe
and stable position. A possible fall may suddenly pull
on the cord and the handpiece, hurting the patient
and the user, and damaging the unit.
Check that the rated voltage of the power
supply corresponds to the local line voltage to
prevent damaging the unit.
Use the unit only in a FI protected mains supply
(FI = Residual current protection).
For USA or Canada: connect only to a Hospital
Grade outlet.
Install the external lter of water before connecting
the hose to the water supply.
Connect the unit to a water supply with the original
EMS water hose supplied with your product.
It is recommended to use an independent
water supply.
BAR
PSI
a
b
c
1
2
6

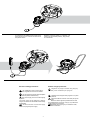
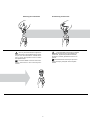
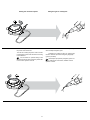
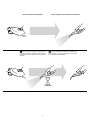
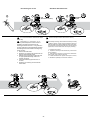
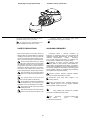
Norėdami prijungti pedalą ir maitinimą prie
Piezon 250, apverskite prietaisą, kaip parody-
ta nuotraukose.
To connect the foot pedal and the power supply
to the Piezon 250, turn over the unit as shown in
the pictures above.
ė
Negalima su įrenginiu naudoti kitų įrenginių
ar priedų, kurie netiekiami prie įrenginio.
Negalima liesti antgalio laido jungties ir tuo pačiu
metu paciento.
Maitinimo šaltinis tvirtinant neturi būti per stipriai
priveržtas.
Maitinimo šaltinis gali būti pastatomas ant stalo
arba pakabinamas ant sienos. Taigi jis yra prieinamas
ir gali būti lengvai nuimamas.
Norėdami atjungti įrenginį nuo maitinimo tinklo,
ištraukite iš maitinimo.
No modication of the unit and the ac-
cessories supplied with the unit are allowed.
Do not touch the connector of the handpiece
cord and the patient simultaneously.
The power supply must not be xed tightly
by screw.
The power supply can be placed on a table or
hung on the wall. So it is accessible and can easily
be detached.
To disconnect the unit from the supply
network, unplug the power supply.
7

Akmenų šalinimas
Venkite naudoti HVE (didelės apimties evakuacijos),
siekiant užtikrinti pakankamą danties ir instrumento aušinimą.
Instrumentas įkaista greičiau, jei drėkinimo srautas yra
nepakankamas.
Instrumentai: skaitykite “Piezon Systems” vadovą.
Režimas ir instrumentai
ASIRUOŠIMAS ROCDŪRAI
Scaling
Avoid using the HVE (high volume evacu-
ation) to ensure sufficient cooling of the tooth
and the instrument. The instrument heats up
quickly if the irrigation ow rate is not sufcient.
Instruments: please refer to the "Piezon
Systems" manual.
PREPARING fOR TREATMENT
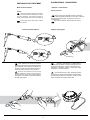
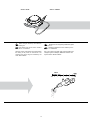
Antgalio prijungimas
Išvalykite, dezinfekuokite ir sterilizuokite šio
produkto atskiras detales ir priedus prieš kiekvieną nau-
dojimą. Žiūrėkite skyriuje “Valymas, dezinfekavimas ir
sterilizacija”. Nesterilios detalės ir priedai gali sukelti
bakterines ar virusines infekcijas.
Nusausinkite pučiant jungtis, pašalindami galimą
buvimą skysčio, užtikrinti tinkamą elektros kontaktą. Nieka-
da nepūskite suspausto oro į drėkinimo jungtis, nes taip
galite nepataisomai sugadinti vidines dalis.
Clean, disinfect and sterilize the different
pieces and accessories of this product before each
use. Please refer to the "Cleaning, disinfecting and
sterilizing" chapter. Non-sterile pieces and acces-
sories may cause bacterial or viral infections.
Blow dry the connections to remove the
possible presence of liquid to ensure a proper
electrical contact. Never blow compressed air in
the irrigation connections as this will irremediably
damage internal parts.
8

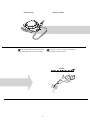
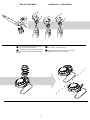
Instrumentų pritvirtinimas
Priveržiant EMS instrumentą ant antgalio
naudokite tik CombiTorque. Kai prietaisas yra
prisukamas, papildomai pasukite ketvirtadalį
apsisukimo, kad būtų pakankamas sukimo mo-
mentas.
Dėl išsamesnės informacijos apie instru-
mentų naudojimą, skaitykite “Piezon Sytems”
vadove.
Use only the CombiTorque to tighten the
EMS instrument on the handpiece to the correct
torque. Once the instrument is screwed all the
way in, give an extra quarter of a turn to obtain
the required torque.
For further details on the use of the instru-
ments, please refer to the "Piezon Sytems"
manual.
9

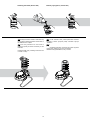
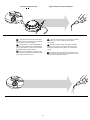
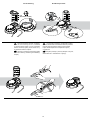
Prieš uždedant butelį visada patikrinkite buteliuko
dangtelio O-žiedo (tarpinės) būklę. Žiūrėkite skyriuje
“Priežiūra”.
Naudokite matuokles, esančias ant butelio reguliuoti
tirpalo kiekį, reikalingą gydymui (procedūrai).
Uždėkite butelį pasukdami tol, kol jis sustos.
Always check the condition of the bottle cap
O-ring before installing the bottle. Please refer to
the "Maintenance" chapter.
Use the graduations on the bottle to
adjust the quantity of solution necessary for the
treatment.
Install the bottle using a rotating movement until
it comes to a stop.
10

Leistinų skysčių sąrašas
Nesuderinamas maišymas
Įvairūs dezinfekavimo tirpalai gali būti naudojami
procedūros (gydymo) metu. Tarp šių tirpalų gali atsirasti
cheminės reakcijos ir sugadinti įrenginį.
Išplaukite skysčio grandinę 20 sekundžių distiliuotu
(arba demineralizuotu ) vandeniu pries naudojant skirtingus
dezinfekcinius tirpalus (skaitykite skyriuje “Pasibaigus
procedūrai”).
Deineavim iralai rcedūrai
• Chlorheksidinas (≤ 0.3%)
• Fiziologinis vanduo (NaCl ≤ 0.9%)
• Vandenilio peroksidas (H2O2 ≤ 3%)
• Karbanilidai (Carbanilides)
• Quaternary ammonium compounds
• Citrinos rūgštis
• Aromatinė esencija
• Etanolis
Pavyzdžiai paplitusių produktų
BacterX
®
pro / Triclosan / Listerine
®
/ Alodont
®
/ Meridol
®
/ BreathRx
®
/ CloSYS™ / Scope
®
/ Cepacol
®
/
Plvim cil deineavim iralai
• EMS Ultra Clean (H
2
O
2
6%)
• Vandenilio peroksidas (H
2
O
2
5%)
• Sterilox (hipochlorito rūgštis)
Prašome atidžiai perskaityti dezinfekavimo
produktų naudojimo instrukcijas.
Šiuos preparatus įsigydami ir vartodami
vadovaukitės jūsų šalyje galiojančiais standartais.
Different disinfecting solutions can be used
during treatment. Chemical reactions might occur
between these solutions and damage the unit.
Wash the liquid circuit for 20 seconds with distilled
(or demineralized) water before using a different
disinfecting solution (please refer to the "End of
treatment" chapter).
• Chlorhexidine (≤ 0.3%)
• Physiological water (NaCl ≤ 0.9%)
• Hydrogen peroxide (H
2
O
2
≤ 3%)
• Carbanilides
• Quaternary ammonium compounds
• Citric acid
• Aromatic essence
• Ethanol
BacterX
®
pro / Triclosan / Listerine
®
/ Alodont
®
/ Meridol
®
/ BreathRx
®
/ CloSYS™ / Scope
®
/
Cepacol
®
/.....
• EMS Ultra Clean (H
2
O
2
6%)
• Hydrogen peroxide (H
2
O
2
5%)
• Sterilox (hypochlorous acid)
Please read the instructions for use of the
disinfecting products.
Please refer to standards applicâble in your
country regarding the purchase and use of these
products.
11

ARA RA
Norėdami įjungti įrenginį pasukite rankenėlę pa-
gal laikrodžio rodyklę.
Dvi kontrolinės lemputės užsidegs. Viena apšviečia
nustatymo indeksą ir rodo, kad įrenginys yra įjungtas.
Kita apšviečia Perio galios intervalą.
OPERATING ThE UNIT
To switch on the unit turn the power knob
in a clockwise direction.
Two control lamps light up. One lights the setting
index to indicate that the unit is switched on. The
other lights the Perio power range.
MAX.PERIO
4
5
MAX.ENDO
4
5
12

MAX.PERIO
8
6
5
4
3
7
MAX
Ultragarso galios nustatymas
Naudodamiesi besisukančia rankenėle padidėja
arba sumažėja ultragarso galia.
Prietaisas turi nustatymo ribas nuo “ON (įjungta)”
iki “MAX” siekiant optimizuoti ultragarso galią pagal
gydymo procedūrą.
Informacijos apie optimalų ultragarsu galios nus-
tatymą kiekvienam instrumentui, ieškokite “Piezon
Systems” vadove.
Use the rotating knob to increases or decreases
the power of the ultrasound.
The unit has a setting range from "ON" to "MAX"
to optimize the power of the ultrasound according
to the treatment.
For information on optimal setting of the
ultrasound power for each instrument, please refer
to the "Piezon Systems" manual.
MAX.PERIO
4
5
13

MAX. PERIO
6
4
3
2
ON
OFF
5
7
”Perio” režimas
Naudojant Perio antgaliuką, didžiausias galios
nustatymas 4.
Nustatymų diapazonas “Perio” režime yra nuo
“On” iki “4” maksimaliai.
Kai “Perio” režimas įjungtas (ON), šviesos diodas rodo
ultragarso galios nustatymą. Maksimali intervalo riba
žymima ženklu “MAKS. PERIO”.
When using an Perio tip, the maximum
power setting is 4.
The setting range for the "Perio" mode is
from "ON" to "4" maximum.
When the "Perio" mode switch ON, a led indicates
the setting of the power for ultrasounds. The
maximum limit of the range is indicated by the
mark "MAX. PERIO".
ON 456782 3 MAX
PERIO
14

ON
MAX
8
7
6
OFF
2
”aling” režimas
”Scaling” režimas naudoja visą ultragarso
galios intervalą nuo “ON” iki “MAX”.
The "Scaling" mode uses the entire power
range for the ultrasounds, from "ON" to "MAX".
SCALING
ON 4 5 6 7 82 3 MAX
15

MAX.PERIO
4
5
kysčio tekėimo srauto nustatymas
Skysčio srauto kiekvienam instrumentui optimalūs
nustatymai yra nurodyti “Piezon Systems” darbo
instrukcijoje.
Niekada nedirbkite sausai, kad dantys neįkaistų,
nebent jei instrumentas yra skirtas būtent šiam tikslui.
Instrumento galiukas iš karto įkaista, kai naudojamas
sausas.
Dėl papildomos informacijos apie instrumentus, tin-
kamus naudoti “”DRY WORK” (sausas darbas) režimu,
ieškokite “Piezon Systems” vadove.
Optimal settings for the liquid ow rate for
each instrument are indicated in the operating
instructions of the "Piezon Systems".
Never work dry to avoid heat damage on
the tooth, unless the instrument is intended speci-
cally for this purpose. The tip of the instrument
immediately heats up when used dry.
For further information concerning instru-
ments usable in "DRY WORK" mode, please refer
to the "Piezon Systems" manual.
16

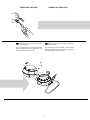
Piezon antgalio LED užsidega, kai pedalas yra
aktyvuojamas. Jis lieka įjungtas apie 20 sekundžių
po to kai atleidžiamas pedalas.
Pieon antgalis LED Paildomai užsaant
The Piezon handpiece LED lights up
when the foot pedal is activated. It remains lit for
a duration of 20 seconds after the foot pedal is
released.
užių
17

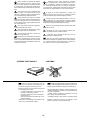
EN
LT
EN
LT
1
1
2
2 žingsniai
Pedalo funkcijos
Ultragarsas su skysčiu
Po pirmo naudojimo, išlaikykite nuspaustą
pedalą, kol vanduo išeina iš antgalio.
Skysčio purškimas + Šviesa
Skysčio purškimas + Šviesa + Ultragarsas
Upon rst use, keep pressure on the pedal
until the water goes out off the handpiece.
Liquid spray + Light
Liquid spray + Light + Ultrsounds
18

PU PŪ
Išvalykite instrumentą ir CombiTorque su
tekančiu vandeniu, prieš dezinfekciją.
Išvalykite prietaisą ir priedus (skaitykite “Valymas,
dezinfekavimas ir sterilizavimas” skyriuje).
END Of TREATMENT
Clean the instrument and the CombiTorque
with running water before disinfection.
Clean the unit and the accessories (please
refer to the "Cleaning, disinfecting and sterilizing"
chapter).
19
Page is loading ...
Page is loading ...
Page is loading ...
Page is loading ...
Page is loading ...
Page is loading ...
Page is loading ...
Page is loading ...
Page is loading ...
Page is loading ...
Page is loading ...
Page is loading ...
Page is loading ...
-
 1
1
-
 2
2
-
 3
3
-
 4
4
-
 5
5
-
 6
6
-
 7
7
-
 8
8
-
 9
9
-
 10
10
-
 11
11
-
 12
12
-
 13
13
-
 14
14
-
 15
15
-
 16
16
-
 17
17
-
 18
18
-
 19
19
-
 20
20
-
 21
21
-
 22
22
-
 23
23
-
 24
24
-
 25
25
-
 26
26
-
 27
27
-
 28
28
-
 29
29
-
 30
30
-
 31
31
-
 32
32
-
 33
33


EMS PIEZON 150 Operation Instructions Manual
- Type
- Operation Instructions Manual
- This manual is also suitable for
Ask a question and I''ll find the answer in the document
Finding information in a document is now easier with AI
Related papers
-
EMS PIEZON MASTER 700 Operation Instructions Manual
-
-
-
-
EMS AIRFLOW Prophylaxis Master Operating instructions
-
-
-
-
-
Other documents
-
 Miracle-Gro MGCPA38050FM Installation guide
-
DENTSPLY 57H User manual
-
Hadewe BS-24 User manual
-
W&H S-11 L G Instructions For Use Manual
-
NSK PER-BA-P Operating instructions
-
Acteon Piezotome 2 LED User manual
-
 BEYES Comfort-Sonic P6 Plus Instructions For Use Manual
-
Sharper Image UV Self-Cleaning Bottle Owner's manual
-
Dentsply Sirona Purevac HVE SYSTEM KIT Operating instructions
-
Zimmer enPulsPro User manual

