Page is loading ...

Model: DCS-2195
21”(54cm) COLOR TELEVISION
WITH DVD PLAYER AND DVB-T
User Manual
Congratulations for purchasing this combined TV DVD player and DVB-T.
To get the best use from it please read this manual carefully and retain for
future use
.

1
CONTENTS
1 Warning and safety precautions………………………………………………………………………..………..3
2 Location of controls……………………………………………………………………………………..………...4
3 Television instauration connect antenna…………………………………………………………………..…...5
4 Remote Control Battery installation………………………………………………………..………...………....5
5 Remote control unit………………………………………………………………………….……..….……….....6
6 Operating your TV DVD and DVB-T
TV button operation
6-1 power/standby………………………………………………………………………………………….…..8
6-2 program up/down…………………………………………………………………………………………..8
6-3 Direct access tuning……………………………………………………………………………………….8
6-4 -/--…………………………………………………………………………………………………………....8
6-5 Volume control……………………………………………………………………………………………..7
6-6 TV/AV/DVB/DVD selection……………………………………………………………………………….8
6-7 mute…………………………………………………………………………………………………………9
6-8 recall………………………………………………………………………………………………………...9
6-9 p.p …………………………………………………………………………………………………………..8
6-10 sleep ………………………………………………………………………………………………………9
6-11 swap……………………………………………………………………………………………………….9
7 TV MENU
7-1 PICTURE MENU……………………………………………………………………………………..….….10
7-2 sound MENU………….…………………………………………………………………………..……….10
7-3 setup MENU…………………………………………………………………………………………….…10
7-4 program exchange MENU……………………………………………………………………..……….….11
7-5 tune MENU………………………………………………………………………………………….……....12
8 DVD BASIC OPERATIONS
8-1 preparations…………………………………………………………………………………………...…….13
8-2 open and close…………………………………………………..………………………………………….13
8-3 pause/step……………………….………………………………………………………………………..…13
8-4 stop playback. ………………………………………………………………………………………………13
8-5 previous and next…………………………………………………………………………………………...13
8-6 fast forward and fast reverse……………………………………………………………………………....14
8-7 subtitle…………..…………………………………………………………………………………………...14
8-8 repeat………………………………………………………………………………………………………...14
8-9 repeat A-B…………………………………………………………………………………………………...14
8-10 angle……………...………………………………………………………………………………………...14
8-11 DVD menu…………………………………………………………………………….…………………...14
8-12title/pbc………………………………………………………………………………….…………………..14
8-13 program….…………………………………………………………………………….…………………...14
8-14 search………………………………………………………………………………….…………………...14
8-15 slow play……………………………………………………………………………….…………………...14
8-16 audio……..…………………………………………………………………………….…………………...14
9 MP3 PLAYBACK………………………………………………………………………………………………...15
10 PLAYING KODAK PICTURE CD OR JPEG FILES……………..………………………………………….16
11 screen saver function………………………………...……………..………………………………………….16
12 DVD SYSTEM SETUP
1 general system setup………………………………………………………………………………………..17
2 audio setup…………………………………….……………………………………………………………..19

2
3 dolby digital setup…………………………….……………………………………………………………..19
4 preference setup..…………………………….……………………………………………………………..20
13 play DISCS……………………………………………………………………………………………….……..22
14 DISC protection and DVD character…………………………………………………………………………23
15 DVB-T OPERATIONS
15-1 basic operations first time tuning……………………………………………………………………24
15-2 program information………………..……………………………………………………………………25
15-3 lists and interactive services………………..…………………………………………………………..26
15-4 advanced operations tuning the receiver
Automatic scan……………………………………………………………………………………………28
Manuals scan…………………………………….……………………………………………………….29
Full scan……………….………………………….……………………………………………………….30
15-5 language TV setup………………………………………………………………………………………..31
15-6 parental control…………………………………………………………………………………………….32
setting you PIN…………………………………………………………………………………………….32
setting censorship………………………………………………………………………………………...32
lock/unlock services………………………………………………………………………………………33
15-7 timer programming and recording……………………………………………………………………….34
15-8 upgrading your receiver…………………………………………………………………………………..35
15-9 technical information display……………………………………………………………………………..35
16 TROUBLES SHOOTING………………………………………………………………………………...….. 36
17 SPECIFICATIONS…………………………………………………………………………………….……….37

3
1.Warning and Safety Instructions
This appliance is designed to operate from a mains supply of 110 -250V AC 50 Hz. Do not attempt
to connect to alternative supplies.
The mains plug is a standard UK 3 pin 5A plug. If this is damaged or removed
If the mains lead becomes damaged or cut you must take the player to a qualified service technician.
Do not place the mains lead where it may be tripped over or walked on.
Do not place this player near hot radiators or other sources of radiated heat.
When leaving the appliance for long periods disconnect from the mains supply.
Do not connect the appliance to other apparatus unless the supply is disconnected to all items.
Do not operate this appliance in locations where moisture and high humidity are present such as: -
Bathrooms, Kitchens, Near Swimming pools or other areas that may be wet or damp.
Do not cover the appliance. Ventilation is necessary to keep the apparatus operating safely.
For your safety do NOT open the appliance. There are no user serviceable parts inside.
During thunderstorms, disconnect the TV from the mains outlet and the aerial if external. If leaving
the TV for long periods such as holidays, disconnect from the supply and aerial also.
It is advisable NOT to leave the TV in Standby for long periods. It should be turned OFF if being left
for more than 2 hrs or over night.
If the player fails to operate, consult the “Troubleshooting guide” on page 27
Changes or modifications by the user will invalidate your guarantee.
The lightening flash with arrowhead symbol, within an equilateral triangle, is intended to
alert the user to the presence of un-insulated “dangerous voltage” within the products
enclosure that may be of sufficient magnitude to constitute a risk of electric shock to the
p
ersons.
The exclamation point within an equilateral triangle is intend to alert the user to the
presence of important operating and maintenance (servicing) instructions in the
literature accompanying the appliance.
The crossed out “Wheelie bin” is intended to show that this appliance must not be
placed with ordinary household waste. When this appliance has reached the end of its
useful life. It must be disposed of in accordance with local by-laws. Consult your local
waste disposal authority. (WEEE Directive)
CLASS 1 LASER PRODUCT
DANGER: INVISIBLE LASER RADIATION WHEN OPEN AND INTERLOCKS DEFEATED, AVOID
EXPOSURE TO BEAM.

4
2 LOCATIONS OF CONTROLS
Front panel
Front panel
1. Power indicator light;
2. Remote control sensor
3. Play/pause button;
4. Open/close button
5. TV/ AV /DVD button;
6. MENU button;
7. DVD door
8. Volume decrease button (V-);
9. Volume increase button (V+);
10. Channel decrease button (P-);
11. Channel increase button (P+);
12. Main power button;
REAR PANEL
13. SCART input (Video input and output RGB
input);
N
ote:
Do not use the “SCART” input and the side AV
input at the same time, as picture quality is
compromised.
14. TV 75 ohm aerial socket.
15. DVB-T VCR SCART.(The function is
option.);
16. DVB-T RF output socket.
17. DVB-T RF input socket.
Video
AUDIO LEFT
AUDIO RIGHT
15
13
14
16
17

5
3 Television Installation
Connect antenna
4 Remote Control Battery installation
1 Press down the grip on the battery cover and
slide rightwards(remove the batteries cover).
2 Insert two size AAA batteries matching
the +/-polarities of the battery.
3 Close the battery cover.
Notes:
When the remote control will not be used for a long period of time or when the batteries are worn out,
remove the batteries to prevent the leakage.
Do not throw the batteries into fire. Dispose of used batteries in the specified manner.
Do not drop, dampen or disassemble the remote control.
75 Ω coaxial cable
Antenna in jack
Input terminal of antenna
TV
OR
DVB-T
Input terminal of antenna

6
1
2
3
7
8
10
12
14
18
21
19
22
23
27
32
33
34
36
37
38
40
41
35
39
31
30
29
24
25
20
17
15
13
16
11
9
6
4
5
28

7
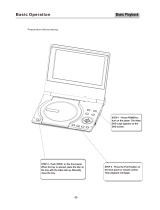
1. DVD tray open and close
2. P.P: Picture mode selection
3. SLEEP: Sleep time set;
4. POWER: Power / stand –by on/off;
5. MUTE: TV and AV DVD DVB mute button;
6. RECALL: recall OSD button;
7. 0-9: directly press 0-9 digital button;
8. -/--: Single/Double/Triple digit selection.;
9. TV/AV: TV AV1 and DVB selection;
10. PROG: DVD DVD Program display playback;
PPR: DVB-T the following keys are for PPR only and do not function with this STB.
11. TV/DVD: among TV and DVD selection
12. V-: Volume decrease button;
13. P+: TV program increase button;
14. DISPALY: DVD Display DVD OSD; DVB-T: subtitle display subtitle menu if available.
15. V+: Volume increase button;
16. Menu: TV menu button;
17. AUDIO: DVD DVD audio button; TV/RAD: DVB-T switches between TV and RADIO
18. P-: TV program decrease button;
19. STOP: DVD play stopping button;
20. PAUSE/STEP: DVD pause and step button;
21. ENTER/PLAY: DVD OK and play button;
22. F.REV: DVD DVD Fast reverse, DVB-T: YELLOW for teletext and interactive services;
23. F.FWD:DVD : DVD Fast forward. DVB-T: BLUE for teletext and interactive services;
24. NEXT: DVD DVD Next Chapte DVB-T: GREEN for teletext and interactive services;
25. PREV: DVD DVD Previous Chapter DVB-T: RED for teletext and interactive services;
26. DVD menu: DVD menu button; DVB-T:DVB-T menu button;
27. UP: DVD and DVB-T selection up button
28. REPEAT-AB: DVD button; DVB-T: calls upon the information banner;
29. REPEAT: DVD button; DVB-T: enters teletext mode.
30. SLOW DVD DVD slowly play button; DVB-T: program increase button;
31. RIGHT: DVD and DVB-T right selection button:
32. LEFT: DVD and DVB-T left selection button
33. SETUP: DVD DVD SETUP button; DVB-T: confirms selection made;
34. ANGLE:DVD DVD ANGLE button; DVB-T: exits the menu button;
35. SEARCH: DVD DVD time chapter playback button DVB-T: program decrease button
36. DOWN: DVD and DVB-T selection down button
37. SWAP: TV program change.
38. SUBTITL: DVD DVD Subtitles On/Off; DVB-T: DISPLAY TV guide.
39. TITLE/PBC: DVD button
40. Zoom: DVD picture Zoom select
41. DVB-T SWITCH button, when press the button, all DVB-T buttons has affection.

8
6 Operating your TV DVD AND DVB-T
TV BUTTON OPERATION
6-1 Power/Stand-By ON/OFF
STANDBY With the Power button on, you may turn the set on and off with the Remote
control. In the “Standby” mode you may also use the P+/P- buttons on the
Remote control and the TV set. This TV has an automatic switch off, if no
signal is received for 10 minutes.
Note: This does not apply in DVD or AV mode.
6-2 Program Up/Down
Push remote or front panel [P+] key,
,to change Program Up
Push remote or front panel [P-] key,
to change Program Down.
6-3 Direct Access Tuning(remote control)
Direct Program Access. Using the numeric buttons
on the Remote Control, programmers may be directly.
selected
6-4 Single/ Dual/ Triple digits Program number selection. -/-- (Remote control)
Single/ Dual/ Triple digit Program number selection. -/-- (Remote control). To select a
programmer number above (9), press the -/-- once, then the two digit number, i.e. -/--
then 2, then 3 = Programmer 23. You may also select three digit numbers by pressing
the -/-- button twice. I.e. -/--, -/-- then 2, then 3, then 4 = Programmer 234. The
maximum number of programmers is 249
6-5 Volume Control
Push the remote control or front panel [V+] key, for Volume Up
Push the remote control or front pane [V-] key, for Volume Down
6-6 TV/ AV /DVB/DVD Selection
This allows you to select TV, AV1 DVB-T/AV2 and
DVD modes, when you press on the front panel the
TV/AV/DVD button. if you press on the remote control
DVD will not display.
1
1
TV/AV
DVD
DVB-T/AV2
AV1
3

9
TV BUTTON OPERATION(CONTINUED)
6-7 MUTE
On the TV AV DVB and DVD mode, you press the MUTE
button on the remote control to turn off the sound, and if you
press MUTE again to turn on the sound back on
NOTE: The factory default is non-mute before switching on the unit.
6-8 RECALL
RECALL You press the RECALL button, on the TV screen TV sound system and program
number OSD would displayed.
6-9 P.P (PICTURE EFFECT)
P.P You can quickly select the desired picture mode from three factory preset modes and
one customized mode.
By repeatedly pushing this key, picture effects will change as follows.
6-10 SLEEP (Sleep Timer)
Press the SLEEP button to set the required time.The
Count down will start immediately.
Note: To check timer left, press the sleep button once. To
cancel the sleep timer, press the SLEEP button to set the timer
to 0.
Swap function enables quick swap to the last watched program.
1 suppose the channel number you used just is 8 and the channel
number you are using is 18 (as shown in the figure).
2 If you want to return to the last watched program channel 8,you
can simply press the SWAP button;
3 If you want to return to channel 18, press the button again.
Through this function, you can easily change between the
channel you are using and the channel you used last time.
STANDARD DYNAMIC PP MILD
MUTE
STANDARD
SWAP
0
15
30
225
240
SLEEP
18
8
18

10
7 TV MENU OPERATION TV MENU (remote control/ TV button)
By repeatedly pressing on the remote control or front panel the menu button, the TV
menu will change as follows: PICTURE, SOUND, SETUP, TUNE, PROG.exchange,
Exit.
If in AV DVB and DVD Mode PROG.exchange will not be displayed.
If no button is pressed for more than several seconds the TV will exit the Menu.
7-1 picture menu
Press the TV MENU on the remote control or on the
front panel, until the PICTURE menu appears.
1 Press the P+/- key to select the item you want to adjust;
2 Press the V+/- key to adjust date;
ITEM PRESS V- PRESS V+
CONTRAST Weak Strong
BRIGHTNESS Dark Bright
COLOUR Shallow Deep
SHARPNESS Soft Sharp
*HUE Lean to purple Lean to green
Note: ”Hue” item only appears when the color system
Is NTSC. DNR is noise reduce.
7-2 SOUND MENU
Press the TV MENU on the remote control or on the
front panel, until the SOUND menu appears.
Press the V+/- key to adjust volume.
7-3 SETUP MENU
Press the TV MENU on the remote control or on the
front panel, until the SETUP menu appears.
A LANGUAGE FUNCTION
1 Press the P+/- key to select LANGUAGE item;
2 Press the V+/- to select your desired OSD language; ;
3 Language OSD including ENGLINSH, FRANCE,
GERMANY and RUSSIA etc.(you want to select
OSD LANGUAGE, the language must setup.
.
B BLUEBACK FUNCTION
1 Press the P+/- key to select BLUEBACK item;
2 Press the V+/- key to toggle through on and off,
C CHILD LOCK FUNCTION
1 Press the P+/- key to select BLUEBACK item;
2 Press the V+/- key to toggle through on and off,
3 If you select to ON, the TV key will not effect;
MENU
SOUND
VOLUME 32
PICTURE
BRIGHTNESS 32
COLOUR 32
CONTRAST 32
SHARPNESS 32
HUE 0
DNR OFF
SETUP
LANGUAGE ENGLISH
BLUEBACK ON
CHILDLOCK OFF
AVL OFF
TIMER
GAME
CALENDAR

11
S M T W T F S
1 2 3
4 5 6 7 8 9 10
11 12 13 15 16 17
18 19 21 22 23 24
25 26 27 28 29 30
14
20
Y: 2004 M: 6 D: 20
PROG.EXCHANGE
PROG.I 2
PROG.II 0
EXCHAGE
D TMER FUNCTION
1 Press the P+/- key to select TIMER item;
2 Press the V+ key to enter TIMER MENU;
3 Press the P+/- key to select “CLOCK”, “ON-TIME”,
“OFF-TIME”, “SLEEP TIME”, or “REMIND TIME”.
4 Press the V+/- key to change date, minutes will change
from “00” to “59”, hours will change as follows
“0,1…23,-- --”
5 For “ON-TIME” , “OFF-TIME” or “REMIND TIME”
setting using [P+]/[P-] keys, select “ON PROG” Using [V+]/[V-] keys, change
On-Program number.
6 Using [P+]/[P-] keys, select “SLEEP TIMER” Using [V+]/[V-] keys, sleep timer will
change as follow; “0 →10 → 20 → 30 → 40→… 240 → 0”
7 Press MENU button, return to main MENU;
E GAME FUNCTION
1 Press the P+/- key to select GAME item, then press V+/- key to enter game;
2 Using MENU to rotate clockwise, using P+ key to rotate anti-clockwise;
3 Using V- key to move left, using V+ key to move right;
4 Press TV/AV button to quit the game;
F CALENDAR FUNCTION
1 Press the P+/- key to select calendar item,
2 Press V+/- key to enter calendar;
3 Press the P+/- key to turn the YEAR MONTH DAY;
4 Press the V+/- key to set or adjust the YEAR MONTH DAY.
5 Press the menu button to return the main menu;
G AVL FUNCTION (auto volume level)
1 Press the P+/- key to select AVL r item,
2 Press the V+/- key , AVL will be turned OFF and ON
7-4 PROGRAM EXCHANGE (PROG.EXCHANGE)
After auto search there may be some program numbers
duplicated and some blank. To reorder the channels.
Press the TV MENU on the remote control or on the
front panel, until the PROG.EXCHANGE menu appears.
1 Press the P+/- button to select PROG.I, then press the
V+/- button to set desired program;
2 Press the P+/- button to select PROG.I I, then press the
V+/- button to set desired program;
3 Press the P+/- button to select EXCHANGE ,then press
the V+/-to set EXCHANGE.
TIMER
CLOCK --:--
ON TIME --:--
ON PROG 1
OFF TIME --:--
SLEEP 0
REMIND TIME --:--
REMIND PROG 1

12
TUNE
AUTO SEARCH
SEARCH
BAND VHF-L
FINE TUNE
COLOR AUTO
SKIP OFF
PROGRAM 2
6
FINE TUNE
VHF-L I
7-5 TUNE MENU
Press the TV MENU on the remote control
or on the front panel, until the TUNE menu
appears.(FOR RIGHT FIGURE)
Note: if you select sound system is error, the TV will not
sound.
if you select COLOUR system is error, the TV will not
color. Color sys will change as follows;
AUTO
PAL NTSC3.58 NTSC4.43 SECAM
A AUTO SEARCH
1 Press the P+/- buttons to select AUTO SEARCH;
2 Press the V+ button to start auto search. The TV
will begin memorizing all the channels available in
your area.
B SEARCH
1 Press the P+/- buttons to select PROGRAM, then
Press the V+/- buttons to select the program number
you want to store;
2 Press the P+/- buttons to select SERAH;
3 Press the V+/- buttons to start the tuning search.
When the search finds a strong channel signal it will
Stop searching. The picture and the Tune menu will
appear.
4 continue the tuning procedure until you have tuned in
all the channels required. To exit, press the TV menu button;
C FINE TUNE(manual fine tune)
Under poor reception conditions it is sometimes possible
to improve the quality of picture and sound using the fine tune.
1 Press the P+/- buttons or PROGRAM NUMBER 0-9
button to choose desired channels;
2 Press the TV MNEU until the TUNE menu appears;
3 Press the P+/- buttons to select FINE TUNE item;
4 Press V+/-to adjust for the best possible picture and
Sound results;
D SKIP (program skip)
After presetting, you can skip needless channels so that you could choose the desired channels.
1 Press the P+/- buttons to select the desired program to be shipped;
2 Press the TV MENU until the TUNE menu appears, Press the P+/- buttons to select skip;
3 Press the V-/+ buttons to turn the skip function “ON”;
If you want to recover the skipped channel
1 Use the PROGRAM NUMBER buttons to select the channel number to be recovered;
2 Repeat the above procedure 2;
3 Press the V+/- buttons to turn the skip function “OFF”;
6
AUTO SEARCH
VHF-L I
6
SEARCH
VHF-L I

13
8 DVD BASIC OPERATIONS
8-1 Preparations
Press the TV/AV/DVD button on the front panel or TV/DVD on the remote control to enter the DVD
status. Press the TV/AV/DVD button on the front panel or TV/DVD on the remote control again to
return to the TV mode.
Note: The unit did not allow enter DVD mode again after it have just left to avoid any damage of the DVD.
Wait for 10 second to enter again
8-2 OPEN AND CLOSE
1. Press OPEN/CLOSE to open the disc tray on the remote control or on the front panel, place a disc on
the disc tray. There are two different disc sizes. Place the disc in the correct guide on the disc tray. If
the disc is out of the guide, it may damage the disc and cause the DVD player to malfunction. Do not
place a disc, which is unplayable in this DVD player.
2. Press OPEN/CLOSE to close the disc tray, the playback will automatically start. Some disc may not
playback automatically, you can press ENTER/PLAY button to start playback.
3. Some disc may start playback with a menu, use the cursor button on the remote control to select menu
options and press ENTER/PLAY to start, or press digits to select a menu options directly.
8-3 PAUSE/ STEP
PAUSE PLAYBACK
1. Press PAUSE/STEP to pause playback (still mode). The sound will be muted during still mode.
2. Press ENTER/PLAY to resume normal playback.
SINGLE STEP PLAYBACK
1. Press the PAUSE/STEP button to pause the playback.
2. To view the next frame, press the PAUSE/STEP button. Each press of the PAUSE/STEP button
advances the film by one frame.
8-4 STOP PLAYBACK
1. Press STOP button to go to stop mode, the TV screen will show the start-up logo. For
some disc the player can recall the location where stopped, such as DVDS and audio CDs.
2. Press ENTER/PLAY to resume playback from the location where playback is stopped.
3. Press STOP twice to stop completely.
8-5 PREVIOUS AND NEXT
During playback, press PREV key can go back to the beginning of this chapter, then each
press of this key will skip a chapter till the start of the disc.
Note: Disc function may vary depending on disc format.
Each press of NEXT key during playback will skip the current chapter and play the next one.
8-6 FAST FORWARD AND FAST REVERSE
1. Press F.FWD to fast forward through the disc. Each time the F.FWD button is pressed,
the fast forward motion speed changes. It would cycle through 2X, 4X, 8X, 16X, 32X and normal.
2. Press ENTER/PLAY to resume normal playback.
3. Press F.REV to fast reverse through the disc. Each time the F.REV button is pressed,
the fast reverse motion speed changes. It would cycle through 2X, 4X, 8X, 16X, 32X and normal.
4. Press ENTER/PLAY to resume normal playback.

14
IMPORTANT NOTE:
All describing function is for DVD discs. if you play other format disc, the operation and display on
screen may different.
8-7 SUBTITLE
Press " SUBTITLE ", the screen will display "SUBTITLE 01/XX XXXXX", "01" indicates the
ordinal number of this language; "XX" indicates total number of language; "XXXXXX” indicates
the language of country. (The number of language depends on disc). This function can select up to
8 languages displayed on screen.
8-8 REPEAT
Press " REPEAT “ can cycle among 'Chapter repeat', 'Title repeat', 'all repeat' and 'off'.
8-9 REPEAT A-B
Press Repeat A-B to mark the start-point, press again to set an end point to complete setting.
The selected section A-B will be repeated immediately. Press the Repeat A-B again to cancel this
function.
8-10 ANGLE
When enjoying sports, concert or theatre, press this key to watch same actions in different angles.
(Valid for discs possessing this function. Using a disc recorded in multi-angle you can view the
scene from different angles, for example, front, side, whole view and exterior scene.)
8-11 DVD MENU
Press this key to display root menu, select item according to your preference. (This function will
work with a DVD having a multi-layer menu.).
8-12 TITLE/PBC
With some DVD discs pressing this key will display the title menu. You can then use the digit
buttons to select the item you prefer.
8-13 PROGRAM
When playing discs, press “ PROG “ to enter program mode. Press the digit buttons to
select the program number that you want. When finished, move the cursor to select "START”.
This will start the program playback. If you want to cancel this function, press " STOP “, then
press "ENTER/PLAY”.
8-14 SEARCH
Press "SEARCH" once to display the search menu. Press again to cancel. Use the UP/DOWN
cursor buttons to select the item you require. Press PLAY/ENTER to confirm.
8-15 SLOW PLAY
Press SLOW PLAY to play a disc in slow forward. Each time the SLOW button is pressed, the
slow motion speed changes. Press ENTER/PLAY to resume normal playback.
Note: This function is invalid for CD and MP3.
8-16 AUDIO
Press this key can change the audio mode.
such as: Audio 1/2: AC 3 2 CH English
Audio 2/2: AC 3 5.1 CH English
If you play CD disc, press this button can cycle among Mono Left, Mono Right, Mix-Mono and Stereo.

15
9 Mp3 Playback
The DVD player can playback discs, including CD-R, CD-RW, DVD-R, DVD-RW, DVD+R or
DVD+RW recorded with MP3 audio files. Multiple and multi-level directories are supported.
Upon loading an MP3 disc, the screen shows a menu as:
1) To go to a preferred directory, use the up or down button arrow keys to scroll to your selection
and then press ENTER/PLAY key to confirm.
2) Use the up or down button arrow keys to select song and press ENTER/PLAY button to start
playing.
3) Press left arrow button can return to the parent directory, you can then select other directory.
Play mode:
There are four play modes available, when playing, press REPEAT button to choose the MP3 play
mode:
1) SINGLE all files will be played only once.
2) REPEAT ONE Play the selected file repeatedly
3) REPEAT FOLDER all files in the selected folder will be played repeatedly
FOLDER All files in the selected folder will be played only once.
Other Functions
Functions such as MUTE, VOLUME, PAUSE, PREVIOUS, NEXT etc. are also available for MP3
discs and they function same as playing audio CDs.

16
10 Playing Kodak Picture CD or JPEG files
The DVD player is compatible to Kodak Picture CD and discs containing JPEG image files
(With .JPG file extension). This function is similar to MP3 playback function.
Operations:
1) Picture selection & Preview
Press buttons to select the target picture and press ENTER/PLAY button to show. The player
will show the preview of the picture in preview area once the cursor stops.
2) Rotate Picture:
You can use “up down left right” buttons to rotate current showing picture.
3) Previous and Next selection:
You can press
button to show previous picture or button to show next picture
manually.
11 SCREEN SAVER FUNCTION
If this unit is not working by 20 minutes, it will go to sleep mode with screen saver on. In this mode,
you can press any key on remote control or on front panel to activate the unit.
You can set SCREEN SAVER function to OFF in GENERAL SETUP PAGE of DVD SYSTEM
SETUP.

17
12 DVD SYSTEM SETUP
When you press SETUP button successively on the remote control, the setup menu will be displayed.
It includes General Setting, Analog Audio Setup, Dolby Digital Setup, Video Setup and Preference
menu.
1. Within the setup menu, you can use
buttons on the remote control to move the
cursor, and press the ENTER/PLAY button to make your selection.
2. Press successively the SETUP button to exit setup menu.
1 GENERAL SETUP
TV DISPLAY
This allows you to select the display mode to suit
the TV you are connecting to.
Note: No matter which display format is selected,
a picture recorded in standard normal format
always displays in the normal aspect ratio.
The display format of DVD titles may vary; please
refer to the information that accompanies your specific
DVD title.
If the DVD title is recorded in wide display format
while the TV is a standard normal screen, horizontal
compression of the image will be resulted. Some DVD
titles may be recorded in special formats.
In such cases, the DVD titles will always appear
on the screen in their original format, regardless
of which TV display format you select.
ANGLE MARK
You can choose to hide or display the angle
mark on the screen.
..---General setup page..---
Tv Display Ps
Angle mark On
Osd lang Eng
Captions Off
Screen saver On
Last memory Off
General Audio Dolb
y
Preference
On
Off
Set ANGLE MARK
..---General setup page..---
Tv Display Ps
Angle mark On
Osd lang Eng
Captions OFF
Screen saver On
Last memory Off
General Audio Dolb
y
Preference
N
ormal/Ps
N
ormal/Lb
Wide
Set TV Display Mode

18
OSD LANGUAGE
To select the On-Screen-Display language,
default setting is English.
You can select ENGLISH FRENCH GERMAN.
CAPTIONS and Screen saver
CAPTIONS
For hearing impaired people. The picture can be
displayed with recorded explanatory captions.
Screen saver
If the screen saver is on, then there will be an
animated picture on the screen whenever the DVD
player is idle for a certain time.
LAST MEMORY
This function is convenient when you want to
continue viewing a disc from the point where
you were watching before. Unlike the resume
function, the Last Memory function is effective
even the disc is removed from the player
When Last Memory is ON, each time when you
remove a disc or stop playing and go to standby,
the DVD player memorizes the point when the DVD
was stopped. The DVD playback may be resumed
from the memorized point.
This function works when the power remains on or
in standby. The memory point is lost if the TV is switched off.
General Audio Dolby Preference
..---General setup page..---
Tv Display Ps
Angle mark On
Osd lang Eng
Captions Off
Screen saver On
Last memory Off
English
French
German
Set Osd language
..---General setup page..---
Tv Display Ps
Angle mark On
Osd lang Eng
Captions Off
Screen saver On
Last memory Off
General Audio Dolb
y
Preference
On
Off
SET LAST MEMORY STATE
..---General setup page..---
Tv Display Ps
Angle mark On
Osd lang Eng
Captions Off
Screen saver On
Last memory Off
General Audio Dolb
y
Preference
On
Off
Closed Caption

19
2 Audio Setup
LT/RT: Select this option when the DVD player
is connect to external amplifier with
Pro-Logic decoding function.
STEREO: Select this option when you want to use
only the front-left & front-right speakers
with normal sound effect.
3 DOLBY DIGITAL SETUP
Dual Mono
Stereo: The player will output Left channel and
Right channel audio.
L-Mono: The player will output left channel
audio only from the 2 front channels.
R-Mono: The player will output right channel
audio only from the 2 front channels.
MIXMono: The player will output the average
signal of the mixed Left channel and
Right channel audio from the 2 front
channels
This is to set the dynamic compression ratio.
Press the right arrow button to enter the
setup column; adjust the rate of the dynamic
range by pressing up or down arrow button.
Default setting is off.
..Dolby digital setup..
DUAL
Dynamic
General Audio Dolb
y
Preference
FULL
3/4
1/2
1/4
OFF
SET DRC Off
--Speaker setup page--
Down mix
General Audio Dolb
y
Preference
LT/RT
STEREO
SET DOWNMIX MODE
General Audio Dolby Preference
--Dolby digital setup--
Dual Mone
Dynamic
STEREO
L-MONO
R-MONO
MIX-MONO
DUAL MONO (1+1)SETUP
/