Page is loading ...

True to the Music
www.radialeng.com
®
True to the Music
®
User Guide
www.radialeng.com
Radial Engineering Ltd.
1588 Kebet Way, Port Coquitlam
British Columbia, Canada, V3C 5M5
tel: 604-942-1001 • fax: 604-942-1010
email: [email protected]
Gold Digger
4x1 Microphone Selector
™

Radial
®
Gold Digger
™
Microphone Selector
Table of Contents ......................................................Page
Overview ........................................................................ 1
Feature Set .................................................................... 2
Making Connections ....................................................... 3
Setting Trim Levels ......................................................... 4
When To Use .................................................................. 4
Specications ................................................................. 5
Warranty ............................................................Back cover
www.radialeng.com
INTRODUCTION
Thank you for purchasing the Radial Gold Digger. We are very excited about how this product
can improve workow and efciencies in the studio. We are also very condent that once
you get it in use, you too will nd it to save you time and bring another level of creativity to
your production.
Although the Gold Digger is extremely easy to use, it is well advised that you take a few
minutes to quickly read through this short manual. Inside, you will surely nd some hints on
how to best approach using the Gold Digger in your studio. If you do not nd everything you
need, please go to the Gold Digger web pages on our site and visit the FAQ section. This is
where we publish the latest updates and answer questions from users. If you are still in need
of more information feel free to send an email to [email protected] and we will do our best
to reply in short order.
Now get out there and start switching!

Radial Engineering Ltd.
Gold Digger™ Microphone Selector
True to the Music
®
OVERVIEW
The Gold Digger is a 4-in, 1-out switcher designed specically for microphones. Although this
may seem simple from the outside, there are a number of concerns that were addressed to
make it work easily, quickly and without noise. This includes switching ‘powered microphones’
such as condensers without creating huge pops that can blow tweeters. Another concern is
keeping old vintage ribbon mics safe. We wanted to make it easy to set up a fair comparison.
This meant that the Gold Digger could not impart any form of coloration or distortion to
the signal path, but we also had to have some type of level control to ensure the tests are
conducted fair and square so that one mic would not be louder than the next.
Ultimately, you will nd the Gold Digger to be super easy to use and will save you time as you
nd the best mic to suit a certain application. Have fun. Experiment. This is what the Gold
Digger is designed to do.
Typical Setup Diagram
1

Radial Engineering Ltd.
Gold Digger™ Microphone Selector
True to the Music
®
2
10
6 87
9
FEATURE SET
1. CHANNEL ON 1 to 4: Radio style
push button switches automatically
turn the selected mic on and the other
microphones off to eliminate bleed.
Illuminated LED indicates which channel
is active.
2. TRIM ADJUST 1 to 4: Individual ‘set &
forget’ trim controls let you quickly match
the signal level between different mics to
ensure a fair and honest comparison.
3. +48V PHANTOM: Turns on the phantom
power that condenser microphones and
active direct boxes require. Switch is
recessed to protect against accidental ‘turn
on’ that could damage vintage ribbon mics.
LED indicator illuminates when phantom is
active.
4. RECESSED PANEL: Extended lip creates
protective zone around the switches and
controls when using the Gold Digger on
stage or in less than ideal locations.
5. 14-GAUGE STEEL: Heavy duty
construction eliminates stress on the PCB
and provides excellent shielding against
magnetic elds and RF which otherwise
could introduce noise.
6. CABLE CLAMP: Locking cable clamp
lets you secure the power cable to
the Gold Digger to prevent accidental
disconnection.
7. 15VDC: Like professional mixers, the
power supply is taken out of the box
to reduce noise and ensure the most
transparent signal ow.
8. XLR OUTPUT: Use to connect the Gold
Digger output to a microphone preamp.
9. XLR INPUTS: Use to connect
microphones to the Gold Digger. Heavy
duty glass-lled XLRs with nickel-silver
contacts are stronger than steel and
provide 100% isolation between channels
to reduce noise and crosstalk.
10. PAD: Full bottom no-slip neoprene foam
pad provides electrical insulation and
mechanical isolation for plenty of stay-
put-ness.
1 2 3 4 5

Radial Engineering Ltd.
Gold Digger™ Microphone Selector
True to the Music
®
3
MAKING CONNECTIONS
Before making audio connections, always ensure volume levels are turned down or off. This
prevents turn-on transients which could harm more sensitive components such as tweeters.
There is no power switch on the Gold Digger. As soon as you connect the power supply, it will
turn on. If you are using the Gold Digger in a mobile studio or in a high trafc area, you may
want to use the power supply cable clamp for an extra secure power connection.
With the power connected, follow these steps to set up the Gold Digger controls. First, make
sure each of the four Gold Digger mic inputs has the +48V phantom power switch in the off
position (outward, LEDs off). Also turn off the phantom power feature on your mic preamp.
For best results, the Gold Digger should be the only source of phantom power. Next, set the
four TRIM controls to maximum (fully clockwise).
Take a moment to notice how the mic input ON buttons work. When pressed, the switch will
simultaneously turn-on the mic input while also turning-off whatever mic is currently active.
This switching method allows only one mic signal to pass through the Gold Digger at a time.
Connect your microphones to the Gold Digger mic inputs using standard XLR cables.
Determine if +48V phantom power is needed depending on the type of microphone. Most
condenser microphones can be powered by the Gold Digger’s onboard phantom power.
Dynamic or ribbon mics do not need it and phantom can be left off for those mic inputs.
Simply use a small screw driver to access the recessed +48V switch if phantom is needed.
An illuminated LED indicates the phantom power is active for that mic input.
Connect the Gold Digger’s male XLR output to your preamp or mixer and use a low gain
setting for testing. Select input-1 (LED will illuminate) and monitor the mic signal as you
slowly turn up the volume on your audio system. It is always best to test all four mics at low
volumes as this reduces opportunity for feedback or noise due to bad cables or improper
connections. Move on and repeat the signal check process for the rest of the mics connected
to the Gold Digger inputs. Once all four mics are tested and working, you can set the front
panel TRIM controls to balance the outputs of the microphones.
1
2
3
4
MIC PREAMP

Radial Engineering Ltd.
Gold Digger™ Microphone Selector
True to the Music
®
4
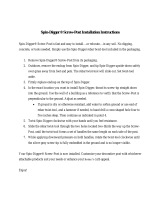
SETTING THE TRIM LEVELS
Setting the TRIM levels on the front panel is a very important step if you are interested in
achieving a fair evaluation between mics. The Gold Digger’s four TRIM controls allow the
output level of each mic to be adjusted individually. Properly setup, there should be very little
change in level when switching between the four mics. This will help ensure a fair and honest
evaluation of your microphones.
Begin by ensuring all four TRIM controls are set to maximum (fully clockwise). Next,
determine which of the four mics has the lowest output level by switching between mics while
monitoring the output. Once the lowest output mic has been determined, the TRIM controls
are used to attenuate the louder mics to match. For instance, if mic-1 is the lowest output
mic, leave it’s TRIM set at maximum and reduce the gain of the other mics to match. Using
a guitar pick or small screwdriver, turn the louder mic’s TRIM controls counter-clockwise until
the relative output level stays the same when switching between mics.
+48V
TRIM
+48V
TRIM
+48V
TRIM
+48V
TRIM
ON
1
ON
2
ON
3
ON
4
MIC INPUT MIC INPUT MIC INPUT MIC INPUT
4 CHANNEL MIC SELECTOR
MIC INPUT MIC INPUT
+48V
ON
+48V
ON
MIC INPUT MIC INPUT
ON
4321
ON
+48V
TRIM TRIM TRIM TRIM
+48V
1
Dynamic
+48V: Off
TRIM: Max
+48V: Off
TRIM: -3dB
+48V: Off
TRIM: -3dB
+48V: On
TRIM: -8dB
2
Dynamic
3
Ribbon
4
Condenser
Once all of the mic levels have been matched, you can nalize your preamps gain setting and
additional signal processing like compression and equalization. Keep in mind that dynamic
microphones do not have built-in buffers like condensers. This means that when you adjust
the TRIM level, the tone may change slightly because of small changes to the impedance.
Good news here is that if you are comparing a dynamic to a condenser, the condenser, by
virtue of it’s active buffers, will usually be louder and less prone to impedance changes, thus
trimming down the level on condenser mics will have no sonic effect on the sound allowing
you to make a fair comparison between dynamic and condenser mics.
WHEN DOES ‘COMPARING MICS’ MAKE SENSE?
The most obvious time to use the Gold Digger will be with vocalists. There is no question
that singers perform better when the sound they hear in their headphones is the one they
envision in their head. Using the Gold Digger to compare mics on guitar cabinets can lead
to very interesting results as well. The same can be said on a snare drum or even on a kick
drum. Putting up more than one mic takes no time at all, and with the Gold Digger in the
signal path, you are not adding any noise or distortion so you are not compromising your
tone in any way. Just have fun!

Radial Engineering Ltd.
Gold Digger™ Microphone Selector
True to the Music
®
5
RADIAL GOLD DIGGER SPECIFICATIONS
Circuit Type .............................. Passive signal path with active relay switching
Frequency Response .............. 20Hz to 20kHz
THD + N .................................. 0.0003%
Dynamic range ........................ -140dBu
Equivalent Input Noise............. -115dBu
CMRR ...................................... -92db @ 55Hz
Input Impedance ...................... 600 Ohms nominal
Output Impedance ................... Same as source impedance
XLR Conguration: .................. Follows AES spec: pin-1 ground, pin-2 hot (+), pin-3 cold (-)
Power requirement .................. 15VDC / 150mA (adapter supplied)
Size (W x H x D): ..................... 5.8” x 1.88” x 4.5” (148mm x 48mm x 115mm)
Weight ..................................... 2.1 lbs. (0.96 kg)
Warranty .................................. 3 years, transferable limited warranty
USING THE GOLD DIGGER TO COMPARE DI BOXES
You can also compare direct boxes following the same procedure. You would be surprised
at how different each DI can sound. In fact you may be surprised to nd that just like
microphones, DIs all have different personalities that can truly atter certain instruments or
render them listless.
For even more fun, get a Radial Cherry Picker! This lets you compare various preamps to
nd the best one for a given vocal.

®
www.radialeng.com
True to the Music
THREE YEAR TRANSFERABLE LIMITED WARRANTY
RADIAL ENGINEERING LTD. (“Radial”) warrants this product to be free from defects in material and
workmanship and will remedy any such defects free of charge according to the terms of this warranty.
Radial will repair or replace (at its option) any defective component(s) of this product (excluding nish
and wear and tear on components under normal use) for a period of three (3) years from the original
date of purchase. In the event that a particular product is no longer available, Radial reserves the
right to replace the product with a similar product of equal or greater value. In the unlikely event that
a defect is uncovered, please call 604-942-1001 or email [email protected] to obtain an RA
number (Return Authorization number) before the 3 year warranty period expires. The product must be
returned prepaid in the original shipping container (or equivalent) to Radial or to an authorized Radial
repair center and you must assume the risk of loss or damage. A copy of the original invoice showing
date of purchase and the dealer name must accompany any request for work to be performed under
this limited and transferable warranty. This warranty shall not apply if the product has been damaged
due to abuse, misuse, misapplication, accident or as a result of service or modication by any other
than an authorized Radial repair center.
THERE ARE NO EXPRESSED WARRANTIES OTHER THAN THOSE ON THE FACE HEREOF
AND DESCRIBED ABOVE. NO WARRANTIES WHETHER EXPRESSED OR IMPLIED, INCLUDING
BUT NOT LIMITED TO, ANY IMPLIED WARRANTIES OF MERCHANTABILITY OR FITNESS FOR
A PARTICULAR PURPOSE SHALL EXTEND BEYOND THE RESPECTIVE WARRANTY PERIOD
DESCRIBED ABOVE OF THREE YEARS. RADIAL SHALL NOT BE RESPONSIBLE OR LIABLE
FOR ANY SPECIAL, INCIDENTAL OR CONSEQUENTIAL DAMAGES OR LOSS ARISING FROM
THE USE OF THIS PRODUCT. THIS WARRANTY GIVES YOU SPECIFIC LEGAL RIGHTS, AND
YOU MAY ALSO HAVE OTHER RIGHTS, WHICH MAY VARY DEPENDING ON WHERE YOU LIVE
AND WHERE THE PRODUCT WAS PURCHASED.
Copyright 2012 Radial Engineering Ltd. All rights reserved.
Specications and appearances subject to change without notice.
Radial
®
Gold Digger
™
User Guide • rev1.0 • Part #: R870 1232 00
Radial Engineering Ltd.
1588 Kebet Way, Port Coquitlam, British Columbia, V3C 5M5
tel: 604-942-1001 • fax: 604-942-1010 • email: [email protected]
/