
1
Waist-High
Stand-On Scale
Models 6855, 6855KGEU
6856 & 6856KGEU
Operating Instructions
CARDINAL SCALE MFG. CO.
1930-M458-O1 Rev B
PO BOX 151 • WEBB CITY, MO 64870
Printed in USA
03/04
PH (417) 673-4631 • FAX (417) 673-5001
Web Site - http://www.detectoscale.com

1

1
WAIST-HIGH STAND-ON SCALE
Thank you for purchasing our model 6855 (6855KGEU) or 6856 (6856KGEU) Waist-High
Stand-On Scale. It has been manufactured with quality and reliability at our factory in Webb
City, MO USA. Your scale has been tested before leaving our factory to insure accuracy and
dependability for years to come.
This manual is provided to guide you through the operation of your scale. Please read it
thoroughly before attempting to operate your scale and keep it handy for future reference.
FCC COMPLIANCE STATEMENT
WARNING! This equipment generates, uses and can radiate radio frequency and if not
installed and used in accordance with the instruction manual, may cause interference to radio
communications. It has been tested and found to comply with the limits for a Class A
computing device pursuant to Subpart J of Part 15 of FCC rules, which are designed to provide
reasonable protection against such interference when operated in a commercial environment.
Operation of this equipment in a residential area may cause interference in which case the
user will be responsible to take whatever measures necessary to correct the interference.
You may find the booklet "How to Identify and Resolve Radio TV Interference Problems"
prepared by the Federal Communications Commission helpful. It is available from the U.S.
Government Printing Office, Washington, D.C. 20402. Stock No. 001-000-00315-4.
All rights reserved. Reproduction or use, without expressed written permission, of editorial or pictorial content, in
any manner, is prohibited. No patent liability is assumed with respect to the use of the information contained
herein. While every precaution has been taken in the preparation of this manual, the Seller assumes no
responsibility for errors or omissions. Neither is any liability assumed for damages resulting from use of the
information contained herein. All instructions and diagrams have been checked for accuracy and ease of
application; however, success and safety in working with tools depend to a great extent upon the individual
accuracy, skill and caution. For this reason the Seller is not able to guarantee the result of any procedure
contained herein. Nor can they assume responsibility for any damage to property or injury to persons occasioned
from the procedures. Persons engaging the procedures do so entirely at their own risk.
SPECIFICATIONS
6855 6855KGEU 6856 6856KGEU
Capacity ………...…… 600 lb x .2 lb or
270 kg x .1 kg
(selectable)
270 kg x .1 kg
800 lb x .2 lb or
360 kg x .1 kg
(selectable)
360 kg x .1 kg
Platform Size ..…..…. 18” x 14” / 457 mm x 356 mm 24” x 24” / 610 mm x 610 mm
Shipping Weight ……. 70 lb / 32 kg 85 lb / 39 kg
Scale Height ..………. 41.69 / 1059 mm
Display ..…………….. 0.7” / 17.8 mm high-contrast LCD
Power ..…………….... 6 “C” size Alkaline batteries (not included) or optional AC adapter
Keys ..………………... On/Off, Zero, Lb/Kg, Hold/Release
Features …………….. Body Mass Index Calculator

2

1
UNPACKING INSTRUCTIONS
• Remove staples or cut along bottom of carton. Lift carton off pallet.
• Check for any damage incurred in shipping. If scale has been damaged, place a claim
with the carrier. It is the responsibility of the purchaser to file all claims for any damages
or loss incurred during transit. Use the original carton and shipping material to return
the scale.
• Cut packing straps securing scale to pallet.
• To remove scale from pallet, at the back of the scale lift up with equal force from the
column and at the platform base near the wheels on the scale. Set gently on floor.
• Remove all plastic wrapping, foam fillers and cardboard material from the scale.
• Remove and unpack the power supply and cord, if the scale was ordered with this
option.
CARE and CLEANING of SCALE
• DO NOT subject the platform to sudden shocks.
• DO NOT spray water directly on the display head.
• DO avoid areas where the scale might be exposed to moisture.
• DO NOT use abrasive cleaners on this instrument.
• DO NOT use acetone or other volatile solvents for cleaning.
• DO clean the scale using a damp soft cloth and mild detergent.
ERROR and STATUS DISPLAYS
Display Meaning
A::Aa
General error, invalid keypad entry was attempted.
A$Aa
Attempting to display a negative number greater than –9,999 or a
positive number greater than 99,999
A<:"Aa
Indicates an attempt to zero a weight outside the scale zero range.
(See Four Percent Zero Tracking Range Limit).
A(1+Aa
Motion is present when the indicator is attempting to perform one of the
following operations: Power Up Zero or Zero Weight Display
4::a
An analog to digital convertor communication error has been detected.
Consult the scale service representative.
".3a
Indicates improper stored calibration data, calibration is necessary.
::a
The analog to digital sample is invalid.
::"a
The load cell input is below the range of the indicator.
:: a
The load cell input is above the range of the indicator.
a::a
NOVRAM failure. Consult the scale service representative.
$%a
Scale weight exceeds scale capacity
$a
Displayed to indicate the indicator is turning off.

2
OPERATING INSTRUCTIONS
1. Install six (6) “C” size Alkaline
batteries or if ordered with the
scale, plug the power supply
module into an appropriate power
receptacle. Plug the small
connector end of the power supply
cord into the power jack located in
the bottom right corner at the back
of the indicator.
2. Set the scale on any hard, level,
flat surface or low-cut carpet.
3. With no weight on the scale
platform, press the [ ON/OFF ]
key. After a second or so the
display should indicate a zero
weight with the ZERO annunciator
turned on. If the display does not
indicate zero, press the [ ZERO ]
key to zero the weight display.
4. Step on the scale and remain
motionless for several seconds
until the scale displays your
weight.
5. To re-zero the scale, remove all
weight from the platform and
press the [ ZERO ] key.
6. For more information, see the
758C Series Operation Manual
(8555-M210-O1).
758C Keypad
Indicator
Column
Platform
Optional
Powe
r
Supply
Module
NOTE! If you wish to
operate the indicator from
batteries, you must first
obtain the batteries.

3
Height Rod Instructions
Height Rod Hole Location
• Please check Height Rod hole locations
before installing Height Rod.
• Some models may require holes to be
drilled.
• Please follow the measurements for drilling
holes if necessary.
• After holes have been drilled, please follow
installation instructions.
• Install the two (2) #10 x ½” hex head screws
from the hardware pack into the column.
IMPORTANT!
Measure from top
of scale base.
Height Rod Installation Instructions
1. Remove Height Rod from shipping container.
Inspect the unit for signs of damage. Contact
our Customer Service Department if
necessary.
2. Loosen screws located on front of scale
column. Place height rod brackets over
screws and pull down; securing brackets.
Tighten screws as needed.
NOTE! The Indicator must be facing away from
the scale platform to install the height rod.
Height Rod Operation
1. Raise the inner rod of the telescoping column.
2. Lift up the spoon and lower the inner rod until
the spoon rests on the patient’s head.
CAUTION! Do not raise or lower Height Rod
by spoon tip!
3. Read the correct height measurement on the
inner rod at the top of the outer rod.
1” from edge
of column to
center of hole
#29 (.136)
diameter
holes
4
1/8”
28
5/8”

4
PART IDENTIFICATION

5
PART IDENTIFICATION
ITEM
NO.
QTY
6855
QTY
6856
PART
NUMBER
DESCRIPTION
1 1 1930-D330-0A WEIGHBRIDGE ASSY
1 1930-D445-OA WEIGHBRIDGE ASSY (6856)
2 1 1930-C338-08 MAT W/ADHESIVE
1 1930-C452-08 MAT W/ADHESIVE (6856)
3 6 6 6007-0034 HEX HEAD SCREW 5/16-18 UNC-2A X 3/4”
4 6 6 6024-0050 LOCK WASHER 5/16”
5 6 6 6013-0275 HEX NUT 5/16-18 UNC-2B
6 1 1930-C143-0A HANDRAIL ASSEMBLY
1 1930-C450-0A HANDRAIL ASSEMBLY (6856)
7 1 1 758C DIGITAL INDICATOR
8 1 1 0033-B164-08 MOUNTING BRACKET
9 4 4 6021-0665 MACHINE SCREW #6-32 X .375 PAN HD PHILLIP DR
10 1 1 391RV204 ELASTIC STOP NUT
11 1 1 6680-1043 GROMMET
12 1 1 1930-B336-1A COLUMN ASSEMBLY
13 1 1930-C337-08 COVER
1930-C451-08 COVER (6856)
14 1 1 6024-0047 EXT STAR WASHER 1/4”
15 1 1 6007-0007 HEX HEAD SCREW 1/4-20 UNC-2A X 3/8”
16 1 1 0033-B110-08 UHMW DISK
17 1 1 6024-0004 FLAT WASHER 1/4” DIA SS
18 1 1 1930-B428-0A CABLE
19 1 1 6021-1454 HEX HEAD BOLT 1/4-20 UNC-2A X 3/4”
20 1 1 0033-C090-0A WHEEL ASSY.
21 2 2 6013-0045 HEX NUT 1/4-20 UNC
1 1 3502-C205-0A TRIM BOARD

6

7

8
-
 1
1
-
 2
2
-
 3
3
-
 4
4
-
 5
5
-
 6
6
-
 7
7
-
 8
8
-
 9
9
-
 10
10
-
 11
11
-
 12
12


Cardinal Detecto 6856 Operating Instructions Manual
- Type
- Operating Instructions Manual
- This manual is also suitable for
Ask a question and I''ll find the answer in the document
Finding information in a document is now easier with AI
Related papers
-
Cardinal Detecto 6855 Operating instructions
-
-
-
-
-
-
-
-
-
Other documents
-
Detecto 685X Series Operating instructions
-
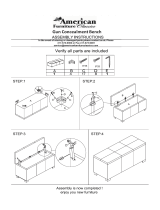 American Furniture Classics 1-520 Operating instructions
-
-
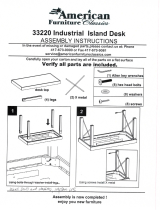 OS Home and Office Furniture 33220 Operating instructions
-
Detecto FH Series Owner's manual
-
-
-
Emtec EKMMD8GM210U3 Datasheet
-
-

