Page is loading ...

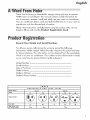
Thank You for buying a dependabb, energy saving and easy to operate
HALERroom air condifionen This manual contains usefuJinformation for
you to maintain, operate, in4aH and safely use your room air conditioner.
Your air conditioner deans, cools and dehumidifies the air in your room to
provide you with the ultimate Jevd of comfort.
Please read instructions carefuJJybefore using the producL AJso, do not
Forget to fiJl out and maiUthe Product Registration Card
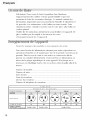
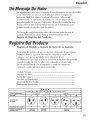
Record Your Mo(JeJand $eriaJ Number.
For aHyour service calls during the warranty period the foJlowing
information will be needed_ Attach the sales receipt to this guide and keep
for future reference. This information can be obtained from the serial pJate,
which is on your air conditioner. This is either on the cabinet (side or back)
or you may have to remove the front grille to bcate iL
Modal Number: ..............................................................
Serial Number: ...............................................................
Date of Purchase: ...........................................................
Dealer's Name: ..............................................................
Dealer's Address: ............................................................
Dealer's Phone Number: ...................................................
?AOLE
RECEPTACLE ANO FUSE TYPES
RATEDVOLTS 125/60 250/60
AMPS 1S 2.0 15 20 30
WALL OUTLET
_USE S(ZE ) 5 20 _ _ 5 20 _ 30
r_mMEDE_Y FUSE
(c_ ¢it_u_ br_k_r) Pmug P|ug pmug

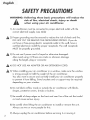
1)
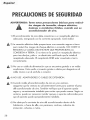
Air conditioner must be connected to proper dectricaJ outlet with the
correct dectricaJ supply. (see table)
Proper grounding must be ensured to reduce the risk of shock and fire.
DO NOT CUT OR REMOVE THE GROUNDING PRONG. Jfyou do
not have a three-prong electric receptacle outlet in the wall, have a
certified dectrician install the proper receptacle. The wdJ receptacle
MUST be properly grounded.
Do not use if power cord is frayed or otherwise damaged_
Also avoid using it if there are cracks or abrasion damage
along the lengfh, plug or connector.
DO NOT USEAN ADAPTER OR AN EXTENSION CORD.
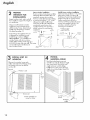
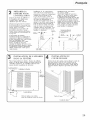
When installing your air conditioner in a window, make sure the window
is strong enough to hdd the wright of the air conditioner.
You also want to secure and correctly install your air conditioner properly
to prevent it from falling. Extra brackets and or support may be required
depending on your window.
6) Do not block airflow inside or outside the air conditioner with blinds,
drapes, protective covers, shrubs or bushes_
7) Be careful of sharp edges on the front and rear fins of the unit that could
cut and cause serious injury.
8) Be careful when lifting the air conditioner to install or remove the uniL
Always usetwo or more people for this.
9) Always unplug the dr conditioner before servicing it or moqng it.
2

English
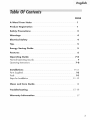
PAGE
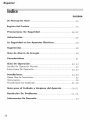
A Word Fro_ Haier 1
Product Reglstratlon 1
$afe_y Precautions 2
Warnings 4
£UectHcaUSafety 4
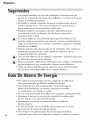
Tips 5
Energy $avlng Gulde 5
Features 6
Operatlng Gulde 7-8
Normal Operating Sounds 7
Operating Instructions 7o8
Uns_Hations g- ]3
PartsSuppJied ] O
TooJs 10
Stepsfor JnstaJJation ] ]- ]3
CUean and Care Guide ]4
TroubUeshootlng ] 5- ]8
Warranty Jnformatlon ]7

i ¸¸¸%¸¸
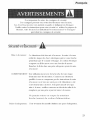
FoJJowingthe safety messages is very important.
These messages can save you from being injured or kiJJed.
Warning symboJsaJert you to be carefuJ and means Danger. AJways
foJJowinstructions to be safe and reduce chances of iniury or deatk
Warning and Danger signs wiJJprecede safety messages.
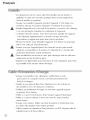
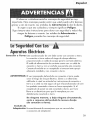
Grounding: This room air conditioner mustbe grounded.
Grounding reducesthe risk of dectric shockby
providing an escapewire for the eJectriccurrent.
Thepower cord hasa grounding wire with a
grounding pJug.PJugit into an outJetthat is
properJyinstdJedand grounded_
WARNUNG:
improperuseof thegrounding
pJugcan resuJtin a risk of eJectricshock.
CaJJa qualified dectridan if you don't understand
thegrounding instructionsor if you are not
sureif theair conditioner is properJygrounded.
Jfthe waJJoutbt is not grounded, pJeasecontactan
eJectridanto haveit repJacedwith a properJy
grounded outJet.
Do not, under any circumstances, cut or remove the
third (ground) prong from the power ¢@rdo
Adapter PUug: We strongJyadvise against using an adapter pJug.
4

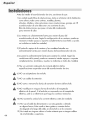
eAirConditionersaredesignedforuseinadoublehungwindowor
throughthewallinstallationonly_(Asapplicableinyourmodel)
• Whileinstallingunitbesure to flit air conditioner 1/4 degree ouhvard to
have the water drip outside the house_
o Install the unit on the north side as normalmythat is the shaded side. This
will enhance _heoperation of your unit.
_e Window has to be strong for installation_ Extra brackets and or support
may be required depending on your window. (Brackets and Supports
not induded in all models)
o Measure the window before installing, if the window is bo big for the
unit you may require professional installation,
_e Use correct electric voltage and proper ampere for the unit to run
effectively.
_® Only let a certified electrician do any modifications to your electrical
outlet,
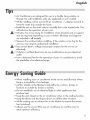
Use a dedicated line for the operation of your air conditioner to avoid
the possibiJih/of an electrical surge,
e When installing your air conditioner make sure to seal all areas where
there is a possibilib, of air bakage,
Airflow should not be blocked inside either by curtains, drapes or
furniture or outside by shrubs or bushes_
• Do not needbssly use on ebctrical light or other appliances that
produce heat,
Keep the vent dosed on the air conditioner when in the coomingfunction.
Keep the blinds and the drapes drawn on all the other windows.
While cooking use an exhaust fan in the kitchen to remove the excess
heat produced_
Always usethe correct BTU size air conditioner to cool the room to
affain optimum efficiency.

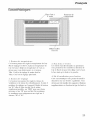
4°way controB
airflow
iiiiiiii_i
iiiiiiiiiiiii
iiiiiiiiiiiii
easy
eccess
fiHters
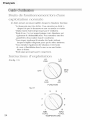
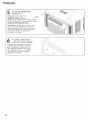
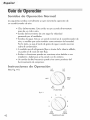
11.Temperature Set Knob
This knob adjusts the temperatureof the air_
Higher thesetting the coder theair temperature.
with this knob you can setthe bmperature to your
desired comfort bvel. Min, Cod being thewarmest
and Max. CooHbeing the coHdest
2. Functlor_ Se_ Knob
with this knob you can controJthefan speedas
well as the cooling speed.There are 3 knob
positionson theA/C for you to selectfrom. LO will
circulate air at the lowestvelocity MED at the
middle leve_ and HI will circulate at the maximum.
You have 2 FanOnly speedsto choose from HI and
LO.
3, 4 Way A_r I:mow
Theseair directional mouversletyou control the
direction of theairflow in your required direction
Theairflow can be directed
up - down - right side- left side
4. Window |n_aff Kit_
Enablesyou to installthe air conditioner in a
double hung window. Extra bracketsor support
may be needed depending on your window.

English
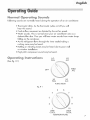
H@ md ©pe o tiHg B@ ds
FdJowing soundsare normaJJyheard during the operation of an air conditioner,
Thermostatclicks.As the thermostatcycleson/off you will
hear this sound.
_'Cod airflow movementas dictated by the set fan speed
®Water sounds.This is normal sinceyour air conditioner actsas a
dehumidifier aJso_Thusyou wiJJhear water soundsfrom water drops
falling on the condensen
o As the refrigerant flows through the inner sealed tubing a
rushing noise may be heard.
_,RattJingor vibrating noisesmay be heard due to poor waJJ
or window instdJation.
High pitch compressor soundmay be heard.
@pe l'isg I sst di@Hs LO
(Seefig. # 1) FAN
LO
AtC
.... M E D
OFF
A/C
fig. # 1
Hm Hm
FAN AtC
FUNCTmON
5 6
4 7
I 10
MIN MAX
COOL COOL
TEMPERATURE

E e/i h
After instaJJingyour air conditioner, pJugit into the proper
dectricd outRetin the wall
1) SelectMed. A/C on the FunctionSetknob.
2) SettheTemperatureSetknob at the mid [eveJsetting. ThiswiJ[turn on
your air conditioner.
3) Youcan setthe thermostatfrom Min Cod to Max Cool Min Cod being
thewarmest settingMax CooJbeing the cddest se_ting.
4} Your air conditioner has 1 or 2 Fanspeedsdepending on your modal
purchased and 3 A/C settings.
5) If your air conditioner has a Ventcontrd make sure that it is on dose.
Leaveit open onJyif you need to recycle the stale room air. By Jeavingit
dosed you will retain the cod air in the room.
6) Letyour air conditioner run for a few hoursbefore adjusting to the
desired settings.
7) Remember the compressor of your air conditioner wiH riot work
when the temperature goes bdow 65°F.
8) Also when you shut oft the _i_" conditioner vv_it f_- 3 minutes
/bef___i'etul'ning it on again. Thisis thecompressor cycle time.
9) if you haveany trouble in operating your air conditioner pJeaserefer to
theTrouble Shooting section.

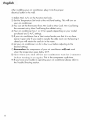
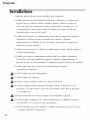
Before you install your air conditioner check the following:
The unit is free of aJJobstructions inside and outside the room e.g. drapes,
curtains, furniture, pJants,shrubs,bushes,trees,other structuresJikebuiJding,
garage etc.Air conditioner musthave dear unobstructed airflow through the
condenserto remove the heat.
2) Thewindow is strong enough to hdd the weight of the air con@ionen
Extra brackets or supportsmay be needed depending on your windows,
(Bracketsor Supports not provided in dJ modds)
3) Thewindow siJJand track are strong enough to hoJdthe weight of the
air conditionen
4) ThewaJJis strongenough to hdd the unit. Extra brackets or supports may be
needed depending on thewaR[ (Bracketsor Supports not provided in aHmodds)_
5)
A 7)
As}
Ag)
There is adequate and proper power suppJynear theair conditionen
DO NOT useadapter pJugs_
DO NOT useextension cords.
DO NOT cut or removethe ground prong_
DO NOT modify the pJugor thedectricd waJJoutJetin any way.
if pJugdoes not fit the dectrical outbt havea certified dectrician do the
necessarychange_
A10) DO NOT connecteJectricalpower to the unit before instaHatiom
A11) DO NOT useif power cord isworn out, frayed or otherwise damaged.
Avoid using if there are cracks or abrasion damage along the bngth,
pJugor connection.
12) DO NOT instaJJinto any existing cabinet or sbeve which does not haveside
and top air vents_

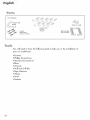
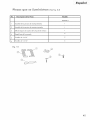
PartsSupplied
window seal
curtain
attachment
screws 13/32"
curtain sash
_crews
basepan angle
You wiJJneedto have the following tools to hdp you in the instaJJationof
your air conditionen
_Sdssors
_PhiJJipsScrewdriver
oStandard Screwdriver
oPJiers
*Wrench
*DriJ[ and DriJ[Bits
*Tape Measure
_GJoves
*Level
*Sockets
10

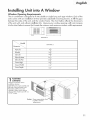
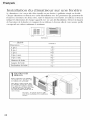
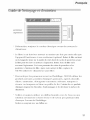
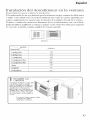
installing Unit intoA Window
Window Opening Requirements
Theair conditioner isdesignedto fit into doubb or singb hungsashtype windows. Eachof the
units comeswith an installation kit that provides adiustabJemounting Houvers,to fiJJthe gaps
between the sidesof the unit, and the window frame. Thechart below refbcts the dimensions
of theunitswith,and without installationkits. Measureyourwindow openingwidth and compare
it tothechart bdow toensurethatit meetsthe minimumand maximumwindow width requirements.
odd Hw[_osxc3
Dimension _\
A(inch)
B(inch) 144"
C(inch) 14_"
D(inch) Max 34_4"
D(inch) Min
Case High 13 Jj,]"
Case width z_!: _'
Case Depth
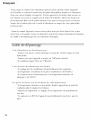
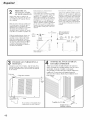
I SSEMgLE
CURTAINS
Unpack unit on floor next to
installation bcation
Shde Jeff-hand curtain assembly into
Jeffends of top and bottom rails
Repeat [or rightohand curtain
assembly Fasten curtain refainer
strips to sides of outer case with six
13_32 _'screws
11

PREPARE
WmNIX:_WFOR
iNSTALLATiON
_nsped window frack_ sash, and sill
for itsability b support the weight of
air conditioner
Measure width bebveenwindow
mddings to ensure UnstantMount
will fit window frame Insiant Mount
models are designed for windows
(the detail see page 11)
UnstantMount kit suppUiedwith unit
isdesigned for mounting in most
doubbohung windows without
Stormwindow ins_lRotlon
Ufstormwindow frame does not allow
adequate clearance below sill(]/2"
required), remove stormwindow
frame or create clearance by adding
a wood strip (atleast ] 1/2" wide}
along entire width of sil_ Fasten
wood #rip to sill "withat least three
countersunk wood screws (not
supplied with kit) Thisprovides a
smooth surface for mounting air
conditioner //2"
Mh_mum
s_rm windows. For ins_Hation in
window frame with storm window,
modify sill by adding wood strips(not D j U°
• . o
mdtl(Jed) to inner and outersills This raises o [. T
unit and eliminates interference of R_',,,
storrn window frame _;_.,_win_ox_.%q_. Or_
MoblJe home wk_dow _nstamatlon
Add wood strip (at least 1 1/2" wide)
along entire width of window silJ
Thicknessof wood strip should match
height of front lip on window frame
Fastenwood strip to sillwith a
minimum of three countersunkwood
screws (not supplied with kit) This
provides a smoothsurfacefor
mounting air conditionen
Must be a minknu, n
of 1/2,_ fo clear
bongo,r, ralJ onuni_
I 1/2"_j_C/_ Window
Minimum _ Frame
D T
D
o°
R
R
iNSTALLUNiT iN
WINDOW
Placeunit in window Lower sash
unt{l itrestsbehlnd front flange of fop
rail Boffom rail mustrestbehind
window sill
I_Jl
_Window sash
.......
J
About
5o
Curtain assembJy cut
away for clarity
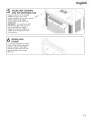
iNSTALL
BASEPANANGLE
Back front attachment screwout
severaJturns and slip Basepan Angle
over screw head Snugscrew with
angle restingon window ledge
UnstdlTwo 31/32" screws through
angle into windg',,vledge Repeat for
opposite side
31/32'
Basepa_
angle
12

SECURESiDECURTAmNS
AND TOPMOUNTING RAiL
_xpand curtains as far as possible
Unstall(2) 31/32 _ curtain sash
screws Install (3) 25=ram top mounting
raiUFor hard wood or metal
window frames, drill a pilot hole
to start screw
|MPORTANT: Be careful not to drill
pilot hob too deep Add a piece J
tape to the drill bit as a depth
gauge Ako stay dear of glass Be
careful not to damage the function
of the window.
mNSTALLSEAL
GASKET
Cut window seal gasket to w_dfhof
window Stuff window seal gasket
beN/een outdoor window glass
and top of indoor sash This will
stop air bc_kagewhich reduces
efficiency.
13

top-air
louvers
51;¸i ;;
i!_i;_LLLLLLLLLLLLLLLLLLLLLLLLLLLLLLLLLLLLLLLLLLLL
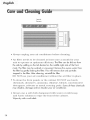
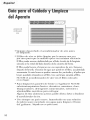
Always unplug your aF con(fitioner before cleaning.
• Air filter needs to be cleaned at least once a mouth fk_r your
unR to operate at opthnmn efficiency. The filter can be slid auf [ram
the side by pulling on the tab located on the middle right side of the front
mask. The filter may be washed or vacuumed. Remove the excess water from
the filter by gently shaking the {:ilter. This will remove dust and particles
trapped in the filter. After cleaning, reinstall the filter.
DO NOT use yam" ah" conditioner w_thout the ah" filter _n place.
To clean the fl'ont panels or tile cabinet DO NOT use harsh
chemicals, abrasives, ammonia, chlorine, bleach, concentrated
detergents, solvents or metal scom'ing pads. Some of these chemicals
may dissolve, damage and/or discolor your air conditioner.
Always use a soft cloth dampened with water or mild soap
and water solution to wipe tile fl'ont if tile cabinet.
Wipe dry with a soft cloth.
14

• Tosbre your air conditioner, after the season,remove the unit from the
window as per the installation guide. Repackthe unit in its original box
and store away. If your unit is installed in a wall or you do not intend to
remove it from the window thencover the outsidewith a winter cover.
Thiscan be purchased from the retaibr where you purchased your
air conditioner or Fromyour Rocalhardware store_
®Beforeputting away your unit make sureany water left in the pan is
removed and drained away. Water left in the pan could lead to Rusting
or damage to the electrical connections.
mfair ¢andi_ianer daes nat aperate:
Check if unit is plugged in. Theplug may have come loose.
* Check if the unit is in "Off" mode.
Thefan controJmay be in "Off" position.
Air from air ¢andi_ianer is warm:
TheA!C selling may need to be raised.
Thetemperatureoutside the room is below 65°F. The compressorwill
not cycle on if the temperatureoutside is below 65°F.
ke farma_ian an caaUlng talus:
o Outside temperature too cold_Setthe unit on fan only
settingto defrost ice_
o Lowertemperaturesetting.Temperatureseffing may be bo coJd.
Unit BTUmay be too high for the room.
15

.elish
Air conditioner working but room not cooUlng:
• Roommay have appJiancesthat produce heat_Usean exhaustfan b
remove excessheat_
Ventmay be in theopen position. Vent has to be closed for
optimum cooRing_
• Redirectthe airflow. Removeany obstacles.
• AHdoors and windows need to be dosed socooJair does
not escape the room.
o Air fiJfermay need cleaning.
Unit BTUmay be too low for the required cooling area.
On extreme hot & humid days air conditioners may take
a Rifflelonger to cool.
A_r ¢ondltloner is maklng nalse when caoUlng:
Youmay hear soundsof air movement,water, compressorcJickingon and
off or window vibrafions_PJeaseread Operating Guide I NormaJ
Operating Sounds_(Seepage 7)
Water in the air condltlaner ¢ablnet:
This is normal as your air conditioner not only cools but also dehumidifies
theair. If there iswater dripping insidethe room, check theinstallation of
the unit. The unit may need to be reinstalled. (Seepage 12)
16

English
This warranty covers aft defects
in workmanship or materials
for:
1_The mechanlcd and dectricd parts
(including labor costs)contained in this
Haier product, for a period of 12
months, Fromthe date of purchase,
(commerciaJ or rental appJicafion, the
warranty is 90 days).
2 The sealed system and compressor
contained in this Haler product is for a
period of 5 years, from the date of
purchase (excluding Jabot costs after the
inltid 12 month period). In commercial
or rental use, the additional limited
compressor warranty is for 1 year and 9
months, (excluding Jabor costs after the
initial 90 days period)
You must keep and be abJe to
provide your originaJ s_Ues
receipt as proof of the date of
Who is covered?
TheoriginaJretaiJpurchaserof thisHaier
product.
What will be done?
Haier wilJrepair or repJace, in your
home, any mechanical, dectricaJ part or
the compressor, which proves defective
in normaJ household, use for a period of
12 months. Haler wiJJrepair or replace
(excJuding labor costs)the sealed system
and compressor (parts onJy)for an
additionaJ 4 year period_
How can y@u get service?
1_Contact your nearest Haier
authorized Service DepoL For the name
of the Service Depot nearest you,
contact Haier at (877) 337°3639.
2_AJJservice must be performed, by an
authorized Haier Service DepoL
THHSWAR_N_ COVERS UNITS
WiTHiN THE CONTINENTAL
UNITED STATES,CANADA
AND PUERTORH¢O°
THiS WARRANTY DOES NOT
COVER:
• Damagesfrom improperinstaJJation
Damagesin shipping
Damagesfrom misuse,abuse,
accident,aJteration,Jackof proper care
and maintenance
• Damagesfrom service,by otherthan
an authorizeddealeror servicecenter
• Labor,service,transportationand
shippingchargesfor theremovalof
defectivepartsand instaJJationof a
repJacementpart, beyondtheinitiaJ12
monthperiod.
THIS LIMITEDWARRANTY JSGIVEN
IN LiEUOF ALL OTHER WARRANTIES,
EXPRESSOR IMPLIED, INCLUDING
THE WARRANTIES OF
MERCHANTABILITY AND FITNESSFOR
A PARTICULARPURPOSE.
Theremedyprovided in thiswarranty is
exclusiveandisgrantedin Jieuof aJJ
other remedies_Thiswarranty doesnot
coverincidentalor consequential
damages Somestatesdo notaJJowthe
exclusionof incidentalor consequential
damages,sothis Jimitationmay not
appJytoyou. Somestatesdo notaJJow
Jimitationson howlong an impJied
warranty Jasts,sothisJimitationmaynot
appJytoyou. Thiswarranty givesyou
specificJegaJrights,and you mayaJso
haveother rights,which vary from state
tostate.
17
Page is loading ...
Page is loading ...
Page is loading ...
Page is loading ...
Page is loading ...
Page is loading ...
Page is loading ...
Page is loading ...
Page is loading ...
Page is loading ...
Page is loading ...
Page is loading ...
Page is loading ...
Page is loading ...
Page is loading ...
Page is loading ...
Page is loading ...
Page is loading ...
Page is loading ...
Page is loading ...
Page is loading ...
Page is loading ...
Page is loading ...
Page is loading ...
Page is loading ...
Page is loading ...
Page is loading ...
Page is loading ...
Page is loading ...
Page is loading ...
Page is loading ...
Page is loading ...
Page is loading ...
Page is loading ...
Page is loading ...
Page is loading ...
Page is loading ...
-
 1
1
-
 2
2
-
 3
3
-
 4
4
-
 5
5
-
 6
6
-
 7
7
-
 8
8
-
 9
9
-
 10
10
-
 11
11
-
 12
12
-
 13
13
-
 14
14
-
 15
15
-
 16
16
-
 17
17
-
 18
18
-
 19
19
-
 20
20
-
 21
21
-
 22
22
-
 23
23
-
 24
24
-
 25
25
-
 26
26
-
 27
27
-
 28
28
-
 29
29
-
 30
30
-
 31
31
-
 32
32
-
 33
33
-
 34
34
-
 35
35
-
 36
36
-
 37
37
-
 38
38
-
 39
39
-
 40
40
-
 41
41
-
 42
42
-
 43
43
-
 44
44
-
 45
45
-
 46
46
-
 47
47
-
 48
48
-
 49
49
-
 50
50
-
 51
51
-
 52
52
-
 53
53
-
 54
54
-
 55
55


Ask a question and I''ll find the answer in the document
Finding information in a document is now easier with AI
in other languages
- français: Haier HWF08XC3 Le manuel du propriétaire
- español: Haier HWF08XC3 El manual del propietario
Related papers
-
Haier HWF05XCA Owner's manual
-
-
-
-
-
-
-
-
-
Haier HWR24VC3 User manual
Other documents
-
COMFORT-AIRE RAD-303A User manual
-
-
Robus RCP16EU-01 Product information
-
 Thermo Fisher Scientific FAIMS Pro and FAIMS Pro Duo User guide
-
 qudo 6211100227 Compact EV Charger User manual
-
Goldstar R5207 Owner's manual
-
-
 Thermo Fisher Scientific FAIMS Pro System User guide
-
 UStec TP-IPR8 Owner's manual
-
GE 75909HD Installation guide


