Page is loading ...

D
• T-40 star driver
• Pry tool
• Silicone sealer
• Metric and Standard socket set
• Open-ended 14mm
• 5/16 bit
• Pry tool
• Helper
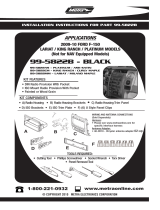
Polaris RZR
®
2014-up* 900 / 1000
Subwoofer Enclosure and Speaker Pods
Visit MetraPowerSports.com for more detailed information about the product and up-to-date vehicle specific
applications.
• Sealed enclosures for improved bass performance
• Provides 10in sub mounting solution
• Molded enclosure replaces original storage box location
• Stainless steel hardware
• Provides (2) 6.5-6.75 speaker mounting enclosures
• HDPE construction
• Black texture coat finish to match Polaris textures
• Amp brackets for 14-17 and 18+
Disassembly............................................................................2-5
MPS-RZSB Install....................................................................6-7
14-17 Amp bracket install..........................................................8
18+ Amp bracket install............................................................9
MPS-RZSP Install..................................................................10-11
Specifications............................................................................12
TABLE OF CONTENTS
Attention! We recommend removing the main battery fuse prior
to installation. When testing the after-market equipment, ensure
that all factory equipment is connected before cycling the key to
ignition.
TOOLS & INSTALLATION ACCESSORIES REQUIRED
Part Components
A) Sub Enclosure (MPS-RZSB) B) Amp Bracket 14-17, 18+ C) Speaker Pods (MPS-RZSP, L & R) D) Mounting Hardware
A
C
MPS-RZKIT
INSTALLATION INSTRUCTIONS
#MetraPowerSports
MetraPowerSports.com
©COPYRIGHT 2020 METRA ELECTRONICS CORPORATION REV. 01/03/2020 INSTMPS-RZKIT
Product Features
Note: This kit comes with 2 amplifier mounting brackets; 14-17, 18+
B
1
2

Hood Removal (w/ or w/out Ride Command
®
)
1. Turn both latches 1/4 turn to unlock the rear portion of the hood.
2. Lift the rear of the hood and slide forward to disengage the front tabs.
(Figure A)
Dash Removal
1. Un-clip locking pin then slide out passenger T handle.
2. Remove (2) T-40 Torx screws located between front fenders on the upper dash cover.
(Figure B)
3. Disconnect the instrument cluster, AWD switch, headlight switch, and ignition switch.
Notate their location and wire routing, then remove the upper dash.
(Figure C, page 3)
4. If equipped, back out the blue LED light from the lower dash.
5. If equipped, remove (1) T-40 Torx head screw from the dash pocket brace, then the plastic dash pocket can be pulled
out f the dash.(USB cable as well on Ride command models.)
(Figure D, page 3)
6. Remove the (2) T-40 Torx screws retaining the lower dash. The lower dash is also attached by clips.
(Figure E, page 3)
7. Remove the dash assembly from the vehicle, pull the dash straight out to remove.
Storage Box
1. Remove the (2) 10 mm bolts.
(Figure F, page 3)
2. Remove the storage box from the vehicle, pull down and out to release from the mounting tabs.
The storage box will no longer be needed.
2
386.257.2956 MetraPowerSports.com
(
Figure A
)
(
Figure B
)
Continued on next page
DISASSEMBLY 15-17 900/1000

3
REV. 01/03/2020 INSTMPS-RZKIT
(
Figure E
)
(
Figure F
)
(
Figure D
)
DISASSEMBLY 15-17 900/1000
(
Figure C
)

4
386.257.2956 MetraPowerSports.com
(
Figure A
)
(
Figure B
)
Hood Removal
1. Turn both latches 1/4 turn to disengage the rear portion of the hood.
2. Lift the rear of the hood and slide forward to disengage the front tabs.
(Figure A)
Dash Removal
1. Un-clip locking pin then slide out passenger T handle.
2. Remove (4) T-40 Torx screws located between front fenders on the upper dash cover.
(Figure B.1)
3. Depending on vehicle model, remove (2) push pins retaining display bezel / storage bezel.
(Figure B.2)
4. Remove the upper dash. (NON Ride Command unit shown).
(Figure C, page 5)
5. For Ride Command models remove (4) T-40 Torx screws located around display.
(Figure D, page 5)
6. Remove upper storage box buy removing (2) push pins.
(Figure E, page 5)
7. If equipped, back out the LED light (or USB in Ride command models) from the lower dash pocket.
8. Remove (1) T-40 Torx from the dash pocket brace, then the plastic dash pocket can be pulled out.
(Figure F, page 5)
9. Disconnect Ignition/switches; note their location for easy re-assembly.
10. Remove the lower dash assembly from the vehicle, pull the dash straight back to remove.
Storage Box
1. Remove the (2) 10 mm bolts.
2. Remove the storage box from the vehicle, pull down and out to release from the mounting tabs.
The storage box will no longer be needed.
DISASSEMBLY 18+ 900/1000
Continued on next page

5
(
Figure E
)
(
Figure F
)
REV. 01/03/2020 INSTMPS-RZKIT
(
Figure C
)
(
Figure D
)
DISASSEMBLY 18+ 900/1000

Subwoofer Enclosure
1. Before mounting the 10 in sub-woofer, Metra Powersports recommends applying a bead of silicone
sealant around the sub.
Metra Powersports also recommends applying a silicone sealant to the speaker wire in the opening
to ensure a good weather tight seal.
2. Lift the enclosure into place and align to the OE storage box mount against the square bar channel.
(Figure A)
Note: 2014-17 Uses all (3) mounting brackets.
(Figure B.1)
3. While holding the enclosure in place, loosely attached the brackets to the top of the enclosure using the
5/16 head bolts and washers provided.
(Figure C, page 7)
Note: 2018+ Uses larger (4) hole bracket and the smaller (2) hole U shaped bracket.
(Figure B.2, page 7)
4. For proper alignment of the sub box, slide the box toward the front of the vehicle.
(Figure D, page 7)
Note: 2018+ The U shaped front mounting bracket will align the sub box properly
If not properly placed, the dash panel clips may not align properly.
(Figure E, page 7)
5. Push against the sub box to keep the enclosure tight against the front wall.
Note: 2018+ Use an open-ended wrench to tighten the front bolts during this step.
6. Tighten the top brackets, as they tighten they may bend slightly, this will help avoid vibrations.
(Figure F, page 7)
6
386.257.2956 MetraPowerSports.com
INSTALLATION MPS-RZSB
(
Figure B
)
(
Figure A
)
Continued on next page

7
(
Figure E
)
(
Figure F
)
REV. 01/03/2020 INSTMPS-RZKIT
(
Figure C
)
(
Figure D
)
INSTALLATION MPS-RZSB

Amplifier Bracket
2014-2017
1. The bracket mounts to (4) existing factory points in the middle of the dash above the center pocket bracket.
(Figure A)
2. Use (4) supplied self threading T-40 Torx bolts.
(Figure B)
3. mount the amplifier bracket to existing holes in the vehicle.
(Figure C)
8
386.257.2956 MetraPowerSports.com
INSTALLATION AMPLIFIER BRACKET 14-17
(
Figure C
)
(
Figure B
)
Continued on next page
(
Figure A
)

9
(
Figure E
)
(
Figure F
)
Continued on next page
REV. 01/03/2020 INSTMPS-RZKIT
INSTALLATION AMPLIFIER BRACKET 18+
Amplifier Bracket
2018+
1. The bracket mounts to existing factory points in the middle of the dash directly behind upper pocket or
Ride Command display if equipped.
(Figure D)
2. Use (3) supplied self threading T-40 Torx bolts to mount the amplifier bracket to existing holes in the vehicle.
(Figure E)
Note: The threads may not be cut in the existing holes, if this is the case run the bolts in and out to tap the
threads. In the event that there are no factory hole(s), drill a 7/32 hole and use the supplied
self-threading T-40 Torx bolts.
(Figure F)
(
Figure D
)

Speaker Pod Enclosure
Preparation
1. Before mounting the MPS-RZSP pods, drill (2) 5/16 holes in each of the pods at the indented
marks.
(Figure A)
2. Hold the pods up in the correct location on the kick well area.
(Figure B, page 11)
Note: The speaker pods will mount in the same location from 2014+ model RZR.
3. Use a 5/16 bit to drill out the mounting holes.
4. The supplied 1/2 in Head Hex bolts, split washers and lock nuts will be used to attach the pods
to the vehicle.
5. Assistance may be needed to tighten the nuts and bolts.
TIP: Use silicone to seal around the bolt holes and after the bolts are tightened.
6. Run the speaker wires through the wire hole and seal with silicone.
10
386.257.2956 MetraPowerSports.com
INSTALLATION MPS-RZSP 14+
(
Figure A
)
Continued on next page

11
REV. 01/03/2020 INSTMPS-RZKIT
(
Figure B
)
INSTALLATION MPS-RZSP 14+

©COPYRIGHT 2020 METRA ELECTRONICS CORPORATION
MetraPowerSports.com
REV. 01/03/2020 INSTMPS-RZKIT
K
NOWLEDGE IS
P
OWER
Enhance your installation and fabrication skills by
enrolling in the most recognized and respected
mobile electronics school in our industry.
Log onto www.installerinstitute.com or call
800-354-6782 for more information and take steps
toward a better tomorrow.
®
Metra Recommends MECP
certified technicians
Having difficulties? We’re here to help.
Contact our Tech Support line at:
386-257-1187
Or via email at:
techsupport@metra-autosound.com
Tech Support Hours (Eastern Standard Time)
Monday - Friday: 9:00 AM - 7:00 PM
Saturday: 10:00 AM - 7:00 PM
Sunday: 10:00 AM - 4:00 PM
AMP Bracket
14-17 15 x 6.5 in
18+ 14.5 x 4.5 in
Speaker Enclosure
MPS-RZSB Subwoofer cut Opening 9.2 in dia.
Approx. 0.9 cubic feet
MPS-RZSP Speaker cut Opening 5.75 in dia.
Grill mount 7in dia.
Mounting depth 3.25
Approx. 0.2 cubic feet
Recommended to be used with BC-SGP
SPECIFICATIONS
MPS-RZKIT
INSTALLATION INSTRUCTIONS
#MetraPowerSports
/