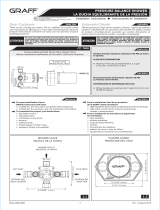
1)Before soldering,remove pressure balanced valve(14,13,12,11,10)
remove integral(8,7,6,5,4,3,2)from shower body.
2)After cool down from soldering,replace Integal(2,3,4,5,6,7,8)in order back to
shower body,use flat head screwdriver to turn the Studs(6)to"Close"position,
install pressure balanced valve and ceramic cartridge, turn on water supplies, check
connection for leak,turn Studs(6)slowly to"Semi On"position,flush the system with
both hot and cold water for 1 minute.Turn off water supplies,turn Studs(6)to"full
open"position,
3)Replace pressure balanced valve back to shower body,make sure silicon seals(A)
are on the right position,installed without silicon seals may cause leakage.
Installation
When connect with"CxM Adapter or CxF Adapter,wrap
the threads with right amount of Teflon Tape.(Wrap 20cycles)
Note:connected without Teflon Tape may cause leakage.
Important Notes:
Before reinstall the Pressure balanced valve make sure temperature
ring(E)is on the factory temperature preset position.
Soldering without removing ceramic cartridge,pressure
balanced valve and integral stop will void the factory warranty.
1)Connect spout and shower unit,Put a
1/2"spout if there is no connection to
either one.Attach shower head only
after flushing the system with both hot
and cold for 1 minute.
2)After all connection has been made.
Attach handle and test system.Check
all connection and valve for any leaks.
3)Test water pressure on full hot and cold.
If water pressure is unbalanced,use the
stud on the valve to adjust.
Insert the
screens washer
Models:YPH24224,Series
1)Remove handle and attach faceplate
with supplied screws.
2)Attach handle and fasten,test system
again.
Hot Position
Cold Position
Warm Position
Pressure Balance Valve Application
APPLICATION
A pressure balance valve was designed to be adjusted incoming hot or cold
water pressure and compensates for fluctuations to keep shower temperatures
constant and comfortable.When the inlet hot water is 120°F-180°F and inlet
cold water is 39°F to 84°F.The balance valve can compensate the temperature of
outlet water from normal to 106°F and there is a component that can limit the
hottest position setting . Tub/shower faucets have this pressure
balancing feature to prevent shower shock.
FEATURES:
1.passed the certificate of anti-scaled standard ASME
A112.18.1M U.S.A. And CSA
2.Our balance valve have applied the patent of USA,China and Taiwan.The
other countries patent are pending.
3.The balance valve are component of #303 stainless steel.precise ceramic
and high tech plastic material.Therefore the parallel and concentricity keep
well.Easy to installation,operation smoothly and quality stability.
4.Temperature limit setting our pressure balance valve can be adjusted via a
component to the temperature limit setting.So that the discharge temperature
will not exceed 120°F.
5.When the inlet water pressure change up to 50% or cold water pressure raise
up to 50%,the temperature of outlet still can maintain within ± 35.2°F
to ensure shower safety to prevert hot burn.
6.When the temperature of outlet water is 100°F ±2°F, outlet cold
water flow rate decrease,the outlet water still can be adjusted within 120°F
in 2 second. In other words,the oulet hot water can be decreased flow rate to
1.9L/min(1.5GPM)to free from hot burn.
7.The pressure balance valve we designed can be said as two in one valve for
installation eighter in the front side or in the oppostite direction of the same
wall and the same water suppley pipes.
NOTE:
1.Make sure the proper position of hot/cold water supply pipes before
install the valve
2.The torque suggest condition:
100-120 kgf.com(for mode )
3.The hot/cold water supply condition
hot water supply 120°F-180°F
cold water supply 39°F-85°F
4.When finish assembly,make sure it is cold water,warm water, hot water
incoming when you turm on the faucet.
5.If the water contains contaminants a lot,it's required in
a period and check the valve to ensure functionally normal and working
properly,The inspection times depend on the amount of contaminants
in the water.
6.The valve must be set by professional installer to ensure sefety,Any in
-proper installation will raise the discharge temperature and may get
hot burns.
YP57TS、YP57SO
1
2
3
4
5
6
7
8
9
10
11
12
13
14
15
16
17
18
19
26
27
28
20
21
22
23
19
25
24
Pressure
balanced valve
Silicon Seal
up
down
hot
cold
open
close
Min 24
1-5/8 -3-1/8