Page is loading ...

Thank you for purchasing the ProMaster Remote Camera and Flash Trigger System. For
the best performance, please read the instructions carefully before use.
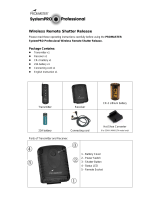
Transmitter
1. Shutter release/test button 2. Indicator light 3. Trigger shoe
4. Battery cover 5. Accessory socket

Receiver
1. Flash shoe socket 2. Power switch 3. Indicator light
4. Mounting shoe 5. Battery cover 6. Accessory socket
For Your Safety
Do not disassemble or modify
Keep Dry
Keep out of reach of children
Do not use in the presence of flammable gas
Do not expose to high temperatures
Features
The ProMaster Remote Camera and Flash Trigger System is a versatile, reliable remote
control kit that will trigger camera mount flash units and studio lights at a distance up to
100 meters/328 feet away.
The ProMaster Remote Camera and Flash Trigger System also offers the convenience of
a wireless remote camera shutter release, ideal for photographing wildlife, and also for
macro and close-up photos, where the slightest camera movement can ruin a picture.
(Optional modular camera release cord is required)
Using the 2.4GHz frequency, the ProMaster Remote Camera and Flash Trigger System
has reduced radio interference and an extended range (up to 100 meters/328 feet). It
does not require line-of-sight alignment as radio waves pass through walls, windows and
floors.
Important Note:
The ProMaster Remote Camera and Flash Trigger System does not transmit TTL settings.

Use of a flash or light unit with full manual control is recommended. You will need to set
the power output manually.
Components Included
Remove the ProMaster Remote Camera and Flash Trigger System from the package and
confirm that you have all the items listed below.
1443 – 1 Receiver System 1450 – 2 Receiver System
Transmitter
Receiver
Studio Light Cable
AAA Alkaline Battery
CR2032 Battery
Manual
1pcs
1pcs
1pcs
2pcs
1pcs
1pcs
Transmitter
Receiver
Studio Light Cable
AAA Alkaline Battery
CR2032 Battery
Manual
1pcs
2pcs
1pcs
2pcs
1pcs
1pcs
Specifications:
Wireless frequency system: 2.4GHz
Operating Distance: up to 100 meters/328 feet
Receiver includes 1/4-20 tripod mount
Sync Speed: up to 1/250s
Channel: 16 channels
Transmitter power: 1x CR2032 battery
Receiver power: 2x AAA battery
Functions:
1. Wired Remote Control (for DSLR cameras with remote socket. Optional
release cord required)
2. Wireless Remote Control (for DSLR cameras with remote socket. Optional
release cord required)
3. Wireless Flash Trigger (for camera mount speed light or studio light)
Weight:
Transmitter: 32g (without battery)
Receiver: 40g (without battery)
Dimension:
Transmitter: 62.6x39.2x27.1mm
Receiver: 79.9x37.8x33.2mm
Selecting an operating channel
The channel selector is inside the battery compartment of the transmitter and
receiver.
Slide off the battery compartment cover in the direction indicated and set the desired
channel. 16 combinations are possible.
Please make sure the transmitter and receiver are set to the same channel.
1 2 3 4
ON DIP
1 2 3 4
ON DIP

Replacing Transmitter batteries:
1. Slide the battery cover off of the transmitter
in the direction indicated
2. Remove the battery (CR2032 battery)
3. Insert a fresh CR2032 battery
4. Replace the battery cover
Replacing Receiver batteries:
1. Turn OFF the receiver unit
2. Slide the battery cover off of the receiver
in the direction indicated
3. Remove the batteries
4. Insert two fresh AAA batteries
5. Replace the battery cover

Wireless Flash Trigger:
1. Turn the power of camera and receiver OFF.
2. Mount the transmitter to the camera hot shoe socket.
3. Mount the flash on the receiver hot shoe socket.
4. If your flash or studio light does not have a hot shoe, connect the studio light cable
to the flash or studio light to the Accessory socket of the receiver.
5. Set the channel selector to the same position on both the transmitter and the
receiver. When using multiple flash units, be sure to set all of the receivers to the
same channel.
6. Turn on the power of the camera and the receiver.
7. Press the test button on the transmitter.
8. If the transmitter and the receiver status lights turn red and your flash triggers, all of
the settings are correct.
Wired Shutter Release:
1. Turn OFF the power on the camera.
2. Connect the optional shutter release cord to the Accessory socket of transmitter and
remote socket of camera body.
3. Turn ON the power to the camera.
4. Press the test button on the transmitter.
5. Press half way to focus and fully press the button to release the shutter.

Wireless Shutter Release:
1. Turn the power on the camera and receiver OFF.
2. Mount the receiver to the camera’s hot shoe socket. Connect the optional shutter
release cord to the Accessory socket of the receiver and the remote socket on the
camera body.
3. Be sure the channel selector is set to the same position on both the transmitter and
the receiver. To use multiple camera units, be sure to set all receivers to the same
channel.
4. Turn the power to the camera and the receiver ON.
5. Press the test button on the transmitter.
6. Press half way to focus and fully press the button to release the shutter.
7. If the transmitter and the receiver status lights turn red and your camera’s shutter
triggers, all of the settings are correct.
ONE YEAR UNCONDITIONAL GUARANTEE
If for any reason, your ProMaster product fails within ONE YEAR of the date of purchase,
return the product to your ProMaster dealer and it will be exchanged for you at no charge.
ProMaster products are guaranteed for ONE FULL YEAR against defects in workmanship
and materials. If at any time after one year, your ProMaster product fails under normal use,
we invite you to return it to ProMaster for evaluation and repair.
www.promaster.com
Fairfield, CT 06825
/


