Page is loading ...

SAFETY INFORMATION AND GENERAL GUIDE
READ AND SAVE THESE INSTRUCTIONS
• Please read and understand this entire manual before attempting to assemble, install or operate
the product.
• Make sure that all electrical connections comply with local codes, ordinances, the National
Electrical Code and ANSI/NFPA 70. Hire a qualified electrician or consult a do-it-yourself wiring
handbook if you are unfamiliar with installing electrical wiring.
Warning
: Before proceeding, be sure to shut off electricity at main switch or circuit breaker in
order to avoid electrical shock.
ESSWC-9-WH WALL TRANSMITTER
INSTALLATION AND OPERATION INSTRUCTION
Note
: Fan installation must be complete including assembly of blades before testing wall control
unit.
Note: Refer to your Ceiling fan instruction manual for Safety and installation instruction.
This wall controller is to be used for the control of ceiling fan and fan light only.
Warning: Do not exceed maximum rating of the wall transmitter. Install the wall transmitter
away from excess heat or humidity
Customer Service
800-969-3347
Customer Service Center
7400 Linder Ave.
Skokie, IL 60077
www.montecarlofans.com

2
© 2019 Monte Carlo Fan Company
7/2019
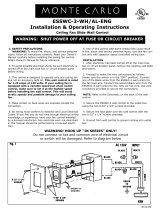
Wall Transmitter Installation, Wiring and Setting
Warning: Before proceeding, be sure to shut off electricity at main
switch or circuit breaker in order to avoid electrical shock.
Note: Before installing the wall transmitter, place it in OFF position by
pushing ON/OFF switch to the OFF. It is under the switch cover. (Fig.3)
Make series-wound connection for the wall transmitter with HOT wire
from house. Connect a black wire from wall transmitter to the HOT wire
and then connect the other wire to the LOAD wire in outlet box.
Note: The ON/OFF switch is to turn the power of fan on/off. If you
have installed a wall switch to control the power of fan, you may keep
the 2 black wires from the wall transmitter free and isolate them.
Connect green grounded wire to grounded wire from outlet box. (Fig.
1)
Install the wall transmitter to outlet box using machine screws
provided. (Fig. 2)
Install battery, remove switch cover by finger or using a small
pointed object and place batteries as shown in figure 3. Use a 12V,
23A/23AE batteries. The battery will weaken with age and should be
replaced before leaking as this will damage the transmitter. Dispose of
used battery properly, keep the battery out of reach for children.
Attach wall plate to wall control unit with screws provided. (Fig. 2)
Note: Place the wall transmitter in ON position when operating the fan.
Figure 2
White AC IN N
Green
120 VAC SUPPLY
Black To Hot
Black AC IN L
Black To Fan
Outlet Box
Figure 1
Black from fan (Receiver)
White from Fan (Receiver)
Green from
Wall
Transmitter
Receiver
Wall plate
Dimming Non Dimming Setting
The “DIM” selection is the light dimmable selection and it is to be
used with incandescent light bulbs including halogen bulbs, and
dimmable LED luminaries. The “ON/OFF” selection is the light
ON/OFF only (non-dimming function) and it is to be used with CFL
bulbs and other non dimmable luminaries. (
Fig. 4, page 3
)
Warning: The remote controller is set with dimming function at
factory, make sure to select “ON/OFF” (non-dimming
function) when use this remote controller with CFL and other
non dimmable luminaries. Wrong setting may damage the
light kit or the remote controller.
Figure 3
Battery
Switch cover
+
-
Open end

3
© 2019 Monte Carlo Fan Company
7/2019
WALL TRANSMITTER OPERATION
Press the OFF button to turn fan off.
Press this forward/reverse button to get desired airflow
direction. Fan must be running to reverse. It will take about 25
seconds for fan to slow down and change rotation direction.
Press this button quickly to turn light on or off. To dim light
(
Setting at “DIM” position
), hold down the button, the light will
cycle from bright to dim to bright until button is released.
Slide ON \ OFF switch to turn power on or off. It is under the
switch cover.
Note: Fan and Light will maintain the last setting if turned power
off by the ON/OFF switch.
The buttons on the wall transmitter control the fan speed and light as follows.
(Fig. 5)
Figure.5
Wall Transmitter Installation, Wiring and Setting
Common Mode and Learning Mode
Remove wall plate and switch cover by finger or using a small pointed object
as shown in figure 4.
There are “COMMON” and “LEARN Mode” with the remote controller.
If choosing “COMMON”, simply place the dip (code) switch at UPPER
position. Your fan with the remote controller is ready to use. (Fig. 4)
Note: If using universal mode, your fan can be controlled with other remote
transmitters with the same setting.
To control the fan with specific remote transmitter, choose “LEARN Mode” by
placing the dip (code) switch at LOWER position and then make learn function
setting as below.
Make “Learn function setting”, Restore power source to your fan, press
and hold the “LEARN” button for about 4 seconds until light flases (If the fan
installed with a light.
For fans without light, check operation using remote
transmitter). Your remote controller is ready to operate the fan. You must
press the “SET” button within 1 minute of restoring power to the fan. (Fig.4)
Note:
If the power is on already, you must turn the power off for 10
seconds at least, and then turn the power back for remote control learn
function setting. If the fan is running after turn power back, still wait for at
least 10 seconds and then press and hold the “SET” button for about 4
seconds. Your remote controller is ready to operate the fan.
Note:
If you want to control the fan with another transmitter, make the
same setting. A fan can be controlled by 2 transmitters maximum.
Turning the power of the first fan off when you make a learn function
setting for the second fan.
Open End
Switches
Cover
Figure 4
LEARN
COMMON ON
DIML CODE
Fan speed
1 = low speed 2 = medium low speed
3 = medium speed 4 = high speed
ON
OFF

4
© 2019 Monte Carlo Fan Company
7/2019
Tips for end users
1. If your fan is operated automatically after installation and power on, it is because your fan is still memorize the previous
setting at factory. Use universal mode or make learn function setting and your fan will be ready for use.
2. If fan or light isn’t working, reset power (turn the power off for at least 10 seconds, then turn the power back, and redo the
learn function setting. You must press the “SET” button within 1 minute of restoring power to the fan.
3. It is not available to separately operate the remote setting for more than one fan in the same room (in the area where remote
signal can reach to) if they share the same power supply. Separate power supplies (like as using individual wall switches for each
fan and turn power off for the fan while you are making learn function for other fan) is required if you want to separately control
more than one fan in same room.
4. When fan is turned on or operated forward/reverse function, it shutters & goes back & forth until it turns. It is a normal
performance of this fan and it will take for few seconds to run this operation.
THIS DEVICE COMPLIES WITH PART 15 OF THE FCC RULES OPERATION IS SUBJECT TO THE FOLLOWING TWO
CONDITIONS. (1)THIS DEVICE MAY NOT CAUSE HARMFUL INTERFERENCE AND (2) THIS DEVICE MUST ACCEPT
ANY INTERFERENCE RECEIVED, INCLUDING INTERFERENCE THAT MAY CAUSE UNDESIRED OPERATION.

Jul.2019
/