Sony ICD UX512 Quick start guide
- Category
- Dictaphones
- Type
- Quick start guide

ICD-UX512/UX513F
IC Recorder
Quick Start Guide
4-273-965-11(1)
© 2011 Sony Corporation
Printed in China
GB
ES
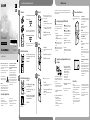
Let’s try out your new IC recorder
1. Power on.
1
1
2
1 Insert a battery with the correct polarity.
2 Turn the power on.
for more than 1 second
To turn the power off, slide the HOLD/POWER switch
in the direction of “POWER” for more than 2 seconds.
To prevent unintentional operations (HOLD)
To release the IC recorder from the HOLD status, slide the
HOLD/POWER switch towards the center.
2. Set the date and time.
2
1
1
1 Press or to set the year, month, day,
hour, and minute in sequence, and then
press /ENT.
2 Press STOP.
3. Select the menu language.
5
2
2, 3, 4
2, 3, 4
1
(The (FM radio) tab is displayed only
on the ICD-UX513F.)
1 Press MENU.
2 Press , press or to select ,
and then press /ENT.
3 Press or to select “Language,” and
then press /ENT.
4 Press or to select the language that
you want to use in the display window,
and then press /ENT.
5 Press STOP.
4. Record.
1
2
Operation
indicator
Before you start using the IC recorder, make sure that
you slide the HOLD/POWER switch towards the center to
release the HOLD status.
1 Press REC/PAUSE.
Recording starts and the operation indicator lights
in red.
You can pause recording by pressing REC/PAUSE.
Press
REC/PAUSE again to restart recording.
2 Press STOP to stop recording.
Recording stops and the operation indicator
flashes in orange.
5. Listen.
2
1
3
Operation
indicator
1 Press /ENT.
Playback starts and the operation indicator lights
in green.
2 Adjust the volume by pressing VOL –/+.
3 Press STOP to stop playback.
6. Erase.
2
2
1
Once a file is erased, you cannot restore it.
1 Press ERASE.
“Erase?” is displayed and the file to be erased is
played back for confirmation.
2 Select “Execute” using or , and then
press /ENT.
“Erasing…” is displayed while the selected file is
being erased.
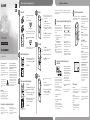
You can select a tab and a folder in which you
are going to record a file. You can also specify
the file to be played back or erased in the
selected folder.
1 Select a tab.
Press
to display the folder selection
window.
Press
and press or to select a
tab.
(Voice): Recordable area to be used
to manage files recorded with the IC
recorder.
(Music): Playback-only area to be used
to manage music files transferred from
your computer.
(Podcast): Playback-only area to be
used to manage podcast files transferred
from your computer.
(Built-in memory) or (External
memory): Memory to be used. You can
switch between the built-in memory and
external memory (memory card).
2 Select a folder.
Press to move to the tab you have
selected, and then press or to select
a folder.
3 Select a file.
Press to move to the folder you have
selected, and then press or to select
a file.
Selecting a memory/tab/folder/file
What to do next
The operating instructions explaining all the
features and functions of the IC recorder are
stored as PDF files in the built-in memory of
the IC recorder.
You can also download the operating
instructions from the Sony support home page:
http://support.sony-europe.com/DNA
1 Connect the IC recorder to your
computer.
2 Open the “Instructions” folder on
your computer.
On Windows: Click [My Computer]
or [Computer] - [IC RECORDER]
- [Instructions].
On Macintosh: Click [IC RECORDER] on the
desktop - [Instructions].
3 Drag and drop the files of the
operating instructions from the
“Instructions” folder to the local
disk on your computer.
The file names of the operating
instructions are as follows:
Product name_language
name_version.pdf (e.g.
ICD-UX512_UX513F_English_11.pdf)
4 Disconnect the IC recorder from
your computer.
To read the operating instructions, double-click
the PDF file you want to read.
Copying the operating instructions to your
computer
On power
Operate the unit only on 1.2 V or 1.5 V DC.
Use an NH-AAA rechargeable battery or an
LR03 (size AAA) alkaline battery.
On safety
Do not operate the unit while driving,
cycling or operating any motorized vehicle.
On handling
Do not leave the unit in a location near
heat sources, or in a place subject to direct
sunlight, excessive dust or mechanical
shock.
Should any solid object or liquid fall into
the unit, remove the battery and have the
unit checked by qualified personnel before
operating it any further.
If you have any questions or problems
concerning your unit, please consult your
nearest Sony dealer.
Precautions
Welcome to your new Sony IC recorder!
This is the Quick Start Guide, which provides
you with instructions on the basic operations
of the IC recorder.
Please read it carefully. We hope you enjoy
using your new Sony IC recorder.
To prevent possible hearing
damage, do not listen at high
volume levels for long periods.
WARNING
Do not expose the batteries (battery pack
or batteries installed) to excessive heat such
as sunshine, fire or the like for a long time.
RATED CURRENT CONSUMPTION: 800 mA
Notice for the customers: the following
information is only applicable to
equipment sold in the countries applying
EU directives
The manufacturer of this product is Sony
Corporation, 1-7-1 Konan Minato-ku
Tokyo, 108-0075 Japan. The Authorized
Representative for EMC and product safety
is Sony Deutschland GmbH, Hedelfinger
Strasse 61, 70327 Stuttgart, Germany. For any
service or guarantee matters please refer to
the addresses given in separate service or
guarantee documents.
IC Recorder (1)
Stereo headphones (1)
USB connection support cable (1)
Application software, Sound Organizer
(CD-ROM) (1)
Carrying pouch (1)
NH-AAA (size AAA) rechargeable battery (1)
Battery case (1)
Operating Instructions (Stored in the
built-in memory)
Check the supplied items.
Congratulations! You have set up your IC recorder and enjoyed your first recording. Let’s step
up to the next stage. There are some more useful functions and information that you can use to
fully utilize your IC recorder.
For details on each operation, refer to the
PDF operating instructions copied to your
computer.
MENU/
NOISE CUT
T-MARK
DPC (SPEED
CTRL)
Scene selection
You can select the menu items for recording
to the most appropriate settings according
to various recording scenes.
NOISE CUT
Reduces ambient noise to make the
playback sound clearer.
T-MARK
Adds a track mark to set the starting point
when recording or playing back a file.
DPC (SPEED CTRL)
Adjusts the playback speed.
MENU
Sets various menu items , such as REC Mode,
Mic Sensitivity, etc.
FM radio*
Allows you to tune in and record an FM
radio station using the menu. You can preset
stations for easy tuning, or change reception
settings.
* for ICD-UX513F only
More advanced features
Sound Organizer (PC application
software**)
Various operations can be performed using
Sound Organizer on your computer. You can
import files recorded with the IC recorder
into Sound Organizer to edit. You can import
music files of a music CD or podcast files to
transfer to the IC recorder. You can also burn
CDs of the music you like.
** for Windows only
Page is loading ...
-
 1
1
-
 2
2


Sony ICD UX512 Quick start guide
- Category
- Dictaphones
- Type
- Quick start guide
Ask a question and I''ll find the answer in the document
Finding information in a document is now easier with AI
in other languages
- español: Sony ICD UX512 Guía de inicio rápido
Related papers
-
Sony ICD-UX512F Quick start guide
-
Sony ICD SX712 Quick start guide
-
Sony ICD-TX50 Quick start guide
-
-
-
-
Sony ICD-UX502 Quick start guide
-
-
Sony ICD-UX560 Operating instructions
-
Sony ICD UX543 Quick start guide
Other documents
-
Olympus DS-2 User manual
-
-
-
JVC Everio GZ-MS130 User manual
-
LG RHT498H User manual
-
JVC Everio GZ-HM200 User manual
-
Olympus DS 3500 Owner's manual
-
JVC Everio GZ-HD320 User manual
-
Insignia NS-DVDR1 User manual
-
Philips LFH 0885 Operating instructions