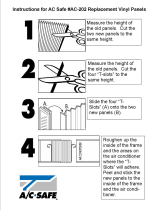
Soleus Air GM-CAC-08ESE User manual

Category
Mobile air conditioners
Type
User manual
Electronic Casement Window Air Conditioner
Operating Instructions
Model
GM-CAC-08ESE
GM-CAC-10SE
G
M-CAC-12SE
Thank you for choosing a Soleus Air powered by Gree Air Conditioner. This owner’s manual will
provide you with valuable information necessary for the proper care and maintenance of your new
product. Please take a few moments to thoroughly read the instructions and familiarize yourself with
all the operational aspects of your new air conditioner.
For your own records, please attach a copy of your sales receipt to this manual. Also, write the store
name/location, date purchased, and serial number below:
Store Name: ____________________________________________________
Location: ______________________________________________________
Date Purchased: _________________________________________________
Serial Number (located on back of unit): ______________________________
IMPORTANT SAFETY INSTRUCTIONS
Before installing and using your air conditioner, please read this owner’s manual carefully. Store this
manual in a safe place for future reference. Your safety and the safety of others is very important to
us. Please pay attention to all safety messages outlined in this owner’s manual.
WARNING: To reduce the risk of fire, electrical shock or injury when using your air conditioner, follow
the following basic precautions:
2
This is a safety alert symbol.
This symbol alerts you to potential hazards that can harm you or others or even cause
death.
All safety messages will directly follow the safety alert symbol and/or the words
“DANGER” or “WARNING”.
Failure to immediately follow these
instructions may cause serious injury
or even death.
All Safety messages alert you of potential hazards, how to reduce the chance of injury,
and what can happen if instructions are not followed correctly.
Plug into a grounded 3 prong outlet.
Do not remove the ground prong.
Do not use a plug adapter.
Do not use an extension cord.
Unplug the air conditioner before servicing
Use two or more people to move and install the air
conditioner
SPECIFICATIONS
Noise level is measured at a distance of 3.28 ft away from the front of the unit in cooling mode.
Power consumption is measured when the fan runs at the highest speed setting.
These specifications are for reference only. For actual data, please refer to the rating label on the back of the unit.
Model GM-CAC-08ESE
Power Supply (Ph/V/Hz) 1/115/60
Dehumidifying Capacity (Pints/Day) 31
Rated Cooling Capacity (BTU/hr) 8,000
Cooling Power Input (Watts) 760
Rated Current Cooling (Amperage) 7.2
Cooling EER 10.5
Noise Level dB(A) (High/Med/Low) 56/54/52
CFM (High/Med/Low) 420/370/320
Power Plug Type NEMA 5-15P
Product Dimensions
(W” x D” x H” ) (Inches)
14.5” x 23.25” x 20.25”
Product Weight (Lbs) 72.8
Refrigerant R-410A
GM-CAC-10SE
1/115/60
36
10,000
1052
9.2
9.5
60/58/56
550/510/470
NEMA 5-15P
14.2” x 24.5” x 20.3”
TBA
R-410A
GM-CAC-12SE
1/115/60
38.4
12,000
1263
11
9.5
60/58/56
550/510/470
NEMA 5-15P
14.2” x 24.5” x 20.3”
TBA
R-410A
Energy Star Yes No No
3
IMPORTANT SAFETY INSTRUCTIONS
4
Read all instructions before using this air conditioner
These instructions describe installation in a typical wood framed window with a wood SLIDE-BY sash, or installation in a
metal CASEMENT window. Modification may be necessary when installing in windows made differently than those
shown in these instructions.
MEETING ELECTRICAL REQUIREMENTS
OBSERVE ALL LOCAL GOVERNING CODES AND ORDINANCES.
DO NOT, UNDER ANY CIRCUMSTANCES, REMOVE THE POWER SUPPLY CORD GROUNDING PRONG.
NOTE: If codes permit, and a separate grounding wire is used; it is recommended that a qualified electri-
cian determine that the grounding path is adequate and not interrupted by plastic, non-metallic gas-
kets, or other insulating materials.
RECEPTACLE WIRING
Receptacle wiring should be a minimum of 14 gauge. Use copper wire only. It is your responsibility to provide proper and
adequate receptacle wiring, installed by an electrician.
ELECTRICAL REQUIRMENTS
A 115 volt (103.5 minimum, 126.5 maximum), 60 Hertz, AC only, 15 ampere fused electrical supply is required. A time
delay fuse or time delay circuit breaker is also required. A separate circuit, serving only this appliance, MUST be pro-
vided.
WARNING: Electrical Shock and Personal Injury Hazard
Electrical ground is required on this appliance.
DO NOT ground to a gas line.
If a cold water pipe is interrupted by plastic, non-metallic gaskets, or other insulating materials, DO NOT use for
grounding.
Check with a qualified electrician if you are in doubt as to whether the appliance is properly grounded.
DO NOT modify the power supply cord plug. If it does not fit the outlet, have the correct outlet installed by a qualified
electrician.
DO NOT have a fuse in the neutral or grounding circuit. A fuse in the neutral, or grounding circuit could result in an
electrical shock.
DO NOT use an extension cord with this appliance.
Failure to follow these instructions could result in electrical shock, serious injury or death.
ELECTRICAL CONNECTION
Electrical ground is required on this appliance.
Recommended grounding method:
For your personal safety, this appliance must be grounded. This air
conditioner includes a power supply cord with a 3-prong grounding
plug. To minimize possible electrical shock:
The cord must be plugged into a mating 3-prong grounding-type
wall receptacle.
Must be grounded in accordance with National Electrical Code
(ANSI/NFPA 70—Latest version) and
All local codes and ordinances
If a mating 3-prong grounding-type receptacle is not available, it is the
responsibility of the consumer to have a properly grounded 3-prong
wall receptacle installed by a qualified electrician.
5
PREPARING FOR INSTALLATION
Installation Tips
For wood-frame casement windows: It may be necessary to construct a frame, using at least 1-inch thick wood, with a
15-1/2-inch wide opening.
For brick or cement building construction: It may be necessary to put a wood stool strip under AC, for mounting pur-
poses.
Tools Required:
Flat-head screwdriver
Phillips-head screwdriver
Carpenter's level
Tape measure
Fine tooth saw
Electric or hand drill
Knife and scissors
Pencil
DISCLAIMER
ALL INFORMATION AND THE TECHNICAL SPECIFICATIONS PRESENTED IN THIS USER’S MANUAL ARE THE
PRESENTATION OF THE MANUFACTURER. SOLEUS INTERNATIONAL HAS NOT CONDUCTED INDEPENDENT
TEST TO THE INFORMATION AND THE SPECIFICATIONS PRESENTED HEREWITHIN.
PREPARING FOR INSTALLATION
WARNING: Failure to adhere to the following precautions could result in personal injury and product
damage.
Because this unit weighs about 88 to 105 pounds, it is recommended that you have someone help you when install
your new unit, and that you both use proper lifting techniques.
Inspect the condition of the window where unit will be installed. Be sure it will support the weight of the unit.
This appliance must be installed according to all applicable codes and ordinances.
Handle AC with care. AVOID sharp metal fins on front and rear coils.
Make sure your AC does not fall during installation.
Do not use water collected in the unit for drinking. It is not sanitary.
6
PARTS LIST & INSTALLATION
7
INSTALLATION
INSTALLING THE UNIT IN A SLIDING WINDOW
1. Attach support brace to platform as shown.
Use adjustment bolt and hex flange nut to complete
assembly. Choose slot and adjustment bolt hole
locations that will create a 45 degree angle between
platform and support brace. Try assembly in the
window to determine if platform will rest properly, and
allow proper slope (3/16-inch lower on outside).
NOTE: If you are planning to use a siding protection
board (see Step 5) on the outside of your
house, hold board in place when testing assembly in
window.
2. Measure, and lightly mark a line 8-11/16 inches
from window jamb.
NOTE: If any sash stop protrudes more than 1
inch from the side window jambs, the 8-11/16-inch
measurement must be increased accordingly.
Screen and storm window frames may also require
adjustments to the measurement.
3. Center platform assembly on the line with inside
platform tab pressed against inside edge of window
track. Using the holes in the platform as a guide,
mark and drill two 9/64-inch diameter holes. Drill
holes in either track or stool.
CAUTION
Property Damage Hazard—Failure to adhere
to the following precautions could result in
damage to window or the air conditioner. Make
sure the wood stool or window track is securely
attached to the building construction. Use
longer screws in sub-framing if necessary.
8
INSTALLATION—SLIDING
INSTALLING THE UNIT IN A SLIDING WINDOW (CONT.)
4. Peel off protective backing from track seal. Apply
seal to room side of window track. Center of seal strip
should coincide with the line marked in Step 2. The
two screw holes drilled in Step 3 should be directly
above seal strip in the inner track.
5. Securely attach a siding-protection board to
side of house.
NOTE: Siding-protection board should be long
enough to span 2 wall studs.
6. Place platform assembly, with platform tab
against inside of window track, and attach it to
window jamb. Use appropriate length screws (Items
9-11 in Preparing For Installation).
7. Adjust platform assembly so that outside edge is
3/16-inch lower than inside edge, as shown right.
This ensures proper water drainage from the air
conditioner.
8. Level platform assembly from side-to-side.
Also, make sure window track is level. Use leveling
shims as necessary to ensure unit is level from side-to-
side.
9. Measure height of window opening from top of
platform assembly as shown right. Subtract 20-5/8
inches. Mark this measurement on plastic window
panel, along the longer side. (continued)
9
INSTALLATION—SLIDING
INSTALLING THE UNIT IN A SLIDING WINDOW
(CONT.)
10. Clamp plastic window panel between a board
and a work table, and cut along cutting line with a fine
tooth saw. Remove any burrs with a file.
11. Fasten side channels to the sides of the AC
using 3 screws (Item 17) per channel. Start with first
screw at top of channel. Make sure hook ends of
channels face toward back of unit.
12. Slide plastic window panel into panel frame,
with the smooth side to the room. Slide panel frame
assembly into side channels of the AC cabinet. Make
sure plastic window panel is firmly enclosed on all
sides by the retainer grooves.
13. Cut side channel seal into 2 equal lengths.
Remove protective backing and apply it to the rear
side of cabinet side channels, starting just below
panel frame assembly. Pinch off excess length so
seal is even with the bottom of the cabinet side
channel.
14. To remove front
1. Remove the two front retaining screws from the
front frame.
2. Press firmly on each side of the metal case close
to the front, approximately 2/3 of the way down.
3. While pressing on the sides of the metal case,
gently pull the front out and lift up to release it
from the case.
4. Then remove the four screws from the front frame
to release the control panel box.
NOTE: DO NOT push or pull air direction louvers.
15. Place AC in window opening. As shown right, it
should sit on platform assembly so that window panel
frame, and cabinet side channels are against top and
side window jambs. (continued)
10
INSTALLATION—SLIDING
INSTALLING THE UNIT IN A SLIDING WINDOW (CONT.)
16. Slide inner window sash firmly against side
of the cabinet. Make sure not to peel the seal strips
from the window track and cabinet side channels. If
the panel frame does not fit snugly to the inner
window sash, secure the panel frame to the sash
with #8x3/4-inch screws, or #8-32x3/4-inch self-
threading screws. Use the partially plugged holes in
the panel frame. Drill 1/8-inch pilot holes for the
screws.
17. Hook the safety bracket over the base of the
unit and fasten it to the front of the platform
assembly. Use a #8-32x3/4-inch self-threading
screw.
NOTE: The bracket prevents movement of the
air conditioner (either in or out) after completing the
installation.
18. Stuff the foam seal strip/sash seal between
the vertical sash and the window glass, as shown
right.
19. Use the window locking bracket to lock the
inner window sash to the base of the outer window
sash. Use one #8x3/4-inch screw, or #8-32x3/4-
inch self-threading screw. (Drill 1/8-inch pilot hole).
20. To replace the front
First reconnect the coupler plugs, make the exhaust
control positioned through the front in the proper
location. Gently push the front into position on the
cabinet. It should click into place. Then replace the
retaining screws that holds the panel in place.
Do not push or pull the front panel louvers.
Alternate Window Jamb Applications
To install in windows having no flanges or wood stops
on the top and side jambs, the channels and panel
frame must fit against a mating flange (or 1/16-inch
max. thick angle) attached to the window jambs.
Figure A shows this angle installed. Figures B & C
show alternate treatments. On the sash side of the
opening, the leading corner of the inner sash
becomes the flange. You can purchase the angle
Strip locally.
11
INSTALLATION—CASEMENT
INSTALLING THE UNIT IN A CASEMENT WINDOW
NOTE:
Open the window the maximum amount to allow for clearance of the cabinet. The crank handle
should be removed to allow the platform to be fastened to the jamb. If the window cannot open far enough
(more than 15-1/2 inches) for the cabinet to clear the window, remove the window entirely by drilling out the
rivets. Bolts can serve as the pivots in the future.
To avoid crank handle and window clearance problems, the unit can be installed in a stationary sash section.
However, the horizontal mullion and the 2 glass panels must be removed before installation.
1. Attach support brace to platform as shown. Use
the adjustment bolt and hex flange nut to complete
the assembly. Choose the slot and adjustment bolt
hole locations that will create a 45 degree angle
between the platform and the support brace. Try the
assembly in the window to determine if the platform
will rest properly, and allow the proper slope (3/16-
inch lower on outside).
NOTE: If you are planning to use a siding protec-
tion board (see Step 6) on the outside of your
house, hold the board in place when testing the
assembly in the window.
2. Drill a 9/64-inch diameter pilot hole in the
window jamb an equal distance from each side of the
jamb, and 3/16-inch up from the window sill. If the
hole coincides with the window lever slot in the jamb
bottom, an additional hole will have to be drilled
through the platform edge and the window jamb to
miss this slot.
3. Peel off the protective backing from the track
seal, and stick the seal to the window sill on the
outside of the bottom jamb.
4. Screw the platform assembly to the window
jamb through the pilot hole you drilled in Step 2. Use
a #8x3/4-inch self-threading screw.
12
INSTALLATION—CASEMENT
INSTALLING THE UNIT IN A CASEMENT WINDOW (CONT.)
5. Adjust the platform assembly so that the rear of
the air conditioner will be 3/16-inch lower than the
front. This ensures proper water drainage from
the air conditioner.
NOTE: A projection below the base of the air
conditioner will require the rear of the platform to be
7/16-inch lower than the front to create the 3/16-
inch slant from front to rear.
6. Securely attach a siding-protection board to the
side of the house where the platform assembly hit
the house. The siding-protection board should be
long enough to span 2 wall studs.
7. Measure the height of the window opening
from the top of the platform assembly. Subtract
20-5/8 inches. Mark this measurement on the
plastic window panel, along the longer side.
8. Clamp the plastic window panel between a
board and a work table, and cut along the cutting
line with a fine tooth saw. Remove any burrs with
a file.
9. Fasten the side channels to the sides of the
unit using three screws (Item 17) per channel.
Make sure hook ends of channels face toward the
back of unit.
10. Slide the plastic window panel into the panel
frame with the smooth side to the outside. Slide
the panel frame assembly into the side channels
of the air conditioner cabinet. Make sure the
plastic window panel is firmly enclosed on all
sides by the retainer grooves.
13
INSTALLATION—CASEMENT
INSTALLING THE UNIT IN A CASEMENT WINDOW (CONT.)
11. Cut side channel seal into 2 equal lengths.
Remove the protective backing and apply it to
the rear side of the cabinet side channels,
starting just below the panel frame assembly.
Pinch off excess length so the seal is even with
the bottom of the cabinet side channel.
12. To Remove the Front Panel
1. Remove the two front retaining screws from
the front frame.
2. Press firmly on each side of the metal case
close to the front, approximately 2/3 of the way
down.
3. While pressing on the sides of the metal
case, gently pull the front out and lift up to re-
lease it from the case.
4. Then remove the four screws from the front
frame to release the control panel box.
NOTE: DO NOT push or pull the air direction
louvers.
13. Place the air conditioner in the window
opening as shown to the right. It should sit
on the platform assembly so that the window
panel frame, and the cabinet side channels are
against the top and side window jambs. Side
channels should overlap side window jambs
equally.
14. Drill two 9/64-inch diameter pilot holes in
the top window jamb in line with the partially
plugged holes in the panel frame. Secure the
panel fame to the window jamb with two #8-
32x3/4-inch self-threading screws. If additional
holding is necessary, two screws may be used
on the sides of the panel frame as well.
15. Drill two screw-clearance holes in the cabi-
net side channels (near bottom) and two 9/64-
inch diameter pilot holes in the side window
jambs. Secure the cabinet side channels to the
window jambs with two #8-32x3/4-inch self-
threading screws. When doing this, be careful
not to twist the side channel seals with the
screws.
NOTE: Inserting screws will prevent the air
conditioner from being pushed into the room.
16. To replace the front
First reconnect the coupler plugs, make the
exhaust control positioned through the front
in the proper location.
Gently push the front into position on the cabinet. It
should click into place. Then replace the retaining screws
that holds the panel in place.
IMPORTANT SAFETY INSTRUCTIONS
14
Read all instructions before using this air conditioner
FOR YOUR SAFETY
Do not store or use gasoline or other flammable vapors and liquids in the vicinity of this or any other appliance. Read
product labels for flammability and other warnings.
ACCIDENT PREVENTION
To reduce the risk of fire, electrical shock, or injury to persons when using your air conditioner, follow basic precautions,
including the following:
Be sure the electrical service is adequate for the model you have chosen. This information can be found on the
rating label located on the side of the cabinet or behind the grille.
If the air conditioner is to be installed in a window, you will probably want to clean both sides of the glass prior to
installation. If the windows is a triple-track type with a screen panel included, remove the screen completely before
installation.
Be sure the air conditioner has been securely and correctly installed according to the installation instructions
provided with this manual. Save this manual and the installation instructions for future use when removing and
reinstalling the unit.
When handling the air conditioner, be careful to avoid cuts form sharp metal fins on the front and rear coils.
NOTE: The power supply cord on this air conditioner contains a current detec-
tion device designed to reduce the risk of fire. Please refer to the section “Operation of
Current Device” for details. In the event that the power supply cord is damaged, it
cannot be repaired it must be replaced with a cord from Soleus Air Powered by Gree.
ELECTRICAL INFORMATION
The complete electrical rating of your new air conditioner is
stated on the product rating label located on the unit. Refer to the
ratings on the label when checking electrical requirements.
Be sure the air conditioner is properly grounded. To minimize
shock and fire hazards, proper grounding is important. The
power cord is equipped with a three-prong grounded plug for
protection against shock hazards.
Your air conditioner must be used in a properly grounded
wall receptacle. If the wall receptacle you intend to use is not
adequately grounded or protected by a time delay fuse or
circuit breaker, a qualified electrician will have to install the
proper receptacle.
Do not run the air conditioner with a protective cover on the
outside of the unit. This could result in mechanical damage
within the air conditioner.
Do not use an extension cord or an adapter plug.
15
READ THIS SECTION BEFORE ATTEMPTING TO OPERATE YOUR AIR CONDITIONER
The power supply cord contains a current device that senses damage to the power cord. Follow the instructions below to
test your power cord.
1. Plug in your air conditioner
2. The power supply cord will have TWO buttons on the plug. Press the TEST button. You will notice a click as the
RESET button pops out.
3. Press the RESET button. The button will click when the RESET button engages.
4. The power supply cord is now supplying electricity to the unit.
NOTE:
Do not use this device to turn the unit on or off.
Always make sure the RESET button is engaged for correction operation
The power supply cord must be replaced if it fails to reset when either the TEST button is pushed, or it cannot be
reset. A new one can be obtained from Soleus Air Powered by Gree.
If the power supply cord is damaged, it CANNOT be repaired. It MUST be replaced with one obtained from Soleus
Air Powered by Gree.
OPERATION OF CURRENT DEVICE
IMPORTANT SAFETY INSTRUCTIONS
16
Before you start using your air conditioner, please familiarize yourself with the control panel and remote control
functions. This air conditioner can be controlled by the control panel (touch pad) or the included remote control.
1) Power On and Off - Press the POWER to turn the unit ON and OFF.
2) Digital Display - Displays the Set Temperature in Auto, Cooling, Energy Saver or Dry Mode, as
well as the Time for the Timer function. Displays the ambient temperature in fan mode.
3) Temperature Select - Select the desired temperature by pressing either or button when
using the unit in cooling , Energy Saver, or Dry mode. The temperature indicator flashes to dis-
play the desired temperature setting. After the temperature is set, the unit will display this tem-
perature setting until it is changed by the user.
4) Timer Select - Select the desired ON/OFF time amount by pressing either or button
5) Fan Speed Control - Press the FAN Button to cycle through the different fan speeds: High,
Medium, low, and Auto.
6) Mode Selection
- Press the MODE Button repeatedly to cycle between the different modes:
Cooling, Energy Saver, Dehumidifier, Fan, and Auto mode.
7) Auto-on Timer - To program the Auto-on timer, press the TIMER button when the unit is pow-
ered off. Press the or buttons to change the timer to the desired amount of time (.5-24
hours) for the unit to automatically turn on. Auto-off Timer
- To program the Auto-off Timer ,
press the TIMER button when the unit is powered on. Press the or buttons to change the
timer to the desired amount of time (.5-24 hours) for the unit to automatically turn on.
8) Filter Check - After the unit is on for 250 hours, the filter check light will turn on to remind you to
clean the filter. Press the Filter Check button once the filter has been cleaned to turn the warning
off.
9) Sleep Mode - Press this button to put the unit into sleep mode when in cooling or dry mode.
Sleep mode automatically reduces set temperature by 2°F after one hour and 4°F after two
hours. This feature limits compressor usage and in turn enhances energy saving while you are
sleeping.
OPERATING YOUR AIR CONDITIONER
CONTROL PANEL (TOUCH PAD)
17
OPERATING YOUR AIR CONDITIONER
REMOTE CONTROL
Battery Size: AAA - NOTE: Do not mix old and new batteries or different types of AAA batteries.
1. ON/OFF - Press the ON/OFF button to turn
the A/C on or off. When the unit is turned off,
the Timer and sleep functions will be can-
celled. The set temperature will be saved.
2. MODE
- Press the MODE button to change
the operating mode. You can choose AUTO,
COOL, SAVE (energy saver), FAN only, or
Dry (Dehumidifier). The temperature will not
be displayed when AUTO mode is selected.
3. “—”
- Press the “-” button to decrease the
temperature when the unit is on. Press and
hold the “-” button for more than 2 seconds to
quickly cycle through the temperature op-
tions. Stop pressing the button when the de-
sired temperature is displayed. The tempera-
ture cannot be set in auto mode. Temperature
range: 61°F - 86°F.
4. “+”
- Press the “+” button to increase the
temperature when the unit is on. Press and
hold the “+” button for more than 2 seconds to
quickly cycle through the temperature op-
tions. Stop pressing the button when the de-
sired temperature is displayed. The tempera-
ture cannot be set in auto mode. Temperature
range: 61°F - 86°F.
5. FAN - Press the FAN button to turn change
the FAN options. You can choose between
four speeds and auto mode. The fourth fan
option is only available in cooling and energy
saver modes.
6. IFEEL MODE
- Press the IFEEL button to
change the thermostat sensor from the air
conditioner to the remote location. The air con-
ditioner will cool the area depending on the
location and set temperature of the remote
control. Take the remote control with you so
the air conditioner cools the room to your loca-
tion.
7. SLEEP MODE - Press the SLEEP button to
turn SLEEP mode on or off. SLEEP mode is
set to off automatically. When SLEEP mode is
selected the timer can be adjusted. SLEEP
mode is not available in Fan or Auto mode.
Sleep mode automatically reduces set tem-
perature by 2°F after one hour and 4°F after
two hours. This feature limits compressor us-
age and in turn enhances energy saving while
you are sleeping.
8. TIMER - Press the TIMER button when the
unit is off to set up the Auto-on timer. The Auto
-on time can be set between .5 - 24 hours. The
icons “T-ON” and “H” will flash for 5 seconds.
Start selecting the time using the “+” and “-”
buttons before the icons stop flashing. The
time will increase/decrease in .5 hour incre-
ments with each press of the “+” or “-” buttons.
To cancel the Auto-on time, manually press
the ON/OFF button to turn the unit on.
Press the TIMER button when the unit is on to
set up the Auto-off timer. The Auto-off time can
be set between .5 - 24 hours. The icons “T-
OFF” and “H” will flash for 5 seconds. Start
selecting the time using the “+” and “-” buttons
before the icons stop flashing. The time will
increase/decrease in .5 hour increments with
each press of the “+” or “-” buttons. To cancel
the Auto-off time, manual press the ON/OFF
button to turn the unit off.
Once the Auto-on or Auto-off time is set, the “T
-On” or
“T-Off” and “H” will blink for 2 seconds.
After 2 seconds the set temperature will be
displayed.
18
OPERATING YOUR AIR CONDITIONER
REMOTE CONTROL
Battery Size: AAA - NOTE: Do not mix old and new batteries or different types of AAA batteries.
9. LOCK/UNLOCK- Press the “+” and “—” buttons simultaneously to lock and unlock the remote control.
When the remote is locked, none of the functions or setting can be changed using the remote.
10. F° or C°
- To switch between the F° or C° settings, press the MODE and “—” buttons a the same time.
11. DISPLAY LIGHTS
- Hold the “+” and FAN buttons to turn the light s on the display ON or OFF. This can
be done when the unit is on or off.
12. ENERGY SAVER MODE - When the unit is in energy saver mode, the Energy Saver light will turn on.
In Energy Saver mode, the unit will turn-off once the room is cooled to the user set temperature. The
fan will also be off at this point. The unit will turn back on when the room temperature rises above the
user set temperature.
The temperature control will maintain the set temperature within 2°F, between 60°F and 90°F degrees.
The Exhaust control allows the air conditioner to recirculate inside air when it is set to CLOSED. When it is
set to OPEN the air conditioner exhaust air outside and brings in fresh air. Use the CLOSED position when
maximum cooling is needed. OPEN removes stale inside air and replaces it with fresh air.
Direct air up, down, left, or right throughout the room with the 4-way directional louvers.
19
AIR CONDITIONER FEATURES
OPERATING YOUR AIR CONDITIONER
There is a 3 minute delay when cooling mode is engaged or disengaged.
This delay prevents the compressor from overheating and possible tripping of
the circuit breaker. The fan will continue to run during this time.
EXHAUST CONTROL
4-WAY DIRECTIONAL LOUVERS
20
CARE AND CLEANING
Clean your air conditioner to keep it looking new
and to minimize dust build up.
Air Filter Cleaning
The air filter should be checked at least once
every month to see if it needs cleaning. Trapped
particles and dust can build up in the filter and
may decrease airflow as well as cause the
cooling coils to accumulate frost. To clean the air
filter:
1. Remove the filter grasping the center and
pulling up and out (See FIG. 13)
2. Wash the filter using liquid dish soap and
warm water. Rinse the filter thoroughly. Gen-
tly shake the filter to remove excess water.
3.
Let the filter dry completely before placing it
into the air conditioner.
4.
If you do not wish to wash the filter, you may
vacuum the filter to remove the dust and
other particles.
Wear and Tear
To minimize wear and tear on the air condi-
tioner, always wait at least 3 minutes before
changing modes. This will help prevent the
compressor from overheating and the circuit
breaker from tripping.
Winter Storage
To store the air conditioner when it is not in use
for an extended period of time, remove it care-
fully from the window according to the installation
instructions and cover it with plastic or place it in
the original box.
Cabinet Cleaning
To clean the air conditioner cabinet:
Unplug the air conditioner to prevent shock or
a fire hazard. The cabinet and front panel of
the air conditioner may be dusted with an oil-
free cloth or washed with a cloth dampened in
a solution of warm water and mild liquid soap.
Rinse thoroughly with a damp cloth and wipe
dry.
Never use harsh cleaners, wax or polish on
the cabinet front.
Be sure to wring excess water from the cloth
before wiping around the controls. Excess
water in or around the controls may cause
damage to the air conditioner.
Energy Saving Ideas
Do not block the air flow inside with blinds,
curtains or furniture; or outside with shrubs,
enclosures, or other buildings.
The capacity of the room air conditioner must
fit the room size for efficient and satisfactory
operation.
Install the room air conditioner on the shady
side of your home. A window that faces North
is best because it receives the least amount
of sun exposure.
Close the fireplace damper, floor and wall
registers so cool air does not escape.
Keep blinds and drapes closed for cooling
and open for heating.
Clean the air filter as recommended in the
“care and cleaning” section.
Proper insulation and weather stripping in
your home will help limit cool air loss.
External house shading with trees, plants, or
awnings helps reduce the air conditioner’s
work load.
Operate heat producing appliances during the
coolest part of the day. Such as a dish-
washer, oven, or computer.
FIG. 13
TAKING CARE OF YOUR AIR CONDITIONER
  • Page 1 1
  • Page 2 2
  • Page 3 3
  • Page 4 4
  • Page 5 5
  • Page 6 6
  • Page 7 7
  • Page 8 8
  • Page 9 9
  • Page 10 10
  • Page 11 11
  • Page 12 12
  • Page 13 13
  • Page 14 14
  • Page 15 15
  • Page 16 16
  • Page 17 17
  • Page 18 18
  • Page 19 19
  • Page 20 20
  • Page 21 21
  • Page 22 22
  • Page 23 23

Soleus Air GM-CAC-08ESE User manual

Category
Mobile air conditioners
Type
User manual

Ask a question and I''ll find the answer in the document

Finding information in a document is now easier with AI