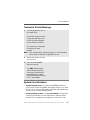
Motorola Astro Digital Spectra Series User manual
- Category
- Two-way radios
- Type
- User manual
This manual is also suitable for

ASTRO
®
Digital Spectra
®
and
Digital Spectra Plus
W4, W5, W7, and W9 Mobile Radios
User Guide

6881076C25-D
*6881076C25*
MOTOROLA, the Stylized M Logo, ASTRO and Spectra are
registered in the U.S. Patent and Trademark Office. All other
product or service names are the property of their respective owners.
© Motorola, Inc. 2002.
All rights reserved. Printed in U.S.A.
Motorola, Inc.
8000 West Sunrise Boulevard
Ft. Lauderdale, FL 33322

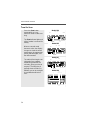
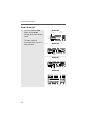
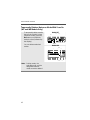
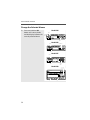
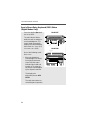
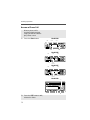
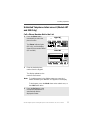
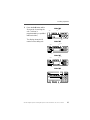
ASTRO
®
Digital Spectra
®
and Digital Spectra Plus
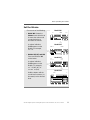
W4 Mobile Radio
Quick Reference Card
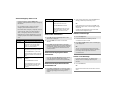
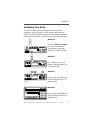
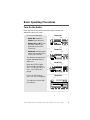
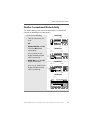
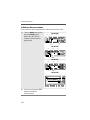
BASIC OPERATION
Turn the Radio On and Off
Set the Volume and Squelch
Change Modes
Transmit
Transmit (Conventional Modes)
Activate Scan
Program a Scan List
Select Scan Mode Priority
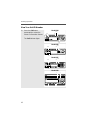
PHONE
PAGE
or
SECURE
or
EMERGENCY
Page
Emer
CALL DIRECT
XMIT
BUSY
Mode
Volume
Pwr
Phon
Call SelScan
Mic
Home
Dim
H/L
Dir Mon
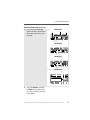
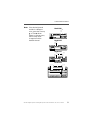
SCAN SELECT MONITOR
MODE
KNOB
POWER ON/OFF/
VOLUME KNOB
HOME
HORN/
LIGHTS
PRIORITY/
NON-PRIORITY
INDICATORS
DIRECT
INDICATOR
Rotate the Vol (Volume) knob clockwise.
1 Turn the Vol knob clockwise to increase volume or
counterclockwise to decrease volume as desired.
2 On conventional modes with Private-Line or Digital
Private-Line, press Mon or remove the microphone
from the hang-up clip to defeat the coded squelch.
3 Press Mon again, or replace the microphone on the
hang-up clip to return to coded-squelch operation.
4 To adjust squelch level, hold Mon until a tone sounds.
5 Turn Mode knob to select squelch level.
6 Press Home.
Turn the Mode knob to select the desired mode
OR
Press Home to access the preprogrammed Home
mode.
1 Press and hold the microphone PTT button.
2 When the transmit light comes on solid and no alert
tones sound (or a talk-permit tone or ID sidetone
sounds), speak into the microphone in a normal voice.
3 State your FCC call sign at the beginning of each
transmission.
1 Press Dir (Direct). The Dir indicator lights.
2 Press Dir again to return to repeater operation.
1 Press Scan to start a scan. If no activity exists, the
display shows your selected mode. When a scanned
channel or talkgroup becomes active, the display
shows the active mode name. The PRI and NPRI
indicators show priority.
2 Press Scan again to stop scanning.
1 Hold Scan until a tone sounds and the scan indicator
blinks.
2 Turn the Mode knob to select the mode you want to
program.
3 Press the Sel button as indicated in the table below to
add or remove the displayed mode from the scan list.
4 Repeat the previous steps to continue editing the list.
5 Press Home or Scan to exit.
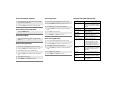
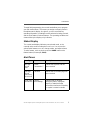
Press Sel Mode Indicator
One time Non-Priority NPRI lit
Two times Second Priority PRI lit
Three times First Priority PRI blinks
Four times Delete from List No indicator
1 Press the Sel button as indicated in the table above
to designate up to two modes as priorities.
2 Press Home or Scan to end scan list selection.

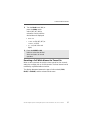
Send an Emergency Alarm or Call
Send a Status Transmission
Send a Direct-Entry Keyboard Status
Transmission
Send a Direct-Entry Enhanced Private
Conversation Call
Initiate a Call Alert Page
Answer a Call Alert Page
Press the emergency actuator (Emer button,
footswitch, hidden pushbutton) to begin an
emergency transmission.
For conventional modes, a silent or non-silent
emergency alarm data transmission is sent.
For trunked modes, emergency call (priority access
to a voice channel), silent or non-silent emergency
alarm, or emergency alarm and call is entered.
Depending on your radio’s programming, one of the
emergency sequences described in the table below
occur.
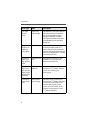
Alarm Type Indications/Actions
Non-Silent A tone sounds and the display
alternates between
EMERGNCY and the
zone/channel. When acknowledged,
four more tones sound and the display
shows
ACK RCVD, then the radio
returns to normal operation.
Silent The audio is muted and no display
changes take place during the alarm.
Press the PTT button, or press and
hold the emergency switch to stop the
emergency condition and unmute the
radio.
Call (Trunked
Modes only)
A tone sounds and the display
alternates between
EMERGNCY and the
zone/channel.
Press the PTT button and talk.
After completing the call, press and
hold the emergency actuator until a
tone sounds to return to normal
operation.
Alarm and Call After ACK RCVD (see Non-Silent Alarm
above) is displayed, the radio has
priority voice-channel access.
Press the PTT button and talk.
After completing the call, press and
hold the emergency actuator until a
tone sounds to return to normal
operation.
1 Press Sts. The last acknowledged status or first
status name is displayed.
2 Rotate Mode to select other statuses.
3 Press Sel to send the transmission. The display
flashes the selected status/message name until the
dispatcher acknowledges, at which time alert tones
sound and
ACK RCVD is displayed. The radio then
returns to normal operation.
Press the appropriate Sts # button you wish to send.
The associated indicator blinks until an
acknowledgment is received, then it lights steadily.
1 Press Sel or the PTT button. A single tone sounds
and the display changes to
PLS WAIT, followed by
telephone-type ringing if the receiving unit is in
service.
Alarm Type Indications/Actions
2 If the receiving unit answers, press the PTT button to
identify yourself and proceed with your call.
OR
If the called unit does not respond, press Sel or the
PTT button again to leave a Call Alert page message
and your ID.
A single tone followed by four tones sounds if the
called unit acknowledges the page.
1 Press the Page button.
2 Follow the instructions for initiating a Private
Conversation to select a unit ID.
3 Press Sel or the PTT button to send a Call Alert page
to the displayed ID,
OR
To send a Call Alert page following an Enhanced
Private Conversation attempt, follow the instructions
for sending a direct-entry Enhanced Private
Conversation call.
Four tones sound and PAGE RCV flashes on the
display. The tone and display repeat every five
seconds.
1 Press the PTT button,
OR
Initiate an Enhanced Private Conversation call to the
caller.

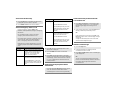
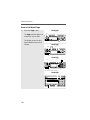
Select a Zone/Mode (Optional)
Select a Home Zone/Home Mode
Select Secure Mode
Select an Encryption Key
Select a Key Index
Erase an Encryption Key
DISPLAY AND LIGHT INDICATORS
1 Press the Zone Up ▲ button or Zone Down ▼ button
to scroll to the desired zone.
2 Turn the Mode knob to select the mode.
Press the Home button.
Press and release the D button. The D indicator
lights up.
1 Press and hold the D button until a tone sounds.
2 Turn the Mode knob to scroll to KEY SEL.
3 Press Sel to enter the Key Selection Menu.
4 Turn the Mode knob to select desired key.
5 Press Sel to select key.
6 Press Home or the PTT button to quit.
1 Press and hold the D button until a tone sounds.
2 Turn the Mode knob to scroll to INDX SEL.
3 Press Sel to enter the Index Selection Menu.
4 Turn the Mode knob to select desired index.
5 Press Sel to select index.
6 Press Home or the PTT button to quit.
1 Press and hold the D button until a tone sounds.
2 Turn the Mode knob to scroll to ERASE KY.
3 Press Sel to enter the Key Erase Menu.
4 Turn the Mode knob to select desired index.
5 Press Sel to select index.
6 Press Home or the PTT button to quit.
Display/Light Meaning
BUSY light on Displayed conventional mode has
activity on it, or selected trunked
system is currently busy. Wait for
callback.
XMIT light on Indicates you are transmitting.
Dir indicator lit Radio is in direct (mobile-to-
mobile) operation.
PRI, NPRI
indicators lit
Mode displayed is in scan list with
the indicated priority level.
P displayed Telephone dialing pause. Press
Sel to continue the dialing.
NO ACK displayed Unit being called with the
Enhanced Private Conversation or
Call Alert Page feature is not in
service, or emergency alarm or
status/message transmission is
not acknowledged by dispatcher.
NO ANSWR
displayed
Unit being called with Enhanced
Private Conversation or Call Alert
Page does not respond, but is
operational.
EMERGNCY
displayed
Radio is in emergency alarm or call
state.
NO EMERG
displayed
A mode incapable of emergency
transmission has been selected.
OUT RNG displayed Radio is out of range of the
trunking system.

Examples: Not exiting phone mode after a call (radio
cannot receive fleet or subfleet calls), transmitting in
receive-only conventional mode, trying to select a dynamic
mode when no dynamic ID assignment has been made.
ALERT TONES
Type of Tone Name Explanation
1 Low-Pitched
Tone
Invalid Key
Alert
Feature button
pressed is not valid
in selected mode, or
a Call Alert or
emergency alarm
was not
acknowledged.
1 High-Pitched
Tone
Central
Acknowledge
or Valid Key
Central controller
has received request
for Call Alert or
emergency alarm
transmission.
You pressed a valid
key.
4 High-Pitched
Tones
Dispatcher or
Mobile Unit
Acknowledge
Dispatcher is
acknowledging your
emergency
transmission. Mobile
unit has received
your Call Alert.
5 High-Pitched
Tones
The above two
acknowledge tones,
heard in tandem.
2 High-Pitched
Tones
Private
Conversation
You have an
incoming call. Press
Call, then the PTT
button, then talk.
4 High-Pitched
Tones every 6
seconds
Call Alert Page Call Alert page has
been received.
Phone-Type
Busy Tone
(when pressing
the PTT button)
System Busy All system radio
channels in use.
Release the PTT
button, and wait for
callback.
3 Short High-
Tones (after
requesting a
busy channel)
upon pressing
the PTT button)
Automatic Call
Back or Talk
Permit
Channel is available
for previously
requested
transmission.
System is accepting
your transmission.
Low-Pitched
Tone (upon
pressing the
PTT button
during Transmit)
(Operation
Error)
Talk Prohibit/
Out-of-Range
or Time-Out
Timer or Illegal
Mode
Out of trunked radio
system range or
system is out of
service.
Present transmission
will soon be disabled.
You have entered a
mode where normal
system traffic will be
missed, or you
attempted something
that is not allowed.
(See examples
below.)
High-Pitched
Tone every 10
seconds in
unmuted receive
condition
Failsoft System central
controller failure. The
radio reverts from
trunked operation to
operation similar to a
conventional
repeater.
Others may share
the channel.
ALERT TONES (Continued)
Type of Tone Name Explanation

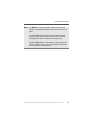
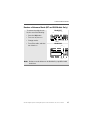
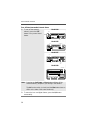
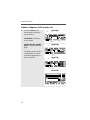
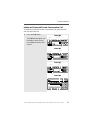
ASTRO
®
Digital Spectra
®
and Digital Spectra Plus
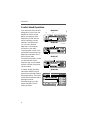
W5 Mobile Radio
Quick Reference Card
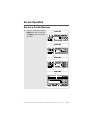
BASIC OPERATION
Turn the Radio On and Off
Set the Volume and Squelch
Change Modes
Transmit
Transmit (Conventional Modes)
Activate Scan
Program a Scan List
Select Scan Mode Priority
Mode
Vol
Mic
Phon
Call Sel
H/L Mon Dir
PWR
Scan
XMIT
BUSY
DIM
HOME
MODE
POWER
ON/OFF
PAGE
or
SECURE
or
EMERGENCY
Page
Emer
PHONE
SCAN
CALL
SELECT
VOLUME
PRIORITY/
NON-PRIORITY
INDICATORS
DIRECT
INDICATOR
HORN/
LIGHTS
MONITOR
DIRECT
HOME
Press the PWR button once.
1 Hold the Vol rocker switch down to increase or
decrease volume as desired, then release.
The display shows volume levels from 0 to 15.
2 On conventional modes with Private-Line or Digital
Private-Line, press Mon or remove the microphone
from the hang-up clip to defeat the coded squelch.
3 Press Mon again, or replace the microphone on the
hang-up clip to return to coded-squelch operation.
4 To adjust squelch level, hold Mon until a tone sounds.
5 Press the Mode rocker switch to select squelch level.
6 Press HOME.
Press the Mode rocker switch to select the desired
mode
OR
Press HOME to access the preprogrammed Home
mode.
1 Press and hold the microphone PTT button.
2 When the transmit light comes on solid and no alert
tones sound (or a talk-permit tone or ID sidetone
sounds), speak into the microphone in a normal voice.
3 State your FCC call sign at the beginning of each
transmission.
1 Press Dir (Direct). The Dir indicator lights.
2 Press Dir again to return to repeater operation.
1 Press Scan to start a scan. If no activity exists, the
display shows your selected mode. When a scanned
channel or talkgroup becomes active, the display
shows the active mode name. The PRI and NPRI
indicators show priority.
2 Press Scan again to stop scanning.
1 Hold Scan until a tone sounds and the scan indicator
blinks.
2 Press the Mode rocker switch to select the mode you
want to program.
3 Press the Sel button as indicated in the table below to
add or remove the displayed mode from the scan list.
4 Repeat the previous steps to continue editing the list.
5 Press HOME or Scan to exit.
Press Sel Mode Indicator
One time Non-Priority NPRI lit
Two times Second Priority PRI lit
Three times First Priority PRI blinks
Four times Delete from List No indicator
1 Press the Sel button as indicated in the table above
to designate up to two modes as priorities.
2 Press HOME or Scan to end scan list selection.

Send an Emergency Alarm or Call
Send a Status Transmission
Send a Direct-Entry Keyboard Status
Transmission
Send a Direct-Entry Enhanced Private
Conversation Call
Initiate a Call Alert Page
Answer a Call Alert Page
Press the emergency actuator (Emer button,
footswitch, hidden pushbutton) to begin an emergency
transmission.
For conventional modes, a silent or non-silent
emergency alarm data transmission is sent.
For trunked modes, emergency call (priority access to
a voice channel), silent or non-silent emergency
alarm, or emergency alarm and call is entered.
Depending on your radio’s programming, one of the
emergency sequences described in the table below
occur.
Alarm Type Indications/Actions
Non-Silent A tone sounds and the display flashes
EMERGNCY. When acknowledged, four
more tones sound and the display
shows
ACK RCVD, then the radio
returns to normal operation.
Silent The audio is muted and no display
changes take place during the alarm.
Press the PTT button, or press and
hold the emergency switch to stop the
emergency condition and unmute the
radio.
Call (Trunked
Modes only)
A tone sounds and the display flashes
EMERGNCY.
Press the PTT button and talk.
After completing the call, press and
hold the emergency actuator until a
tone sounds to return to normal
operation.
Alarm and Call After ACK RCVD (see Non-Silent Alarm
above) is displayed, the radio has
priority voice-channel access.
Press the PTT button and talk.
After completing the call, press and
hold the emergency actuator until a
tone sounds to return to normal
operation.
1 Press Sts. The last acknowledged status or first
status name is displayed.
2 Press the Mode rocker switch to select other
statuses.
3 Press Sel to send the transmission. The display
flashes the selected status name until the dispatcher
acknowledges, at which time alert tones sound and
ACK RCVD is displayed. The radio then returns to
normal operation.
Press the appropriate Sts # button that you wish to
send. The associated indicator blinks until an
acknowledgment is received, then it lights steadily.
1 Press Sel or the PTT button. A single tone sounds
and the display changes to
PLS WAIT, followed by
telephone-type ringing if the receiving unit is in
service.
Alarm Type Indications/Actions
2 If the receiving unit answers, press the PTT button to
identify yourself and proceed with your call.
OR
If the called unit does not respond, press Sel or the
PTT button again to leave a Call Alert page message
and your ID.
A single tone followed by four tones sounds if the
called unit acknowledges the page.
1 Press the Page button.
2 Follow the instructions for initiating a Private
Conversation to select a unit ID.
3 Press Sel or the PTT button to send a Call Alert page
to the displayed ID,
OR
To send a Call Alert page following an Enhanced
Private Conversation attempt, follow the instructions
for sending a direct-entry Enhanced Private
Conversation call.
Four tones sound and PAGE RCV flashes on the
display. The tone and display repeat every five
seconds.
1 Press the PTT button,
OR
Initiate an Enhanced Private Conversation call to the
caller.

Select a Zone/Mode (Optional)
Select a Home Zone/Home Mode
Select Secure Mode
Select an Encryption Key
Select a Key Index
Erase an Encryption Key
DISPLAY AND LIGHT INDICATORS
1 Press the Zone Up ▲ button or Zone Down ▼ button
to scroll to the desired zone.
2 Press the Mode rocker switch to select the mode.
Press the HOME button.
Press and release the D button. The D indicator
lights up.
1 Press and hold the D button until a tone sounds.
2 Press the Mode rocker switch to scroll to KEY SEL.
3 Press Sel to enter the Key Selection Menu.
4 Press the Mode rocker switch to select the desired
key.
5 Press Sel to select the key.
6 Press HOME or the PTT button to quit.
1 Press and hold the D button until a tone sounds.
2 Press the Mode rocker switch to scroll to INDX SEL.
3 Press Sel to enter the Index Selection Menu.
4 Press the Mode rocker switch to select the desired
index.
5 Press Sel to select the index.
6 Press HOME or the PTT button to quit.
1 Press and hold the D button until a tone sounds.
2 Press the Mode rocker switch to scroll to ERASE KY.
3 Press Sel to enter the Key Erase Menu.
4 Press the Mode rocker switch to select the desired
index.
5 Press Sel to select the index.
6 Press HOME or the PTT button to quit.
Display/Light Meaning
BUSY light on Displayed conventional mode has
activity on it, or selected trunked
system is currently busy. Wait for
callback.
XMIT light on Indicates you are transmitting.
Dir indicator lit Radio is in direct (mobile-to-
mobile) operation.
PRI, NPRI
indicators lit
Mode displayed is in scan list with
the indicated priority level.
P displayed Telephone dialing pause. Press
Sel to continue the dialing.
NO ACK displayed Unit being called with the
Enhanced Private Conversation or
Call Alert Page feature is not in
service, or emergency alarm or
status/message transmission is
not acknowledged by dispatcher.
NO ANSWR
displayed
Unit being called with Enhanced
Private Conversation or Call Alert
Page does not respond, but is
operational.
EMERGNCY
displayed
Radio is in emergency alarm or
call state.
NO EMERG
displayed
A mode incapable of emergency
transmission has been selected.
OUT RNG displayed Radio is out of range of the
trunking system.

Examples: Not exiting phone mode after a call (radio
cannot receive fleet or subfleet calls), transmitting in
receive-only conventional mode, trying to select a dynamic
mode when no dynamic ID assignment has been made.
ALERT TONES
Type of Tone Name Explanation
1 Low-Pitched
Tone
Invalid Key
Alert
Feature button
pressed is not valid
in selected mode, or
a Call Alert or
emergency alarm
was not
acknowledged.
1 High-Pitched
Tone
Central
Acknowledge
or Valid Key
Central controller
has received request
for Call Alert or
emergency alarm
transmission.
You pressed a valid
key.
4 High-Pitched
Tones
Dispatcher or
Mobile Unit
Acknowledge
Dispatcher is
acknowledging your
emergency
transmission. Mobile
unit has received
your Call Alert.
5 High-Pitched
Tones
The above two
acknowledge tones,
heard in tandem.
2 High-Pitched
Tones
Private
Conversation
You have an
incoming call. Press
Call, then the PTT
button, then talk.
4 High-Pitched
Tones every 6
seconds
Call Alert Page Call Alert page has
been received.
Phone-Type
Busy Tone
(when pressing
the PTT button)
System Busy All system radio
channels in use.
Release the PTT
button, and wait for
callback.
3 Short High-
Tones (after
requesting a
busy channel)
upon pressing
the PTT button)
Automatic Call
Back or Talk
Permit
Channel is available
for previously
requested
transmission.
System is accepting
your transmission.
Low-Pitched
Tone (upon
pressing the
PTT button
during Transmit)
(Operation
Error)
Talk Prohibit/
Out-of-Range
or Time-Out
Timer or Illegal
Mode
Out of trunked radio
system range or
system is out of
service.
Present transmission
will soon be disabled.
You have entered a
mode where normal
system traffic will be
missed, or you
attempted something
that is not allowed.
(See examples
below.)
High-Pitched
Tone every 10
seconds in
unmuted receive
condition
Failsoft System central
controller failure. The
radio reverts from
trunked operation to
operation similar to a
conventional
repeater.
Others may share
the channel.
ALERT TONES (Continued)
Type of Tone Name Explanation

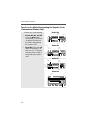
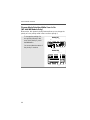
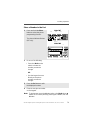
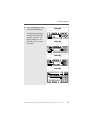
ASTRO
®
Digital Spectra
®
and Digital Spectra Plus
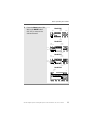
W7 Mobile Radio
Quick Reference Card
BASIC OPERATION
Turn the Radio On and Off
Set the Volume and Squelch
Change Modes
Transmit
Transmit (Conventional Modes)
Activate Scan
Program a Scan List
POWER
ON/OFF
2
2Pge
or
SITE
LOCK
MESSAGE
REPROGRAM
DIRECT
O
#
Del Rcl
Mode
Vol
Mic
Phon
Call Sel
PWR
Scan
XMIT
BUSY
DIM
HOME
1Ste 2
3
Lck
4Sts
5Rpg
6Msg
7
H/L
8
Mon
9
Dir
MAEPF 23213 A
MODE
EMERGENCY
or
SECURE
Emer
PHONE
SCAN
CALL
SELECT
PAGE
VOLUME
DIRECT
INDICATOR
DELETE
RECALL
MONITOR
STATUS
HORN/LIGHTS
HOME
PRIORITY/
NON-PRIORITY
INDICATORS
Press the PWR button once.
1 Hold the Vol rocker switch down to increase or
decrease volume as desired, then release.
The display shows volume levels from 0 to 15.
2 On conventional modes with Private-Line or Digital
Private-Line, press Mon or remove the microphone
from the hang-up clip to defeat the coded squelch.
3 Press Mon again, or replace the microphone on the
hang-up clip to return to coded-squelch operation.
4 To adjust squelch level, hold Mon until a tone sounds.
5 Press the Mode rocker switch to select squelch level.
6 Press HOME.
Press the Mode rocker switch to select the desired
mode
OR
Press HOME to access the preprogrammed Home
mode.
1 Press and hold the microphone PTT button.
2 When the transmit light comes on solid and no alert
tones sound (or a talk-permit tone or ID sidetone
sounds), speak into the microphone in a normal voice.
3 State your FCC call sign at the beginning of each
transmission.
1 Press Dir (Direct). The Dir indicator lights.
2 Press Dir again to return to repeater operation.
1 Press Scan to start a scan. If no activity exists, the
display shows your selected mode. When a scanned
channel or talkgroup becomes active, the display
shows the active mode name. The PRI and NPRI
indicators show priority.
2 Press Scan again to stop scanning.
1 Hold Scan until a tone sounds and the scan indicator
blinks.
2 Press the Mode rocker switch to select the mode you
want to program.
OR
Press the Rcl button to scroll through the modes
currently in the scan list.
3 Press the Sel button as indicated in the table below to
add or remove the displayed mode from the scan list.
4 Repeat the previous steps to continue editing the list.
5 Press HOME or Scan to exit.
Press Sel Mode Indicator
One time Non-Priority NPRI lit
Two times Second Priority PRI lit
Three times First Priority PRI blinks
Four times Delete from List No indicator

Select Scan Mode Priority
Send an Emergency Alarm or Call
Send a Status Transmission
Send a Direct-Entry Keyboard Status
Transmission
Send a Direct-Entry Enhanced Private
Conversation Call
Initiate a Call Alert Page
1 Press the Sel button as indicated in the table above
to designate up to two modes as priorities.
2 Press HOME or Scan to end scan list selection.
Press the emergency actuator (Emer button,
footswitch, hidden pushbutton) to begin an emergency
transmission.
For conventional modes, a silent or non-silent
emergency alarm data transmission is sent.
For trunked modes, emergency call (priority access to
a voice channel), silent or non-silent emergency
alarm, or emergency alarm and call is entered.
Depending on your radio’s programming, one of the
emergency sequences described in the table below
occur.
Alarm Type Indications/Actions
Non-Silent A tone sounds and the display flashes
EMERGNCY. When acknowledged, four
more tones sound and the display
shows
ACK RCVD, then the radio
returns to normal operation.
Silent The audio is muted and no display
changes take place during the alarm.
Press the PTT button, or press and
hold the emergency switch to stop the
emergency condition and unmute the
radio.
Call (Trunked
Modes only)
A tone sounds and the display flashes
EMERGNCY.
Press the PTT button and talk.
After completing the call, press and
hold the emergency actuator until a
tone sounds to return to normal
operation.
Alarm and Call After ACK RCVD (see Non-Silent Alarm
above) is displayed, the radio has
priority voice-channel access.
Press the PTT button and talk.
After completing the call, press and
hold the emergency actuator until a
tone sounds to return to normal
operation.
1 Press Sts. The last acknowledged status or first
status name is displayed.
2 Press the Mode rocker switch to select other
statuses.
3 Press Sel to send the transmission. The display
flashes the selected status name until the dispatcher
acknowledges, at which time alert tones sound and
ACK RCVD is displayed. The radio then returns to
normal operation.
Press the appropriate Sts # button that you wish to
send. The associated indicator blinks until an
acknowledgment is received, then it lights steadily.
Alarm Type Indications/Actions
1 Press Sel or the PTT button. A single tone sounds
and the display changes to
PLS WAIT, followed by
telephone-type ringing if the receiving unit is in
service.
2 If the receiving unit answers, press the PTT button to
identify yourself and proceed with your call.
OR
If the called unit does not respond, press Sel or the
PTT button again to leave a Call Alert page message
and your ID.
A single tone followed by four tones sounds if the
called unit acknowledges the page.
1 Press the Page button.
2 Follow the instructions for initiating a Private
Conversation to select a unit ID.
3 Press Sel or the PTT button to send a Call Alert page
to the displayed ID,
OR
To send a Call Alert page following an Enhanced
Private Conversation attempt, follow the instructions
for sending a direct-entry Enhanced Private
Conversation call.

Answer a Call Alert Page
Select a Zone/Mode (Optional)
Select a Home Zone/Home Mode
Request Dynamic Regrouping
Automatic Multiple Site Selection (AMSS)
View the Current Site
Initiate a Site Scan
Lock on a Site
Select Secure Mode
Select an Encryption Key
Select a Key Index
Erase an Encryption Key
Four tones sound and PAGE RCV flashes on the
display. The tone and display repeat every five
seconds.
1 Press the PTT button,
OR
Initiate an Enhanced Private Conversation call to the
caller.
1 Press the Zone Up ▲ button or Zone Down ▼ button
to scroll to the desired zone.
2 Press the Mode rocker switch to select the mode.
Press the HOME button.
Press Rpg. A central acknowledgement tone sounds
and
RPGM RQST is displayed while the request is
being processed.
When the dispatcher acknowledges, four additional
tones sound,
ACK RCVD is displayed, and your radio
returns to normal operation.
Press Ste momentarily. If the radio is scanning for a
new site,
SCANNING is displayed.
Press and hold Ste until a tone sounds and SCANNING
is displayed.
1 Press Lck to lock the radio onto the current site.
2 To view its condition (locked or unlocked), press Lck
momentarily.
LOCKED or UNLOCKED is displayed.
OR
To toggle to the opposite condition, press and hold
Lck until a beep sounds and the display changes to
the other condition.
The radio then returns to normal operation.
Press and release the D button. The D indicator
lights up.
1 Press and hold the D button until a tone sounds.
2 Press the Mode rocker switch to scroll to KEY SEL.
3 Press Sel to enter the Key Selection Menu.
4 Press the Mode rocker switch to select the desired
key.
5 Press Sel to select the key.
6 Press HOME or the PTT button to quit.
1 Press and hold the D button until a tone sounds.
2 Press the Mode rocker switch to scroll to INDX SEL.
3 Press Sel to enter the Index Selection Menu.
4 Press the Mode rocker switch to select the desired
index.
5 Press Sel to select the index.
6 Press HOME or the PTT button to quit.
1 Press and hold the D button until a tone sounds.
2 Press the Mode rocker switch to scroll to ERASE KY.
3 Press Sel to enter the Key Erase Menu.
4 Press the Mode rocker switch to select the desired
index.
5 Press Sel to select the index.
6 Press HOME or the PTT button to quit.

DISPLAY AND LIGHT INDICATORS
Examples: Not exiting phone mode after a call (radio
cannot receive fleet or subfleet calls), transmitting in
receive-only conventional mode, trying to select a dynamic
mode when no dynamic ID assignment has been made.
Display/Light Meaning
BUSY light on Displayed conventional mode has
activity on it, or selected trunked
system is currently busy. Wait for
callback.
XMIT light on Indicates you are transmitting.
Dir indicator lit Radio is in direct (mobile-to-
mobile) operation.
PRI, NPRI
indicators lit
Mode displayed is in scan list with
the indicated priority level.
P displayed Telephone dialing pause. Press
Sel to continue the dialing.
NO ACK displayed Unit being called with the
Enhanced Private Conversation or
Call Alert Page feature is not in
service, or emergency alarm or
status/message transmission is
not acknowledged by dispatcher.
NO ANSWR
displayed
Unit being called with Enhanced
Private Conversation or Call Alert
Page does not respond, but is
operational.
EMERGNCY
displayed
Radio is in emergency alarm or
call state.
NO EMERG
displayed
A mode incapable of emergency
transmission has been selected.
OUT RNG displayed Radio is out of range of the
trunking system.
ALERT TONES
Type of Tone Name Explanation
1 Low-Pitched
Tone
Invalid Key
Alert
Feature button
pressed is not valid
in selected mode, or
a Call Alert or
emergency alarm
was not
acknowledged.
1 High-Pitched
Tone
Central
Acknowledge
or Valid Key
Central controller
has received request
for Call Alert or
emergency alarm
transmission.
You pressed a valid
key.
4 High-Pitched
Tone s
Dispatcher or
Mobile Unit
Acknowledge
Dispatcher is
acknowledging your
emergency
transmission. Mobile
unit has received
your Call Alert.
5 High-Pitched
Tone s
The above two
acknowledge tones,
heard in tandem.
2 High-Pitched
Tone s
Private
Conversation
You have an
incoming call. Press
Call, then the PTT
button, then talk.
4 High-Pitched
Tones every 6
seconds
Call Alert Page Call Alert page has
been received.
3 Short High-
Tones (after
requesting a
busy channel)
(upon pressing
the PTT button)
Automatic Call
Back or Talk
Permit
Channel is available
for previously
requested
transmission.
System is accepting
your transmission.
Low-Pitched
Tone (upon
pressing the
PTT button
during Transmit)
(Operation
Error)
Talk Prohibit/
Out-of-Range,
or Time-Out
Timer, or Illegal
Mode
Out of trunked radio
system range or
system is out of
service.
Present transmission
will soon be disabled.
You have entered a
mode where normal
system traffic will be
missed, or you
attempted something
that is not allowed.
(See examples
below.)
High-Pitched
Tone every 10
seconds in
unmuted receive
condition
Failsoft System central
controller failure. The
radio reverts from
trunked operation to
operation similar to a
conventional
repeater.
Others may share
the channel.
ALERT TONES (Continued)
Type of Tone Name Explanation

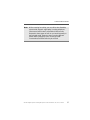
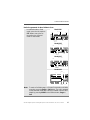
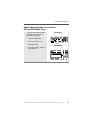
ASTRO
®
Digital Spectra
®
and Digital Spectra Plus
W9 Mobile Radio
Quick Reference Card
BASIC OPERATION
Turn the Radio On and Off
Set the Volume and Squelch
Change Modes
Transmit
Transmit (Conventional Modes)
TELEPHONE OPERATION
Make a Phone Call
Dial the Displayed Number
Dial a Number from the Pre-Stored List
Dial or Direct Dial a New Number
XMIT BUSY
123
456
789
0
DIM
Pri
Non
Pri
Emer Dir
Scan
Call
Mode Vol Sel
Home
Page
Rpgm
Site
Phon H/L Lock
Rcl Sql
Del
MODE SELECT
HOME
PHONE
DELETE
Sts Msg
Srch
RECALL
SQUELCHNON-PRIORITY
INDICATOR
PRIORITY
INDICATOR
CALLSCAN
Slide the power switch on the bottom of the control
unit to the left.
1 Hold the Vol rocker switch down to increase or
decrease volume as desired, then release.
The display shows volume levels from 0 to 15.
2 On conventional modes with Private-Line or Digital
Private-Line, press Sql or remove the microphone
from the hang-up clip to defeat the coded squelch.
3 Press Sql again to return to coded-squelch operation.
4 To adjust squelch level, hold Sql until a tone sounds.
5 Press the Mode rocker switch to select squelch level.
6 Press Home.
Press the Mode rocker switch to scroll to the desired
mode
OR
Press Home to access the preprogrammed Home
mode.
1 Press and hold the microphone PTT button.
2 When the transmit light comes on solid and no alert
tones sound (or a talk-permit tone or ID sidetone
sounds), speak into the microphone in a normal voice.
3 State your FCC call sign at the beginning of each
transmission.
1 Press Dir (Direct). The Dir indicator lights.
2 Press Dir again to return to repeater operation.
Press Phon to select the phone function. The display
shows the last phone number dialed or a series of
dashes.
1 Press Sel or the PTT button, and wait for dial tone.
2 Press Sel or the PTT button again to dial the
displayed number.
1 Press the Mode rocker switch to scroll to the number
or name you want to call.
2 Press Sel or the PTT button, and wait for dial tone.
3 Press Sel or the PTT button again to dial the
displayed number.
1 Using the keypad, enter the telephone number.
2 Press Sel or the PTT button, and wait for dial tone.
3 Press Sel or the PTT button again to dial the
displayed number.

Answer a Phone Call in Trunked Modes
Make a Call (Trunked Modes Only)
Alarm and Call
Send a Status Transmission
Send a Direct-Entry Keyboard Status
Transmission
Initiate an Enhanced Private Conversation Call
Initiate a Private Conversation II
Initiate a Call Alert Page
Answer a Call Alert Page
Answer a Private Conversation Call
When a call is received, ringing tones are heard from
the speaker, and
PHONE is displayed.
1 Press PHON and begin your conversation.
2 Press Home to hang up.
A tone sounds and the display alternates between
EMERGENCY and the zone/channel.
1 Press the PTT button and talk.
2 After completing the call, press and hold the
emergency actuator until a tone sounds to return to
normal operation.
After ACK RCVD is displayed, your radio has priority
voice-channel access.
1 Press the PTT button and talk.
2 After completing the call, press and hold the
emergency actuator until a tone sounds to return to
normal operation.
1 Press Sts. The last acknowledged status or first
status name is displayed.
2 Press the Mode rocker switch or use the keypad to
select other statuses.
3 Press Sel or the PTT button to send the
transmission. The display flashes the
PLEASE WAIT
until the dispatcher acknowledges, at which time alert
tones sound and
ACK RCVD is displayed. The radio
then returns to normal operation.
Press the appropriate Sts # button that you wish to
send. The associated indicator blinks until an
acknowledgment is received, then it lights steadily.
1 Press Sel or the PTT button. A single tone sounds
and the display changes to
PLEASE WAIT, followed
by telephone-type ringing if the receiving unit is in
service.
2 If the receiving unit answers, press the PTT button to
identify yourself and proceed with your call.
OR
If the called unit does not respond, press Sel or the
PTT button again to leave a Call Alert page message
and your ID.
A single tone followed by four tones sounds if the
called unit acknowledges the page.
1 Press the PTT button to initiate a Private
Conversation I or II call.
2 Pause for a second, then begin the conversation.
3 Press Home or Call to hang up.
1 Press the Page button.
2 Follow the instructions for initiating an Enhanced
Private Conversation to select a unit ID.
3 Press Sel or the PTT button to send a Call Alert page
to the displayed ID,
OR
To send a Call Alert page following an Enhanced
Private Conversation attempt, follow the instructions
for sending an Enhanced Private Conversation call.
Four tones sound and PAGE RCV flashes on the
display.
1 Press either the microphone PTT button or the Call
button to clear the Call Alert state.
Two tones sound and CALL RCV flashes on the
display.
1 Press the Call button.
2 Press the microphone PTT button, and speak into
the microphone.
3 Press Home or Call to hang up.

Request Dynamic Regrouping
Automatic Multiple Site Selection (AMSS)
View the Current Site
Initiate a Site Scan
Lock on a Site
Select Secure Mode
Select an Encryption Key
Select a Key Index
Erase an Encryption Key (Single-Key
Option Only)
Erase an Encryption Key
Press Rpgm. A central acknowledgement tone
sounds and
RPGM RQST is displayed while the request
is being processed.
When the dispatcher acknowledges, four additional
tones sound,
ACK RCVD is displayed, and your radio
returns to normal operation.
Press Site momentarily. If the radio is scanning for a
new site,
SCANNING is displayed.
Press and hold Site until a tone sounds and
SCANNING is displayed.
1 Press Lock to lock the radio onto the current site.
2 To view its condition (locked or unlocked), press
Lock momentarily.
SITE LOCKED or SITE UNLCKD is
displayed.
OR
To toggle to the opposite condition, press and hold
Lock until a tone sounds and the display changes to
the other condition.
The radio then returns to normal operation.
Press and release the D button. The D indicator
lights up.
1 Press and hold the D button until a tone sounds.
2 Press the Mode rocker switch to scroll to KEY SEL.
3 Press Sel to enter the Key Selection Menu.
4 Press the Mode rocker switch to select the desired
key.
5 Press Sel to select the key.
6 Press HOME or the PTT button to quit.
1 Press and hold the D button until a tone sounds.
2 Press the Mode rocker switch to scroll to INDX SEL.
3 Press Sel to enter the Index Selection Menu.
4 Press the Mode rocker switch to select the desired
index.
5 Press Sel to select the index.
6 Press HOME or the PTT button to quit.
1 Press and hold the D button until a tone sounds. The
display changes to
ERASE KY.
2 Press Sel to erase the key.
3 Press HOME or the PTT button to quit.
1 Press and hold the D button until a tone sounds.
2 Press the Mode rocker switch to scroll to ERASE KY.
3 Press Sel to enter the Key Erase Menu.
4 Press the Mode rocker switch to select the desired
index.
5 Press Sel to select the index.
6 Press HOME or the PTT button to quit.

DISPLAY AND LIGHT INDICATORS
Message Meaning
BUSY light on Displayed conventional mode has
activity on it, or selected trunked
system is currently busy. Wait for
callback.
XMIT light on Indicates you are transmitting.
Pri indicator blinks Mode displayed is first priority.
Pri indicator lit Mode displayed is second priority.
Non Pri lit Mode displayed is non-priority.
P displayed Telephone dialing pause. Press
Sel to continue the dialing.
NO ACK displayed Unit being called with the
Enhanced Private Conversation or
Call Alert Page feature is not in
service, or emergency alarm or
status/message transmission is
not acknowledged by dispatcher.
LIST FULL
displayed
Scan list full. Delete a mode
before adding another.
PHON BSY
displayed
Trunked phone interconnect is
busy.
NO ANSWER
displayed
Unit being called with Enhanced
Private Conversation or Call Alert
Page does not respond, but is
operational.
EMERGENCY
displayed
Radio is in emergency alarm or
call state.
NO EMERGNCY
displayed
A mode incapable of emergency
transmission has been selected.
OUT OF RNGE
displayed
Radio is out of range of the
trunking system.
ALERT TONES
Type of Tone Name Explanation
1 Low-Pitched
Tone
Invalid Key
Alert
Feature button
pressed is not valid
in selected mode, or
a Call emergency
alarm was not
acknowledged.
1 High-Pitched
Tone
Central
Acknowledge
or Valid Key
Central controller
has received request
for Call Alert,
emergency alarm,
reprogram request,
or status/message
transmission.
You pressed a valid
key.
4 High-Pitched
Tone s
Dispatcher or
Mobile Unit
Acknowledge
Dispatcher is
acknowledging your
emergency
transmission. Mobile
unit has received
your Call Alert.
5 High-Pitched
Tone s
The above two
acknowledge tones,
heard in tandem.
2 High-Pitched
Tone s
Private
Conversation
You have an
incoming call. Press
Call, then the PTT
button and talk.
4 High-Pitched
Tones every 6
seconds
Call Alert Page Call Alert page has
been received.
Phone-Type
Busy Tone
(when pressing
the PTT button)
System Busy All system radio
channels in use.
Release the PTT
button, and wait for
callback.

ASTRO
®
Digital Spectra
®
and
Digital Spectra Plus
W4, W5, W7, and W9
Mobile Radios
User Guide
6881090C62-C
Motorola, Inc.
8000 West Sunrise Boulevard
Fort Lauderdale, Florida 33322

ii
This declaration is applicable to your radio only if your radio is labeled
with the FCC logo shown below.
DECLARATION OF CONFORMITY
Per FCC CFR 47 Part 2 Section 2.1077(a)
Responsible Party
Name: Motorola, Inc.
Address: 8000 West Sunrise Boulevard
Plantation, FL 33322 USA
Phone Number: 1-888-567-7347
Hereby declares that the product:
Model Name: ASTRO Digital Spectra and Digital Spectra Plus
conforms to the following regulations:
FCC Part 15, subpart B, section 15.107(a), 15.107(d) and section 15.109(a)
Class B Digital Device
As a personal computer peripheral, this device complies with Part 15 of the FCC
Rules. Operation is subject to the following two conditions:
1. this device may not cause harmful interference, and
2. this device must accept any interference received, including interference that
may cause undesired operation.
Note: This equipment has been tested and found to comply with the limits for a
Class B digital device, pursuant to part 15 of the FCC Rules. These limits are
designed to provide reasonable protection against harmful interference in a
residential installation. This equipment generates, uses and can radiate radio
frequency energy and, if not installed and used in accordance with the
instructions, may cause harmful interference to radio communications.
However, there is no guarantee that interference will not occur in a particular
installation.
If this equipment does cause harmful interference to radio or television reception,
which can be determined by turning the equipment off and on, the user is
encouraged to try to correct the interference by one or more of the following
measures:
• Reorient or relocate the receiving antenna.
• Increase the separation between the equipment and receiver.
• Connect the equipment into an outlet on a circuit different from that to which
the receiver is connected.
• Consult the dealer or an experienced radio/TV technician for help.
Page is loading ...
Page is loading ...
Page is loading ...
Page is loading ...
Page is loading ...
Page is loading ...
Page is loading ...
Page is loading ...
Page is loading ...
Page is loading ...
Page is loading ...
Page is loading ...
Page is loading ...
Page is loading ...
Page is loading ...
Page is loading ...
Page is loading ...
Page is loading ...
Page is loading ...
Page is loading ...
Page is loading ...
Page is loading ...
Page is loading ...
Page is loading ...
Page is loading ...
Page is loading ...
Page is loading ...
Page is loading ...
Page is loading ...
Page is loading ...
Page is loading ...
Page is loading ...
Page is loading ...
Page is loading ...
Page is loading ...
Page is loading ...
Page is loading ...
Page is loading ...
Page is loading ...
Page is loading ...
Page is loading ...
Page is loading ...
Page is loading ...
Page is loading ...
Page is loading ...
Page is loading ...
Page is loading ...
Page is loading ...
Page is loading ...
Page is loading ...
Page is loading ...
Page is loading ...
Page is loading ...
Page is loading ...
Page is loading ...
Page is loading ...
Page is loading ...
Page is loading ...
Page is loading ...
Page is loading ...
Page is loading ...
Page is loading ...
Page is loading ...
Page is loading ...
Page is loading ...
Page is loading ...
Page is loading ...
Page is loading ...
Page is loading ...
Page is loading ...
Page is loading ...
Page is loading ...
Page is loading ...
Page is loading ...
Page is loading ...
Page is loading ...
Page is loading ...
Page is loading ...
Page is loading ...
Page is loading ...
Page is loading ...
Page is loading ...
Page is loading ...
Page is loading ...
Page is loading ...
Page is loading ...
Page is loading ...
Page is loading ...
Page is loading ...
Page is loading ...
Page is loading ...
Page is loading ...
Page is loading ...
Page is loading ...
Page is loading ...
Page is loading ...
Page is loading ...
Page is loading ...
Page is loading ...
Page is loading ...
Page is loading ...
Page is loading ...
Page is loading ...
Page is loading ...
Page is loading ...
Page is loading ...
Page is loading ...
Page is loading ...
Page is loading ...
Page is loading ...
Page is loading ...
Page is loading ...
Page is loading ...
Page is loading ...
Page is loading ...
Page is loading ...
Page is loading ...
Page is loading ...
Page is loading ...
Page is loading ...
Page is loading ...
Page is loading ...
Page is loading ...
Page is loading ...
Page is loading ...
Page is loading ...
Page is loading ...
Page is loading ...
Page is loading ...
Page is loading ...
Page is loading ...
Page is loading ...
Page is loading ...
Page is loading ...
Page is loading ...
Page is loading ...
Page is loading ...
Page is loading ...
Page is loading ...
Page is loading ...
Page is loading ...
Page is loading ...
Page is loading ...
Page is loading ...
Page is loading ...
Page is loading ...
Page is loading ...
Page is loading ...
Page is loading ...
Page is loading ...
Page is loading ...
Page is loading ...
Page is loading ...
Page is loading ...
-
 1
1
-
 2
2
-
 3
3
-
 4
4
-
 5
5
-
 6
6
-
 7
7
-
 8
8
-
 9
9
-
 10
10
-
 11
11
-
 12
12
-
 13
13
-
 14
14
-
 15
15
-
 16
16
-
 17
17
-
 18
18
-
 19
19
-
 20
20
-
 21
21
-
 22
22
-
 23
23
-
 24
24
-
 25
25
-
 26
26
-
 27
27
-
 28
28
-
 29
29
-
 30
30
-
 31
31
-
 32
32
-
 33
33
-
 34
34
-
 35
35
-
 36
36
-
 37
37
-
 38
38
-
 39
39
-
 40
40
-
 41
41
-
 42
42
-
 43
43
-
 44
44
-
 45
45
-
 46
46
-
 47
47
-
 48
48
-
 49
49
-
 50
50
-
 51
51
-
 52
52
-
 53
53
-
 54
54
-
 55
55
-
 56
56
-
 57
57
-
 58
58
-
 59
59
-
 60
60
-
 61
61
-
 62
62
-
 63
63
-
 64
64
-
 65
65
-
 66
66
-
 67
67
-
 68
68
-
 69
69
-
 70
70
-
 71
71
-
 72
72
-
 73
73
-
 74
74
-
 75
75
-
 76
76
-
 77
77
-
 78
78
-
 79
79
-
 80
80
-
 81
81
-
 82
82
-
 83
83
-
 84
84
-
 85
85
-
 86
86
-
 87
87
-
 88
88
-
 89
89
-
 90
90
-
 91
91
-
 92
92
-
 93
93
-
 94
94
-
 95
95
-
 96
96
-
 97
97
-
 98
98
-
 99
99
-
 100
100
-
 101
101
-
 102
102
-
 103
103
-
 104
104
-
 105
105
-
 106
106
-
 107
107
-
 108
108
-
 109
109
-
 110
110
-
 111
111
-
 112
112
-
 113
113
-
 114
114
-
 115
115
-
 116
116
-
 117
117
-
 118
118
-
 119
119
-
 120
120
-
 121
121
-
 122
122
-
 123
123
-
 124
124
-
 125
125
-
 126
126
-
 127
127
-
 128
128
-
 129
129
-
 130
130
-
 131
131
-
 132
132
-
 133
133
-
 134
134
-
 135
135
-
 136
136
-
 137
137
-
 138
138
-
 139
139
-
 140
140
-
 141
141
-
 142
142
-
 143
143
-
 144
144
-
 145
145
-
 146
146
-
 147
147
-
 148
148
-
 149
149
-
 150
150
-
 151
151
-
 152
152
-
 153
153
-
 154
154
-
 155
155
-
 156
156
-
 157
157
-
 158
158
-
 159
159
-
 160
160
-
 161
161
-
 162
162
-
 163
163
-
 164
164
-
 165
165
-
 166
166
-
 167
167
-
 168
168
-
 169
169
-
 170
170
-
 171
171
-
 172
172
-
 173
173
-
 174
174


Motorola Astro Digital Spectra Series User manual
- Category
- Two-way radios
- Type
- User manual
- This manual is also suitable for
Ask a question and I''ll find the answer in the document
Finding information in a document is now easier with AI
Related papers
-
Motorola Astro XTL 5000 User manual
-
-
-
-
-
-
-
-
-
Other documents
-
Ericsson TRUNKED MDX User manual
-
-
Avaya EU DoC for 1100 Series Deskphones User manual
-
Nikon XTS-5000 User manual
-
-
Ericsson LBI-38950 User manual
-
Explore Scientific Solarix AZ 114/500 Carbon Design Telescop Starter Kit Owner's manual
-
E.F. Johnson Company FM Portable Radio Intrinsically-Safe SMARTNET, SmartZone Conventional User manual
-
-
Grace SuperCELL SC500-H-SM User's Information Manual