Page is loading ...

COMPETENCE E 1000
The Electric Built-In Oven
Operating Instructions

2
Dear Customer,
Please read these operating instructions through carefully.
Above all, please take note of the “Safety” section on the first few
pages. Please keep these operating instructions for future reference.
Pass them on to any subsequent owner of the appliance.
1
The warning triangle and/or specific words (Warning!, Caution!,
Important!) are used to highlight instructions that are important for
your safety or for the function of the appliance. It is imperative that
these instructions are observed.
0 1. This symbol guides you step by step when operating the appliance.
2. ...
3. ...
3
Next to this symbol you receive additional information and practical
tips on using the appliance.
2
Tips and information about the economical and ecological use of the
machine are marked with a cloverleaf.
Before calling out an engineer to a fault please read the chapter „What
to do if...“ as you may be able to resolve the problem yourself.
For further assistence contact your local AEG Service Force Centre, see
the chapter „Service“.
Printed on paper manufactured with environmentally sound processes.
He who thinks ecologically acts accordingly ...

Inhalt
3
INHALT
Operating Instructions . . . . . . . . . . . . . . . . . . . . . . . . . . . . . . . . . . . . 5
Safety Instructions . . . . . . . . . . . . . . . . . . . . . . . . . . . . . . . . . . . . . . . . . . . . 5
Disposal . . . . . . . . . . . . . . . . . . . . . . . . . . . . . . . . . . . . . . . . . . . . . . . . . . . . . . 7
Appliance structure . . . . . . . . . . . . . . . . . . . . . . . . . . . . . . . . . . . . . . . . . . . . 8
Control panel . . . . . . . . . . . . . . . . . . . . . . . . . . . . . . . . . . . . . . . . . . . . . . . . . 8
Oven Features . . . . . . . . . . . . . . . . . . . . . . . . . . . . . . . . . . . . . . . . . . . . . . . . . . 9
Oven Accessories . . . . . . . . . . . . . . . . . . . . . . . . . . . . . . . . . . . . . . . . . . . . . . . 10
Oven Functions . . . . . . . . . . . . . . . . . . . . . . . . . . . . . . . . . . . . . . . . . . . . . . . . 11
Before using for the first time . . . . . . . . . . . . . . . . . . . . . . . . . . . . . . . . . . 11
Cleaning for the first time . . . . . . . . . . . . . . . . . . . . . . . . . . . . . . . . . . . . . . . 11
Using the Rings . . . . . . . . . . . . . . . . . . . . . . . . . . . . . . . . . . . . . . . . . . . . . . . 12
Cooking with the Ring . . . . . . . . . . . . . . . . . . . . . . . . . . . . . . . . . . . . . . . . . . 13
Operating the Oven . . . . . . . . . . . . . . . . . . . . . . . . . . . . . . . . . . . . . . . . . . . . 14
Inserting the Shelf and Universal Sheet . . . . . . . . . . . . . . . . . . . . . . . . . . . . 14
Switching the Oven On and Off . . . . . . . . . . . . . . . . . . . . . . . . . . . . . . . . . . . 15
Usage, Tables and Tips . . . . . . . . . . . . . . . . . . . . . . . . . . . . . . . . . . . . . . . . . 16
Boil . . . . . . . . . . . . . . . . . . . . . . . . . . . . . . . . . . . . . . . . . . . . . . . . . . . . . . . . . . 16
Indicative figures for cooking with the ring . . . . . . . . . . . . . . . . . . . . . 16
Baking . . . . . . . . . . . . . . . . . . . . . . . . . . . . . . . . . . . . . . . . . . . . . . . . . . . . . . . . 17
Baking Table . . . . . . . . . . . . . . . . . . . . . . . . . . . . . . . . . . . . . . . . . . . . . . . . 19
Tips on Baking . . . . . . . . . . . . . . . . . . . . . . . . . . . . . . . . . . . . . . . . . . . . . . 20
Roasting . . . . . . . . . . . . . . . . . . . . . . . . . . . . . . . . . . . . . . . . . . . . . . . . . . . . . . 21
Roasting Table . . . . . . . . . . . . . . . . . . . . . . . . . . . . . . . . . . . . . . . . . . . . . . 22
Grilling . . . . . . . . . . . . . . . . . . . . . . . . . . . . . . . . . . . . . . . . . . . . . . . . . . . . . . . 24
Grilling Table . . . . . . . . . . . . . . . . . . . . . . . . . . . . . . . . . . . . . . . . . . . . . . . 24
Cleaning and Care . . . . . . . . . . . . . . . . . . . . . . . . . . . . . . . . . . . . . . . . . . . . . 25
The Exterior of the Appliance . . . . . . . . . . . . . . . . . . . . . . . . . . . . . . . . . . . . . 25
Oven Interior . . . . . . . . . . . . . . . . . . . . . . . . . . . . . . . . . . . . . . . . . . . . . . . . . . 25
Accessories . . . . . . . . . . . . . . . . . . . . . . . . . . . . . . . . . . . . . . . . . . . . . . . . . . . . 25
Side Rails . . . . . . . . . . . . . . . . . . . . . . . . . . . . . . . . . . . . . . . . . . . . . . . . . . . . . . 26
Oven Light . . . . . . . . . . . . . . . . . . . . . . . . . . . . . . . . . . . . . . . . . . . . . . . . . . . . 27
Oven Door . . . . . . . . . . . . . . . . . . . . . . . . . . . . . . . . . . . . . . . . . . . . . . . . . . . . . 28
Oven Door Glass . . . . . . . . . . . . . . . . . . . . . . . . . . . . . . . . . . . . . . . . . . . . . . . . 29

Inhalt
4
What to do if ... . . . . . . . . . . . . . . . . . . . . . . . . . . . . . . . . . . . . . . . . . . . . . . . 30
Special accessories . . . . . . . . . . . . . . . . . . . . . . . . . . . . . . . . . . . . . . . . . . . . . 31
Installation Instructions . . . . . . . . . . . . . . . . . . . . . . . . . . . . . . . . . . . 32
Technical Data . . . . . . . . . . . . . . . . . . . . . . . . . . . . . . . . . . . . . . . . . . . . . . . . . 32
Regulations, Standards, Directives . . . . . . . . . . . . . . . . . . . . . . . . . . . . . . . . . 32
Safety Instructions for the Installer . . . . . . . . . . . . . . . . . . . . . . . . . . . . . . . . 33
Installation . . . . . . . . . . . . . . . . . . . . . . . . . . . . . . . . . . . . . . . . . . . . . . . . . . . . 34
Service . . . . . . . . . . . . . . . . . . . . . . . . . . . . . . . . . . . . . . . . . . . . . . . . . . . . . . 51

Operating Instructions
5
OPERATING INSTRUCTIONS
1 Safety Instructions
The new appliance may only be assembled and connected by an
approved installer.
Please observe this instruction, otherwise the warranty will not cover
any damage that may occur.
The safety features of AEG electrical appliances comply with accepted
technical standards and the German Appliance Safety Law. However, we
also consider it our obligation as a manufacturer to make you aware of
the following safety information.
General Safety
• When using other electrical appliances ensure the cable does not
come into contact with the hot surfaces of the oven.
• Do not store flammable substances in the oven. They could ignite
when the oven is switched on.
• For safety reasons do not clean the appliance with a steam or high
pressure cleaner.
• If force is used, especially on the edges of the front pane of glass, the
glass may break.
• When cooking, roasting and grilling the oven door will become hot.
Therefore always keep small children away from the door.
• Overheated fat and oil can catch fire quickly. Please always stay close
to the appliance when preparing food in fat or oil (e.g. chips).
• If you use alcoholic ingredients in the oven, it is possible that an easily
ignitable alcohol-air mixture might be produced. In this case open the
door very carefully. When doing so, avoid having any hot embers,
sparks or open flames in the immediate vicinity.
• Repairs to the appliance may only be performed by qualified service
engineers. Improper repairs can give rise to significant hazards. If
your appliance needs repairing, please contact your local AEG Service
Force Centre.
• In the case of the appliance malfunctioning: remove the fuses or
switch off the circuit breaker.

Operating Instructions
6
Intended Use
• This appliance must not be used for purposes other than that
intended, it must only be used for the cooking, roasting and baking
of food in the home.
• Only use the appliance to prepare food.
• Do not use the oven to heat the room.
In this way you avoid damaging your appliance
• Do not line your oven with aluminium foil and do not place a baking
sheet or dish on the oven floor, otherwise the oven enamel will be
damaged by the resulting build up of heat.
• Clean the appliance after each use. Spills are then easier to clean up
and do not become burnt onto the surface.
• Any drops of fruit juice that fall from the baking sheet will leave
spots that cannot be removed. Use the universal sheet for very moist
cakes.
• Never pour water directly into the hot oven. The enamel may be dam-
aged.
• Do not sit on the open oven door.
• Do not store moist food in the oven.

Operating Instructions
7
Eco-Insulation
In the factory the oven is fitted with eco-insulation. This insulation has
been tested for pollutants by independent test institutes and categor-
ised as harmless
2 Disposal
Disposing of the packaging materials
All materials used can be fully recycled.
The plastics are marked as follows:
• >PE< for polyethylene, e.g. as used for the outer wrapping and the
bags inside.
• >PS< for polystyrene foam, e.g. as used for the packing pieces, com-
pletely free of CFCs.
The cardboard is made from 80% recycled paper.
Disposal of old appliances
All old appliances must be correctly disposed of for environmental rea-
sons.
1
Warning! When disposing of an old appliance, make it unusable by
cutting off the cable. Remove any door catches to prevent small chil-
dren being trapped inside.
2
Information on disposal
• The appliance must not be disposed of in the household rubbish.
• You can obtain information about collection dates or public tips from
your local refuse department or council.
Operating Instructions
8
Appliance Structure
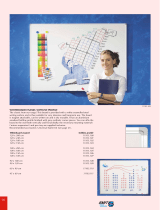
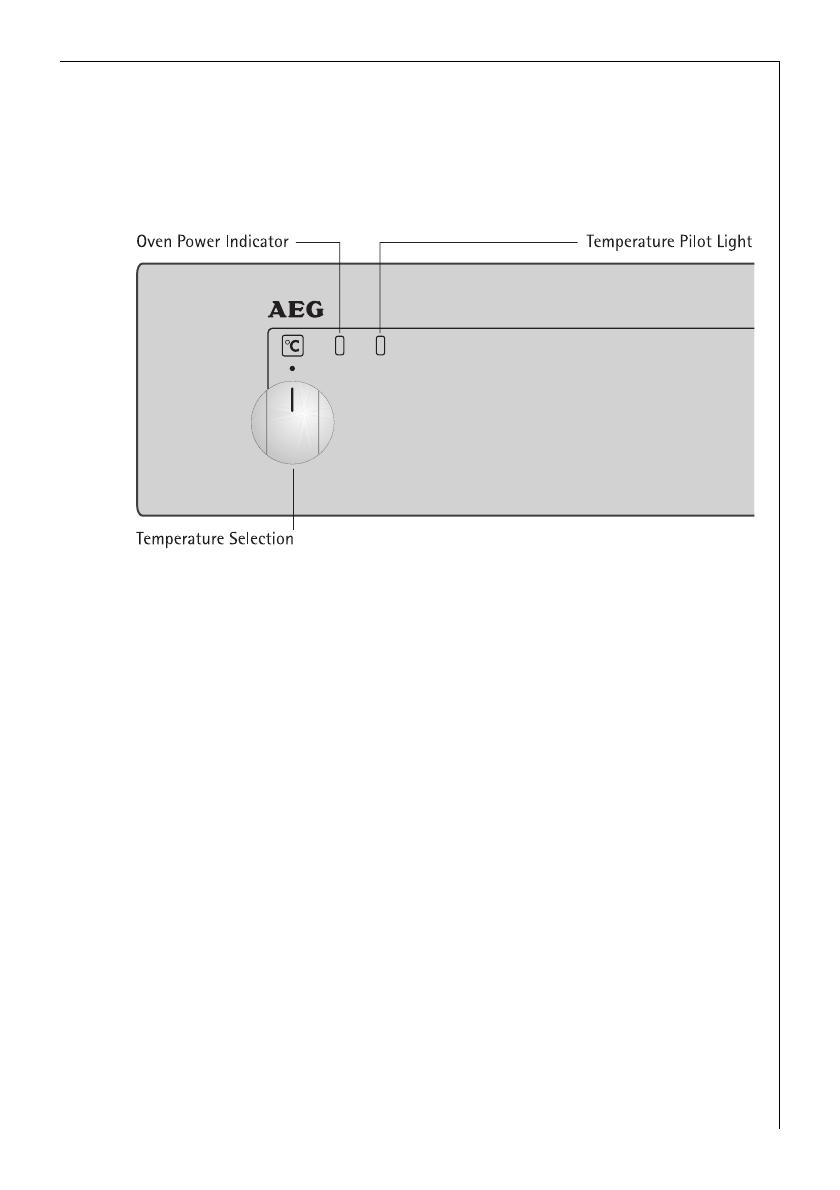
Control panel
Temperature Selection
Rotary switch used for selecting the required oven temperature. The
selected oven temperature can be read off on the switch from above.
Oven Power Indicator
The oven power indicator illuminates as soon as the oven or rings are
switched on.
Temperature Pilot Light
The temperature pilot light illuminates while the oven is heating up
and extinguishes when the selected temperature is reached. It then
cycles on and off during cooking to show that the temperature is being
maintained.
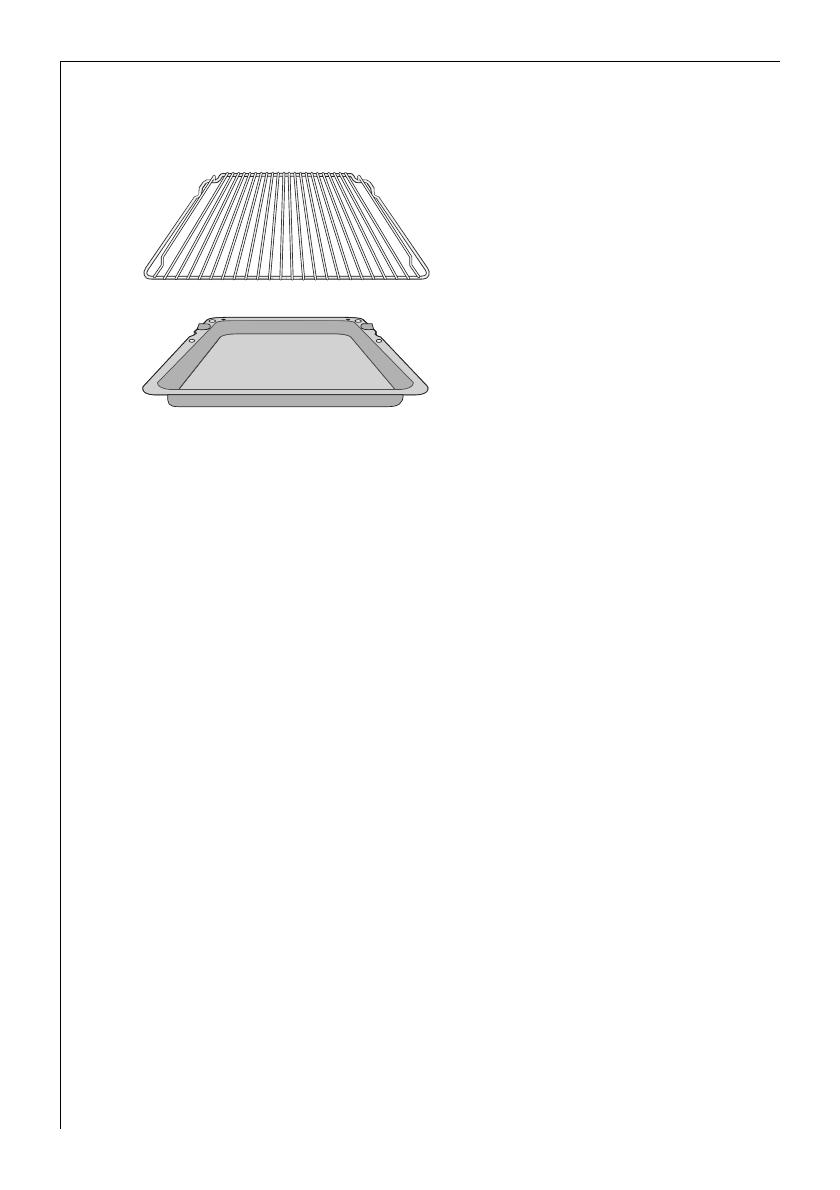
Ring Switches
Rotary switches for switching on the cooking zones. The selected heat
setting can be read off on the switch from above.

Operating Instructions
9
Oven Features
Shelf Positions
There are side rails on both sides of
the oven, each of these has 6 shelf
positions.
Please note that the shelf positions
are counted from top to bottom.
Anti-Tip Device
All slide-in parts are fitted with an
anti-tip device to prevent them
being unintentionally pulled all
the way out
When inserting slide-in parts, the
anti-tip device must be at the rear.
Oven Steam Outlet
The steam from the oven is fed
directly to the extraction hood via
the duct in the rear of the cooking
surface.
✘
Operating Instructions
10
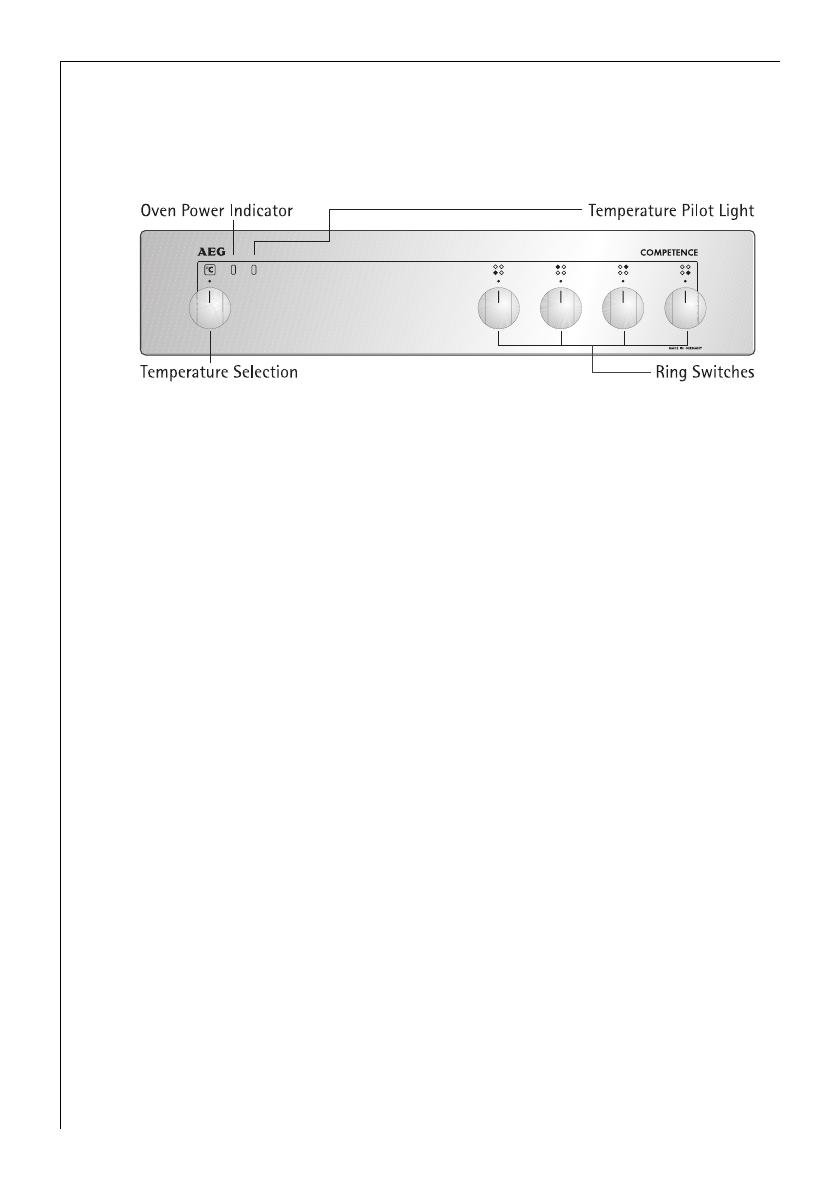
Oven Accessories
The following items are supplied:
Combination Shelf
For dishes, cake tins,
items for roasting and grilling
Universal Sheet
For cakes or roasts with a high
juice content or as
a baking sheet
or tray for collecting fat

Operating Instructions
11
Oven Functions
The following functions are available for the oven:
Conventional Heat
Conventional heat is suited to baking and roasting on one level.
Heat is supplied evenly from above and below.
F Grill
Grilling is particularly suited to the grilling or toasting of flat foods,
for example, steaks, cutlets, fish or toast.
The heat is provided by the grill element on the roof of the oven.
Before using for the first time
Cleaning for the first time
Before you use the oven for the first time, you should clean it
thoroughly. You can switch on the oven lighting to make cleaning
easier.
0 1. Turn the temperature selection switch to oven lighting L.
2. Remove all accessories and the side rails, and wash with warm water
and washing up liquid.
3. Also wash out the oven with warm water and washing up liquid, and
dry.
4. Only clean the front of the appliance with a damp cloth.
3
Tip: Use commercially available cleaner for stainless steel fronts that at
the same time also forms a protective film against finger marks.
1
Important: Do not use any caustic or abrasive cleaners! The surface
could be damaged.
Operating Instructions
12
Using the Rings
Please also observe the operating instructions for your built-in cooking
surface. They contain important information on pans, operation,
cleaning and care.
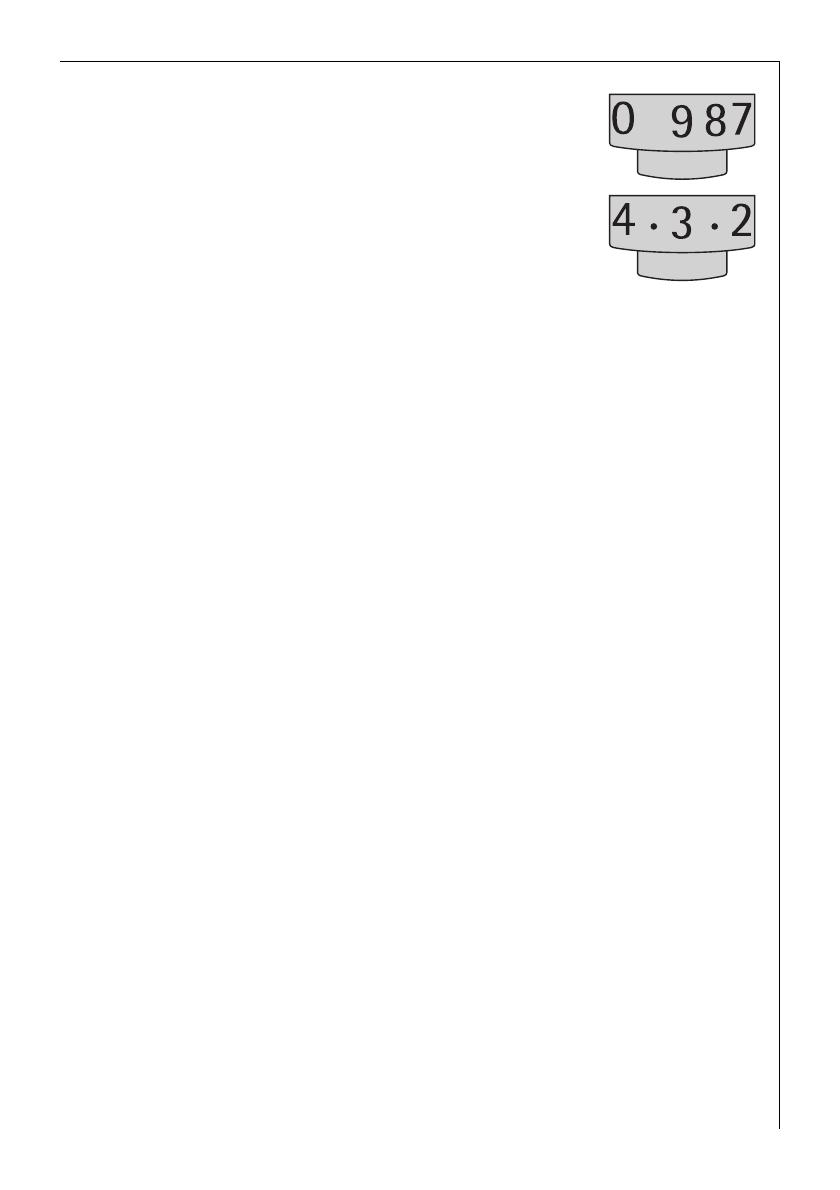
Heat Settings
• Over the ranges 1-9, you can set 14 heat settings (including interme-
diate settings).
• Intermediate settings can be selected in the range between 2 and 7.
They are marked with a dot between the heat settings.
1 = lowest power
9 = highest power
Operating Instructions
13
Cooking with the Ring
0 1. For heating up/browning, select a high power.
2. As soon as steam starts to form or the oil is hot, turn
back to the heat setting necessary for further
cooking.
3. To stop cooking, turn back to the zero position.
2
Switch the cooking zone off approx. 5-10 minutes before cooking is
finished to make use of the residual heat. By this means you can save
electricity.

Operating Instructions
14
Operating the Oven
Inserting the Shelf and Universal Sheet
All slide-in parts have a small pro-
trusion on the right and left. This
protrusion is an anti-tip device
and must point downwards.
Inserting a Shelf
0 Insert the shelf such that the two
guide rails point upwards. The
anti-tip device must point down-
wards and be in the rear of the
oven.
Inserting the Shelf and Sheet
0 When the shelf and universal
sheet are used together, carefully
place the shelf anti-tip device in
the protuberances on the sheet.
Operating Instructions
15
Switching the Oven On and Off
0 1. Set the required temperature by turning the “Temperature Selection”
switch.
The oven power indicator illuminates as long as the oven or rings are in
use.
The temperature pilot light illuminates as long as the oven is warming
up and extinguishes as soon as the temperature set is reached.
2. To switch off the oven, turn the “Temperature Selection” switch to the
zero position.

Operating Instructions
16
Usage, Tables and Tips
Boil
The figures given in the following tables are for guidance. Exactly
which switch setting needs to be used depends on the quality of the
pans and the type and quantity of the food.
Indicative figures for cooking with the ring
3
When heating up or browning, we recommend to set the switch to the
heating up setting "9" and then to complete the cooking of foods that
require longer cooking times at the appropriate heat setting.
Switch
setting
Cooking Process/
Heat Setting for
Further Cooking
suitable for
9 Heating Up
Heating up large quantities of water, cooking
pasta
7-8
Heavy
Browning
Frying chips,
browning meat, e.g. goulash,
frying, e.g. potato pancakes
frying pieces of loin, steaks
6-7
Mild
Frying
Frying meat, schnitzels, cordon bleu
cutlets, rissoles, sausages, liver
roux, mild frying of
eggs, omelettes, frying doughnuts
4-5 Boil
Cooking larger quantities of food,
stews and soups,
steaming potatoes,
cooking bouillon
3-4
Steaming,
Braising
Steaming vegetables,
braising beef
cooking rice pudding
2-3 Simmering
Simmering rice and milk-based dishes
(stir occasionally),
Steaming small quantities of potatoes or vegetables,
warming up ready meals
1-2 Melting
Beaten omelette, egg garnish, hollandaise sauce,
keeping dishes warm,
melting butter, chocolate, gelatine
0 Residual Heat, Off Position
Operating Instructions
17
Baking
Cake Tins
Cake tins made of dark metal and coated tins are suitable for
conventional heat.
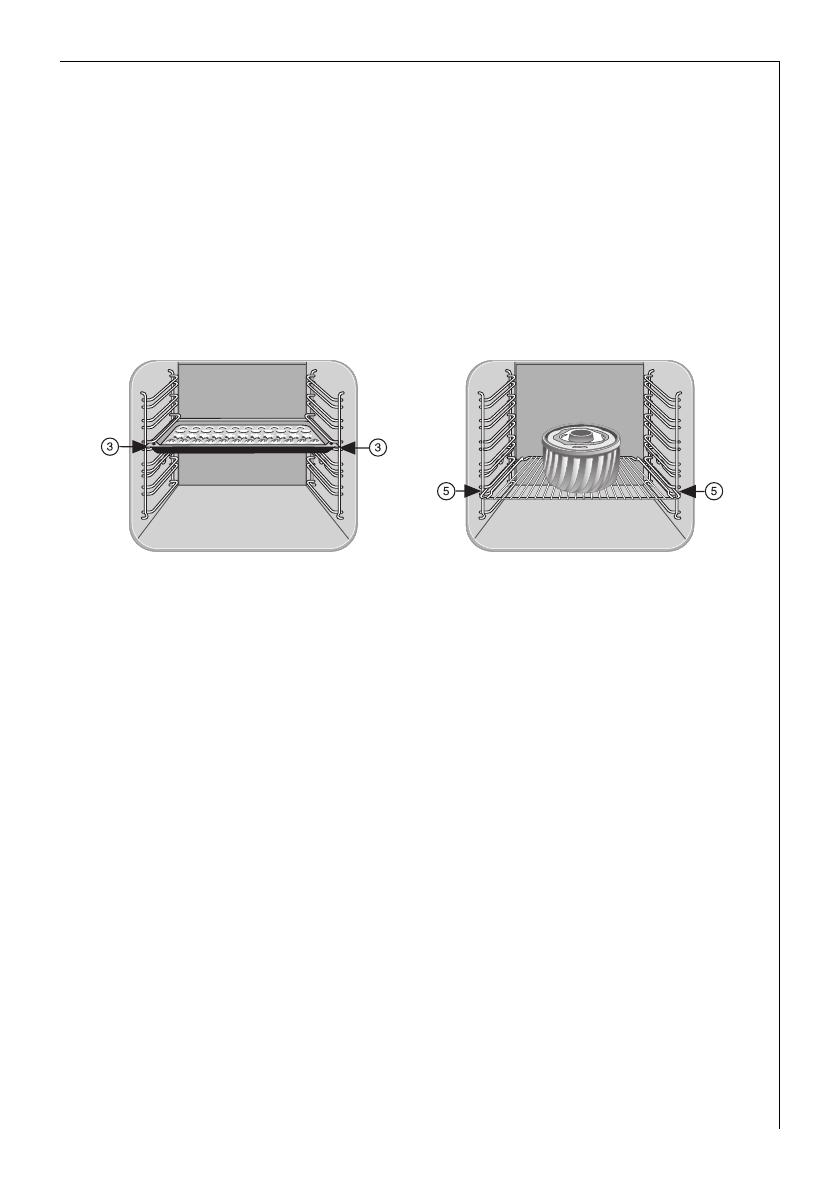
Shelf Positions
When using conventional heat it is only possible to bake on one level.
General information
• Please note that the shelf positions are counted from top to bottom.
• Slide the baking sheet to the rear wall.
• Always place cakes in cake tins in the middle of the shelf.
You can also bake two cakes simultaneously using conventional heat.
In this case place the tins side by side on the shelf. The baking time is
then increased only slightly.
1 Baking Sheet:
Shelf Position 3
1 Cake Tin:
Shelf Position 5

Operating Instructions
18
Notes on the Baking Tables
In the tables you will find information on temperatures, cooking times
and shelf positions for a selection of dishes.
• Ranges are given for the temperature and cooking time since these
are dependent on the mixture, quantity and cake tin used.
• When using for the first time, we recommend setting the lower tem-
perature, and only if necessary, e.g. if increased browning is required
or the cooking time is too long, selecting a higher temperature.
• If you cannot find specific information for one of your own recipes,
use information on a similar recipe for guidance.
2
Switch off the oven 10-15 minutes before the end of the cooking time
to make use of the residual heat.
The information in the tables applies, when not otherwise stated, for a
cold oven.

Operating Instructions
19
Baking Table
Type of Cake or Pastry
Shelf
Position
from the
Top
Temperature
ºC
Time
Cakes in Cake Tins
Ring-Shaped Cakes 5. 160-180 0:50-1:10
Madeira Cake, King Cake 5. 150-170 1:10-1:30
Sponge Cake 5. 160-180 0:25-0:40
Shortcrust Pastry Flan Base 5.
190-210
1
0:10-0:25
Sponge Flan Base 5. 170-190 0:20-0:25
Covered Apple Flan 5. 170-190 0:50-1:00
Savoury Flan (e.g. Quiche Lorraine) 5./6. 180-200 0:30-1:10
Cheesecake 5. 160-180 1:00-1:30
Cakes and Pastries on Baking Sheets
Plaited Roll/Ring 3. 170-190 0:30-0:40
Christmas Stollen 3.
160-180
1
0:40-1:00
Bread (rye bread) first
...................................then
5.
250
1
160-180
0:20
0:30-1:00
Cream Puffs, Eclairs 3. 190-210 0:25-0:40
Swiss Roll 3.
180-200
1
0:10-0:20
Dry Streusel Cake 3. 170-190 0:20-0:40
Butter Cake/Sugar Cake, Bienenstich 3.
190-210
1
0:15-0:30
Fruit Flans (on yeast dough/sponge
base)
2
3. 170-190 0:25-0:50
Fruit Flans on Shortcrust Pastry Base
2
3. 170-190 0:40-1:20
Flat Cakes with Delicate Toppings (e.g.
curd cheese, cream, etc.)
3. 170-190 0:40-1:20
Pizza (with deep topping)
2
5.
190-210
1
0:30-1:00
Pizza (thin) 5.
230-300
1
0:10-0:25
Unleavened Bread 3.
275-300
1
0:08-0:15

Operating Instructions
20
Tips on Baking
Waehen (CH) 5.
210-230
1
0:35-0:50
Biscuits
Shortcrust Biscuits 3.
170-190
1
0:06-0:20
Small Piped Biscuits 3.
160-180
1
0:10-0:40
Sponge Fingers 3. 170-190 0:15-0:20
Meringues 3. 100-120 2:00-2:30
Macaroons 3. 120-140 0:30-0:60
Small Pastries made with Yeast Dough 3. 170-190 0:20-0:40
Small Pastries made with Puff Pastry 3.
190-210
1
0:20-0:30
Bread Rolls 5.
180-220
1
0:20-0:35
1) Pre-Heat the Oven
2) Use the combination/fat tray or the fat tray!
Tip
This is how to tell if your cake
is cooked through
Push a wooden skewer into the highest point of the
cake. When no more cake mixture sticks to the wood,
you can switch off the oven and utilise the residual
heat.
The cake collapses (is sticky,
not properly cooked through,
water marks)
Check your recipe. Next time use less liquid. Observe
mixing times, particularly when using kitchen appli-
ances.
The cake is too light
Next time use a dark cake tin or place the cake one
level lower.
Cake with moist topping/
cheesecake is not cooked
through
Next time bake at a lower temperature and increase
the cooking time.
Type of Cake or Pastry
Shelf
Position
from the
Top
Temperature
ºC
Time
/