EK Water Blocks EK-FC R9-280X DCII User manual
- Category
- Computer liquid cooling
- Type
- User manual
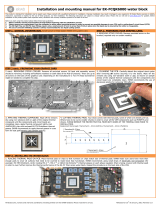
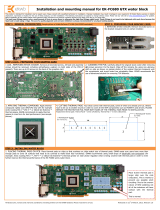
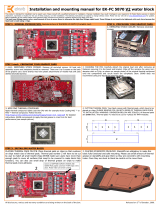
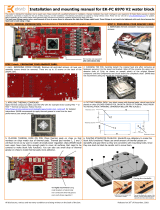
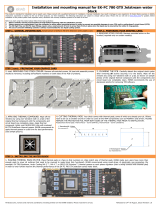
EK Water Blocks EK-FC R9-280X DCII is a high-performance water block for the ASUS Radeon R9-280X DCII graphics card. It is designed to provide excellent cooling for the GPU, VRM, and memory, allowing for higher clock speeds and improved performance. The block is made from high-quality materials and features a nickel-plated copper base for optimal heat transfer. It comes with pre-cut thermal pads for easy installation and is compatible with G1/4" threaded compression fittings.
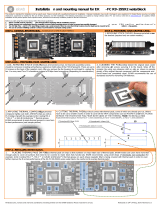
EK Water Blocks EK-FC R9-280X DCII is a high-performance water block for the ASUS Radeon R9-280X DCII graphics card. It is designed to provide excellent cooling for the GPU, VRM, and memory, allowing for higher clock speeds and improved performance. The block is made from high-quality materials and features a nickel-plated copper base for optimal heat transfer. It comes with pre-cut thermal pads for easy installation and is compatible with G1/4" threaded compression fittings.


-
 1
1
-
 2
2


EK Water Blocks EK-FC R9-280X DCII User manual
- Category
- Computer liquid cooling
- Type
- User manual
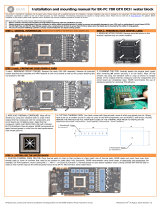
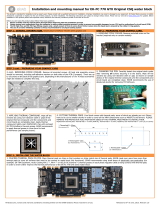
EK Water Blocks EK-FC R9-280X DCII is a high-performance water block for the ASUS Radeon R9-280X DCII graphics card. It is designed to provide excellent cooling for the GPU, VRM, and memory, allowing for higher clock speeds and improved performance. The block is made from high-quality materials and features a nickel-plated copper base for optimal heat transfer. It comes with pre-cut thermal pads for easy installation and is compatible with G1/4" threaded compression fittings.
Ask a question and I''ll find the answer in the document
Finding information in a document is now easier with AI
Related papers
-
EK Water Blocks EK-FC R9-280X DCII Installation guide
-
EK Water Blocks 3831109869130 Installation guide
-
EK Water Blocks EK-FC780 GTX Ti DCII User manual
-
EK Water Blocks EK-FC R9-290X DCII User manual
-
EK Water Blocks EK-FC R9-290X - Acetal+Nickel 2.0 User manual
-
EK Water Blocks EK-FC R9-290X Lightning User manual
-
-
 ekwb EK-FC R9-290X Matrix Series User manual
-
EK Water Blocks 3831109869055 User manual
-

Other documents
-
 ekwb EK-FCQK6000 Installation guide
-
 ekwb EK-FC780 GTX DCII Installation guide
-
 ekwb EK-FC R9-295X2 Installation guide
-
 ekwb EK-FC780 GTX Ti DCII Installation guide
-
 ekwb EK-FC6870 Installation guide
-
 ekwb EK-FC680 GTX Installation guide
-
 ekwb EK-FC5870 V2 Installation guide
-
 ekwb EK-FC6970 V2 Acetal+Nickel Installation guide
-
 ekwb EK-FC770 GTX Installation guide
-
 ekwb EK-FC780 GTX Jetstream Installation guide


