Page is loading ...

GB
Cordless steel rod cutter Instruction manual
F
Coupe tige sans-fil Manuel d’instructions
D
Akku-Moniereisenschneider Betriebsanleitung
I
Taglia-tondini a batteria Istruzioni per l’uso
NL
Akku staafsnijder Gebruiksaanwijzing
E
Cortadora de ferralla a batería Manual de instrucciones
P
Cortadora para heliaço a bateria Manual de instruço˜es
DK
Akku-Stangjernsklipper Brugsanvisning
S
Sladdlös bult sax Bruksanvisning
N
Batteridrevet boltekutter Bruksanvisning
SF
Akkukäyttöinen terästangon katkaisukone Käyttöohje
GR
∫fiˇÙ˘ ·ÙÛ·Ïfi‚ÂÚÁ·˜ Ì ̷ٷڛ· √‰ËÁÈ· ÃÚËÛˆ˜
SC130DRA
SC160DRA
SC190DW
SC130DRA
SC190DW
SC160DRA
SC130DA/SC160DRA (cover) (’100. 1. 27)

Note:
The recycling method may differ from country to country, or state (province) to state (province). Consult with
your nearest Makita Authorized Service Center or Distributor.
Note :
La méthode de recyclage peut varier suivant les pays ou suivant les états (régions). Consulter le Centre Makita
Autorisé le plus proche ou bien le distributeur.
Achtung:
Die Art des Recycling kann von Land zu Land unterschiedlich sein. Bei Fragen wenden Sie sich an eine
autorisierte Werkstatt oder an den nächstgelegenen Makita-Kundendienst.
Nota:
Il modo di riciclare le batterie varia da paese a paese, o da zona a zona. Consultatevi con il più vicino Centro
d’Assistenza o Distributore della Makita.
Opmerkingen:
De recycle-methode kan van land tot land en zelfs van provincie tot provincie verschillen. Wend u zich hierover
tot de dichtstbijzijnde erkende Makita Service Center of Agent.
Nota:
La manera de reutilizarlas puede ser que difiera de país a país o de estado (provincia) a estado (provincia).
Indague en el Centro de Servicio Makita autorizado más cercano o recurra a su distribuidor.
NOTA:
O método de reciclagem pode ser diferente de país para país. Consulte o Serviço de Assistência MAKITA
autorizado ou o seu Distribuidor mais próximo.
Bemærk:
Genbrugs- og indsamlingsmetoden kan være forskellig fra land til land, eller amt (kommune) til amt (kommune).
Kontakt Deres nærmeste autoriserede Makita service-center eller distributør for detaljer.
Obs!
Sättet för resursåtervinning är olika i olika länder (distrikt eller kommuner). Rådfråga den närmaste Makita-
serviceverkstaden eller din återförsäljare.
Merk:
Resirkuleringsmetoden kan variere fra ett land (bygd, by, distrikt) til et annet. Rådfør deg derfor med nærmeste
service center eller forhandler.
Huom!
Kierrätysmenetelmä on erilainen eri maissa (alueilla). Kysy tarkemmat tiedot valtuutetusta Makita-huoltamosta
tai jälleenmyyjältä.
¶·Ú·ÙËÚËÛË:
∏ ̤ԉԘ ·Ó·Î‡ÎψÛ˘ ÌÔÚ› Ó· ‰È·ˇ¤ÚÂÈ ·fi ¯ÒÚ· Û ¯ÒÚ· ‹ ·fi ¶ÔÏÈÙ›· (¡ÔÌ·Ú¯›·) Û ¶ÔÏÈÙ›·
(¡ÔÌ·Ú¯›·), ™˘Ì‚Ô˘Ï¢ı›Ù ÙÔ ÏËÛȤÛÙÂÚÔ ∂ÍÔ˘ÛÈÔ‰ÔÙËÌÂÓÔ ∫¤ÓÙÚÔ ∂͢ËÚ¤ÙËÛ˘ ‹ ÙÔÓ
¶ÚÔÌËıÂ˘Ù‹ Û·˜.
1
6
SC130DRA/SC160DRA (illust) 1 (’100. 1. 13)

ENGLISH
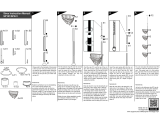
Explanation of general view
1 Set plate
2 Battery cartridge
3 Push button
4 Charging light
5 Battery charger
6 Cutter head
7 Hex socket head bolt
8 Flat washer
9 Cutter head
0 Vents
q Balance stand
w Switch trigger
e Steel rod
r Cutters
t Stopper
y Adjusting hex bolt
u Hex wrench
i Return valve
o Hex bolt
SPECIFICATIONS
Model SC130DRA SC160DRA SC190DW
Cutting capacity (Diameter) ................................. 3 – 13 mm 3 – 16 mm 3 – 19 mm
Cutting speed ...................................................... 4 seconds 5.5 seconds 6 seconds
Overall length ...................................................... 312 mm 371 mm 430 mm
Net weight ........................................................... 4.0 kg 5.8 kg 10.5 kg
Rated voltage ...................................................... D.C. 12 V D.C. 12 V D.C. 18 V
•
Due to our continuing program of research and
development, the specifications herein are subject
to change without notice.
•
Note: Specifications may differ from country to
country.
Safety hints
For your own safety, please refer to the enclosed
safety instructions.
IMPORTANT SAFETY INSTRUCTIONS
FOR CHARGER & BATTERY
CARTRIDGE
ENC001-2
1. SAVE THESE INSTRUCTIONS — This manual
contains important safety and operating
instructions for battery charger.
2. Before using battery charger, read all instruc-
tions and cautionary markings on (1) battery
charger, (2) battery, and (3) product using
battery.
3. CAUTION — To reduce risk of injury, charge
only MAKITA type rechargeable batteries.
Other types of batteries may burst causing
personal injury and damage.
4. Do not expose charger to rain or snow.
5. Use of an attachment not recommended or
sold by the battery charger manufacturer may
result in a risk of fire, electric shock, or injury
to persons.
6. To reduce risk of damage to electric plug and
cord, pull by plug rather than cord when dis-
connecting charger.
7. Make sure cord is located so that it will not be
stepped on, tripped over, or otherwise sub-
jected to damage or stress.
8. Do not operate charger with damaged cord or
plug — replace them immediately.
9. Do not operate charger if it has received a
sharp blow, been dropped, or otherwise dam-
aged in any way; take it to a qualified service-
man.
10. Do not disassemble charger or battery car-
tridge; take it to a qualified serviceman when
service or repair is required. Incorrect reas-
sembly may result in a risk of electric shock or
fire.
11. To reduce risk of electric shock, unplug
charger from outlet before attempting any
maintenance or cleaning. Turning off controls
will not reduce this risk.
12. The battery charger is not intended for use by
young children or infirm persons without
supervision.
13. Young children should be supervised to
ensure that they do not play with the battery
charger.
ADDITIONAL SAFETY RULES FOR
CHARGER & BATTERY CARTRIDGE
1. Do not charge battery cartridge when tempera-
ture is BELOW 10°C (50°F) or ABOVE 40°C
(104°F).
2. Do not attempt to use a step-up transformer,
an engine generator or DC power receptacle.
3. Do not allow anything to cover or clog the
charger vents.
4. Always cover the battery terminals with the
battery cover when the battery cartridge is not
used.
5. Do not short the battery cartridge:
(1) Do not touch the terminals with any con-
ductive material.
(2) Avoid storing battery cartridge in a con-
tainer with other metal objects such as
nails, coins, etc.
(3) Do not expose battery cartridge to water or
rain.
A battery short can cause a large current flow,
overheating, possible burns and even a break-
down.
6. Do not store the machine and battery cartridge
in locations where the temperature may reach
or exceed 50°C (122°F).
SC130DRA/SC160DRA/SC190DW (E) (’100. 1. 13)
7

7. Do not incinerate the battery cartridge even if
it is severely damaged or is completely worn
out. The battery cartridge can explode in a fire.
8. Be careful not to drop, shake or strike battery.
9. Do not charge inside a box or container of any
kind. The battery must be placed in a well
ventilated area during charging.
ADDITIONAL SAFETY RULES FOR
TOOL
1. Be aware that this tool is always in an operat-
ing condition, because it does not have to be
plugged into an electrical outlet.
2. Hold the tool firmly.
3. Keep face/hands, etc. away from cutters and
vicinity during operation.
4. Switch off and discontinue use immediately
when the tool does not work well or abnormal
sound occurs. Have it repaired at point of
purchase or your nearest Makita Authorized
Service Center.
5. An accidentally dropped or struck tool must
be inspected carefully for breakage, cracks or
deformities.
6. Don’t charge battery cartridge anywhere near
locations where lacquer, paint, benzene, thin-
ner, gasoline, gas or the like may be.
7. Never charge battery cartridge on top of card-
board or paper, seat/floor cushions, carpet,
vinyl, etc.
8. Never charge in a dusty location where
dust/dirt accumulates.
9. Install cutters carefully in accordance with the
instruction manual.
10. Always be sure you have a firm footing. Be
sure no one is below when using the tool in
high locations.
11. Cutters that become worn, deformed, nicked
or broken not only cause a tool breakdown;
they may cause a serious accident. Replace
them right away with new ones from Makita.
SAVE THESE INSTRUCTIONS.
OPERATING INSTRUCTIONS
Installing or removing battery cartridge
(Fig. 1 for SC130DRA and SC160DRA)
•
Always switch off the tool before insertion or
removal of the battery cartridge.
•
To remove the battery cartridge, pull out the set
plate on the tool and grasp both sides of the
cartridge while withdrawing it from the tool.
•
To insert the battery cartridge, align the tongue on
the battery cartridge with the groove in the housing
and slip it into place. Snap the set plate back into
place. Be sure to close the set plate fully before
using the tool.
•
Do not use force when inserting the battery car-
tridge. If the cartridge does not slide in easily, it is
not being inserted correctly.
(Fig. 2 for SC190DW)
•
Always switch off the tool before insertion or
removal of the battery cartridge.
•
Toremove the battery cartridge, withdraw it from the
tool while pressing the buttons on both sides of the
cartridge.
•
To insert the battery cartridge, align the tongue on
the battery cartridge with the groove in the housing
and slip it into place.Always insert it all the way until
it locks in place with a little click. If not, it may
accidentally fall out of the tool, causing injury to you
or someone around you.
•
Do not use force when inserting the battery car-
tridge. If the cartridge does not slide in easily, it is
not being inserted correctly.
Charging (Fig. 3 for SC130DRA and SC160DRA)
Plug the fast charger into your power source. The charging light will flash in green color. Insert the battery
cartridge so that the plus and minus terminals on the battery cartridge are on the same sides as their respective
markings on the fast charger. Insert the cartridge fully into the port so that it rests on the charger port floor.When
the battery cartridge is inserted, the charging light color will change from green to red and charging will begin.
The charging light will remain lit steadily during charging. When charging is completed, the charging light color
will change from red to green and tone will sound steadily for about 5 seconds. After charging, unplug the
charger from the power source. Refer to the table below for the charging time.
Battery type Capacity (mAh) Number of cells
Charging time
Fast charger DC1439 Fast charger DC1209
1202/1202A 2,000 10 Approx. 14 min. Approx. 14 min.
1200 1,300 10 Approx. 9 min. Approx. 9 min.
8
SC130DRA/SC160DRA/SC190DW (E) (’100. 1. 27)

(Fig. 4 for SC190DW)
1. Plug the battery charger into your power source. The charging light will flash in green color.
2. Insert the battery cartridge so that the plus and minus terminals on the battery cartridge are on the same
sides as their respective markings on the battery charger. Insert the cartridge fully into the port so that it
rests on the charger port floor.
3. When the battery cartridge is inserted, the charging light color will change from green to red and charging
will begin. The charging light will keep lighting up steadily during charging.
4. When charging is completed, the charging light color will change from red to green.
5. After charging, unplug the charger from the power source. The charging time is as follows:
Battery type Capacity (mAh) Number of cells Charging time
1822 2,000 15 Approx. 60 min.
1833 2,200 15 Approx. 65 min.
1834 2,600 15 Approx. 75 min.
1835 3,000 15 Approx. 90 min.
CAUTION for SC130DRA and SC160DRA:
•
The fast charger Model DC1439/DC1209 is for charging Makita battery cartridge. Never use it for other
purposes or for other manufacturer’s batteries.
•
When you charge a new battery cartridge or a battery cartridge which has not been used for a long period of
time, it may not accept a full charge. This is a normal condition and does not indicate a problem. You can
recharge the battery cartridge fully after discharging it completely and recharging a couple of times.
•
If you charge a battery cartridge from a just-operated tool or a battery cartridge which has been left in a
location exposed to direct sunlight or heat for a long time, the charging light may flash in red color. If this
occurs, wait for a while. Charging will begin after the battery cartridge cools.
•
If the charging light flashes alternately in green and red color and tone will sound ‘‘beep, beep, beep, ....’’ for
about 20 seconds, a problem exists and charging is not possible. The terminals on the charger or battery
cartridge are clogged with dust or the battery cartridge is worn out or damaged.
•
If charging two or more battery cartridges in succession with fast charger DC1209, the charging time may
become longer to protect the charger.
CAUTION for SC190DW:
•
The battery charger Model DC1801 is for charging Makita-battery cartridge. Never use it for other purposes
or for other manufacturer’s batteries.
•
When you charge a new battery cartridge or a battery cartridge which has not been used for a long period of
time, it may not accept a full charge. This is a normal condition and does not indicate a problem. You can
recharge the battery cartridge fully after discharging it completely and recharging a couple of times.
•
If you charge a battery cartridge from a just-operated tool or a battery cartridge which has been left in a
location exposed to direct sunlight or heat for a long time, the charging light may flash in red color. If this
occurs, wait for a while. Charging will begin after the battery cartridge cools.
•
If the charging light flashes alternately in green and red color, charging is not possible. The terminals on the
charger or battery cartridge are clogged with dust or the battery cartridge is worn out or damaged.
•
If you wish to charge two battery cartridge, allow 15 minutes between chargings on the battery charger.
•
Any of the following conditions indicates damage to the charger and/or battery cartridge. Ask your Makita
Authorized or Factory Service Center to check them.
1) The charging light does not flash (green) when the battery charger is plugged into a power source.
2) The charging light does not light up or flash (red) when the battery is inserted in the charger port.
3) Charging is not completed at even more than two hours after red light comes ON at start of charging.
Installing or removing cutters
(Fig. 5 for SC130DRA, Fig. 6 for SC160DRA and Fig. 7 for SC190DW)
CAUTION:
Always be sure that the tool is switched off and the battery cartridge is removed before installing or removing
the cutters.
SC130DRA/SC160DRA/SC190DW (E) (’100. 1. 27)
9

Replace the cutters in accordance with the following procedure. Use only Makita genuine cutters for the tool.
1. There are two cutters. Cutter A is to be installed on the cutter head, and cutter B on the cutter rod. Be sure
to install them in the correct respective position. Refer to the table below for the cutter sizes.
For Model Cutter A Cutter B
SC130DRA
20x15x9mm
(four cutting edges)
20x15x8mm
(four cutting edges)
SC160DRA
22x17x9mm
(four cutting edges)
22x17x8mm
(one cutting edge)
SC190DW
28x20x11.5mm
(four cutting edges)
26x20x10mm
(four cutting edges)
2. To install the cutters, first remove the two hex socket head bolts holding the cutters on the cutter head and
cutter rod, respectively.
3. Wipe off any dirt or foreign matter from the cutter-mounting position on the cutter head and cutter rod.
4. Secure firmly cutter A on the cutter head and cutter B on the cutter rod, using their respective flat washers
and hex socket head bolts. Failure to tighten securely is extremely dangerous.
Installing balance stand (Fig. 8)
When using the balance stand on the tool, be sure not
to block the air vents.
Switch action (Fig. 9)
CAUTION:
Before inserting the battery cartridge into the tool,
always check to see that the switch trigger actuates
properly and returns to the ‘‘OFF’’ position when
released.
To start the tool, simply pull the trigger. Tool speed is
increased by increasing pressure on the trigger.
Release the trigger to stop.
Cutting operation (Fig. 10, 11, 12, 13 and 14)
1. Place the steel rod (material to be cut) in the
opening so as to be at right angles to the cutters.
Adjust the stopper (adjusting hex bolt for
SC190DW) in terms of the steel rod size (diam-
eter). When cutting large size steel rods, position
the stopper (adjusting hex bolt) as shown in
Fig. 11-1, 12-1. When cutting small size steel
rods, position the stopper (adjusting hex bolt) as
shown in Fig. 11-2, 12-2. The stopper (adjusting
hex bolt) keeps the steel rod at right angles to the
cutters during the cutting.
2. Keep the steel rod at the deepest position in
between the cutters as shown in Fig. 13-1. Never
keep it as shown in Fig. 13-2. If the steel rod is not
placed at the deepest position between the cut-
ters, it may ride up and cause a fragment or piece
to fly up. Besides this dangerous situation, the
cutters may be damaged. Always position the
steel rod properly.
3. Pull the trigger. The cutter rod advances to cut off
the steel rod. Keep the trigger pulled until the steel
rod is completely cut off.
4. Release the trigger, and the cutter rod will auto-
matically return to its initial position.
NOTE:
The cutter rod will not return to its initial position
even if you release the trigger until the cutter rod
advances all the way and stops. And until the
cutter rod completely return to its initial position, it
will not move forward again even if you pull the
trigger. Pull the trigger to begin the next cut-off
only after the cutter rod has completely returned to
its initial position.
Return valve (Fig. 15)
For SC160DRA and SC190DW
It may happen that the cutters will engage the steel
rod and come to a stop before the cut-off is com-
pleted. In that case, use the hex wrench M4 to release
the hydraulic pressure in the return valve. Insert the
hex wrench M4 into the return valve hole and make a
half turn in the counterclockwise direction. This
releases the hydraulic pressure inside the tool, allow-
ing the cutter rod to return to its initial position. Always
retighten the valve before doing the next cut-off job.
Angling into tight places
For SC160DRA and SC190DW
One useful feature is that you can, even after begin-
ning a cut-off (load condition), rotate the tool by the
handle 360° left or right. This makes work in tight
places easier, especially trigger access and activa-
tion. You can even swing the tool while pulling the
trigger.
10
SC130DRA/SC160DRA/SC190DW (E) (’100. 1. 13)

MAINTENANCE
CAUTION:
Always be sure that the tool is switched off and the
battery cartridge is removed before carrying out any
work on the tool.
Oil replenishment (Fig. 16)
This cordless rod cutter is electrohydraulic. When
shipped from the factory, it was filled with the oil. Do
not attempt to add oil as long as the tool performs
well. When the oil-pressure is not enough to cut steel
rods, replenish the oil as follows. Use only Genuine
Makita Hydraulic Oil #46.
1. Place the steel rod between the cutters and pull
the trigger.
2. Release the trigger just before cut-off is com-
pleted to stop the tool.
3. Remove the battery cartridge from the tool.
4. Remove the hex bolt which caps the oil hole.
Replenish oil, being careful not to allow any oil into
the motor.
5. Replace the hex bolt and tighten securely.
6. Install the battery cartridge on the tool and com-
plete cut-off of the steel rod.
7. Repeat the above procedures several times.
To maintain product safety and reliability, repairs,
maintenance or adjustment should be carried out by
Makita Authorized Service Center.
SC130DRA/SC160DRA/SC190DW (E) (’100. 1. 13)
11
/