Amana AGS1740BDQ Installation guide

Category
Cookers
Type
Installation guide
GasSlide-InRange
Cuisini_reencastrable- verre/ Estufadeslizantedevidrio
Printed in USA ©2005 MaytagCorporation REVl6/22/05 8101P667-60
GasSlide-In Range
PLEASEKEEPTHIS MANUALFORFUTUREREFERENCE
This manualis intendedto assist in the initial installation and adjustmentsof the range.
Onlyqualified personnelshouldinstall or service this range.
Read"Safety Instructions" in Use & Carebookbefore using range.
Improper installation, adjustment,alteration, service,maintenanceor useof range
can result in serious injury or propertydamage.
Installer,take care not to damageflooring.
CAUTIONS
Donotlift ormoverangebygraspingdoorhandlesor maintop.
Thisrange hasbeendesignedin accordancewith the
requirementsof varioussafetyagencies andcomplieswith
the maximumallowablewood cabinettemperatures of 194_E
If this rangeis installedwith cabinets that have a lower
working temperature than 194_F,discoloration, delamination
or melting may occur.
Placerange inawell lit area. Do not set rangeover holesin
the floor or other locations where it may be subjectto strong
drafts. Anyopeningin the wall behind the rangeand in the
floor under the rangeshouldbe sealed. Makesurethe flow
of cooling/ventilation air is not obstructed belowthe range.
Note:Arangeshould NOTbe installed overkitchen carpeting.
HighAltitudeNotice: Thespecified gasburner ratings
typically applyto elevations up to 2000feet. For higher
altitudes, the ratesmay needto be reducedto achieve
satisfactory operation.Alocal certified gasservicer will be
able to advise if a reductionis necessary
Arisk of rangetip-over exists if the applianceis not installed in
accordancewith the providedinstallationinstructions.Theproper use
of the ANTI-TIPdeviceminimizes the risk ofTIP-OVER.Inusingthis
device the consumermust still observethe safetyprecautionsas
stated in the USEand CAREMANUALandavoid usingthe ovendoors as
a step stool. Installationinstructions areprovidedfor wood andcement
in either floor or wall. Anyother typeof construction may require
special installationtechniques as deemednecessaryto provide
adequatefastening ofthe ANTI-TIPbracket to the floor or wall. The
bracketmust be installedto engagethe RIGHTrear levelingfoot. Install
the bracket asshown in step 2.
MOBILEHOMES
Theinstallation of arangedesignedfor mobile home installation must
conform with the ManufacturedHomeConstructionandSafety
Standard,Title 24 CFR,Part3280 (formerlythe FederalStandardfor
MobileHomeConstructionandSafety,Title 24 HUD,Part 280)or, when
such standard is not applicable,the Standardfor ManufacturedHome
InstallationsANSIA225.1/NFPA501A,or with localcodes.In Canada
the rangemust be installedin accordancewith the current CSA
StandardC22.1- CanadianElectrical CodePart 1and SectionZ240.4.1
- Installation Requirementsfor GasBurningAppliancesin MobilHomes
(CSAStandardCAN/CSA- Z240MH).
ElectricalGroundingInstructions_ Thisappliance isequipped I
with a (three-prong)groundingplugfor Yourprotectionagainst I
shock hazardandshouldbe pluggeddirectlyintoa properlY I
groundedrecePtac!e_DOnot cutor removethegroundingProng I
from!bspug I
I
RECREATIONALPARKTRAILERS
Theinstallation of a range designed for recreational parktrailers must
conform with stateor other codes or,in the absenceof such codes,
with the Standardfor RecreationalPark Trailers,ANSIA119.5-latest
edition. In Canadathe range must be installed in accordancewith
CAN/CSA- Z240.6.2- Electrical Requirementsfor R.V.'s(CSAStandard
CAN/CSA- Z240 RVSeries)and SectionZ240.4.2- Installation
Requirementsfor PropaneAppliancesand Equipmentin R.V.'s(CSA
StandardCAN/CSA- Z240 RVSeries).
[l(I]_]_l_fl_[_] i i: 1:11.'F:I_[_]_
Electric Supply
Theappliance,when installed,must be electrically groundedin
accordancewith localcodes or,in the absenceof local codes,with the
NationalElectricalCode,ANSI/NFPA70. InCanadathe rangemust be
installedin accordancewith the current CSAStandardC22.1-
CanadianElectricalCodePart1.
Electrical Supply Connection
Therange requires 120volts,60 cycle alternating current from a
dedicated groundedoutlet with a 15 ampcircuit breaker. Seeserial
platefor rating,locatedon front frame behindstorage drawer. User
may experience occasionalcircuit tripping if GroundFaultCircuit
Interrupter (GFCl)outlet or breaker is in use.
Gas Supply
Installationof thisrangemustconformwith localcodesor,inthe
absenceof localcodes,with theNationalFuelGasCode,ANSIZ223.1-
latestedition.In Canadathe rangemustbeinstalledin accordance
withthecurrentCGAStandardCAN/CGA-B149- InstallationCodesfor
GasBurningAppliancesand Equipmentand/orlocalcodes.
In TheCommonwealthOf Massachusetts
Thisproductmustbe installedbya licensedplumberorgasfitter when
installedwithin the CommonwealthofMassachusetts.A "T" handle
typemanualgasvalvemustbe installedin thegas supplylineto this
appliance.Aflexiblegasconnector,when used,mustnotexceeda
lengthofthree(3)feet / 36 inches.
Gas leaksmay occur in your system and resultin a dangerous
situation. Gasleaks may not bedetected bysmell alone.Gas
suppliers recommendyou purchaseandinstall an ULapproved
gas detector.Install anduse in accordancewith manufacturerls
instructions.
A QUALIFIED SERVICEMAN OR GAS APPLIANCE INSTALLER
MUST MAKETHEGAS SUPPLYCONNECTION.Leak testing of the
appliance shall be conducted by the installer according to the
instructions given in Step 7.
Applya non-corrosiveleak detection fluid to all joints and fittings in
the gas connectionbetween the supply lineshut-off valve and the
range.Include gasfittings andjoints in the rangeif connectionswere
disturbed duringinstallation. Checkfor leaks! Bubblesappearing
aroundfittings and connectionswill indicatea leak. If a leakappears,
turn off supply line gasshut-off valve,tighten connections,turn on the
supply line gasshut off valve,andretest for leaks.
CAUTION:NEVERCHECK FORLEAKSWITH A FLAME.WHEN
LEAKCHECKIS COMPLETE,WIPE OFFALL RESIDUE.
NATURALGASSUPPLYLINEMUSTHAVEA NATURALGASSERVICE
REGULATOR.INLETPRESSURETOTHISAPPLIANCESHOULDBE
REDUCEDTOA MAXIMUMOF14INCHESWATERCOLUMN(0.5 POUNDS
PERSQUAREINCH(P.S.I.)LIQUEFIEDPETROLEUM(L.P.)/PROPANEGAS
SUPPLYLINEMUSTHAVEA L.P.GASPRESSUREREGULATOR.INLET
PRESSURETOTHISAPPLIANCESHOULDBEREDUCEDTOA MAXIMUM
OF14INCHESWATERCOLUMN(0.5 P.S.I.).INLETPRESSURESIN
EXCESSOF0.5 P.S.I.CANDAMAGETHEAPPLIANCEPRESSURE
REGULATORANDOTHERGASCOMPONENTSINTHISAPPLIANCEAND
CANRESULTINAGASLEAK.
Gassupply pressurefortestingregulatormustbeat least1" water
columnpressureabovemanifoldpressureshownonserialplate.
Check Pressure of House Piping System
1.Theapplianceand itsindividual shutoff valve mustbe
disconnectedfrom the gassupply piping system duringany
pressuretestingofthat system at testpressuresinexcess of
1/2 Ibs./sq.in.(3.5 kPa)(13.8 in.water column).
2. Theappliancemustbe isolatedfrom the gassupply piping
systemby closingits individualmanualshutoff valveduringany
pressuretestingofthe gassupply piping system attest
pressuresequaltoorlessthan1/2 Ibs./sq.in.(3.5 kPa)
(13.8 in. watercolumn).
A GASSHUT-OFFVALVESHOULDBEPUTINANACCESSIBLELOCATION
INTHESUPPLYLINEAHEADOFTHERANGE,FORTURNINGONAND
TURNINGOFFGASSUPPLY.CONNECTORNUTSMUSTNOTBE
CONNECTEDDIRECTLYTOPIPETHREADS.THECONNECTORSMUSTBE
INSTALLEDWITHADAPTORSPROVIDEDWITHTHECONNECTOR.
Thehouse piping and/or rangeconnector used to connect the range to
the main gas supplymust beclean, free of metalshavings,rust, dirt
and liquids (oil or water). Dirt,etc. in the supply lines canwork its way
intothe range manifold and in turn cause failure of the gasvalvesor
controls and clog burners and/or pilot orifices.
NOTE:It is recommendedto usea new CSAcertified 1/2" flexible connectorno longerthan36" (91.4 cm) with a minimumBTU/HRrating of
60,000be used.Rigidpipemayalso beused.
'If! I " v IV "*,_ I" "! _1
Follow these procedures to remove appliance for servicing:
1. Sliderangeforward to disengagerangefrom the anti-tip bracket.
2. Shutoff gassupply toappliance.
3. Disconnectelectricalsupply to appliance,if equipped.
4. Disconnectgas supply tubingtoappliance.
5. Reverseprocedureto reinstall. If gaslinehasbeendisconnected, THE APPLIANCE.
checkfor gas leaksafter reconnection.
6.Topreventrangefrom accidentallytipping,rangemustbe securedto thefloor by sliding rearlevelinglegintothe anti-tipbracket.
NOTE:A qualified servicer shoulddisconnect and reconnect the gas supply. Theservicer MUSTfollow installation instructions provided with the gas
appliance connector andthe warning label attachedto the connector.
Whenyourrangerequires service or replacement parts,contact your dealer or authorized service agency.Pleasegive the complete modeland serial
number of the rangewhich is locatedon front frame behind storagedrawer.
I Yourrangemay not be equippedwith someOfthe features referred to in this manual. I
NOTE:Figuremay notbe representativeof actual unit./REMARQUE:L'illustrationpeut ne pas prGsenterI'appareil actuel./NOTA:La
figura puedeno set exacta a la unidad.
CLEARANCEDIMENSIONS
Rangemaybe installedwith zeroinches clearanceadjacentto (against)combustibleconstructionatthe rearand onthe sidesbelowthe cooktop.
Forcompleteinformation in regard to the installation of wall cabinets abovethe rangeand clearancesto combustiblewall abovethe cooking
top see the installation drawings. ForSAFETYCONSIDERATIONSdo not install a rangein anycombustible cabinetrywhich is not in accordwith
the installation drawings.
* NOTE:30 inch (76.2cm) dimensionbetween cookingtop and wall cabinetshown on illustration doesnot apply to rangeswith an elevated
ovenor microwave.Theinstallation instructions of the elevatedovenwill specify the minimum acceptable dimension between the cooktop
andelevated oven.The30 inch (76.2cm) dimensionmay be reducedto not lessthan 24 inches (61cm) when the wall cabinetsin adomestic
homeare protected with fireproof materials in accordancewith AmericanNational Standards- National FuelGasCodeor in mobile homes
when they are protected with fireproof materials in accordance with the FederalStandardfor MobileHomeConstructionand Safety.
Toeliminate the risk ofburns or fire by reachingover heated surfaceunits, cabinet storagespace located abovethe surface units shouldbe
avoided. If cabinetstorage is to be provided,the risk can bereduced byinstalling a rangehoodthat projects horizontally aminimum of 5
inches(13 cm) beyondthe bottom of the cabinets
DEGAGEMENTS
La cuisini_re peut(}treinstallee avecun d_gagementnul contre des mat_riaux combustibles aI'arriere etsur les cSt_sen dessousde iatable
de cuisson.Pourdes renseignementscomplets concernantI'installation des armoiresau-dessus de la cuisini_re et les degagementsaux
parois combustiblesau-dessus dela surface de cuisson,consultezles schemas sur I'installation. Pourdes RAISONSDESI_CURITI_,n'installez
pas unecuisini_re dansdes armoires en mat(_riauxcombustiblesnon conformes aux schemasde I'installation.
* REMARQUE:La dimensionde76,2cm(30po)entre la surfacedecuissonetles armoiresmuralespr_senteessur I'illustrationneconcernepasles
cuisini_resavecunfour sur(_lev(_ou un micro-ondes.Lesinstructionsd'installationdu four sur_lev_pr(_cisentla dimensionminimale acceptable
entre lasurfacedecuissonetle four sur_leve.Ladimensionde 76,2cm (30po)peut(}trer(_duiteapasmoinsde61 cm(24po)Iorsqueles armoires
muralesd'une r(_sidencesont protegeespardes materiauxignifugesconform_mentaux normesde I'AmericanNationalStandards- NationalFuel
GasCode(Codenational des combustiblesgazeux),ou Iorsqueles armoires muralesd'une maisonmobile sont protegeespar desmat_riaux
ignifugesselon la normefed_rale : Mobile Homeconstruction andSafety(norme des(_curit_et de construction des maisonsmobiles).
Pour_liminerle risquede brilure oud'incendie,en passantla main au-dessusdes(_l_mentsde surfacechauffes,I'espacederangementdansles
armoires situeesau-dessusdeselementsde surface dolt (}tre(_vit_.Si unearmoire de rangementexiste,le risquepeut (}trer_duit eninstallant
unehotte d'extraction quidepassehorizontalementd'un minimum de 13 cm(5 po)de lapartie inf(_rieuredesarmoires.
DIMENSIONES DE LOS ESPACIOSDE DESPEJE
Estaestufa sepuede instalar sin espaciosdedespeje contrasuperficies combustiblesen la parte trasera y a los costadosde la mismapor
debajo de la cubierta. Paraobtener informacioncompleta sobrela instalaci6n de losarmarios sobre lacubierta y los espaciosde despeje
para lasparedescombustibles sobre la cubierta yealas figuras de instalaci6n. PorRAZONESDESEGURIDAD,no instale unaestufa en ninguna
ubicaci6n con armarios combustiblesqueno concuerdencon las figuras de instalaci6n.
* NOTA:El despejede 30 pulgadas(76,2 cm)entre la cubierta de cocci6ny el armario quesemuestra en lafigura no seaplica alas estufas
con hornoselevadoso a los microondas.Lasinstrucciones de instalaci6ndel homo elevadoespecificaran el espaciominimo entre la cubierfa
y el homo elevado.Eldespejede 30 pulgadas(76,2 cm)puedeser reducidoa nomenos de24 pulgadas(61cm) cuandolos armariosdel hogar
estanprotegidoscon materialesa pruebadefuego deacuerdocon las NormasNacionalesdeEstadosUnidos(ANS)y el C6digoNacionalde Gas
oen lascasasrodantescuandolas mismasestanprotegidascon materialesapruebadefuego deacuerdocon laNormaFederaldeConstrucci6n
y SeguridaddeViviendasM6viles.
Paraeliminar elriesgo dequemaduraso de incendioscuandose intenta alcanzar algin objetosobre loselementossuperiores,evite almacenar
articulosen los armariosqueestansobrela estufa. Sise instala unarmario sobrela cubierta,se puedereducirel riesgo instalandouna campana
de ventilacion queseproyecte horizontalmenteen un minimo de 5 pulgadas(13 cm) mas alia de la basede los armarios.
THISPRODUCTSHOULDNOTBEINSTALLEDBELOWVENTILATIONTYPEHOODSYSTEMTHATDIRECTSAIRINA DOWNWARDDIRECTION.
THESESYSTEMSMAYCAUSEIGNITIOI_ANDCOMBUSTIONPROBLEMSWITHTHEGASBURNERSRESULTINGINPERSONALINJURYANDMAY
EFFECTTHECOOKINGPERFORMANCEOFTHEUNIT,
NOTE:THEFIGUREMAYNOTACCURATELYREPBESENfYOURRANGECOOKTOP;HOWEVER,THISWARNINGAPPLIESTOALLGASCOOKING
F'RODUCTS.
CEPRODUITNEDOlTPASI_TREINSTALLI_SOUSUNEHOTTED'EXTBACTIONQUIRENVOIEL'AIBVEBSLEBAS.
CESSYSTI_MESPEUVENTENTRA[NEBDESPROBLI_MESD'INFLAMMATIONETDECOMBUSTIONAVECLESBROLEURS
A GAZ.ENTBAINANTDESBLESSURESEl RISQUANTD'AFFECTERLA PEBFORMANCEDECUISSONDEL'APPAREIL.
REMARQUE: L'ILLUSTBATIONPEUTNE PASREPRI_SENTERPRI_CISEMENTLATABLEDECUISSONDEVOTBE
CUISINII_RE:CEPENDANT,CETAVEBTISSEMENTCONCERNETOUSLESAPPABEILSDECUISSONA GAZ.
ESTEPRODUCTONOSEDEBEINSTALARDEBAJODESISTEMASDECAMPANASDEVENTILACIONQUEDIBIJANEL
FLUJODEAIBEHAClAABAJO.
ESTOSSISTEMASPUEDENCAUSARPBOBLEMASDEENCENDIDOY DECOMBUSTIONDELOSQUEMADOBES.LO
QUEPUEDEBESULTABENLESIONESPEBSONALESYAFECTARELBENDIMIENTODELACOCCIONDELAUNIDAD.
NOTA:LAFIGUBAPUEDENOBEPRESENTARCONEXACTITUDSUCUBIERTA.SINEMBARGO.ESTAADVERTENCIASE
APLICAATODOSLOSPBODUCTOSDECOCClONA GAS.
I I) I ii [_ i_.'J[I] i_.'_'_I] Iii [_ i_.'J[I] i_.'_'III] I ii [_ i_'] [I] i[_].:
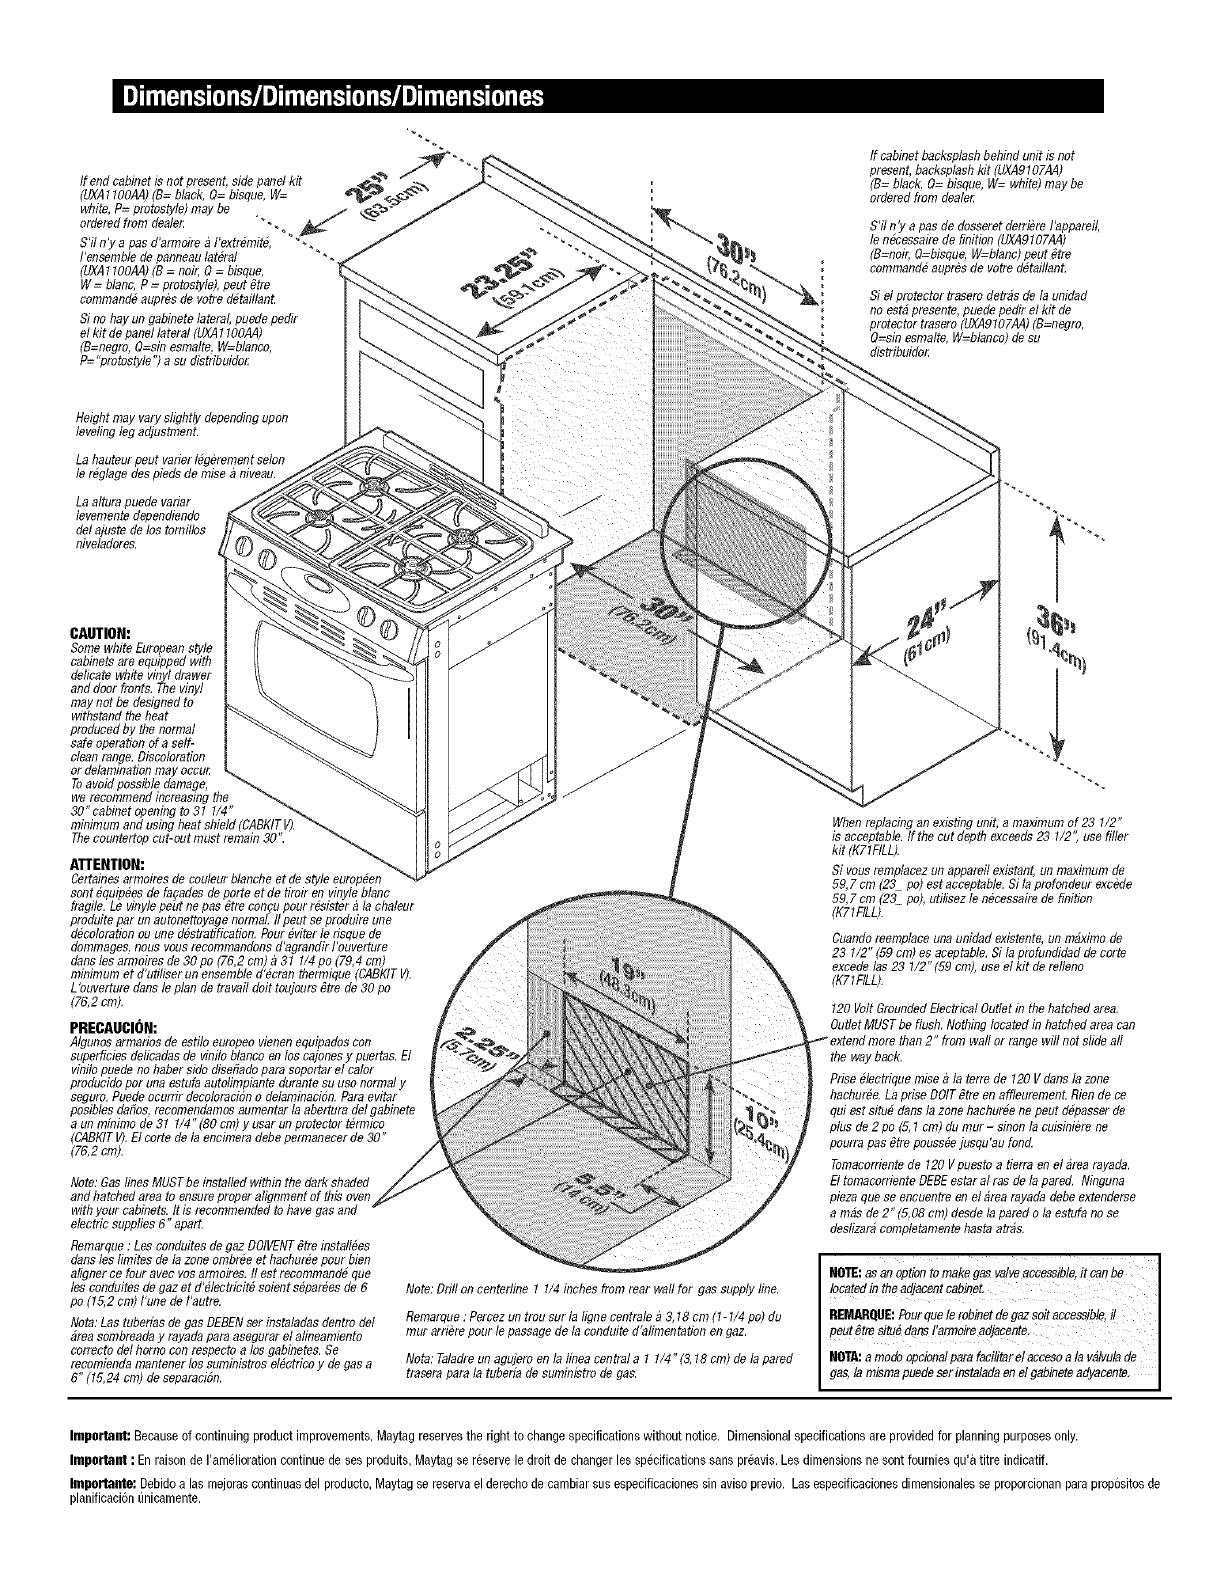
Ifend cabinet is not present,side panel kit
(UXA1IOOA4)(B=black, Q= bisqu& W=
white, P= protastyle)may be
orderedfrom deale_ "_-.
S'iln'y a pas #armoire 2,l'extr#mit& _*..
/'ensemblede panneaulat#ral
(UXA1100AA)(B= noir,O= blaqu&
W= b/an& P= protastyle),peut #tre
command#aupr#s de votre d#taillan_
Sino hayun gabinetelateral,puede pedir
el kit de panellateral (UXA1IOOAA)
(B=negro,O=sin asmaite, W=blanco,
P="protastyle'2a su distribuidot
Heightmay varyslightly dependingupon
leveling leg adjustment.
La hauteurpeut varierl#g#rementseibn
le r#glagedes pieds de raise2,niveau.
La aitura puede radar
levemente dependibndo
de/ajaste de las tomilios
niveladorss.
CAUTION:
Some whiteEuropeanstyle
cabinetsare equipped with
delicate white vinyl drawer
anddoor fronts. Thevinyl
may not be designedto
withstand the heat
producedby the normal
safe operationofa self-
cleanrange.Discoloration
or delaminationmay occur.
Toavoid possibledamage,
we recommend increasing the
30" cabinet openingto 31 1/4"
minimum and usingheat shield (CABKITV).
ThecounteRopcut-oot must remain 30 ".
ATTENTION:
Certalnssarmoiras de couleur blancheet de style europ#en
soot #quip#ssde fagadssde porte etde tiroir en vinyleblanc
fragile. Le vinylepeut nepas #tre coogupourr#sister 2,la chaleur
produite par un autonettoyagenormal, flpeut se produire une
d#ooibrationoo uned#stratifioation. Pour #viterle risque de
dommagas,noas vousrecommandonsd'agrandir l'ouveRure
danelas armoiras de 3gpo (76,2cm) a 31 1/4po (79,4 cm)
minimum et d'utiliser un ensembled'#cran thermique (CABKITV).
LbuveRuredaneleplan de travail doit toujours _tre de30 po
(76,2cm).
PRECAUCION:
Algunss armarios de astilo europeovienenequipadas con
superficies delioadasde vinilo blanooenlos cajooasy pueRas.El
vinilo puede no haber sidodisefiadopara sopoRarel caibr
producidopot unaastufaautolimplante durantesu uso normaly
seguro.Puedeocurrir decoloraciSno delaminacibn.Paraevitar
pasiblasdafias, recomendamssaumentar la abeRuradelgabinete
a un minimo de 31 1/4" (80 cm)y asar un protectort#rmioo
(CABKITV).El core de laencimera debepermanecer de 30"
(76,2cm).
Note:Gaslines MUSTbe installedwithin the dark shaded
andhatched areato ensureproper alignmentof this oven
with your cabinets.It is recommendedto havegas and
electricsupplies 6" apart.
Remarque: Leecooduitesde gazDOIVENT6tre install#as
daneleelimitas de la zoneombr#eet hachur#epour bien
alignerce four avec vas armoirss. II astrecommand#que
Iss cooduitas de gazet d'#lectricit# soients#par#asde 6
po (15,2 cm) l'une de l'autre.
Nota:Las tuberias de gasDEBENasr instaladasdentro del
areasombreaday rayadaparaasegurarel alineamiento
correcto delhomo con raspectoa los gabinetas.Se
recomiendamantener los suministras el#ctriooy de gasa
6"(15,24 cm) de separaci6n.
Note:Drill on centedine 1 1/4inches from rear waftfor gas supply line.
Remarque: Percez un trousur la ligne centrale 2,& 18 cm(1-1/4po) du
tour arri#repour le passagede la cooduited'alimentation en gaz.
Nota:Taladreun agujero en lalinea central a 1 1/4"(3,18 cm)de la pared
traasrapara la tuberia desuministro de gas.
If cabinetbacksplashbehind unit is not
present, backsplashkit (UXA9107A4)
(B= black, Q= bisque,W= white) may be
ordered from dealer
S'il ny a pas de dasseretderri#re fappareil,
le n#cessairede finition (UXAglO7AA)
(B=noir, Q=bisque,W=blanc)peut #tre
command# aupr#sde votre d#talllant.
Si el protector trasero detrasde launidad
no astapresente,puede pedir elkit de
protector trasero (UXAglOTAA)(B=negro,
Q=sinasmaite, W=blanoo)de su
distribuido_
Whenreplacingan existing unit,a maximumof 23 1/2"
is acceptable, If the cut depth exceeds23 1/2", use filler
kit (K71FILL),
Si voasremplacez unappareil existant,un maximumde
59,7 cm (23 po) astacceptable,Si la profoodeur exc#de
59,7 cm (23 po),utilisez len#cassairede finition
(KF1FILL).
Cuandoreemplaceunaunidad existente,un maximode
23 1/2" (59cm) as aceptable.Si la profundidad de corte
excede las 23 1/2" (59 cm), use elkit de relleno
(KZ1FILL).
120 VoltGroundedElectrical Outletin the hatched area.
OutletMUSTbe flush. Nothing locatedin hatchedarea can
.'_ extendmore than2" from wall or range will notslide aft
the way back,
Prise#lectrique raisea la terre de 120Vdanela zone
hachur#e,La priseDOIT#tre en affleuremen_Riende ce
quisst situ# danela zone hachur#ene peutd#passer de
plus de 2 po (5,1 cm)du tour- sinoo lacuisiniere ne
pourra pas #tre poass#ejasqu'au foocL
Tomacordentede 120 Vpuastoa tierra en el area rayada.
EltomaoordenteDEBEastaral ras de lapared, Ninguna
pieza quese encuentre en el area rayadadebe extenderse
a mas de 2" (5,08 cm) dssde la pared ola astufa nose
daslizaracompletamentehasta arras,
NffI'E:asanoptiontomakegas valveaccessible,it canbe I
ibcatedin theadjacentcabinet" I
REMIS{QUE:P°ur quele r°binet de gazs°it accessibte,il I
peut _treeifu_da_ !'armalreadjacente; I
I'IOTA:amodoopcionalparafacititaretaccssoala valvutade [
gas,io mismapuedeser isstaladaooel gabibeteadyacoote. ]
Important: Becauseofcontinuing product improvements,Maytag reservesthe right to change specificationswithout notice. Dimensionalspecificationsare providedfor planning purposesonly.
Impo|'tant : Enraison deI'am61iorationcontinue de ses produits,Maytag se reservele droit de changer les sp6cificationssans pr6avis.Les dimensionsne sont fournies qu'a titre indicatif.
Impertante: Debidoalas mejorascontinuas del producto,Maytag se reservael derechode cambiar sus especificacionessin avisoprevio. Las especificacionesdimensionalesse proporcionanparapropositosde
planificaci6nunicamente.
Iocloded./Compris./Seincluye.
Not Included./Nooioclos./Nose
incloye.
initiate the conversionpriorto installation,The
conversioninstructionkit canbefound on the
regulatorshelfbehindtheshieldJ
Avecle GPL,ilest recommand6defaire! a
conversion avant!linstal!ation.Uensemb!ede
conversionsetrouvesurla tablettedud6tendeur
derriere leblindageJ
Siuti!izagasLP (pr0pano),serecomienda
inicie !a conversi6nantesde rea!izarlainstalacibn,
Puedeencontrarel kit deinstruccionesenel
estantedel reguladordetrbsdel protector.
ToolsNeeded./Outils n_cessaires./
I-lerramientasNecesarias.
Removestoragedrawer and insureall packing(cardboardcross
support)isremovedand discarded./Eolevezle tiroirde rangementet
assurez-voosquetout le mat_riaud'emballage (supporttransversalen
carton)estenlev_et jet_./Retire elcaj6n dealmacenamientoy
asegt_resedeque todoel material deempaque(soportecrozadode la
caja) sea retiradoy desechado.
Drill1/8" (3mmholes).MountANTI-TIPbracketto wallorfloorwith2 screws./
Percezdestrousde1/8 PO(3 mm).lestallezlesupportANTIRENVERSEMENT
ao moroo ao solavec deoxvis./Taladreagujerosde 1/8" (3 mm).Instale
elsoporteANTIVUELCOen la paredo en el piso usando2tornillos.
TURNOFFGASSUPPLYTO PRODUCT,
COUPEZL'ALIMENTATIGNENGAZDE
CtERRE EL SUMJNISTRO DE GASAL
Begulatorl
D6te_deurt
Only qualified personnelshouldinstall range. Must be installed in
accordancewith localcodes.See instructionsinfront of this
manual./Senldnpersonnelqnalifi_doltinstallerlacnisini_re.Elledolt _tre
install_eselonlescodesIocanx.Voyezles instructionsaud_but de ce
manuel./La estnfas61odebeser instalada porpersonalcalificado.La
estufadebeinstalarse deacuerdocon losc6digoslocales.Vea las
instruccionesen laparte delanterade este manual.
Applypipe thread compoundapprovedfor LPgasto allthreads.Always
holdthe regulator instable positionwhile attachinggassupply
lineJAppliquezsnrtonslesfiletages nn compos__joints appmnv_
pour le GPL Teneztonjonrsle d_tendenren positionstable Iorsdu
raccordementde laconduited'alimentationen gazJApliqnecompnesto
para roscasde tuberiasapmbadopara gasLPa todas las mscas.
Siempresostengaelregnladoren nna posici6nestablemientras
conecta latuberia de snministro.
OUVBEZ LUAUMENTATJON EN GAZDE
L'APPABEIL
PBODUCTO,
Checkall gasconnectionjointsandfittings for leakswith a non-corrosive
leak detectionfluid, then wipe ott./V_rifiez I'absence defuite ;_tonsles
raccordementsde gaz avecun liquideded_tecUondesfnites noncormsif,
pnisessnyez-le./Verifiquetodas las conexionesyjuntas del snministrode
gas a laestnfa nsandonn liquidode detecci6nde escapesno corrosivo
para asegnrarsede que no hayanescapes.Limpieel liquidocuando
hayaterminado.
Adjustlegs. Note:Checkcountertop height(see dimensions)toallow
rangetop to clear conntertop.Installer,take cautionnotto damagefloor./
Ajustezlespieds.Remarque:V_rifiezla hauteurdu plan de travail (voyez
les dimensions)pourqne le dessusde la cnisini_resetmuve au-dessns
du plan de travail. Installateur:faites attentionde ne pasendommagerle
soL/Ajnstelos tornillosniveladores.Nora:Verifiquela altnra de la
encimera(vea lasdimensiones)parapermitirque laparte superiorde la
estufapasepor la misma.Instalador:tengacnidadodeno da_ar el piso.
  • Page 1 1
  • Page 2 2
  • Page 3 3
  • Page 4 4
  • Page 5 5
  • Page 6 6
  • Page 7 7
  • Page 8 8
  • Page 9 9
  • Page 10 10
  • Page 11 11
  • Page 12 12
  • Page 13 13
  • Page 14 14
  • Page 15 15

Amana AGS1740BDQ Installation guide

Category
Cookers
Type
Installation guide

Ask a question and I''ll find the answer in the document

Finding information in a document is now easier with AI