Think Wireless Orbit-HD TWGL-SR1 User manual
- Type
- User manual

Orbit-HD
On-Glass Satellite Radio Antenna
Model #: TWGL-SR1
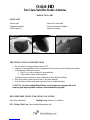
PARTS LIST
Exterior unit Interior unit with cable
Alignment template Glass curvature test template
Alcohol pads (2) Instruction Manual
PRE-INSTALLATION CONSIDERATIONS
• Do not install if air temperature is below 600 F.
• Integrity of the installation will be compromised if one or more of the following are present
at the planned installation location:
1. Rain XTM or other commercial water repellant.
2. After market window tinting material.
If present, remove material or select a different location before installing.
• Receiver location cannot be more than 12 feet from antenna.
• Avoid locations with curved glass (typically close to windshield edge)
CAUTION: For front windshield installation, select location on passenger side as far
from the glass edge as possible and away from windshield wiper path.
RECOMMENDED VEHICLE MOUNTING LOCATIONS
Car: Rear windshield Big Rig Truck: Sunroof (if available)
SUV, Pickup, Mini-Van: Front windshield passenger side

LOCATION AND GLASS PREPARATION
• Mount as high on glass as possible for optimal performance.
• Driver visibility should not be obstructed in any manner.
• Identify location of installation. Select a location that allows for interior headliner clearance.
Allow for windshield wiper clearance if present. Using the glass curvature card, test for
nearly flat (non-curved) surface.
• Thoroughly clean with provided alcohol pads only. (Isopropyl alcohol can be used for
rewetting the pads.) Do not use WindexTM or other commercial cleaners.
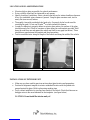
• In order for adhesive to properly adhere to exterior glass surface, the surface of the glass
should be nearly flat. Check for curvature of glass using the card template provided. Hold
down the card from one end against the surface and look for any gaps (see below). There
should be no gaps between the template and the glass surface.
• Test for curvature twice: along the length of the vehicle and along the width of the vehicle.
Correct Location Incorrect Location
INSTALLATION OF EXTERIOR UNIT
• Make sure you have read the previous sections about glass location and preparation.
• Position the alignment template to exterior windshield location with the printed side
pressed against the glass. Hold in place using masking tape.
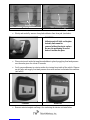
• Verify correct installation by viewing from inside of the vehicle. Check that there are no
defogger wires in the areas indicated on the templates. (see figure below)
CAUTION: Do not install the interior unit yet!
gap

Correct Incorrect
• Slowly and carefully, remove clear plastic adhesive liner from pad. (see below).
CAUTION:
Adhesive pad will stick on the glass
instantly and cannot be
removed without having to replace.
Be sure the positioning is correct
before it touches the glass.
• Place exterior unit inside the template and adhere to glass by applying firm hand pressure
over the entire piece for at least 60 seconds.
• Verify proper adherence to exterior surface by viewing from inside of the vehicle. Observe
any air gaps, and reapply firm hand pressure over entire surface to eliminate this condition.
(see below)
Correct Incorrect
• Remove exterior template and keep it for use during the interior unit installation.
Air gap
Defogger lines Defogger lines

INSTALLATION OF INTERIOR UNIT
• Make sure you have read the previous sections about glass location and preparation.
• Install the alignment template on the interior surface directly opposite to the exterior unit.
Hold in place using masking tape. Make sure that the empty template space is aligned
properly with the footprint of the exterior unit. (see figure below)
• Uncoil cable so that the weight of the cable does not pull the interior unit from the window
during installation.
• Slowly and carefully, remove clear plastic adhesive liner.
Caution: Adhesive pad will stick on the glass instantly and cannot be removed without
having to replace. Be sure the positioning is correct before it touches the glass.
• Place interior unit inside the template (see figure above) and adhere to glass by applying
firm hand pressure over the entire piece for at least 60 seconds.
• Remove interior template.
CABLE ROUTING TO RECEIVER
• Use caution while routing cable through headliner to avoid damage or snagging of the
cable or pulling off the connector.
• Attach connector to receiver.
• Installation is complete. Enjoy the sounds of Satellite Radio.
TECHNICAL SUPPORT
• Website: www.thinkwireless.com/sdars_glass_antenna.html
• Telephone: 954-977-4470
-
 1
1
-
 2
2
-
 3
3
-
 4
4


Think Wireless Orbit-HD TWGL-SR1 User manual
- Type
- User manual
Ask a question and I''ll find the answer in the document
Finding information in a document is now easier with AI
Other documents
-
 Fiberfab Aztec 7 Assembly Manual
-
Chrysler Intrepid User manual
-
Hyundai Coupe (2003-2008) Workshop Manual
-
Dodge Intrepid User manual
-
-
-
 Era Replica Automobiles 427 ROADSTER User manual
-
XM Satellite Radio XM SureConnect Installation guide
-
BMW SERIE 7 2000 User manual
-

