Page is loading ...

Operating Instructions & Parts Manual
SFA Companies
10939 N. Pomona Ave. Kansas City, MO 64153
816-891-6390 [email protected]
Model Number
HW93731
HW93733
Air Actuated
Truck Jacks
Capacity
20
Ton
20
Ton
HW93731-M0 rev 09/07
This is the safety alert symbol. It is used to alert you to potential personal injury hazards.
Obey all safety messages that follow this symbol to avoid possible injury or death.
!
Read this manual and follow all the Safety Rules and Operating Instructions before using this product.
Model HW93731 Model HW93733
Made in the
U.S.A.

Save these instructions. For your safety, read, understand, and follow the information provided with and on this jack.
The owner and operator shall have an understanding of this jack and safe operating procedures before attempting to
use. The owner and operator shall be aware that use and repair of this product may require special skills and knowledge.
Instructions and safety information shall be conveyed in the operator's native language before use of this jack is authorized.
If any doubt exists as to the safe and proper use of this jack, remove from service immediately.
Inspect before each use.
Do not use if broken, bent, cracked, or damaged parts (including labels) are noted. Any jack
that appears damaged in any way, operates abnormally or is missing parts, shall be removed from service immediately
and the manufacturer notified. If you suspect that the jack was subjected to a shock load (a load dropped suddenly,
unexpectedly upon it), immediately discontinue use until the jack has been checked by a Hein-Werner authorized service
center (contact distributor or manufacturer for list of Authorized Service Centers). It is recommended that an annual
inspection be done by qualified personnel.
Replace worn or damaged parts and assemblies with Hein-Werner authorized
replacement parts only (see Replacement Parts, pages 6 thru 11).
PRODUCT DESCRIPTION
Hein-Werner Air Actuated Hydraulic Truck Jacks are designed to lift, but not support, rated capacity loads. They are
designed to be used vertically. Immediately after lifting, loads must be supported by appropriate mechanical means
(as opposed to hydraulic means), such as a pair of appropriately rated jack stands.
NEVER use hydraulic jack as stand-alone device. After lifting, immediately support the lifted vehicle
with a pair of appropriately rated vehicle stands.
2
!
•
Study, understand, and follow all printed materials
provided with and on this device before use.
• Do not exceed rated capacity.
• This is a lifting device only!
• Immediately after lifting, support the vehicle with a pair of appropriately rated vehicle stands.
• Use only on hard, level surfaces capable of supporting rated capacity loads.
• Never work on, under, or around a load supported only by this device.
• Never wire, clamp or otherwise disable the lift control valve to function by other than operator's hand.
• Use ONLY on vehicles whose lift points are compatible with the saddle of this jack. Incompatibility may result
in structural damage to the vehicle and/or jack.
• Chock each unlifted tire in both directions.
• Do not use this device to lift, level, lower, support nor move a house, mobile home, travel trailer, camper or
any building structure.
• Be alert and sober when using this product! Never operate this device when under the influence of drugs or
alcohol.
• No alterations shall be made on this product.
• FAILURE TO HEED THESE MARKINGS MAY RESULT IN PERSONAL INJURY AND/OR PROPERTY
DAMAGE.
! WARNING
X

3
SPECIFICATIONS
Figure 1 - Model HW93731 Nomenclature
Model HW93731
Rated Load Capacity 20 tons (40,000 lbs)
Low Pick Up Height 9-1/2"
High Lifting Point 17-1/2"
Power Raise 5-1/2"
Screw Extension 2-1/2"
Base Size 8" x 5-1/2"
Ram Diameter 2-3/16"
Handle Length 50"
Wheel Diameter 6"
Max. Air Pressure Supply
150 psi
Required Air Pressure For
Lifting Loads
140 psi for 40,000 lb.
125 psi for 35,400 lb.
100 psi for 27,900 lb.
75 psi for 19,700 lb.
Model HW93733
Rated Load Capacity 20 tons (40,000lbs)
Low Height 9"
High Height With Extension 19-3/4"
Screw Extension 4 3/4"
Lift Cap Diameter 2"
Wheel Diameter 8"
Chassis Overall Length 20"
Width at Wheels 13-1/4"
Handle Length 45"
Base Size 8" x 17"
Max. Air Pressure Supply 150 psi
Typical Operating Pressure 125 - 150 psi
Typical Lift Time - Full
Raise(20 ton, 150 psi)
2 min. 15 sec
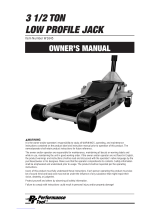
Figure 2 - Model HW93733 Nomenclature
Release Valve
Knob
Handle
Handle Position
Release
Air Supply Inlet
Air Hose
Hydraulic
Unit
Wheel
Handle Fork
Saddle
Lift Control Valve
Air Line Tube
Air Line Elbow/
Shipping Plug
(not shown)
Hydraulic
Unit
Release
Valve Knob
Air Cylinder
Wheel
Air Hose
Air Supply Inlet
Handle
Saddle
Lift Control Valve
Oil Filler Screw

PREPARATION
1. Verify that the product and the application are
compatible, if in doubt call Hein-Werner Technical
Service (816) 891-6390.
2. Read the operator's manual completely and familiarize
yourself thoroughly with the product, its components
and recognize the potential hazards associated with
its use before using this product.
3. To familiarize yourself with the basic operation of these
jacks, locate and turn the release valve knob:
a. Clockwise until firm resistance is felt to further
turning. This is the ‘CLOSED’ release valve position
used to raise the load.
b. Counter-clockwise, but no more than 1/2 full turn
from the closed position. This is the ‘OPEN’ release
valve position used to lower the load. The more you
turn the release valve knob Counter-clockwise, the
faster the load descends.
4. Locate and remove the oil filler screw (Ref# 13 for
Model HW93731, Ref # 24 for Model HW93733, on
replacement parts section) with ram fully retracted.
This will help release any pressurized air which may
be trapped within the reservoir. Check oil level. Proper
oil level should be just below the rim of oil filler hole.
5. Reinstall oil filler screw.
6. For Model HW93733, Remove the shipping plug
and install with air line elbow to reservoir (ref# 47 on
replacement parts section).
7. Remove the plastic plug from air supply inlet and
install a 1/4” PT air coupler (not provided). To ensure
dependable, trouble free operation, an inline air dryer
and oiler is recommended.
Note: Ensure that thread tape or compound is used
when servicing connections.
8. Pour a teaspoon of good quality air tool lubricant, such
as #630-AAA Lubriplate, into the air supply inlet of the
lift control valve. Connect to adequate air source and
operate for 3 seconds to evenly distribute lubricant.
9. Ensure that jack rolls freely. Raise and lower the
unloaded saddle throughout the lifting range before
putting into service to ensure the pump operates
smoothly. Replace worn or damaged parts with
Hein-Werner replacement parts only. Lubricate as
instructed in Maintenance Section.
OPERATION
Lifting
Only attachments and/or adapters supplied by
the manufacturer shall be used. Lift only on areas
of the vehicle as specified by the vehicle manufacturer.
Note:
Loosen the filler screw before use.
1. Connect adequate air source to the air supply inlet.
2. Follow the vehicle manufacturer’s recommended
guidelines for lifting. Engage the emergency brake
and chock each unlifted wheel in both directions to
prevent inadvertent vehicle movement.
3. Locate and close the release valve by turning the
release valve knob clockwise until firm resistance
is felt.
4. Refer to the vehicle manufacturer owner’s manual to
locate approved lifting points on the vehicle. Center
jack saddle under lift point.
5. Verify lift point, Squeeze the lift control valve until
saddle contacts load. To lift, continue squeezing the
lift control. Release the grip on the lift control valve
when load reaches desired height.
6. Transfer the load immediately to appropriately rated
jack stands.
NEVER use hydraulic jack as a stand alone
device! ALWAYS transfer the lifted load
IMMEDIATELY to a pair of appropriately rated jack
stands. Use one pair of jack stands per vehicle.
Rated capacity is per pair only! Do not exceed rated
capacity.
Overloading may cause hydraulic system failure.
Lowering
Be sure all tools and personnel are clear before
lowering load. Slowly open the release valve!
The more you turn the release valve knob counter-
clockwise, the faster the load will come down. Maintain
control of the rate of speed at which the load lowers
at all times!
1. Raise load high enough to clear the jack stands; then
carefully remove jack stands (always used in pairs).
2. Slowly turn release valve knob counter-clockwise, but
no more than 1/2 turn. If the load fails to lower:
a. Use another jack to raise the vehicle high
enough to reinstall jack stands.
b. Remove the malfunctioning jack and then the
stands.
c. Using the non-malfunctioning jack, lower the load
by turning the operating handle counter-clockwise,
but no more than 1/2 turn.
3. After removing jack from under load, push saddle down
to reduce ram exposure to rust and contamination.
!
!
!
!
4

TROUBLESHOOTING
5
MAINTENANCE
Important: Use only a good grade hydraulic jack oil.
Avoid mixing different types of fluid and Never use
brake fluid, turbine oil, transmission fluid, motor oil or
glycerin. Improper fluid can cause failure of the jack and
the potential for sudden and immediate loss of load. We
recommend Hein-Werner hydraulic jack oil HW93291
or equivalent.
Adding Oil
1. With saddle fully lowered, set jack in its upright,
level position. Locate and remove oil filler screw. It
may be necessary to remove cover plate on model
HW93733.
2. Fill with oil until just below the rim of the oil filler hole.
Reinstall the oil filler screw.
Changing Oil
For best performance and longest lift, replace the
complete fluid supply annually.
1. With saddle fully lowered, and pump piston fully
depressed, remove oil filler screw. It may be necessary
to remove cover plate on model HW93733.
2. Lay the jack on its side and drain the fluid into a
suitable container.
Note: Dispose of hydraulic fluid in accordance with local
regulations.
3. Set jack in its level, upright position and fill with oil
until just below the rim of the oil filler hole. Reinstall
the oil filler screw.
Lubrication
1. A periodic coating of light lubricating oil to pivot points,
axles and hinges will help to prevent rust and assure
that wheels move freely and the pump functions
smoothly.
2. When used on a daily basis, air pump should be
internally lubricated before each use. Use only good
quality air tool lubricant such as #630 - AAA Lubriplate.
If no inline oiler is used, pour a teaspoon of air tool oil
into the inlet of the air control valve. Simply operate
the jack using the air feature in order to fully distribute
the oil.
Cleaning
Periodically inspect the ram for signs of rust or corrosion.
Clean as needed and wipe with an oily cloth.
Note: Never use sandpaper or abrasive material on
these surfaces!
Storage
When not in use, store the jack with ram fully retracted.
REPLACEMENT PARTS
(refer to page 6 thru 11)
Not all components of the jack are replacement items, but
are illustrated as a convenient reference of location and
position in the assembly sequence. When ordering parts,
give model number, part number and parts description.
Call or write for current pricing: Hein-Werner Customer
Support, 10939 N. Pomona Ave. Kansas City, MO 64153.
Phone: (816)891-6390;
E-mail: [email protected]
Symptom Possible Causes Corrective Action
Jack will not lift load • Release valve not tightly closed
• Overload condition
• Air supply inadequate
• Ensure release valve tightly closed
• Remedy overload condition
• Ensure adequate air supply
Jack will lift, but not maintain
pressure
• Release valve not tightly closed
• Overload condition
• Hydraulic unit malfunction
• Ensure release valve tightly closed
• Remedy overload condition
• Contact Tech. Service
Jack will not lower after unloading • Reservoir overfilled
• Linkage binding
• Ensure load is removed, then drain
fluid to proper level
• Clean and lubricate moving parts
Poor lift performance • Fluid level low
• Air trapped in system
• Ensure proper fluid level
• With saddle fully lowered, remove
oil filler plug to let pressurized air
escape, then reinstall oil filler plug
Jack will not lift to full extension • Fluid level low • Ensure proper fluid level

Replacement Parts Illustration For Model HW93731 (Part I) - refer to page 8 for parts list
6
Figure 3 - Parts Illustration for Model HW93731 - Main
1
39 62
63
2
61
60
29
19
27
4
33
48
39
5, 14
59
31
49
54
41
15
64
29
17
49
20
9
7
8
32 12 56 16
57 18
26
58
24
3
13
3
52
37
43
44
47
34
39
30
25
22
42
23
11
35
Apply Never-Seez (or equivalent) to threads and face at both ends of Ram Cylinder (Ref# 44)
before assembling. Assemble to Base (Ref# 59) and tighten to crush joint.
Lubricate O-rings (Ref# 37 & 47), Tank Nut (Ref# 43), and upper & lower of Oil Tank (Ref# 58)
with lubriplate (or comparable lubricant) before assembling. Tighten to a crush point.
A
B
A
A
B
B
B
B
Air-Hydraulic
Pump Assembly
(refer to Fig. 5)
Ram Assembly
(refer to Fig. 4)

Replacement Parts Illustration For Model HW93731 (Part II) - refer to page 8 for parts list
Figure 4 - Parts Illustration for Model HW93731 -Ram Assembly
55
53
17
46
50
51
45
38
6
40
21
10
Figure 5 - Parts Illustration for Model HW93731 -Air Hydraulic Pump Assembly
77
95
79
72
77
94
93
88
65
87
98
82
70
86
84
85
80
92
69
101
83
66
69
89
96
}
76
Figure 6 - Parts Illustration for Model HW93731 -Pump Piston Assembly
73
81
78
67
75
99
100
68
71
90
74 91
Piston Assembly
(refer to Fig. 6)
}
97
7
Apply Loctite #242 (color blue)
to threads before assembling
Thread into Piston to
dimensions shown
0.060"
0.080"

8
Replacement Parts List For Model HW93731 - refer to page 6 & 7 for parts drawing
(*) indicates items included in Repair Kit 240579
(#) indicates items included in Repair Kit 240564
Item
Part No. Description Qty.
1 48230 Washer 2
2 50062 Bolt 2
3* 200003 Gasket 2
4 201733 Expansion
Plug
1
5 201787 Lockwasher 1
6* 203199 Ball 1
7* 203202 Ball 3
8 204446 Cotter Pin 2
9 210311 Pipe Plug 1
10 210411 Washer 1
11 211737 Lockwasher 1
12 212227 Poppet 1
13 212540 Filler Screw 1
14 212566 Bolt 1
15 213728 Spacer 1
16* 214555 O-ring 1
17 216647 Spring 2
18 217649 Roll Pin 2
19 217898 Roll Pin 1
20 222533 Screen 1
21 223166 Screen 1
22 223172 Hose Clip 1
23 223180 Air Valve 1
24 224073 Air Vent
Screw
1
25 224081 Screw 1
26 224164 Adapter 1
27 224165 Rod 1
28 224166 Hand Knob 1
29 224180 Spacer 1
30 224182 Air Hose 1
31 224472 Spacer 1
32 224475 Wheel 2
33 224521 Handle 1
34 224640 Balance
Strap
1
35 224641 Handle Grip 1
36 224644 Bolt 3
37* 224648 O-ring 1
38 225483 Pin 1
39 226019 Locknut 5
40 226331 Spring 1
Item
Part No. Description Qty.
41 226401 Spring 2
42 226483 Pipe nipple 1
43 227136 Tank Nut 1
44 227533 Ram
Cylinder
1
45 228090 Cross pin 1
46 228091 Cross pin 1
47 228099 O-ring 1
48 228929 Air-hydraulic
Pump Assy.
1
49 229131 Pipe Plug 2
50 230125 Heel Plate 1
51 230126 U-cup
Packing
1
52 230134 Ram
Assembly
1
53 230135 Ram 1
54 231102 Axle 1
55 232618 Extension
Screw Assy.
1
56* 233917 Plastic
Spring
1
57 233922 Release
Stem
1
58 234933 Oil tank 1
59 234935 Base 1
60 234990 Strap 2
61 234999 Support
Bracket
1
62 236717 Screw 1
63 236718 Nut 1
64 242876 Bushing 1
65 203202 Ball 1
66*# 219861 O-ring 1
67*# 221013 U-cup
Packing
1
68 221377 Roll Pin 1
69 221820 Retaining
Ring
2
70 222202 Elbow 1
71*# 222288 O-ring 1
72 223173 Return
Spring
1
73 223183 Plug 1
Item
Part No. Description Qty.
74 223184 Spring 1
75# 223187 Valve &
Plunger
1
76 223194 Spring &
Rubber
Cushing
1
77 223203 Trip Washer 2
78 223678 Pump
Packing &
Piston
1
79 223680 Screen 1
80 224034 Air Cylinder 1
81 224038 Pump Rod 1
82 224156 Spring 1
83 224469 Washer 1
84 225371 Rubber
Cushion
1
85 225384 Trip Spring 1
86 226153 Spring 1
87 226373 Adjusting
Screw
1
88 226450 End Block 1
89 226451 Set Screw 2
90 228235 Cotter Pin 1
91 228813 Washer 1
92 228814 Gland Unit 1
93 228815 U-cup
Packing
1
94 228816 Washer 1
95 228930 Piston
Assembly
1
96 228933 Pump
Cylinder
1
97 231347 Piston &
Roll Pin
Assembly
1
98 231572 Cylinder Cap 1
99 236684 Piston 1
100 236685 Sealing Ring 1
101 242877 Bushing 1
(#) 240579 Repair Kit -
(*) 240564 Air Hyd.
Pump
Repair Kit
-

9
Replacement Parts Illustration For Model HW93733 (Part I) - refer to page 11 for parts list
1
2
3
43
Figure 7 - Parts Illustration for Model HW93733 - Main Frame
19
9
5
16
11
13
12
3
17
10
18
14, 15
6 7 8
7

10
Replacement Parts Illustration For Model HW93733 (Part II) - refer to page 11 for parts list
Figure 8 - Parts Illustration for Model HW93733 - Air Motor & Hydraulic Unit
60 7472717069
6867
65
44
64
63
59 6261 66 66 76
7573
Air Motor
Hydraulic Unit Assembly (includes Air Motor)
32
45
34
31
41
33
30
48
50 47
40
21
26
23 51
46 22
43
42
47
24, 25
49
27 57
28
58
52
53
37
54
29
35
36 55, 56
38, 39
(in reservoir)
20

11
Item Part No. Description Qty
1 BK210980SF Top Cover 1
2 BJ511626SF Frame Weldment 1
3 BB557523SF Retaining ring, .94D 6
4 48002006 Wheel, Rubber
8Dx2.5W
2
5 85004016SF Axle Thrust 1 ID 2
6 BK901038SF Release Valve Adapter 1
7 235-21011 Pin, 3/16D 2
8 85004024 Flex Shaft 1
9 BJ395104SF Wheel Axle 1D x 4-1/8L 2
10 23314012SF Handle Release Spring 1
11 85002007SF Release Rod 1
12 23220005
Handle Grip, Release Rod
1
13 23220001 Handle Grip 2
14 23220094SF Knob, Release Valve 1
15 23521011SF Pin, Knob 3/16D x 1-1/8L 1
16 85001011SF Handle Assembly 1
17 35100007 Air Valve, 1/4NPT 1
18 BJ354646 Air Hose, 1/4 ID 1
19 SJ100374 Screw, Philips
#10-32x1/2L
6
20 90000352SF Jack & Air Motor Assy. 1
21 BJ318028 Screw, Flat
1/4-20UNCx1L
2
22 BD215108 Washer, 1/4 2
23 SJ100079 Nut, Hex 1/4-20UNC 2
24* AJ100060 Filler Screw, 5/16-24x1/2L 1
25* AJ100020 Gasket, 15/32OD 1
26 BJ389025 Reservoir 1
27 BJ398020 Top Cap 1
28* NJ100046 Quad ring 1
29 BD674061 Pin, 1/8D x 9/16L 1
30* B1160000 Ball, 7/32 1
31* BS116000 Ball, 5/16 1
32* AJ100040 Valve Spring 1
33* BB159167 Gaket, 19/32OD 1
34* BK300600 Valve Plug 1
35 BK490010 Release Spindle 1
36* AJ100312 O-ring, 3/16ID 1
37 BK810800 Washer, 4-5/8OD 1
38 BK876900 Relief Valve 1
39 BS303700 Washer, 3/8OD, 17/64ID 1
40 BJ790096 Nipple, 1/8"MPT 1
Item Part No. Description Qty
41 BK729200SF Adapter, Air Motor 1
42 BJ580096 Pump Nipple 1
43 BK729100SF Elbow,
78o, 3/8FPTx1/4MPT
2
44 31060002SF Air Motor 1
45 BJ788039 Bushing 1
46 B1060100 Plug, Hex 1/4-28UNF 2
47 BJ990096 Male Elbow, 90o, 1/8MPT 2
48 BK264096U Tee, Union, 1/8PT 1
49 BJ649268 Tube, 1/4ODx16L 1
50 BJ479096 Street Elbow,
90o, 1/8NPTF
1
51 BK550050 Base 1
52 BJ390030 Cylinder 1
53 21100488 Plunger 1
54* 36400011 Bearing 1
55* 248428 U-cup 2.5x2x.38 1
56* 30600031 Retaining Ring 2-18OD,
1-7/8ID
1
57 BJ382028 Adj, Screw 1
58 BJ385446 Plunger Sleeve 1
59 201-00821 Capscrew, Socket Head
#10-32UNF
4
60* 2-315-00002 Seal, Shuttle Valve 1
61 2-310-40004 Air Shuttle Piston 1
62 1-230-06001 Retaining Ring, 2-1/8 D 1
63 310-11033 Cylinder, Air Motor 1
64 1-310-91014 Piston Cap 1
65* 1-390-01061 O-ring,
2-1/4 x 1/16 x 2-1/8
1
66* 1-390-02010 Quad ring, 3OD, 2-5/8ID 2
67* 1-390-10076 Seal,
1-1/4OD x 1ID x 1/8W
1
68 4-310-41017 Piston, air Motor 1
69 1-204-01106 Washer, 1.75x.32x.064 1
70 353-49252 Pump Plunger 1
71 353-49258 Pump Housing Cap 1
72 1-233-15003 Spring, 1.75OD 1
73* 390-10083 Seal, .277IDx.528OD 1
74 310-20032 Air Motor End Cap 1
75 203-62004 Nut, 13/16-16UN x 0.4L 1
76 353-49254 Pump Housing 1
(*) B7002000 Repair Kit -
(*) indicates items included in Repair Kit B7002000
Replacement Parts List For Model HW93733 - refer to page 9 & 10 for parts drawings.

TWO YEARS LIMITED WARRANTY
For a period of two (2) years from date of purchase, SFA Companies will repair or replace, at its option, without charge,
any of its products which fails due to a defect in material or workmanship under normal usage. This limited warranty is
a consumer's exclusive remedy.
Performance of any obligation under this warranty may be obtained by returning the warranted product, freight prepaid,
to SFA Companies Warranty Service Department, 10939 N. Pomona Ave., Kansas City, MO 64153.
Except where such limitations and exclusions are specifically prohibited by applicable law:
(1) THE CONSUMER'S SOLE AND EXCLUSIVE REMEDY SHALL BE THE REPAIR OR REPLACEMENT OF DEFECTIVE
PRODUCTS AS DESCRIBED ABOVE
(2) SFA COMPANIES SHALL NOT BE LIABLE FOR ANY CONSEQUENTIAL OR INCIDENTAL DAMAGE OR LOSS
WHATSOEVER.
(3) ANY IMPLIED WARRANTIES, INCLUDING WITHOUT LIMITATION THE IMPLIED WARRANTIES OF
MERCHANTABILITY AND FITNESS FOR A PARTICULAR PURPOSE, SHALL BE LIMITED TO TWO YEARS,
OTHERWISE THE REPAIR, REPLACEMENT OR REFUND AS PROVIDED UNDER THIS EXPRESS LIMITED
WARRANTY IS THE EXCLUSIVE REMEDY OF THE CONSUMER, AND IS PROVIDED IN LIEU OF ALL OTHER
WARRANTIES, EXPRESS OR IMPLIED.
(4) ANY MODIFICATION, ALTERATION, ABUSE, UNAUTHORIZED SERVICE OR ORNAMENTAL DESIGN VOIDS
THIS WARRANTY AND IS NOT COVERED BY THIS WARRANTY.
Some states do not allow limitations on how long an implied warranty lasts, so the above limitation may not apply to you.
Some states do not allow the exclusion or limitation of incidental or consequential damages, so the above limitation or
exclusion may not apply to you. This warranty gives you specific legal rights, and you may also have other rights which
vary from state to state.
SFA Companies
10939 N. Pomona Ave. Kansas City, MO 64153
816-891-6390
12
/