Page is loading ...

630140_1XFIRE_1200_GB_Manual_R‐emotion
®
X-FIRE 1200
Designer Balanced Flue Fires
INSTALLATION & USERS INSTRUCTIONS
PRODUCT CODES
XT-LIM X-FIRE 1200 Limestone
XT-GRA X-FIRE 1200 Granite
XT-TRA X-FIRE 1200 Travertine
LEAVE WITH THE USER
Acquisitions of London
24 Holmes Road
London NW5 3AB
England
Tel: 0044 (0)207 482 2949
Email: sales@acquisitions.co.uk

630140_1XFIRE_1200_GB_Manual_R‐emotion
Important:
The appliance shall be installed in accordance with;
• This installation instruction booklet
• Local gas fitting regulations and The Rules in Force
• BS 5440-1
• BS 5871-1:2005 & BS 6891
• Any other relevant statutory regulations.
• Must be installed by a Registered Installer
• Converting this appliance for use with G31 Propane must be done by a Registered
Installer
• This appliance is for use on Natural Gas (G20) at a supply pressure of 20mbar or
Propane(G31) at a supply pressure of 37mbar.
• In IE, consult document I.S. 813:1996 Domestic Gas Installation.
DISTRIBUTED BY
Acquisitions of London
24-26 Holmes Road
London NW5 3AB
Tel: 24 hours 0044 (0)207 482 2949
Email: [email protected]
INTELLECTUAL PROPERTY
Acquisitions XFIRES is a Registered Trade Mark
Components of this product are protected under GB Patent no: GB2429186
Similar applications are pending in Europe, USA, Canada, China, Hong Kong,
Australia and New Zealand.

630140_1XFIRE_1200_GB_Manual_R‐emotion
Note:
THERE ARE A FEW THINGS TO CONSIDER BEFORE INSTALLATION
• Cavity Dimensions and Clearances
• MUST be installed 100mm minimum off the floor or nearest horizontal surface.
• Coupling of flue to fire
• Coupling of gas lines to fire
• Fixing the fire to cavity
• Gas pipe placement to the front left of the cavity.
• Before installation, ensure that the local distribution conditions (identification of the type
of gas and pressure) and the adjustment of the appliance are compatible.
The sequence in which it is desired to undertake these tasks may vary upon the individual
installation that is required. Please read these instructions fully before proceeding with the
installation. Leave unpacking and installation of the stone frame (facia) until the fireplace
has been commissioned, to avoid damage to the facia panels.
Recommended Installation Process:
The following diagram illustrates the steps required to install your gas fire, and the trades
required at each stage.
Builder
1.ConstructFrame(Section1.0to6.0)
Gasfitter
4.InstallFlue+FlueRestrictorifrequired(Section12.0to13.0)
5.Testfireandverifyflamepatternisacceptable
6.Cover‐upfireusingpackaging(Section17.0)
Gasfitter
2.InstallGasPipe(Section7.0to8.0)
3.InstallFire(Section9.0to11.0)
Ensurethatyouleaveagapbetweenthestudworkandthefire
chassistoacceptthewallliningifapplicable.
Builder
7.Clad/linechimneybreast
Gasfitter
8.CommissiontheGasFire(Section18.0)

630140_1XFIRE_1200_GB_Manual_R‐emotion
Contents:
1.0 Product Description
2.0 Creating the Cavity
3.0 Hearth and Floor Clearances
4.0 Wall Linings
5.0 Vertical Clearances
6.0 Corner Installations
7.0 Laying Gas Pipe
8.0 Connecting Gas Pipe
9.0 Power Supply
10.0 Fixing Fire to Wall
11.0 Removing the Firebox Glass
12.0 Installing the Flue system
13.0 Fitting the Flue Restrictor
14.0 Converting to G31 Propane Gas
15.0 Placing the Fuel Bed
16.0 Checking Operating Pressure
17.0 Covering up the Fire
18.0 Commissioning the Fire (Including fitting the facia)
19.0 Operating Instructions
20.0 Sounds and Smells
21.0 Annual Service Check
22.0 Installation Check List
23.0 Warranty Terms and Conditions
WARNING:
Failure to follow these instructions could cause a malfunction of the fire, which,
could result in death, serious bodily injury, and/or property damage. Failure to follow
these instructions may also void insurance cover and/or product warranty.
Installation:
Installation must be carried out by a registered installer who, on completion of the
installation, must issue a certificate of compliance, in accordance with national and/or local
codes. To find a registered installer in the UK go to the Gas Safe website –
www.gassaferegister.co.uk In the rebulic of Ireland go to www.rgii.ie
Warranty Repair and Annual Servicing:
Warranty repair work must be carried out by a registered gas installer. It is recommended
that registered gas installers are also used to carry out annual servicing requirements
(particularly during the warranty period). For contact details of UK registered gas installers
in your area, go to the Gas Safe website at www.gassaferegister.co.uk and in the Republic
of Ireland go to www.rgii.ie
This product must be installed according to these instructions and in compliance with all
relevant building, gas fitting and other statutory regulations (eg. BS 5871-1:2005,
BS5440-1 and BS 6891). Any shortcomings in the appliance and flue installation will be
the responsibility of the installer, and Escea will not be accountable for any such failings or
their consequences.

630140_1XFIRE_1200_GB_Manual_R‐emotion
1.0 Product Description:
The XFIRE 1200 decorative gas fire is designed to be built into a cavity. The appliance is
flued via Simpson Duravent Direct Vent Pro 5” x 8” Flue, available only from SpecFlue.
Users may control their fire with the Radio Frequency (RF) remote. The glass on the front
of the appliance is considered a working surface, and as such, care should be taken not to
touch this while the appliance is running as it will get hot.
1.1 Energy Input Ratings:
The following table states the energy input rates for the ST900 Gas Fireplace on all settings
for both possible gas types (XFIRE 1200 is set for G20 Natural Gas upon manufacture).
Gas G20 Natural Gas G31 Propane
Minimum (kW) 3.9 kW 5.2 kW
Intermediate (kW) 4.6 kW 5.4 kW
Maximum (kW) 4.8 KW 5.5 kW

630140_1XFIRE_1200_GB_Manual_R‐emotion
100mm MAX Flue Diam.
203mm
2.0 Creating the Cavity:
The dimensioned drawing below shows the size of opening that must be created to fit the
XFIRE 1200. The wall directly above the fire should be finished / clad / lined after the fire
has been installed, unless there is an access hatch or the chase is open to the ceiling
cavity, which allows the flue to be installed after the wall has been lined.
Note: It is not necessary to line or vent the cavity, and it may be constructed with timber.
3.0 Hearth and Floor Clearances:
There should be at least 100mm between the bottom of the XFIRE 1200 and any horizontal
surface below, for example hearths and floors.
3.1 Wall and Cabinet Clearances:
There must be a minimum of 100mm from the sides of the facia to any protruding side
walls or cabinetry.
4.0 Wall Linings:
The wall board that lines the outside of this opening can be normal dry wall
(Plaster Board) and does not need to be non-combustible providing that it does not come
any closer to the fire than the dimensions shown in section 2.0. Note: The temperature of
the wall lining directly above the heater does get warm and hence may discolour paint
finishes that are susceptible to temperature damage or distort vinyl wall coverings.
5.0 Television Positioning Considerations:
It is becoming common practice for consumers to mount flat screen TV’s above their gas
fireplace.
Most TV manufacturers have specified in their instructions that the TV should not be
installed on, near or above a heat source. For this reason TV location decisions rest solely
with the householder and Escea will not be held liable for any adverse affects on a TV
located near to an Escea fireplace that may be caused by heat.
The drawings overleaf are suggestions that may be used as a GUIDE for those consumers
who do decide to locate their TV above an XFIRE 1200 gas fire. These drawings show
ways to reduce the amount of warm air rising off the fireplace and onto the TV
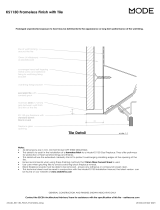
Thewallandframeworkinfrontof
thefluemustnotexceed100mmin
thickness,thisincludesplasterboard
oranywalllinings.Thisistoensure
thereisatleast25mmgapbetween
allfluingcomponentsandany
combustiblematerial.

630140_1XFIRE_1200_GB_Manual_R‐emotion
50 min
50 min
50 min
500 min 500 min
100 min
100 min
500 min
50 min
50 min
50 min
50 min
500 min
Mantle Mantle
Recessed TV
Flush TV with
small mantle Mantle above fire Protruding fire
The material that the wall and mantle are made from will also affect the operating
temperature of the TV so it is the customers responsibility to satisfy themselves that their
TV mounting and mantle design will not exceed the listed maximum operating temperature
of their electronic goods.
5.1 Combustible Mantle Clearances:
The diagram to the right shows the minimum and
maximum allowable size for mantles or protruding
surfaces mounted above the XFIRE 1200.
Note: Acquisitions does not recommend placement
of items on the mantles shown in the diagram to the
right. This is because of the potential for items
placed on or above the mantle to be affected by the
heat rising from the appliance.

630140_1XFIRE_1200_GB_Manual_R‐emotion
5.2 Non-Combustible Mantle Clearances:
If the entire installation (mantle, wall and cavity) is
constructed from non-combustible materials, the clearances
to mantles may be as shown in the shaded area.
6.0 Corner Installations:
If a cavity is to be created in a corner,
the following drawing gives the minimum
sizes.
7.0 Laying Gas Pipe:
Gas pipe should be sized as per the requirements of BS 6896. The pipe sizing must be
sufficient to deliver the following volume of gas to the heater with all other gas appliances in
the home running at the same time on Natural Gas (G20).
XFIRE 1200 = 4.8kW
XFIRE 1200 = 0.45 m3/h

630140_1XFIRE_1200_GB_Manual_R‐emotion
8.0 Connecting the Gas Pipe to the Fireplace:
Before the gas pipe can be connected to the fireplace, the Inlet Connection fitting and the
Inlet Test Point fitting must first be fitted to the appliance pressure regulator.
8.1 The fittings supplied with the fire need to be fitted to the pressure governor. A suitable joint
sealant and/or thread tape needs to be used on these unions.
The diagram below shows how to correctly assemble these two fittings to the pressure
regulator inlet side connection.
8.2 Soft copper should be run directly to fire and connected onto the regulator by means of an
8mm diameter compression fitting. An accessible inline isolation or service valve should
also be fitted. The regulator that is supplied with the fire MUST NOT BE REMOVED.
Removal of the regulator, or replacing it with one not intended for use with an XFIRE 1200,
will void the limited appliance warranty and could result in an unsafe installation.
9.0 Battery-Pack Power Supply:
The XFIRE 1200 runs on a battery pack. This battery pack uses 3x D cell batteries. To
ensure that only fresh batteries are used, batteries are not supplied with the fireplace.
These will be supplied by the installer.
To access the battery pack, remove the facia (described in section 17.0) and the battery
pack will be on the lower right hand side.
The Battery Pack is secured in place with Velcro pads and may be removed by firmly
pulling upwards.

630140_1XFIRE_1200_GB_Manual_R‐emotion
10.0 Fixing the Fire to the base and wall:
It is a requirement that this fire be securely
fastened to the wall and base. Once the fire has
been pushed back into the correct position, use
wood screws (or other suitable fasteners) to fix
the fire to the cavity through each of the four
holes in the corners, as shown in the diagram to
the right. Note: It may be necessary to use
washers on the fasteners to securely fasten the
fire to the wall.
When fixing the fireplace in position ensure that
you leave a gap between the fireplace flange
and the framing timber for the wall lining, which
will be added at a later stage.
11.0 Removing the Firebox Glass:
Pull the four hooks shown below towards you and then away from the glass to release the
glass frame underneath the hook.
Do not operate the appliance if the glass has been broken, damaged, or the glass is
not properly positioned/hooked onto the appliance.

630140_1XFIRE_1200_GB_Manual_R‐emotion
Flue
25
mm
25
mm
25
mm
50
mm
50
mm
25
mm
25
mm
25
mm
115
mm (REF)
30 Elbow
12.0 Installing the Flue System:
Ensure all flue components are Simpson Duravent Direct Vent Pro 5” x 8,” no other flue
types may be used. This flue is available on 24 hour delivery only from SpecFlue UK
FreeFone 0800 9020220 International +44 1787 880333
Note: Consult section 12.13 of this installation manual to ensure correct length of
flue is calculated.
There are two basic types of Balanced Flue System installations:
• Horizontal Termination
• Vertical Termination
Use the diagrams in sections 12.5, 12.6 & 12.7 to check if your proposed flue system is
acceptable. Section 12.9 will also need to be used to determine whether the flue terminal
location meets the requirements of BS 5440-1. Then use Appendix A to work out the
quantities of the flue components that are required.
12.1 Any offsets in your flue configuration should be 45° where possible.
12.2 If your flue configuration has a horizontal run, there must be a minimum 1° inclination
(20mm vertical rise per 1m horizontal run) leading upwards towards the termination.
Do not install the flue with horizontal sections sloping down towards the termination.
This could cause the fire to operate incorrectly and possibly create an unsafe
condition.
12.3 The flue must maintain the following
clearances to combustible materials;
25mm from all sides and bottom of
the flue, and 50mm from the top of
the flue.
12.4 If your flue configuration falls on or near a restriction zone boundary line in diagrams 12.5,
12.6 & 12.7, it may require the restriction value from either side of the boundary line to
achieve the correct flame aesthetic, this may vary from installation to installation.


630140_1XFIRE_1200_GB_Manual_R‐emotion
Figure C.2 Minimum dimensions of room-sealed chimney outlet positions
(refer to Figure C.8)
Symbol Location
(kW input expressed in net)
Minimum dimensions
Natural
Draught Fanned
Draught
A
A)
Directly below an opening, air brick, opening windows, (0-7 kW)
etc (>7-14 kW)
(>14-32 kW)
(>32-70 kW)
300 mm
600 mm
1 500 mm
2 000 mm
300 mm
B
A)
Above an opening, air brick, opening window, etc (0-7 kW)
(>7-14 kW)
(>14-32 kW)
(>32-70 kW)
300 mm
300 mm
300 mm
600 mm
300 mm
C
A)
Horizontally to an opening, air brick, opening windows, (0-7 kW)
etc (>7-14 kW)
(>14-32 kW)
(>32-70 kW)
300 mm
400 mm
600 mm
600 mm
300 mm
D Below temperature-sensitive building components, e.g. plastic gutters,
Soil pipes or drain pipes
300 mm 75 mm
E Below eaves 300 mm 200 mm
F Below balconies or car port roof 600 mm 200 mm
G From vertical drain pipe or soil pipe 300 mm 150 mm
B
)
H
C)
From an internal or external corner 600 mm 300 mm
I Above ground, roof or balcony level 300 mm 300 mm
J From a surface facing the terminal 600 mm 600 mm
K From a terminal facing the terminal 600 mm 1 200 mm
L From an opening in the car port (e.g. door, window) into the dwelling 1 200 mm 1 200 mm
M Vertically from a terminal on the same wall 1 500 mm 1 500 mm
N Horizontally from a terminal on the same wall 300 mm 300 mm
O From the wall on which the terminal is mounted 0 0
P From a vertical structure on the roof N/A N/A
Q Above intersection with roof N/A 300 mm
NOTE N/A = Not applicable.
A) In addition, for temperature and structural reasons, the terminal should not be nearer than 150mm (fanned draught)
or 300mm (natural draught) to an opening in the building fabric formed for the purpose of accommodating a built-in
element such as a window frame (see Figure C.9). Separation distances are linked to the rated heat inputs as shown.
B) This dimension may be reduced to 75mm for appliances of up to 5 kW heat input.
C) The reference to external corners does not apply to building protrusions not exceeding 450mm, such as disused
chimneys on external walls for; fanned draught appliances; natural draught appliances not exceeding a net input
of 7 kW; any other appliances if detailed in the appliance manufacturer’s instructions.
If using a horizontal flue terminal, a guard must be fitted to the terminal where
it is located less than 2m above the ground, above a balcony or flat roof to
which people have access.
This guard is available from SpecFlue, UK FreeFone 0800 9020220,
International +44 1787 880333
12.10 Supporting the flue system:
Wall straps are required to fix the flue system in place for each installation. This will ensure
that no undue strain is placed on flue components once installed.
For a flue offset or horizontal run, it is recommended that wall straps be used to the flue
system with a spacing of 900mm between straps. Plumbers strapping / tape can be used to
connect the wall straps to the building structure where there are large distances between
the support point and the anchor point.
For vertical flue runs it is recommended that wall straps be used to anchor the flue system
with a spacing of 1200mm between straps.

630140_1XFIRE_1200_GB_Manual_R‐emotion
12.11 Sealing ‘through roof’ and ‘through wall’ penetrations:
For ‘through roof’ penetrations, use a Master Flash flashing or equivalent to create a
weather-tight seal between the flue and the roof cladding.
For ‘through wall’ penetrations, this will require the use of a Wall Thimble. The Wall Thimble
will ensure you have suitable clearance from combustibles as well as sealing the
penetration. The section of the wall thimble installed on the external surface of the wall
should be sealed to the wall using a high temperature sealant such as Envirograf Product
62, Sealocrete Heat Resistant Silicone or equivalent. Additional sealant is required to seal
the Terminal Cap to the external wall. A bead should be run along the edge of the Terminal
that will be in contact with the wall once installed.
12.12 Twist locking procedure:
Before connecting flue components, to ensure an airtight seal run a single 7-8mm bead of
Sealocrete Heat Resistant Silicone, or equivalent, on the ‘male’ end of the flue as
shown in the diagram below.
The four indentations located on the female end of the flue are designed to slide straight
onto the male ends of the adjacent flue length, by orienting the four flue indentations so
they match and slide into the four entry slots on the male ends.
Push the pipe sections completely together, then twist-lock one section clockwise
approximately one-quarter turn, until the two sections are fully locked.
Wipe off any excess sealant from the exterior of the flue joint.
/