Page is loading ...

1
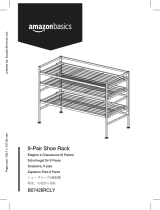
TILTING TV WALL MOUNT FOR MOST 12-INCH TO 39-INCH TVs
SUPPORT DE MONTAGE MURAL INCLINABLE POUR LA PLUPART DES TÉLÉVISEURS
DE 12 À 39 POUCES
NEIGBARE TV-WANDHALTERUNG FÜR DIE MEISTEN FERNSEHER VON 12 ZOLL BIS
39 ZOLL DIAGONALE (30 CM BIZ 99 CM)
STAFFA DI MONTAGGIO A PARETE CON INCLINAZIONE PER LA MAGGIOR PARTE DEI
TV DA 12 POLLICI A 39 POLLICI
SOPORTE DE TV PARA PARED INCLINABLE PARA LA MAYORÍA DE LAS PANTALLAS
DE 12 A 39 (30 CM A 99 CM)
ASIN B01KBEO54Q

2
English Françias Deutsche Italiano Español
SPECIFICATIONS
Display Size: 12” to 39” Maximum Load: 18.2 kg (40 lbs.)
Mounting Pattern: 75 x 75, 100 x 100, 200 x 100, 200 x 200
Tilt Range: -3° to 10° down Prole: 1.5” (38mm)
CAUTION!
This product is for indoor use only! Never use the mount outdoors!
WARNINGS
1. Read these instructions before you begin. If at any time you are unclear
about the directions and believe you need further assistance, contact
1-866-216-1072. If you are unsure about any part of the process,
contact a professional contractor or installer for assistance. Only use the
correct tools as noted in these instructions. Improper installation can
result in personal injuries and/or damage.
2. At least two people with technical knowledge are required for installing
the mount and TV. Keep children and pets away during installation, as
they might swallow small parts or packaging resulting in danger of
choking/suffocation.
3. Check carefully to ensure that there are no missing or damaged parts.
Never use defective parts. To receive replacement or missing part(s) visit
amazon.com/gp/help/customer/contact-us or call our Customer Service
Department at 1-866-216-1072. Please have the model number, date
code, part number(s) and your sales receipt, or other proof of purchase
available for reference.
4. Use and install this product only according to the intended use as de-
scribed within these instructions. Misuse may lead to hazards resulting
in potential damage and personal injuries. Do not modify the structure
of this product in any way. Manufacturer cannot be liable for direct or
indirect damage or personal injuries caused by incorrect mounting,
incorrect use, modication to the structure, or incorrect assembly. Keep
the instruction manual in a safe place..
5. Refer to the instruction manual provided with the TV you are going to
install on this product. It includes additional information for the mount-
ing, ventilation and suitable mounting location. Compare the technical
data and requirements to make sure that this product is suitable for your
TV.
6. IMPORTANT! Choose the right place to install the wall plate.
• For safety reasons make sure the wall can support at least 5 times the
weight of the television and mount. The manufacturer takes no responsi-
bility for failure caused by walls of insufcient strength.

3
English Françias Deutsche Italiano Español
• The maximum wall covering thickness; such as gypsum drywall, lath,
plastic, etc. should not be greater than 16mm (wood stud walls) or 10mm
(masonry walls).
• Do not mount to drywall alone.
• Examine the wall you want to install the mount to before you start
installation. Make sure that there are no hidden power supply cables, gas
pipes, water pipes or other objects hidden in the wall that might be hit by
the drill, screws or other hardware.
• For wood stud walls: This mount is designed to be mounted to 2” X 4”
and Grade No. 2, wood studs that are spaced 16” on center. Wood studs
should be 2” x 4”, at minimum: 1.5” X 3.5” (38 mm X 89 mm).
Only install the product into wood studs which meet the requirement of
American Softwood Lumber Standard No. PS20, never install on plywood.
• For concrete walls: The bracket must be installed into a solid concrete
wall. Make sure the concrete wall is suited for Standard Test Method for
Compression Strength of Cylindrical Concrete Specimens, ASTM C39, or
equivalent.
• This product should never be mounted to metal framing studs or bricks.
• If the mounting bracket will be attached to any structure other than
specied in this manual, only a licensed professional contractor/installer
should perform this installation. The supporting structure must support,
at minimum, four times the combined weight of the mounting bracket
and TV. It is the responsibility and liability of the installer to ensure the
suitability of the supporting structure.
• Never install into furniture! This can lead to instability resulting in person-
al injuries and/or damage.
7. Always support the TV with your hands when making adjustments. Make
sure to tighten screws and other connections well, but do not over-tight-
en them. Never use an electric tool to tighten screws and nuts.
8. Once you have mounted the bracket and television, ensure they are
sufciently secure and safe to use.
Maintenance Users should check and maintain the product frequently
to ensure the at panel TV and mount work normally, safely and securely.
Make sure the screws are tight every two months.

12
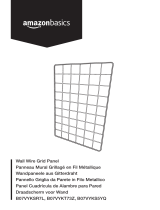
(EN) INCLUDED PARTS
(FR) PIÈCES INCLUSES
(DE) IM LIEFERUMFANG ENTHALTENE TEILE
(IT) PARTI INCLUSE
(ES) PARTES INCLUIDAS
(EN) Wall Mount, 1
(FR) Support mural, 1
(DE) Wandbefestigung, 1
(IT) Supporto a parete, 1
(ES) Soporte de pared, 1
[WM]
(EN) Monitor Plate, 1
(FR) Plaque de moniteur, 1
(DE) Monitor-Platte, 1
(IT) Piastra per lo schermo, 1
(ES) Placa del monitor, 1
[MP]
(EN) Adapter Plates, 4
(FR) Plaques d’adaptation, 4
(DE) Adapter-Platten, 4
(IT) Piastre-adattatore, 4
(ES) Placas adaptadoras, 4
(EN) Level (IT) Livella
(FR) Niveau (ES) Nivel
(DE) Nivellierinstrument
[AP]
(EN) Wrench, 1
(FR) Clé, 1
(DE) Schraubenschlüssel, 1
(IT) Chiave, 1
(ES) Llave, 1
[WR5]
(EN) Wall Anchor, 2
(FR) Chevilles, 2
(DE) Dübel, 2
(IT) Tasselli, 2
(ES) Anclajes, 2
[U8]
[LE]
[IT]
(EN) Installation Template, 1
(FR) Gabarit de pose, 1
(DE) Plantilla de instalación, 1
(IT) Schema di installazione, 1
(ES) Schablone für Installation, 1
6
M5 x 6mm
[TS] M6.3 X 63 mm, 2

13
(EN) INCLUDED PARTS
(FR) PIÈCES INCLUSES
(DE) IM LIEFERUMFANG ENTHALTENE TEILE
(IT) PARTI INCLUSE
(ES) PARTES INCLUIDAS
INCLUDED PARTS PIÈCES INCLUSES
PARTES INCLUIDAS
PARTI INCLUSE
ПОСТАВЛЯЕМЫЙ
КОМПЛЕКТ
IM LIEFERUMFANG
ENTHALTENE TEILE
[A] M4 x 12mm, 4
[B] M4 x 22mm, 4
[J] M6 x 14mm, 8
[K] M6 x 24mm, 4
[M] M8 x 20mm, 4
[N] M8 x 30mm, 4
[GG] M5 x 14mm, 1
[JY] M6 Nut, 4
[D] M4, 4
[Q] M6/M8, 4
[R] M4, 6 [S] M6/M8, 4

14
(EN) NECESSARY TOOLS
(FR) OUTILLAGE NÉCESSAIRE
(DE) ERFORDERLICHE WERKZEUGE
(IT) ATTREZZI NECESSARI
(ES) HERRAMIENTAS NECESARIAS
NECESSARY
TOOLS
OUTILLAGE
NÉCESSAIRE
HERRAMIENTAS
NECESARIAS
ATTREZZI
NECESSARI
НЕОБХОДИМЫЕ
ИНСТРУМЕНТЫ
ERFORDERLICHE
WERKZEUGE
(EN) Phillips-head Screwdriver
(FR) Tournevis à tête Phillips
(DE) Kreuzschlitzschraubenzieher
(IT) Cacciavite Phillips
(ES) Destornillador philips (cruz)
(EN) Ratchet Set
(FR) Clé à cliquet à douilles
(DE) Schaltklinke Hilfsmittel
(IT) Strumento Del Cricco
(ES) Equipo de trinquete
(EN) Masking Tape
(FR) Ruban de masquage
(DE) Abdeckband
(IT) Nastro adesivo
(ES) Cinta de enmascarar
(EN) Stud Finder
(FR) Détecteur de montant
(DE) Bolzennder
(IT) Rilevatore di montanti
(ES) Localizador de montantes
(EN) Drill Bit: Wood: 5/32" (4mm), Masonry: 5/16" (8mm)
(FR) Foret Bois : 5/32 po (4 mm), Maçonnerie : 5/16 po (8 mm)
(DE) Bohrerspitze, Holz: 4 mm; Mauerwerk: 8 mm
(IT) Punte trapano da legno: 4 mm; da muratura: 8 mm
(ES) Broca para madera: 5/32" (4 mm), para mampostería: 5/16" (8 mm)
(EN) Drill
(FR) Perceuse
(DE) Bohrer
(IT) Trapano
(ES) Taladro
(EN) Tape Measure
(FR) Ruban à mesurer
(DE) Messband
(IT) Metro
(ES)] Cinta métrica
(EN) Pencil
(FR) Crayon
(DE) Bleistift
(IT) Matita
(ES) Lápiz

15
(EN) ATTACHING THE MONITOR PLATE [MP]
(FR) FIXER LA PLAQUE DE MONITEUR [MP]
(DE) BEFESTIGUNG DER MONITOR-PLATTE [MP]
(IT) FISSAGGIO DELLA PIASTRA PER LO SCHERMO [MP]
(ES) CÓMO FIJAR LA PLACA DEL MONITOR [MP]
(EN) SELECT THE CORRECT SCREW - Before beginning, test several of the screws in your
hardware kit to nd the correct size and length for your television.
(FR) SÉLECTIONNER LA VIS CORRECTE - Avant de commencer, essayer différentes vis du
nécessaire de visserie pour trouver la section et la longueur correctes pour le téléviseur.
(DE) DIE RICHTIGE SCHRAUBE AUSWÄHLEN - Bevor Sie mit der Installation beginnen, sind
mehrere der in Ihrem Eisenteil-Satz enthaltenen Schrauben auszuprobieren, um die richtige
Größe und Länge für Ihr TV zu ermitteln.
(IT) SELEZIONARE LE VITI CORRETTE - Prima di iniziare, cercare tra le varie viti nel kit di
ferramenta quelle di dimensione e lunghezza corrette per il vostro televisore.
(ES) ELIJA EL TORNILLO CORRECTO - Antes de comenzar, pruebe varios tornillos de su kit de
accesorios para encontrar el de tamaño y longitud indicados para su televisor.
(EN) TELEVISION (FR) TÉLÉVISEUR (DE) FERNSEHER (IT) TELEVISORE (ES) TELEVISOR
(EN) Monitor Plate [MP]
(FR) Plaque de moniteur [MP]
(DE) Monitor-Platte [MP]
(IT) Piastra per lo schermo [MP]
(ES) Placa del monitor [MP]
(EN) Washer
(FR) Rondelle
(DE) Distanzscheibe
(IT) Rondelle
(ES) Arandela
(EN) Spacer
(FR) Douille d’espacement
(DE) Abstandshalter
(IT) Distanziali
(ES) Espaciador

16
(EN) DECIDE IF ADAPTER PLATES [AP] ARE NECESSARY
Compare to the mounting holes on the back of your television.
(FR) DÉCIDER SI DES PLAQUES D’ADAPTATION [AP] SON NÉCESSAIRES
Comparer aux trous de xation au dos du téléviseur.
(DE) ENTSCHEIDEN SIE SICH, OB ADAPTER-PLATTEN [AP] ERFORDERLICH SIND
Vergleichen Sie sie mit den Montagelöchern auf der Rückseite Ihres Fernsehers.
(IT) DECIDERE SE LE PIASTRE-ADATTORE [AP] SONO NECESSARIE
Vericare la corrispondenza tra la posizione dei fori sul retro del televisore e il
supporto stesso.
(ES) DETERMINE SI NECESITA LAS PLACAS ADAPTADORAS [AP]
Compare los oricios de montaje en la parte trasera de su televisor.

17
(EN) IF USING THE ADAPTER PLATES [AP]:
Attach the Adapter Plates [AP] to the Monitor Plate [MP] using four M6 x 14mm Screws [J]
and four M6 Nuts [JY].
(FR) SI LES PLAQUES D’ADAPTATION [AP] SONT UTILISÉES :
Fixer les plaques d’adaptation [AP] à la plaque de moniteur [MP] à l’aide de quatre rondelles
M6 x 14mm [J] et de quatre vis M6 [JY].
(DE) FALLS SIE ADAPTER- PLATTEN [AP] VERWENDEN:
Befestigen Sie die Adapter-Platten [AP] an der Monitor-Platte [MP] unter Einsatz von vier M6
x 14 mm Distanzscheiben [J] und vier M6 Schrauben [JY].
(IT) SE LE PIASTRE-ADATTORE [AP] SONO NECESSARIE:
Fissare le piastre-adattatore [AP] alla piastra per lo schermo [MP] con quattro
rondelle M6 x 14mm [J] e quattro viti M6 [JY].
(ES) SI USA LAS PLACAS ADAPTADORAS [AP]
Una las placas adaptadoras [AP] a la placa del monitor [MP] usando cuatro tornillos M6 x
14mm [J] y cuatro tuercas M6 [JY].
[J]
[AP]
[MP]
[JY]
[WR5]

18
(EN) DO NOT OVER TIGHTEN SCREWS!
(FR) NE PAS FORCER SUR LES VIS !
(DE) BITTE DIE SCHRAUBEN NICHT ZU FEST ZIEHEN!
(IT) NON SERRARE ECCESSIVAMENTE LE VITI!
(ES) NO AJUSTE DEMASIADO LOS TORNILLOS.
[R] OR [S]
[A] OR [J]
[J] OR [M]
[R] WITH [J]
OR
[S] WITH [M]
(EN) ATTACH MONITOR PLATE [MP] TO TELEVISION
Attach the Monitor Plate [MP] using the correct TV Mounting Screws [A, J, or M] and Washers [R or S]
as shown. Do not place the Washers between the monitor plate and the TV.
(FR) FIXER LA PLAQUE DE MONITEUR [MP] AU TÉLÉVISEUR
Fixer la plaque de moniteur [MP] avec les vis [A, J, ou M] de xation de TV et les rondelles [R ou S]
correctes comme sur l’illustration. Ne pas place pas de rondelle entre la plaque de moniteur et le
téléviseur.
(DE) BEFESTIGEN SIE DIE MONITOR-PLATTE [MP] AN IHREM TV
Befestigen Sie die Monitor-Platte [MP] unter Einsatz der passenden TV-Befestigungsschrauben [A, J,
oder M] und Distanzscheiben [R o S], wie dargestellt.
Legen Sie die Distanzscheiben nicht zwischen die Monitor-Platte und den Fernseher.
(IT) FISSARE LA PIASTRA PER LO SCHERMO [MP] AL TELEVISORE
Fissare la piastra per lo schermo [MP] usando le viti [A, J, o M] e le rondelle [R o S] adatte per il
televisore, come illustrato. Non posizionare le rondelle tra la piastra per il monitor e il televisore.
(ES) UNA LA PLACA DEL MONITOR [MP] AL TELEVISOR
Una la placa del monitor [MP] usando los tornillos [A, J, o M] de montaje para TV y las arandelas [R o
S] correctos, tal como se muestra. No coloque las arandelas entre la placa del monitor y el TV.

19
(EN) Use spacers [D or Q] if the Monitor Plate [MP] does not t rmly against the back of the television,
such as when the back of the television is curved, contains larger recessed mounting holes, or some other
obstruction is in the way. The Monitor Plate must rest securely on the spacers, and should not be loose.
Use longer screws [B, K or N].
(FR) Utiliser les douilles d’espacement [D ou Q] si la plaque de moniteur [MP] où les bras n’appuient pas
fermement contre le dos du téléviseur, comme lorsque le dos du téléviseur est incurvé, qu’il contient de
grands trous de xation en retrait ou qu’il y a d’autres obstacles. La plaque de moniteur doit appuyer
fermement sur les douilles d’espacement et ne pas avoir de jeu. Utilisez des vis plus longues [B, K ou N].
(DE) Verwenden Sie Abstandshalter [D oder Q], wenn die Monitor-Platte [MP] nicht fest gegen die
Rückseite des TVs sitzt, beispielsweise, wenn die Rückseite des Fernsehers gerundet ist, größere
ausgesparte Befestigungslöcher hat, oder falls irgend eine andere Blockierung vorhanden sein sollte. Die
Monitor-Platte muss sicher auf den Abtandshaltern liegen, und darf nicht locker sein. Längere Schrauben
[B, K oder N].
(IT) Utilizzare i distanziali [D o Q] quando la piastra per il monitor [MP] non appoggia perfettamente al retro
del televisore, ad esempio quando la parte posteriore del
televisore è ricurva, oppure è dotata di fori di montaggio infossati e di dimensioni maggiori, o quando è
presente qualche tipo di intralcio. La piastra per lo schermo deve aderire fermamente ai distanziali, e non
deve risultare allentata. Utilizzare viti più lunghe [B, K o N].
(ES) Use los espaciadores [D o Q] si la placa del monitor [MP] no encaja con rmeza contra la parte
trasera del televisor, como en el caso en que esta parte es curva, contiene oricios de montaje embutidos
más grandes o presenta alguna otra obstrucción. La placa del monitor tiene que descansar de manera
segura sobre los espaciadores y no deben estar ojos. Utilice tornillos más largos [B, K o N].
(ES) DO NOT OVER TIGHTEN SCREWS!
(FR) NE PAS FORCER SUR LES VIS !
(DE) BITTE DIE SCHRAUBEN NICHT ZU FEST ZIEHEN!
(IT) NON SERRARE ECCESSIVAMENTE LE VITI!
(ES) NO AJUSTE DEMASIADO LOS TORNILLOS.
[R] WITH
[B] OR [K]
[B] OR [K]
[D] WITH
[B] OR [K]
[D] WITH [K] OR
[Q] WITH [N]
[K] OR [N]
[R] WITH [K]
OR
[S] WITH [N]

23
(EN) FOR MASONRY INSTALLATIONS, SEE PAGE 26.
(FR) POUR UNE POSE SUR DE LA MAÇONNERIE, VOIR PAGE 26.
(DE) FÜR INSTALLATIONEN IN MAUERWERK, SIEHE SEITE 26.
(IT) PER INSTALLAZIONI A MURO, VEDERE A PAGINA 26.
(ES) PARA INSTALACIONES EN MAMPOSTERÍA CONSULTE LA PÁGINA 26
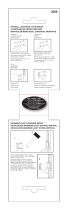
(EN) DRILL PILOT HOLES
Follow directions on the Installation Template (IT) carefully. Drill two holes 2.5" (64mm) deep
using a 5/32" (or 4mm) size drill bit in the “A” and “B” locations noted on the Installation
Template.
(FR) PERCER LES TROUS GUIDES
Suivre avec attention les instructions gurant sur le gabarit de pose (IT). Percer deux trous de
64 mm (2,5 po) de profond avec un foret de 5/32 po (ou 4 mm) de diamètre aux emplace-
ments notés « A » et « B » sur le gabarit de pose.
(DE) FÜHREN SIE EINE VORBOHRUNG DURCH
Bitte achten Sie darauf, dass der Installationsschablone (IT) sorgfältig gefolgt wird. Bohren
Sie zwei 64 mm tiefe Löcher mit einer 4 mm großen Bohrerspitze in die “A” und “B” Stellen
auf der Installationsschablone.
(IT) TRAPANARE I FORI-PILOTA
Seguire con attenzione le istruzioni contenute sullo schema di installazione (IT).
Trapanare due fori profondi 64 mm, con una punta da 4 mm, nei punti “A” e “B” indicati sullo
schema di installazione.
(ES) TALADRE ORIFICIOS GUÍA
Siga atentamente las instrucciones de la plantilla de instalación (IT). Taladre dos oricios de
2,5" (64 mm) de profundidad con una broca de 5/32" (4 mm) en las ubicaciones “A” y “B”
apuntadas en la plantilla de instalación.

25
(EN) INSTALL THE WALL MOUNT [WM]
Install the Wall Mount [WM] using two Lag Bolts [TS] and Washers [R] in the “A” and “B”
holes. Do not tighten Lag Bolts completely.
(FR) POSER LE SUPPORT MURAL [WM]
Poser le support mural [WM] en vissant deux tire-fond [TS] et rondelles [R] dans les trous
« A » et « B ». Ne pas complètement serrer les tire-fond.
(DE) INSTALLATION DER WANDBEFESTIGUNG [WM]
Installieren Sie die Wandbefestigung [WM] mit zwei Ankerbolzen [TS] und distanzscheibe
[R] in die “A” und “B” Löcher. Ziehen Sie die Ankerbolzen nicht vollständig fest.
(IT) INSTALLAZIONE DEL SUPPORTO A PARETE [WM]
Installare il supporto a parete [WM] con due bulloni [TS] e rondelle [R] nei fori “A” e “B”.
Non serrare completamente i bulloni.
(ES) INSTALE EL SOPORTE DE PARED [WM]
Instale el soporte de pared [WM] usando dos tirafondos [TS] y arandellas [R]
en los oricios “A” y “B”. No ajuste completamente los tirafondos.
[WM]
[R]
[TS]
A
B
(EN) DO NOT OVER TIGHTEN LAG BOLTS [TS]!
(FR) NE PAS FORCER SUR LES TIRE-FOND [TS] !
(DE) ZIEHEN SIE DIE ANKERBOLZEN [TS] NICHT ZU FEST!
(IT) NON SERRARE ECCESSIVAMENTE I BULLONI [TS]!
(ES) NO AJUSTE DEMASIADO LOS TIRAFONDOS [TS]!

26
A
B
[LE]
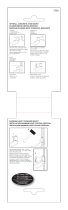
(EN) MOUNTING TO SOLID CONCRETE OR CINDER BLOCK
(FR) POSE SUR DU BÉTON PLEIN OU DES PARPAINGS
(DE) MONTAGE AN FESTBETON ODER SCHLACKENBETONBLOCK
(IT) MONTAGGIO SU CALCESTRUZZO O BLOCCHI IN CEMENTO
(ES) MONTAJE EN CONCRETO SÓLIDO LADRILLOS DE ESCORIAS
(ES) After you have determined your desired TV location, Line up the
Installation Template [IT] to ensure you will not drill into any mortar joints.
Tape the Installation Template in place securely on the wall with masking tape. Use a
Level.
(FR) Après avoir déterminé l’emplacement souhaité pour le téléviseur, aligner le gabarit
de pose [IT] de manière à ne pas percer dans des joints de mortier. Bien attacher le
gabarit au mur avec du ruban de masquage. Utiliser un niveau.
(DE) Nachdem Sie den gewünschten Platz des Fernsehers bestimmt haben, wird die
Installationsschablone [IT] ausgerichtet, um sicherzustellen, dass Sie nicht in Mörtelfugen
bohren. Befestigen Sie die Installattionsschablone [IT] sicher an der Wand mit Hilfe von
Abdeckband. Verwenden Sie dazu Ihr Nivellierinstrument.
(IT) Dopo aver determinato
la posizione più adatta per il
televisore, allineare lo schema
di installazione [IT] per assicu
-
rarsi di non trapanare in giunti
di malta. Fissare lo schema
al muro con nastro adesivo.
Utilizzare una livella.
(ES) Luego de haber deter
-
minado la ubicación deseada
para su TV, alinee la plantilla de
instalación [IT] para asegurarse
de que no necesitará perforar
ninguna junta de argamasa.
Utilice cinta adhesiva para
sujetar la plantilla de instalación
[IT] a la pared de forma segura.
Utilice un nivel.

28
(EN) DO NOT DRILL INTO MORTAR JOINTS! DRILL TOP HOLES AT LEAST
1" (25.4 MM) FROM THE JOINTS. USE A NEW DRILL BIT TO ENSURE
OPTIMUM HOLDING ABILITY. DO NOT USE A HAMMER DRILL!
(FR) NE PAS PERCER DANS LES JOINTS DE MORTIER ! PERCER LES
TROUS SUPÉRIEURS À AU MOINS 25 MM (1 PO) DES JOINTS. UTILISER
UNE MÈCHE NEUVE POUR ASSURER UNE CAPACITÉ DE MAINTIEN
OPTIMALE. NE PAS UTILISER DE PERCEUSE À PERCUSSION !
(DE) BITTE NICHT IN DEN FUGEN BOHREN! DIE OBEREN BOHRUNGEN
SIND MINDESTENS 25,4 MM VON DEN FUGEN ENTFERNT
VORZUNEHMEN. VERWENDEN SIE EINE NEUE BOHRERSPITZE, UM
EINE OPTIMALE HALTEKAPAZITÄT ZU GEWÄHRLEISTEN. BENUTZEN
SIE KEINEN BOHRHAMMER!
(IT) NON TRAPANARE DIRETTAMENTE NEI GIUNTI DI MALTA!
PERFORARE FORI SUPERIORI AD UNA DISTANZA DI ALMENO 25,4
MILLIMETRI DA QUESTI. UTILIZZARE UNA PUNTA DI TRAPANO NUOVA
PER
ASSICURARE LA MIGLIORE CAPACITÀ DI OSTEGNO POSSIBILE.
NON UTILIZZARE UN TRAPANO A PERCUSSIONE!
(ES) NO PERFORE LAS JUNTAS DE ARGAMASA. TALADRE ORIFICIOS
SUPERIORES A UNA DISTANCIA DE, POR LO MENOS, 1" (25,4 MM) DE
LAS JUNTAS. USE UNA BROCA NUEVA PARA GARANTIZAR UNA
CAPACIDAD ÓPTIMA DE SUJECIÓN. NO USE UN TALADRO PERCUTOR.

30
(EN) INSTALL THE WALL MOUNT [WM]
Install the Wall Mount [WM] using two Lag Bolts [TS] and Washers [R] in the “A” and “B”
holes. Do not tighten Lag Bolts completely. Leave enough room to slip the Wall Mount
over the Bolts. After the Wall Mount is on the wall, use a level to make sure the Wall
Mount is vertically level.
(FR) POSER LE SUPPORT MURAL [WM]
Poser le support mural [WM] en vissant deux tire-fond [TS] et rondelles [R] dans les trous
« A » et « B ». Ne pas complètement serrer les tire-fond. Laisser sufsamment de jeu pour
enler le support mural sur les tire-fond. Une fois que le support mural est sur le mur,
utiliser un niveau pour vérier qu’il est bien vertical.
(DE) INSTALLATION DER WANDBEFESTIGUNG [WM]
Installieren Sie die Wandbefestigung [WM] mit zwei Ankerbolzen [TS] und distanzscheibe
[R] in die “A” und “B” Löcher. Ziehen Sie die Ankerbolzen nicht vollständig fest. Lassen
Sie genug Platz, um die Wandbefestigung über die Bolzen gleiten lassen zu können.
Nachdem die Wandbefestigung an der Wand angebracht wurde, stellen Sie mit Hilfe eines
Nivellierinstruments sicher, dass sie vertikal verläuft.
(IT) INSTALLAZIONE DEL SUPPORTO A PARETE [WM]
Installare il supporto a parete [WM] con due bulloni [TS] e rondelle [R] nei fori “A” e “B”.
Non serrare completamente i bulloni, e lasciare spazio sufciente per far scivolare il sup-
porto a parete oltre i bulloni. Dopo aver ssato il supporto alla parete, utilizzare la livella
per vericare che il supporto sia parallelo al suolo.
(ES) INSTALE EL SOPORTE DE PARED [WM]
Instale el soporte de pared [WM] usando dos tirafondos [TS] y arandellas [R] en los
oricios “A” y “B”. No ajuste completamente los tirafondos. Deje el espacio suciente
para deslizar el soporte sobre los pernos. Una vez que el soporte está sobre la pared, use
un nivel para asegurarse que está verticalmente nivelado.

31
[WM]
[R]
[TS]
A
B
(EN) DO NOT OVER TIGHTEN LAG BOLTS [TS]!
(FR) NE PAS FORCER SUR LES TIRE-FOND [TS] !
(DE) ZIEHEN SIE DIE ANKERBOLZEN [TS] NICHT ZU FEST!
(IT) NON SERRARE ECCESSIVAMENTE I BULLONI [TS]!
(ES) NO AJUSTE DEMASIADO LOS TIRAFONDOS [TS]!
[U8]

32
(EN) MOUNTING THE TELEVISION
(FR) POSE DU TÉLÉVISEUR
(DE) MONTAGE DES FERNSEHERS
(IT) MONTAGGIO DEL TELEVISORE
(ES) CÓMO INSTALAR EL TELEVISOR
(EN) PREPARE THE SECURITY SCREWS
Use the 14mm Security Screws [GG]. Place the screws in the Wall Mount [WM]as shown.
(FR) PRÉPARER LES VIS DE SÉCURITÉ
Utiliser les vis de sécurité de 14 mm [GG]. Poser les vis sur le support mural [WM] comme
sur l’illustration.
(DE) BEREITEN SIE DIE SICHERUNGSSCHRAUBEN VOR
Werden die kürzeren 14 mm langen Sicherungsschrauben [GG] verwendet.
Platzieren Sie die Schrauben in die Wandbefestigung [WM] wie hier abgebildet.
(IT) PREPARARE LE VITI DI SICUREZZA
Utilizzare le viti di sicurezza [GG] da 14 mm. Porre le viti nel supporto a parete [WM] come
illustrato.
(ES) PREPARE LOS TORNILLOS DE FIJACIÓN
Use los tornillos de jación de 14 mm [GG]. Coloque los tornillos en el soporte de pared
[WM], tal como se muestra.

34
(EN) MOUNT THE TELEVISION
With the help of an assistant, lift the television and guide the Monitor Plate [MP] onto the
Wall Mount [WM] as shown. Once safely on the mount, secure the television with the
Security Screws [GG] using a Phillips-head screwdriver.
(FR) FIXER LE TÉLÉVISEUR
Avec l’aide d’une autre personne, soulever le téléviseur et guider la plaque de moniteur
(MP) dans le support mural [WM] comme sur l’illustration. Une fois le téléviseur bien
accroché au support, le xer en serrant les vis de sécurité [GG] à l’aide d’un tournevis à
tête Phillips.
(DE) BEFESTIGUNG DES FERNSEHERS
Mit einem Gehilfen wird der Fernseher hochgehoben und die Monitor-Platte [MP] auf die
Wandbefestigung [WM] wie abgebildet geführt. Nach einer
sicheren Befestigung an der Montage-Platte wird der Fernseher mit
Sicherungsschrauben [GG] mit Hilfe eines Kreuzschlitzschraubenziehers befestigt.
(IT) MONTAGGIO DEL TELEVISORE
Con l’aiuto di un assistente, sollevare il televisore e guidare la piastra per lo schermo
[MP] all’interno del supporto a parete [WM], come illustrato. Una volta sicuramente nel
supporto, ssare il televisore con le viti di sicurezza [GG] con un cacciavite Phillips.
(ES) CÓMO MONTAR EL TELEVISOR
Con la ayuda de un asistente, levante el televisor y guíe la placa del monitor [MP] sobre
el soporte de pared [WM], tal como se muestra. Una vez ubicado con seguridad sobre el
soporte, asegúrelo con los tornillos de jación [GG] con un destornillador philips.

38
English Françias Deutsche Italiano Español
Feedback
Love it? Hate it?
Let us know with a customer review.
AmazonBasics is committed to delivering customer-driven products
that live up to your high standards. We encourage you to write a
review sharing your experiences with the product.
Please visit: https://www.amazon.com/review/review-your-purchases
Warranty Information
To obtain a copy of the warranty for this product:
For further service:
Visit amazon.com/gp/help/customer/contact-us
— or —
Contact Customer Service at 1-866-216-1072
Visit amazon.com/AmazonBasics/Warranty
— or —
Contact Customer Service at 1-866-216-1072
/