VIRTUFIT 183*274 CM Premium Trampoline User manual

Type
User manual
USER MANUAL
EN
PREMIUM TRAMPOLINE WITH SAFETY NET
EN
VIRTUFIT PREMIUM TRAMPOLINE WITH SAFETY NET
2
SAFETY INSTRUCTIONSSAFETY INSTRUCTIONS
CHECKLISTCHECKLIST
ASSEMBLY INSTRUCTIONSASSEMBLY INSTRUCTIONS
MOVING THE TRAMPOLINEMOVING THE TRAMPOLINE
MAINTENANCEMAINTENANCE
BASIC TRAMPOLINE SKILLSBASIC TRAMPOLINE SKILLS
3 - 5
6 - 7
8 - 17
18
19
20
INDEX
EN
VIRTUFIT PREMIUM TRAMPOLINE WITH SAFETY NET
3
SAFETY INSTRUCTIONS
Recommended age 6+ years.
No somersaults or flips - can cause serious injury. Jump without shoes.
Not suitable for children under 36 months - small parts, choking hazard.
The trampoline is intended for outdoor use only.
Only one user at a time. Danger of Collision hazard.
Always close the net opening before jumping.
Do not use the mat when it is wet
Empty pockets and hands before jumping
Always jump in the middle of the mat
Do not eat while jumping. It is advisable not to bounce immediately after a meal.
Do not exit by a jump
Do not use in strong wind conditions and secure the trampoline.
The trampoline shall be assembled by an adult in accordance with the assembly instructions and
thereafter checked before the first use.
The max user weight is: 183x274x245 cm: 150 KGS - 214x305x256 cm: 150 KGS - 244x366x265 cm:
150 KGS.
Limit the time of continuous usage (make regular stops).
Only use the trampoline if it is completely in accordance with the instructions in the manual
mounted.
ATTENTION
WARNING:
Consult your child’s doctor before jumping, especially for children with health problems.
Read all instructions before using the trampoline. VirtuFit takes no responsibility for
any injuries or material damage caused by the use of this product. Read the manual
carefully before you start to assemble and/or use the trampoline. Adult supervision is
required at all times.
EN
VIRTUFIT PREMIUM TRAMPOLINE WITH SAFETY NET
4
This trampoline is not intended to be buried in the ground.
The trampoline must be placed on a level surface at least 2m from any structures or obstructions
such as fence, garage, house, overhanging branches, laundry lines or electrical wires.
Do not install the trampoline over concrete, asphalt or any other hard surface. Also not in proximity
of other conflicting installations, such as padding / swimming pools, swings, slides or climbing
frames.
Any modifications made by the consumer to the original trampoline (e.g. the adding of an accessory)
shall be carried out according to the instructions of the manufacturer.
Inspect trampoline / enclosure net before each use.
If an access ladder is used it should be removed when trampoline is not in use.
Make sure there are no children / animals / obstructions underneath the trampoline.
Access the trampoline through the door of the enclosure net only. Making sure you securely close it
before bouncing. Use: Ensure the door is securely closed before bouncing.
Don’t intentionally rebound off the enclosure net as this will weaken it.
Only attach manufacturer approved accessories to the trampoline and enclosure net.
Always jump in the middle of the mat and practice bounce techniques safely with adult supervision
and guidance.
Warranty claim is excluded if the cause of the defect is the result of:
Maintenance assembly and repair work not performed by an official dealer.
In case of improper use, neglect and / or poor maintenance.
Failure to maintain the fitness equipment in accordance with the manufacturer’s instructions.
The product has been incorporated into the soil.
Defects caused by external influences (eg climate and weather influences).









 























SAFETY INSTRUCTIONS
ADVISORY
EN
VIRTUFIT PREMIUM TRAMPOLINE WITH SAFETY NET
5
SAFETY INSTRUCTIONS
Attention to the need to carry out checks and maintenance of the main parts (frame, suspension
system, mat, padding, and enclosure) at the beginning of each season and also at regular intervals
of every 2 weeks, pointing out that if these checks are not carried out, the trampoline could become
dangerous.
Check all nuts and bolts for tightness and tighten when required.
Check that all spring-loaded (pit pin) joints are still intact and cannot become dislodged during play.
Check all coverings and sharp edges and replace when required.
Retain the maintenance instruction manual.
Outdoor trampolines should be equipped with a device that in strong wind conditions avoid
displacement due to wind (e.g. steel bars in the ground or loads like sand bag or water bags) and/or
items catching wind like net and mat should be removed.
In certain countries during winter period, the snow load and the very low temperature can damage
the trampoline. It is recommended to remove the snow and store the mat and the enclosure indoor.
Check that mat, padding, enclosure and soft surface are without defects.
Make sure that the hook-and-loop fasteners are closed correctly during use of trampoline!
Trampoline and net should be packed away in winter. Make sure all parts are dry and packed securely.
Store dry to support product longevity. Always be aware of wear and tear due to weather and wind.
We recommend securing the trampoline in strong winds. Tie the trampoline down with ropes
attached to the trampoline pad. Tie the trampoline down in a minimum of three places distributed
evenly across the trampoline frame.
Do not secure the legs as these may become misaligned and ruin the trampoline. Dismantle or
remove the trampoline completely, if required. It may result in great danger if the trampoline is not
secured in strong winds.
If the trampoline is not used for short periods of time and to avoid jump mat debris caused by fallen
leaves and twigs, Its recommended usage of a Weather Cover. When the trampoline is not used for a
longer period of time (e.g. during the winter). Its recommended storing the trampoline, especially
the protective padding, in a dry area to support product longevity.
NOTE! Sunlight, rain, snow and extreme temperatures reduce the strength of these parts over time.
ASSEMBLY AND MAINTENANCE INSTRUCTIONS
EN
VIRTUFIT PREMIUM TRAMPOLINE WITH SAFETY NET
6
When you open the carton, and you will find the below parts in the carton. Place all
parts on the floor. Make sure you have all the parts listed. If parts are missing, please
contact the supplier.
TOOLKIT
CHECKLIST
#DESCRIPTION 183*274
CM
214*305
CM
244*366
CM
AJumping Mat 1 1 1
BFrame pad 1 1 1
CT-connector 8 8 8
DBend Top Rail 4 4 4
EShort Top Rail 2 2 2
FLong Top Rail 2 2 2
GVertical Leg Extension 8 8 8
HLeg Base 4 4 4
ISprings 48 52 64
JSpring Tool 1 1 1
EN
VIRTUFIT PREMIUM TRAMPOLINE WITH SAFETY NET
7
#DESCRIPTION
KBottom Pole Tube 888
LUpper Pole Tube 888
MEnclosure Net 1 1 1
NFork Screw 8 8 8
O9-Shaped Screw 8 8 8
PSpanner 1 1 1
QScrewdriver 1 1 1
RSmall screw 8 8 8
SCord 111
TPVC Sleeve 8 8 8
UPole Cap 8 8 8
VFiberglass rod V 444
WFiberglass rod W 222
XFiberglass rod X 2 2 2
YBungee Cord 20 20 20
TOOLKIT
CHECKLIST













































183*274
CM
214*305
CM
244*366
CM
EN
VIRTUFIT PREMIUM TRAMPOLINE WITH SAFETY NET
8
Missing parts: If you think you are missing certain parts in your package, carefully check the styrofoa and
the trampoline. Some parts (bolts, screws, etc.) are already attached to/in the trampoline.
Use gloves to protect your hands from bottlenecks during assembly. When youre ready to get started,
make sure you have plenty of room and a clean, dry area for mounting.
Read the assembly instructions below before you start mounting the trampoline. Incorrect mounting
will damage the trampoline frame:
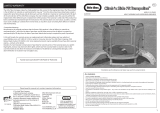
Make sure the trampoline is placed on level ground. Uneven ground surfaces may cause the
trampoline frame to warp (FIG 1).
Make sure that all bolts holding the frame joints are tightened completely before installing the
springs. Failure to do this properly will cause the frame to warp.
Make sure NOT to use one’s leg to push against the trampoline leg or frame when loading the springs.
It will cause the trampoline to warp (FIG 2).
DO NOT load the springs onto the frame on only one side of the trampoline. Uneven distribution of
tension from the springs will cause the frame to warp (FIG 2).
If the trampoline frame warps up, do not be alarmed as the “Quad-lock system is designed to be
flexible. Push down on the part of the frame that warped with two people as shown. The frame will
level out (FIG 3).
NOTE! For the next assembly 2 adults in good physical condition are required. Wear good shoes and
keep balance to avoid a fall. Failure to follow all instructions and warnings exactly could result in
serious injury.
ASSEMBLY INSTRUCTIONS




















                 
                 

                    
                 
               



          

               

                

                    

FOTO 1
FIGUUR 7




















                 
                 

                    
                 
               



          

               

                

                    

FOTO 2
FOTO 3
EN
VIRTUFIT PREMIUM TRAMPOLINE WITH SAFETY NET
9
ASSEMBLY INSTRUCTIONS
STEP 1
By attaching Vertical Leg Extension (G) to Leg Base (H), to form a “U” shaped.
Connect all the Bend Top Rails (D) together with T connectors (C), Long Top Rails (F), Short Top Rails
(E) to form a rectangular frame as photo show. Note position of Long Top Rail (F) and Short Top Rail
(E).
Two people will be necessary at this point to assemble the trampolines. One person lifts the
rectangular frame to a standing position and insert the “U” shape legs into the Top Rail.
EN
VIRTUFIT PREMIUM TRAMPOLINE WITH SAFETY NET
10
ASSEMBLY INSTRUCTIONS
When Attaching springs to the jumping mat, please be careful. You will need another person to help
you with this portion of the assembly. CAREFUL-When attaching the Spring, the Connector Points
can become pinch points since the trampoline is tightening up.
Lay out the Jumping Mat (A) inside the frame
How to use the Spring Tool (J)
Take Spring(I) and insert end ‘b’ into Top Rail tube, then put end a’ of spring into trampoline Jumping
Mat(A) rings.
Hold Spring Tool (J) overhand and pull spring hook towards Top rail as picture shown; drop hook into
frame hole until it latches on completely, tap it down if hook is not completely in the hole.
Please be careful where you place your hands and other parts of your body during spring assembly
as connector points become pinch points!
STEP 2
EN
VIRTUFIT PREMIUM TRAMPOLINE WITH SAFETY NET
11
ASSEMBLY INSTRUCTIONS
STEP 3 - ASSEMBLY TRAMPOLINE MAT
Use 2 springs in each corner.
Use 2 springs equally spaced along each edge. This will equalize the mat.
Assemble remaining springs.
TIP: Use equal amounts along each edge to keep the mat tension equal.
Final result when all springs are placed depending the quantity of springs.
EN
VIRTUFIT PREMIUM TRAMPOLINE WITH SAFETY NET
12
ASSEMBLY INSTRUCTIONS
STEP 4
Springs must be attached the right way around and fully inserted into the holes along the top of the
frame.
Lay the Frame Pad (B) over the trampoline so that the springs and the steel frame is covered. Please
ensure that the Frame Pad covers all metal parts.
Insert the bungee cord through the rings under the pad and then attach it to the frame as shown in
the photos. Do not tie them to the springs.
Select your Pad model.
EN
VIRTUFIT PREMIUM TRAMPOLINE WITH SAFETY NET
13
ASSEMBLY INSTRUCTIONS
STEP 5
Connect the bottom pole tube (K) to the upper pole tube (L).
Align the hole in the bottom pole tube with the slot in the top tube, screw one of small screws (R)
through the slot in the top tube and into the hole in the bottom tube using the screwdriver (P). Slide
the PVC sleeves (T) onto the assembled enclosure poles.
Fixing on bottom pole tube (K) onto trampoline legs with fork screw (N) and 9 shape screw (O) as
shown in diagram, secure with nut by Spanner (P). Be sure to have someone help you hold the tube
frame steady when you do this. Ensure all nuts and bolts are securely tight.
EN
VIRTUFIT PREMIUM TRAMPOLINE WITH SAFETY NET
14
IMORTANT! Position the fiberglass rods.
Insert the fiberglass rod W into the passage sewn at the top of the enclosure net (M) above the zipper
entrance. Insert another fiberglass rod W to the opposite side of the zipper entrance. Please refer to
the above image to correctly fit the fiberglass rods and plastic caps to the net.
Slide the fiberglass rods into the passage sewn at the top of the enclosure net (M). Repeat this until
all the fiberglass rods are fully inserted with Pole caps (U). One person will be required to thread the
fiberglass rods through the passage at the top of the net, another person will be required to gradually
bend the rods around the passage to form a circle.
NOTE! The quick snap click on the pole tube need to face toward the center of fiberglass rod circle.
ASSEMBLY INSTRUCTIONS
STEP 6
 


 

 


EN
VIRTUFIT PREMIUM TRAMPOLINE WITH SAFETY NET
15
ASSEMBLY INSTRUCTIONS
 
 
 
                  

Attached the fiberglass rods with the enclosure net to the top of the enclosure poles by inserting
the Pole cap into the top of the enclosure poles. Making sure the quick snap click on the pole tube
out through the hole in the upper pole tube.
Connect the velcro straps at the top of PVC sleeve.
 
 
 
                  

EN
VIRTUFIT PREMIUM TRAMPOLINE WITH SAFETY NET
16
Install the bottom of enclosure net to the jumping mat as below 3 steps.
Locate the D-ring closest to the door of the net. Thread one end of the cord through the lower eyelet
of the enclosure net above the D-ring and then thread the cord through the D-ring. Tie the enclosure
net to the D-ring, by making a double knot in the cord.
Thread the cord through the lower eyelet of the enclosure net halfway between the first D-ring and
the D-ring to right, and then thread the cord through to the right. Repeat this procedure until the
cord are threaded through the enclosure net.
Tie the cord to the last D-ring that is reaches. Make sure that the enclosure net is attached to every
D-ring on the trampoline mat.
ASSEMBLY INSTRUCTIONS
EN
VIRTUFIT PREMIUM TRAMPOLINE WITH SAFETY NET
17
ASSEMBLY INSTRUCTIONS
LADDER
Place the two frame legs (2) in a free space. Then place one of the ladder steps (1) on the bottom of
each frame leg. Then slide the step up to the top bolt holes of the legs and the steps. NOTE! Make
sure the diamond pattern of the stairs is facing up is targeted.
Insert two Bolts (4) through the Ladder Step (1) and Frame Legs (2). Then, tighten a Nut (3) to the
back of each Bolt with a Screwdriver (Q).
Repeat steps 1 and 2 to assemble the second ladder step.
Place the lower frame base (5) on to the ladder frame legs (2), making sure that the screw holes are
aligned.
Insert two short screws (6) through the Lower Frame base (5) and Frame Legs (2). Then, tighten each
Short Screw with a Screwdriver (Q).
Test the steps to ensure they are properly attached.
Find the net opening of your safety net. Lift your protective edge and transfer the hooks from the
ladder the curved frame of the trampoline. Pull out the ladder at the base of the trampoline to make
sure it hits the ground as far away from the trampoline frame as possible.
# DESCRIPTION QTY
1Ladder Step 2
2Frame Leg 2
3Nut 4
4Bolt 4
5Lower Frame Base 1
6Short Screw 2
EN
VIRTUFIT PREMIUM TRAMPOLINE WITH SAFETY NET
18
INSTRUCTIONS
Moving trampoline. If the trampoline and enclosure needs to be moved, it should be moved by two
persons at least, kept horizontal, and lifted slightly.
If necessary, the trampoline and enclosure can be taken for moving. To take the trampoline apart,
follow the assembly steps in reverse order.
If you need to move the trampoline, two people should be used at least.
All connector points should be wrapped secured with weather resistant tape, such as duct tape.
This will keep the frame intact during the move and prevent the connector points from dislocating
and separating.
When moving, lift the trampoline slightly of the ground and keep it horizontal to the ground. For any
type of other move, you should disassemble the trampoline.
MOVING THE TRAMPOLINE
EN
VIRTUFIT PREMIUM TRAMPOLINE WITH SAFETY NET
19
SEMI-ANNUAL MAINTENANCE
DAILY MAINTENANCE
Clean and remove sweat / moisture after each use. Do not use aggressive cleaning agents
Check that the trampoline is free from dust and dirt.
Inspect all bolts and nuts related to the trampoline, tighten as required.
MAINTENANCE
EN
VIRTUFIT PREMIUM TRAMPOLINE WITH SAFETY NET
20
BASIC SKILLS USING THE TRAMPOLINE






1. Start from a standing position with your head
upright and your eyes on the frame.
2. Swing your arms forward and raise in one circular
motion.
3. Bring your feet together and point your toes down
while in the air.
4. Keep your feet about 1 foot apart if you lands on
the bed.
BASE JUMP






1. Start jumping from a standing position, keeping
your eyes on the frame.
2. Land on your knees, keep your back straight and
your body upright.
3. Bounce back to an upright position.
KNEE JUMP






1. Start from a low jump and land on the jumping
mat in a prone position.
2. Keep your head up and extend your arms on the
front of the bed.
3. Push with your arms to return to one upright
position.
BELLY JUMP






1. Land in a sitting position with your legs parallel to
the jumping mat.
2. Place your hands on the jumping mat next to your
Hips.
3. Push with your hands to return to one upright
position.
SIT JUMP
BASIC TRAMPOLINE SKILLS
  • Page 1 1
  • Page 2 2
  • Page 3 3
  • Page 4 4
  • Page 5 5
  • Page 6 6
  • Page 7 7
  • Page 8 8
  • Page 9 9
  • Page 10 10
  • Page 11 11
  • Page 12 12
  • Page 13 13
  • Page 14 14
  • Page 15 15
  • Page 16 16
  • Page 17 17
  • Page 18 18
  • Page 19 19
  • Page 20 20
  • Page 21 21

VIRTUFIT 183*274 CM Premium Trampoline User manual

Type
User manual

Ask a question and I''ll find the answer in the document

Finding information in a document is now easier with AI