Page is loading ...

Metaltech is a registered trademark of Metaltech-Omega inc.
WWW.METALTECH.CO
LAVAL, QUEBEC, CANADA H7L 3N6
INPJALNAEN
OPERATIONAL SAFETY
AND ASSEMBLY INSTRUCTIONS
ENGLISH
ULTRA-JACK® SYSTEM
READ THESE INSTRUCTIONS CAREFULLY BEFORE USING THIS PRODUCT.
KEEP THIS MANUAL HANDY FOR FUTURE REFERENCE.
Pictures may differ from actual product
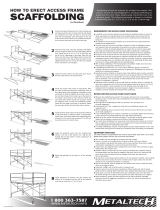
INSTRUCTIONS FOR THE INSTALLATION
ULTRA-JACK® SYSTEM
WARNING
CARE AND USE OF THE
ULTRA-JACK® SCAFFOLD SYSTEM
This product must be used in strict compliance with local,
national or OSHA legislation which applies.
GENERAL WORKSITE CONDITIONS
A) Insure worksite is free of construction debris.
B) Survey the work site for the location of power lines; contact electric
company for appropriate precautions. Never install this scaold system in
close proximity to power lines, as this aluminum scaold system will conduct
electricity.
C) Inspect all power tools and extension cords. Damaged tools and cords can
cause serious personal injuries.
EVALUATE AND PLAN WORK SITE LOCATION
A) Intended work area should not exceed 48 feet in height.
B) Plan location of poles. Distance between poles should correspond to the
type of walk planks being used. See section on choosing a walk plank.
C) Insure that poles rest securely on a firm foundation. Always use the most
appropriate pole accessory based on ground conditions.
CHOOSING SYSTEM COMPONENTS
A) Use only Ultra-Jack products as part of this system.
Do not use with other manufacturers’ pump jacks, poles or accessories.
B) Do not use with wood poles.
C) Always use Ultra-Jack Pole Braces (rigid triangular bracing) at top, bottom
and at points in-between as required, in accordance with these instructions
1) Prior to use, the user should inspect the
installation to insure that the system is
properly set up and ready to use.
2) Do not use equipment if wet or frozen.
3) Lubricate crank handle bushing
with one or two drops of all-purpose
lubricating oil as necessary. Keep
rubber surfaces clean of all lubricant.
Do not use spray-type lubricants.
4) Rubber surface should be cleaned
as necessary using a soft cloth and
Isopropyl Alcohol (rubbing alcohol).
5) An access ladder shall provide safe
access to and from the work platform.
6) Ultra-Jack Scaolding must not be
used over 48 feet o the ground.
7) There should never be more than
two people on an Ultra-Jack System
between any two poles.
8) Only one walk plank shall be supported
between any two poles.
9) Additional safety accessories such
as guardrails, mid-rails, toe-boards,
fall arrest harness systems must be
used as required by Federal OSHA
Regulations.
FAILURE TO UNDERSTAND AND FOLLOW
ALL SAFETY RULES AND ASSEMBLY
INSTRUCTIONS COULD RESULT IN
SERIOUS INJURY OR DEATH.
To prevent an unstable scaold that could
lead to serious personal injury:
• Use only Ultra-Jack products as part
of this system. Do not use with other
manufacturers’ pump jacks, poles or
accessories.
• Do not use with wood poles.
• Do not use above 48 feet.
• Poles must be secured with rigid triangular
steel bracing at top, bottom and at
points in-between in accordance with
instructions.
• Do not use without guardrails, mid-rails toe
boards, and or a fall-arrest system. OSHA
requires the user to have knowledge of all
regulations that apply to the use and care
of this product and that the employer must
provide training.
• This product must be used in strict
compliance with with local, national or
OSHA legislation which applies.
• Inspect all Ultra-Jack equipment before
and after each use. Be sure that there is
no damage or deformation to any of the
equipment.
• Inspect the rubber surface of the pole
before and after each use for worn or
damaged surface, replace if necessary
with Ultra-Jack replacement components.
• When joining two poles always inspect
splices to insure that there is no gap
between rubber surfaces.
CHOOSING A WALK PLANK
INSTALLATION OF THE ULTRA-JACK®
INSTALLATION OF BRAKE ASSEMBLY
B) Aluminum walk planks must have been
manufactured for that purpose and shall not
exceed 24 feet in length.
C) All walk planks shall be overlapped a minimum of 12 inches and secured from
movement except when using aluminum walk planks designed to be fastened
together. For this style walk plank the joint must be secured in place directly
over the Ultra-Jack support arm.
D) All scaold planks must extend no less than 6 inches and no more than 12
inches over the support arm.
E) OSHA regulations require that the platform be fully decked and that the
minimum width be 12 inches.
A) The Ultra-Jack should be installed
onto the Ultra-Jack
Aluminum/Rubber Pole prior
to installation of the pole to
the work wall. First place the
Aluminum/Rubber Pole on
the ground with the rubber
surface facing upward.
B) Slide the bottom of the pole
(exposed aluminum end) through
the top of the Ultra-Jack with the jack’s
platform retainer facing the ground. It may be
necessary to pump the stirrup as you move
the Ultra-Jack from the bottom of the pole.
C) Stop when the Ultra-Jack is approximately
1 foot up from the bottom of the pole.
A) Slide brake pedal rod through
square holes. The rod should go
through holes on both sides of the
brake mechanism.
METAL CONDUCTS ELECTRICITY:
Do not use this equipment where contact may be made
with power lines or other live electrical circuits.
SYSTEM COMPONENTS
ULTRAJACK
MODEL: PJPJAL
ULTRAJACK FT
POLE CONNECTOR
MODEL: PJC
ULTRAJACK ALUMINUM/
RUBBER POLE
FT MODEL: PJP
FT MODEL: PJP
FT MODEL: PJP
ULTRAJACK
WORKBENCH
MODEL: PJWBAL
ULTRAJACK ANTISLIP
POLE BASE
MODEL: PJPBAL
ULTRAJACK
POLE ANCHOR
MODEL: PJPAAL
ULTRAJACK BRACE
MODEL: PJBAL
A) Wood walk planks shall be made
of Scaold Grade or equivalent
lumber. When fabricated from
2-inch full thickness, undressed
lumber the maximum span
between supports shall not
exceed 9 feet. When fabricated
from 2-inch nominal thickness
lumber, the maximum span
between supports shall not
exceed 7 feet.
B) Slide the cotter pin through
the small hole at the end of the
brake pedal rod and bend as
indicated to prevent the rod
from sliding out of position.
Customer Service: 1 800 363-7587
Our customer service sta is available to help you. For help with product assembly, to report damaged or
missing parts, or for any other information about this product, please call our toll-free number.
KEEP THIS MANUAL FOR FUTURE REFERENCE
Keep this manual and the original sales invoice in a safe, dry place for future reference.
One Year Limited Warranty
Metaltech-Omega Inc. guarantees this product against any material defect. Please return this
product, freight prepaid, to Metaltech-Omega Inc. At its own discretion, Metaltech-Omega Inc.
will replace or repair this product and return it within a reasonable time. This warranty does
not cover any damage(s) caused by any incorrect or inappropriate use, care or maintenance.
Proof of purchase must accompany the return.
CAPACI T Y:
Pump jack scaolding should not carry
more than two people or 500 lb between
any two poles. This capacity considers
a 4:1 safety factor as required by OSHA
Standards when installed and used in
accordance with the instructions.
WHEN USED IN ACCORDANCE WITH
INSTRUCTIONS THIS PRODUCT MEETS
U.S. DEPARTMENT OF LABOR
O.S.H.A. REGULATIONS
OSHA
MEETS 1926.451
& 1926.452(J)
ANSI
MEETS 10.8-2019

ASSEMBLY OF THE ULTRA-JACK®
ALUMINUM/RUBBER POLE
A) To join two Ultra-Jack Aluminum/Rubber Poles together orientate both
poles so that the ends that provide a rubber surface that is even with the
cut end of the pole are being connected. Never join more than two poles
of any length together.
B) Assemble two Ultra-Jack Aluminum/Rubber Poles by inserting the
Ultra-Jack Pole Connector into one of the two Ultra-Jack Aluminum/
Rubber Poles so that the button locks engage into the holes located
approximately two inches in from the end of each pole. It will be
necessary to depress the button locks prior to inserting the Pole
Connector so that they can glide just inside the pole until reaching the
corresponding holes in the pole. Check to insure that the buttons snap
securely into the holes locking the connector into position.
C) Slide the second pole over the remaining exposed section of the Pole
Connector in the same way, insuring that the buttons snap into the holes
on the pole.
D) Inspect to insure that the rubber surfaces abut each other without a gap.
INSTALLING WALK PLANKS
A) Extend the platform arm of each Ultra-Jack to the
actual width of the walk platform and secure in
place by tightening the fasteners along the
side of the adjustable arm.
B) Place appropriate decking between two
Ultra-Jack System. See “Choosing a
Walk Plank”.
C) Walk planks should overhang the
Ultra-Jack platform arm not less than
6” and not more than 12” on either end.
When using more than two walk planks to
complete a system installation, overlap and
secure plank as required by OSHA.
D) Secure walk planks to each Ultra-Jack with the
chains attached to each platform arm, passing the chain over and under the
rungs and securing to the Ultra-Jack with the hardware provided. A padlock
may be used for added security.
E) Always erect the scaold system so that the working or standing platform is
level.
TO RAISE THE ULTRA-JACK® PLATFORM
A) Stand on the walk plank with the jack and pole in front of you. Lock the crank
handle by turning the handle until the spring lock engages. (see fig. #1)
B) Place your foot in the stirrup and pump slowly until the platform is raised
approximately 1 foot.(see fig. #2)
C) Repeat this procedure with other Ultra-Jacks. Always keep the work surface
level.
D) Lock the Jack by placing the stirrup in the “UP” position. (see fig #3)
TO LOWER THE ULTRA-JACK® PLATFORM:
A) With your back to the work wall, face the pole and raise the stirrup to
the “UP” position (see fig.#3)
B) Insure that the crank handle is in the locked position. (see fig. #1)
C) Holding onto the pole, place one foot on the square pedal of the lower
lock, press down and hold open. (see fig. #4)
D) Take hold of the crank handle pulling the arm out to
the right (see fig. #4) and begin turning the until the
work platform reaches the desired height.
Always keep work surface level.handle
until the platform begins to lower.
Continue lowering the platform for
approximately one foot.
E) Lock the Ultra-Jack by turning the
handle untilthe lock ring is seated and
the handle is no longer under spring
tension.(see fig. #4) Release the
square pedal to re-engage the lower
safety lock.
F) Repeat this procedure with the other Ultra-Jacks
A) When passing an Ultra-Jack Brace
that is already installed, an extra brace
should be installed approximately 4 feet
above the one to be passed until the
brace is reinstalled.
B) After installing the temporary brace,
loosen the wing nut and allow the brace
to be passed to swing clear of the pole.
Do not remove from the wall. After brace
has been passed, reconnect it to the
pole and remove the extra brace.
A) Begin installation of the workbench brackets by removing
the top bolt and roller assembly and bottom bolt.
(see fig #1)
B) Place each bracket (with the platform arm up and
pointing away from the work wall) over the pole just above the
Ultra-Jack. (see fig.#2 ) Re-install the upper roller bolt and lower
bolt assemblies so that each workbench bracket rides on top
of the Ultra-Jack and that the lower bolt goes through the top
connector plate of the Ultra-Jack. Re-install nut and cotter pin
on each bolt. (see fig.#3)
C) Install the workbench platform by first adjusting the
platform arm of the workbench to the width of the
platform and secure in place by inserting and tightening
the fasteners along the side of the adjustable arm.
D) Place the workbench platform on the platform arm.
E) Always erect the scaold system so that the working or
standing platform is level. Overlap each workbench platform
arm and secure in place. in the same manner as with the walk
planks.
E) The installation of a workbench does not substitute for the upper
guardrail as required by OSHA regulations.
F) Do not stand on the workbench or use it for any purpose other than
providing a work surface for tools and materials.
INSTALLING A
GUARDRAIL
SYSTEM
A) Install a guardrail
support arm to the walk
plank at each of the outside
corners and along the
length of the walk plank in
increments of 8 feet or less.
B) Install aluminum guardrails at both the top and mid-
rail holders for the full length of the walk platform and
secure in place.
C) Install toe boards along the length of the walk plank
and secure in place.
D) Install End rail System (top, mid-rail & toe boards) at each end of the work
platform.
E) See Walk Plank Manufacturer for additional instructions regarding guardrail
systems.
FALL PROTECTION
When working at heights above 4 feet
it is necessary to comply with all local,
national or OSHA regulations regarding
the use of fall protection equipment.
Always use guardrails, mid-rails, toe-
boards and/or a personal fall protection
harness system when using the Ultra-
Jack System.
D) Using a Ultra-Jack Brace, secure all poles to the work wall at the bottom and
the top of each pole, and at other points as necessary. For poles longer than
24 feet, install intermediate bracing every 12 feet. Poles must be plumb. The
rubber surface of each pole should face out from the work wall. The round
bar of the pole brace should be fastened to the work wall at right angle to
the pole. The angle of the bar should then be fastened to the right or left as
desired. Fasten using two 2 inch or longer #12 wood screws per fastening
plate. Always fasten to structural members; stud, rafter or joist. The spread
between the brace arms is 32 inches thus enabling installation on studs 16
inches on center.
INSTALLING THE ULTRA-JACK® ALUMINUM/RUBBER
POLES ALONG THE WORKING WALL OF THE BUILDING
A) Plan the location of each pole based on
the type of walk plank being used. Never
install with spans between poles greater
than those required by the type of walk
plank being used. Doing so could lead to
an unstable scaold system and serious
personal injury.
B) Do not install pole on unstable ground,
on top of other scaolds or on roof
surfaces. Inspect ground to insure that
the pole will rest on a firm level surface.
C) Use a Pole Anchor or Rubberized Base
Plate at the bottom of each pole. Pole
Anchors should be used when ground
conditions require the need to spread
the pole’s load over a wider area, such as
soft surface materials. When paved and/
or solid ground surfaces are present use
a Rubberized Pole Base. Insert Pole Base
or Anchor into the bottom of the pole so
that the button locks are fully engaged.
INSTALLING WORKBENCH
INSTRUCTIONS FOR USING THE ULTRA-JACK® SYSTEM
FIG #
FIG # FIG #FIG #
FIG #
FIG #
TO PASS AN ULTRA-JACK® BRACE
FIG #
/