
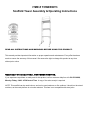
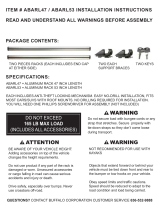
ITME # TOWERINT3
Scaffold Tower Assembly & Operating Instructions
READ ALL INSTRUCTIONS AND WARNINGS BEFORE USING THIS PRODUCT.
This manual provides important information on proper operation and maintenance. Every effort has been
made to ensure the accuracy of this manual. We reserve the right to change this product at any time
without prior notice.
Questions? Problems? CALL CUSTOMER SERVICE.
If you experience a problem or need parts for this product, call our customer help line at 1-636-532-9888,
Monday-Friday, 8 AM - 4 PM Central Time. A copy of the sales receipt is required.
NOTE: This scaffold can be used indoors, and can be used outdoors on flat surfaces. It should not be stored
outdoors, as the wood platform is not water resistant. This item is not compatible with stem jacks.

TOWERINT3 Scaffold Tower Assembly & Operating Instructions
2
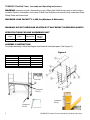
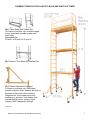
Figure A
Connector
Pin (F)
TOWERINT3 Scaffold Tower Assembly and Operating Instructions
WARNING: Improper erection, dismantling or use of Multi-Use Scaffold may result in serious injury
or death! Erectors, dismantlers, and users of Multi-Use Scaffold must read and fully understand these
Safety Rules and Instructions.
MAXIMUM LOAD CAPACITY: 1,000 lbs (Workers & Materials)
WARNING: DO NOT OVERLOAD SCAFFOLD! IT MAY RESULT IN SERIOUS INJURY!
SPECIFICATIONS FOR ONE ASSEMBLED UNIT
Total
Length
Total
Depth
Total Height
w/Guard Rail
Max
Standing
Height
74 5/8 in
97 in
20 feet
16.5 feet
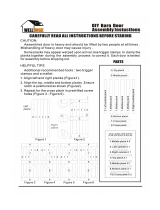
ASSEMBLY INSTRUCTION
For proper assembly, follow the diagram and locate all individual parts. (See Figure A)
Item
Part Name
Qty
A
Frame
2
B
Side Brace
2
C
Platform
1
D
Caster
4
E
Lock Pin
4
F
Connector Pin
8
Lock Pin
(E)
Connector
Pin (F)
Connector
Pin (F)

Scaffold Tower Assembly & Operating Instructions
3
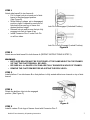
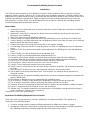
STEP 1
Attach side brace B to two frames A:
• Pull L-shape lock pin at each end of side
brace to the disengaged position.
(See Figure B)
• While holding L-shape pin in disengaged
position, place U-channel on each end of
side brace B around leg of frame A at
desired platform height.
• Release lock pin and be sure that pin fully
engages into hole in frame A leg
• Install Connector Pins F under Lock Pin
on all four sides.
Lock Pin Is Disengaged (Unlocked Position)
Lock Pin Is Fully Engaged (Locked Position)
Figure B
STEP 2
Attach second side brace B to both frames A (REPEAT INSTRUCTIONS IN STEP 1).
WARNING:
• BOTH SIDE BRACES MUST BE POSITIONED AT THE SAME HEIGHT ON THE FRAMES
SO THAT THE PLATFORM WILL BE LEVEL.
• BE SURE ALL 4 L-SHAPE LOCK PINS ARE FULLY ENGAGED IN HOLES OF FRAMES.
• REMOVE THE PLATFORM BEFORE ADJUSTING THE DECK LEVEL.
STEP 3
Install platform C on side braces B so that platform is fully seated within inner channel on top of side
braces.
STEP 4
Rotate the platform clips into the engaged
position. (See Figure C)
Figure C
STEP 5
Install 4 casters D into legs of frames A and with Connector Pins F.

TOWERINT3 Scaffold Tower Assembly & Operating Instructions
4
WARNING:
• RECHECK ALL SIDE BRACE LOCK PINS FOR FULL ENGAGEMENT BEFORE
ACCESSING PLATFORM.
• RECHECK PLATFORM TO BE SURE IT IS PROPERLY SEATED WITHIN SIDE BRACE
CHANNEL AND THE PLATFORM CLIPS ARE FULLY ENGAGED BEFORE ACCESSING.
• WHEN ACCESSING PLATFORM, CLIMB OVER TOP OF FRAME LADDER – DO NOT
SWING AROUND SIDE OF FRAME.
• REMOVE THE PLATFORM BEFORE ADJUSTING THE DECK LEVEL.
TYPICAL APPLICATIONS INCLUDE:
• Painting
• Overhead Door Installation
• Acoustical/Ceilings
• Lighting and wire Maintenance & Electrical
• Drywall installation & taping
• General Building Maintenance
• Window Cleaning & Treatment Installation
• HVAC Installation
• Sign Installation and Maintenance
• Shelving
DISMANTLING NOTES
The work of dismantling scaffolding should be under the supervision of an individual with proper
experience and aptitude. The following should be observed while dismantling:
1. It shall be the responsibility of the user to read and comply with the following common sense
guidelines that are designed to promote safety in the dismantling of scaffolding.
2. Check to see if scaffold has been structurally altered in any way that would make it unsafe; and, if
so, reconstruct where necessary before commencing with the dismantling procedures.
3. Dismantle scaffold from the top down. Begin by removing all accessories from that section being
dismantled at the time.
4. On stacked scaffolds do not remove ties and braces until dismantling has reached the section to
which they are attached.
5. Always work within the inside of the scaffolding.
6. When moving up or down the scaffold do NOT climb on ties, braces or un-braced components.
Climb over the top of the frame. Do not swing around outside of the frame.
7. Be sure that area below is clear of individuals not involved in the dismantling and is secured
against unauthorized access.
8. Lower scaffold components in a safe manner as they are dismantled. Avoid dropping or throwing
the components as this could result in injury or damage to the equipment.
9. Use energy absorbing lanyards and full body harness when feasible

Scaffold Tower Assembly & Operating Instructions
5
SCAFFOLDING SAFETY RULES
SERIOUS INJURY OR DEATH MAY RESULT FROM IMPROPER ERECTION OR USE of
scaffolding equipment. Erectors and users must be familiar with and follow safe practice and the
Safety Rules contained herein. These Safety Rules cover generalized situations only and should not
be used to replace any other additional safety and precautionary measures that may be necessary to
cover the many usual or unusual conditions encountered during installation or dismantling. The
Rules are not intended to conflict with, or supersede the requirements of OSHA or any other
governmental regulations, codes and ordinances; the user must refer to and comply with all such
specific provisions of law.
A. FOLLOW SAFE PRACTICE OF THE SAFETY RULES AND COMPLY WITH OSHA and all other
federal, state and local regulations, codes and ordinances pertaining to scaffolding during any use of
the equipment.
B. THE POTENTIALLY HAZARDOUS NATURE OF SCAFFOLDING ERECTION WORK makes it
important that all personnel assigned to this work be instructed in these Safety Rules, safe practices
and procedures and be under the supervision of an experienced and knowledgeable person. Assure
that these Safety Rules are posted and that all persons erecting and using the scaffold are aware of
and follow them.
C. REPORT ANY UNSAFE CONDITIONS TO SUPERVISORS. Do not work or allow persons to work
on scaffolds when sick or suffering from dizziness, unsteadiness or other physical symptoms which
could affect their ability to work safely.
D. INSPECT ALL EQUIPMENT BEFORE USING. Never use any equipment which is damaged,
defective or deteriorated in any way.
E. INSPECT ERECTED SCAFFOLD FREQUENTLY and be sure that they are maintained in safe
condition, that scaffold connections have not become loose and that components have not been
improperly released or removed.
F. MAINTAIN ALL EQUIPMENT IN GOOD REPAIR. Never use corroded or excessively rusted
equipment; the strength of such equipment is not known.
G. CONSULT YOUR SCAFFOLDING SUPPLIER WHEN IN DOUBT. NEVER TAKE CHANCES.
H. ALWAYS READ THESE SAFETY RULES in conjunction with the safety packet.
I. ALWAYS SUPPORT SCAFFOLDS FROM A SOUND, STABLE SURFACE and assure that it is
adequate to support the intended scaffold loads. Never support scaffolds on unstable, loose objects
which could tip, break or become dislodged.
J. LIFT AND LOWER COMPONENTS CAREFULLY AND SAFELY; use tag lines when appropriate
to the handling method. Never allow excessive quantities of components to be stockpiled on partially
complete scaffolds. Stock only sufficient components consistent with the progress of the work. Lower
dismantled components as soon as possible. Never drop components deliberately.

TOWERINT3 Scaffold Tower Assembly & Operating Instructions
6
K. TIEING THE SCAFFOLD TO THE STRUCTURE IS OF GREAT IMPORTANCE to the stability
and safety of the scaffold. Assure that the structure to which the scaffold is tied or anchored is
capable of safely supporting all loads imposed by the scaffold.
L. FREE STANDING SCAFFOLDS other than wall scaffolds must be restrained from tipping by
guying or other means, recognizing that stability is essential to the safety of the scaffold.
M. INSTALL GUARDRAILS, MIDRAILS, AND TOEBOARDS at all openings, open sides and ends of
every work platform when recommended or required.
N. NEVER USE LADDERS OR MAKESHIFT DEVICES on top of scaffold to increase the height.
Never place plank on or stand on guardrails and mid-rails.
O. POWER LINES NEAR SCAFFOLDS ARE DANGEROUS. Use extreme caution and consult the
power service company to have the lines de-energized, insulated or otherwise rendered safe.
Never allow any installation or use of scaffolds until this is done.
P. WHEN ANY CANTILEVERS ARE USED, such as brackets, etc., proper care and precautions
must be taken to prevent tipping of the scaffold.
Q. FOR ROLLING SCAFFOLDS, FOLLOW THESE ADDITIONAL SAFETY RULES:
a. Never ride rolling scaffolds.
b. Remove all material and equipment from the scaffold before moving.
c. Lock caster brakes at all times the scaffold is not being moved.
d. Do not attempt to move rolling scaffolds without sufficient help and roll on level surfaces only.
Watch out for holes or floor obstructions and for overhead obstructions, including power lines,
energized craneways, and other hazards.
e. The maximum platform height of a rolling scaffold must not exceed four (4) times the narrowest
dimension. Check local state/OSHA Regulations for other height/base limitations such as 3:1 in CA,
OH, OR, MT and ME; 3.5:1 in WA. Comply with these regulations by appropriately widening and /or
lengthening the scaffold at the lower levels so that the above proportions are not exceeded. If the
base dimensions cannot be increased, extreme care must be taken to secure the scaffold from
tipping; it must be guyed, or tied to a solid structure and maintained in a stabilized condition at all
times so that it cannot tip over while supporting persons, while being moved or while being erected or
dismantled.
f. Apply pulling or pushing forces at the bottom frames and as close to the scaffold base as possible.
Never attempt to move scaffold from on top.
g. If rolling scaffolds are used outdoors, care must be taken to assure that they cannot become
unstable due to wind or other conditions.
R. DO NOT OVERLOAD SCAFFOLD. Refer to and do not exceed the scaffold load capacities.

Scaffold Tower Assembly & Operating Instructions
7
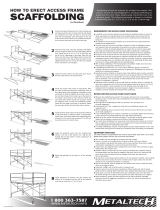
ASSEMBLE THREE SCAFFOLD UNITS TO BUILD ONE SCAFFOLD TOWER
(A) 1-Piece Guard Rail System Set
For interior or exterior use. Includes hinged
doors, steel frame, durable powder coat
paint finish.
Assembled size:
69 inch L x 39 inch H x 29 inch W
(B) 3-Pieces 6 Foot Multi-Use Scaffold Unit
(C) 4-Pieces Adjustable Outriggers
For interior or exterior use. Steel frame,
powder coat paint finish. Extends the width of
the base so that units can be stacked.
(Requires four 5 inch casters from first
scaffold unit, and four 5 inch casters from
second scaffold unit for a total of eight
casters.) With 9 adustment settings.
201903 ENG

Recommended Scaffolding Erection Procedure
Introduction
This Guide has been prepared by the Scaffolding, Shoring & Forming Institute to assist contractors, architects,
engineers, dealers, erectors, and users, etc. for the proper use of scaffolding equipment. Scaffolding Safety Rules
published by the Institute should be used in conjunction with this publication, as well as the instruction for the use of
scaffolding provided by the manufacturer. Safety precautions and requirements prescribed by local, state, and
federal agencies, including OSHA, must be followed at all times and persons working with scaffolding systems
should be equipped with requisite safety devices.
Nomenclature
1. Accessories-Those items other than the frames and braces used to facilitate the construction of scaffolding
towers and structures.
2. Adjustment Screws-Device composed of a thread screw and on adjusting handle used for the vertical
adjustment of the scaffolding.
3. Base Plate- A device used to distribute the leg load.
4. Climbing Ladders-A separate ladder attached to the scaffolding structure or built into the scaffold frame.
5. Casters- Wheels of a suitable dimension and unit designed to attach to the base of a tower and containing a
brake to prevent the wheels from rotation.
6. Coupling Pin-Device used to align and connect lifts or tiers together vertically.
7. Cross-bracing- Systems of members connecting frames or panels of scaffolding other than an adjustment
screw.
8. Extension Device- Any device used to obtain vertical adjustment of scaffolding other than and adjustment
screw.
9. Factor of Safety- The ratio of ultimate load to the allowable load.
10. Frame or Panel-The principal prefabricated, welded structural unit.
11. Guardrail-A rail secured to uprights and erected along the exposed sided and ends of platforms.
12. Horizontal Diagonal Bracing- Diagonal braces running horizontally between frames of scaffolding.
13. Lifts or Tiers- The number of frames stacked one above the other in a direction.
14. Locking Device- A device used to secure the cross brace to the panel.
15. Putlog or Truss-A separate horizontal load carrying member.
16. Rolling Towers- A composite structure of frames, braces, platforms, guardrails, and accessories supported
by casters.
17. Safe Leg Load- That load which can safely be directly imposed on a horizontal member.
18. Safe Scaffold Frame Horizontal Member Load- That load which can safely be directly imposed on a
horizontal member.
19. Scaffolding Layout- A engineered drawing prepared prior to erection showing arrangement of equipment for
proper scaffolding use.
20. Side Basket- A cantilevered arm unit supported by the scaffolding frame.
21. Sill or Mud Sill*- A footing, usually wood, which distributes the vertical leg loads to the ground.
22. Ties- A tension compression member used to securely attach scaffold to a structure.
23. Toeboard- A barrier secured along the sides and ends of a platform to guard against the falling of material.
24. Towers- A composite structure of frames, braces, and accessories.
25. Ultimate Load- The maximum load which may be placed on the scaffolding causing failure by buckling of
column members or yielding of some component.
*These terms can be used synonymously.
Inspection of Scaffolding Equipment Prior to Erection
Three main areas of inspection are for corrosion, straightness of members and welds. This applies to all
components of a scaffolding system.
1.
Corrosion- Heavily rusted or eroded scaffolding equipment is a telltale sign of abuse or neglect.
2. Straightness of Members- Mishandling, trucking and storing may cause damage to scaffolding equipment.
All scaffolding components should be straight and free from bends, kinks or dents.

3. Welds- Equipment should be checked before use for damage of welds and any piece of equipment showing
damaged welds or rewelding beyond the original factory welds should not be used. The factory weld
reference pertains to location and quality of welds.
While corrosion, straightness of members, and welds are of primary concern other component parts should
be checked.
4. Locking devices on frames and braces shall be in good working order, and if not, must be repaired or
replaced prior to use.
5. Coupling pins must effectively align the frame or panel legs.
6. Pivoted cross braces must have the center pivot securely in place.
7. Caster Brakes shall be in good working order and if not must be repaired or replaced prior to use.
Safe Bearing Loads For Soils
Considering that the allowable loads (bearing) on various soils and rock range from less that 1,000 p.s.f. to more
than 50,000 p.s.f. care should be exercised in determining the capacity of the soil for every scaffolding job, realizing
that weather conditions can turn an otherwise suitable ground condition into a hazardous situation. As an example,
dry clay with an allowable bearing capacity of 8,000 p.s.f. could become very plastic after a rainfall and drop to less
than 2,000 p.s.f.
Care should also be taken not to excessively disturb the soil. If fill is required in areas where scaffolding is used, a
qualified engineer should be consulted as to materials and compaction.
Foundations
The purpose of a good foundation or mud sill is to distribute the scaffolding load over a suitable ground area. The
size of the footing or sill is determined be the total load carried over a particular ground area, and by the nature of
the soil supporting these sills.
The total load should be computed and the sills designed accordingly.
When scaffolding from earth fill, the areas should be leveled and the sills spaced in a pattern assuring adequate
stability for all scaffolding legs.
Erection of Frames
The work of erecting the scaffolding should be under the supervision of a person with proper experience and
aptitude for securing a safe installation and who is familiar with all Local, State and Federal Regulations concerning
scaffolding as well as the SSFI Scaffolding Safety Rules.
It shall be the responsibility of the person supervising the erection of the scaffold to see that all components and
locking devices are in working order, and no damaged or deteriorated equipment is used in the setup. Should any
scaffolding become damaged after the equipment has been erected, Workman shall not be allowed on the same
until the damaged items have been repaired or replaced.
Advance planning will help the erection of scaffolding to progress smoothly. The equipment should be unloaded as
close to the area of use as possible and should be arranged in the order it is to be used in the setup. Adjustment
screws should be set to the approximate final adjustment before setting up the scaffolding. Check that all coupling
pins are matched with the proper panels. Consult safety rules as recommended by the Institute.
After erecting the first tier of scaffold frames, plumb and level (using instruments) all frames so that no matter how
high the final scaffolding setup, the additional frames will also be in correct alignment.
As erection proceeds, securely tie all scaffolding to the structure at the ends and at least every 30’ horizontally, and
at height intervals not to exceed * four (4) times the minimum base dimension. Freestanding scaffold towers must be
restrained from tipping by guying or other means. Scaffold frames must be fastened together at coupling pins where
there is a possibility of uplift.
When scaffolds are to be partially or fully enclosed, specific precautions must be taken to assure frequency
adequacy of ties attaching the scaffolding to the building due to increased load conditions resulting from effects of

wind and weather. The scaffolding components to which the ties are attached must also be checked for additional
loads.
When erecting additional lifts, always work from planking within the scaffold structure. Move planking as erection
progresses.
Planking and Accessories
Use only lumber that is properly inspected and graded for use as scaffold plank.
Planking shall have at least 12” of overlap and extend 6” beyond center of support or be cleated at both ends to
prevent sliding off support. Do not allow unsupported ends of plank to extend beyond supports. Secure plank to
scaffolding when necessary.
All scaffold accessories shall be used and installed in accordance with the manufacturer’s recommended
procedures. Accessories shall not be altered in the field.
When installing hanger or clamp supported putlogs (trusses), care should be taken to see that they extend 6”
beyond the point of support. Also, make sure that the proper bracing is placed between the putlogs (trusses). When
the span between supporting members is more that 12’ additional bracing between the putlogs (trusses) and the
supporting member may be required. Do not cantilever or extend putlogs (trusses) as side brackets without
thorough consideration for the loads to be applied or transmitted to the scaffold. When clamping putlogs, clamp
capacity may control rather than putlog capacity. Consult scaffold manufacturer.
All brackets should be seated correctly with side brackets parallel to the frames and the end brackets at 90 degrees
to the frame. Brackets shall not be bent or twisted from normal position.
Equip all planked or staged areas with proper guard rails and add toeboards when required.
Final and Daily Inspection of Erected Scaffolding
The following is a list of check points to be covered when making a final and daily inspection of scaffolding prior to
use. All points should be carefully checked to insure a safe and accident-free job and be periodically rechecked.
1. Check to see that there is proper support under every leg or every frame on the job. Check also for possible
washout due to rain.
2. Check to make certain that all base plates and adjustment screws are in firm contact with their supports. All
adjustment nuts should be snug against the legs of the frame.
3. Frames should be checked for plumbness in both directions.
4. If there is a gap between the lower ends of one frame and the upper end of another frame it indicates that
one adjustment screw must be adjusted to bring the frames in contact. If this does not help it indicates that
frame is out of square and should be replaced.
5. Each leg of the frame should be cross braced to the corresponding leg of the next frame.
6. While checking the cross braces also check the locking devices to assure that they are all in their closed
position or that they are all tight.
7. Check to be certain that all planking and accessories are properly installed.
8. Check to make certain all ties are secured between the structure and the scaffolding.
9. Check to be certain all guard rails are in place.
10. If scaffolding is enclosed, check to see that additional precautions have been taken as noted in the “Erection
of Frame” section. Recheck periodically ties, clamps, etc., for movement.
11. Insure that safe access to work platforms(s) is provided.
Dismantling of Scaffolding
The work of dismantling scaffolding should be under the supervision of an individual with proper experience and
aptitude. The following should be observed while dismantling.
1. Check to see if scaffolding has been structurally altered in any way which would make it unsafe, and if so
reconstruct where necessary before commencing with the dismantling procedure.

2. Dismantle scaffold from the top down. Begin by removing all accessories from that lift being dismantled at
the time.
3. Always work from a minimum of two planks placed on the tier of frames below those being removed. Move
the planking down as dismantling progresses.
4. Do not remove ties until dismantling has reached the tier to which they are attached.
5. Always stay within the inside of the scaffold. Do not climb on the outside for any reason when dismantling.
Do not climb on ties, braces or unbraced frames.
6. Only remove fastening devices from bottom of frames being removed.
7. Lower scaffolding components in a safe manner as they are dismantled. Avoid dropping or throwing the
components as this could result in damage to the equipment, or injury to personnel below.
Erection of Rolling Towers
When erecting rolling scaffolding towers, the following additional items apply. These items are in addition to the
application portions of the preceding section.
1. Caster should be of adequate load capacity and size in relation to the height of the tower, the surface over
which the tower is to be used and in accordance with all government, state, and local codes, ordinances and
regulations.
Casters with plain stems shall be attached to the panel or adjustment screw by pins or other suitable means.
2. Do not extend adjusting screws on rolling towers more that 12”.
3. The platform height shall not exceed * four (4) times the smallest base dimension unless guyed or otherwise
stabilized.
4. Horizontal diagonal braces should be used near the bottom, top and 20’ intervals measured from the rolling
surface.
5. When side brackets are used, consideration should be given to the overturning effect these brackets will
have upon the stability of the tower.
6. Cross brace both sides of every lift.
7. Install guardrails.
8. Plank according to the “Plank and Accessories” section.
* Exceptions: Three times in California, Ohio, Oregon, Montana, Maine; 3.5 times in Washington.
Final Inspection of Rolling Towers
The following additional points should be checked when making a final inspection of rolling towers prior to their use.
These points are in addition to the applicable times covered under the preceding section entitled. “Erection Of
Rolling Towers”
1. Check to see that the platform height does not exceed* four (4) times the smallest base dimension unless
the tower is properly guyed or otherwise stabilized.
2. Check to see that, if adjusting screws have been used, they are not extended more than 12”.
3. Check to make sure the caster brakes are in good working condition and are applied when tower is not
being moved.
4. Inspect to make sure horizontal diagonal bracing has been placed near the bottom, top, and 20’ intervals
measured from the rolling surface. A hook on manufactured platform properly attached to the top frame may
be equivalent to the top horizontal diagonal brace.
5. Cross bracing had been installed on both sides of every lift.
6. Check the area in which the tower is to be used to insure there are no obstructions either in, on, or above
the floor which will interfere with the proper and safe use of the rolling tower.
7. Check for guardrails.
8. Check to see that all planks and fabricated platforms are properly installed.
9. Insure that safe access to work platforms(s) is provided.
Refer to “Scaffolding, Shoring & Forming Institute Scaffolding Safety Rules” before using scaffolding.
The procedures outlined in this guide described conventional procedures for erecting and dismantling scaffolding
systems. However, equipment and systems differ and, accordingly, reference must always be made to the
instructions and procedures of the manufacturer or supplier of the equipment. Since field conditions vary and are
beyond the control of the Institute and its members, safe and proper use of this equipment is the responsibility of the
user and not the Institute or its members.
-
 1
1
-
 2
2
-
 3
3
-
 4
4
-
 5
5
-
 6
6
-
 7
7
-
 8
8
-
 9
9
-
 10
10
-
 11
11


Ask a question and I''ll find the answer in the document
Finding information in a document is now easier with AI
Related papers
-
Buffalo GSBP Owner's manual
-
PRO-SERIES 803051 User guide
-
-
-
-
-
-
-
-
 Pro-Series by Buffalo Tools 550511 User manual

Other documents
-
Buffalo GSAL6 Owner's manual
-
Sunnydaze Decor LY-HCS-OS-COMBO Installation guide
-
 ScaffoldMart UTLSCAFF3 Owner's manual
-
 WELLHOME DR-WZ36-B User manual
-
 WELLHOME DR-WB36-C User manual
-
 MetalTech M-MLS User manual
-
Kmart 42579922 User manual
-
 MetalTech M-MBSJP24HK4 User manual
-
MetalTech M-MFS606084AK3 User manual
-
MetalTech M-MAS8036ATLW1 User manual


