Page is loading ...

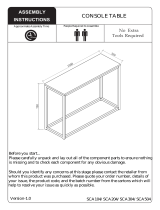
Orion Triple Sleeper
Product Code - ORI501/ORI502/ORI503/ORI504/ORI505
Approximate Assembly Time People Required to Assemble Tools Required
1hr
ASSEMBLY
INSTRUCTIONS
ASSEMBLY
INSTRUCTIONS
Before you start...
Please carefully unpack and lay out all of the component parts to ensure nothing
is missing and to check each component for any obvious damage.
Should you identify any concerns at this stage please contact the retailer from
whom this product was purchased. Please quote your order number, details of
your issue, the product code, and the batch number from the cartons which will
help to resolve your issue as quickly as possible.
Version Number - 1.0
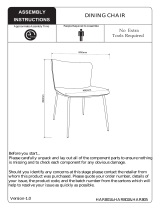
1966mm
1708mm
1684mm

Page : 2 of 29

Page : 3 of 29
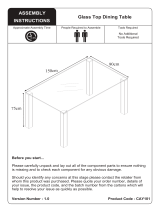
We strongly advise that you do not use Power Tools, such as
drills or electric screwdrivers during the assembly as this may
cause irreparable damage and will invalidate your warranty.
Please check all hardware matches the list below. Should
you notice any are missing please contact your retailer.
63CS 67PCS 4PCS 116PCS
Cam Stud Cam Contractfix Dowel M8 x 25mm
9PCS
M6 x 45mm
ABCD E
FG H K L
28PCS 7PCS
M4 x 45mm M4 x 38mm
40PCS
M3.5 x 14mm
20PCS
M6 x 13mm
4PCS
M6 Round Nut
MN P QR
8PCS 14PCS 26PCS
M6 x 60mm M6 x 50mm
10PCS
M6 x 35mm
62PCS
M6 x 30mmM6 x 40mm

4PCS
Hole Plug 10mm
Z
20PCS
Felt Pads 32PCS
Sticker
1PCS
Metal Plate
X
2PCS
Round Stopper
W
8PCS
L Braket 2PCS
M4
Y
Page : 4 of 29
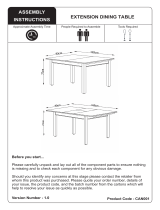
We strongly advise that you do not use Power Tools, such as
drills or electric screwdrivers during the assembly as this may
cause irreparable damage and will invalidate your warranty.
Please check all hardware matches the list below. Should
you notice any are missing please contact your retailer.
1PCS 17PCS8PCS
M6 x 25mm M6 x 12mm M6
ST UJ
4PCS
Castor
Z1 Z2 V

30 x4
02
04
01
03
07
08
09
10
13
14
15
16 17
18
19
20
21
06
05
03
02
04
25
03
05
03
10
12
22
23
24
26
27
28
29
31 x4
32
33
33
LVL Slat (Short) x15
11
34 x4
PARTS
Please ensure you carefully check all the pieces, should you have any
concerns please contact the retailer before assembly commences.
Please have your order number, details of the issue, the product code,
and the batch number from the cartons as this will help us to resolve
your issue much faster.
Page : 5 of 29
LVL Slat (Long) x15

IMPORTANT INFORMATION
WARNING - High Beds and the upper bed of bunk beds are not suitable for children under
six years due to the risk of injury from falls.
WARNING - Bunk beds and high beds can present a serious risk of injury from
strangulation if not used correctly. Never attach or hang items to any part of the bunk bed
that are not designed to be used with the bed, for example, but not limited to ropes, st rings,
cords, hooks, belts and bags.
WARNING - Children can become trapped between the bed and the wall, a roof pitch, the
ceiling, adjoining pieces of furniture (e.g.cupboards) and the like. To avoid risk of serious
injury the distance between the top safety barrier and the adjoining structure shall not
exceed 75mm or shall be more than 230mm.
WARNING - Do not use the bunk bed / high bed if any structural part is broken or missing.
It is recommended that you always follow the manufacturer's instructions to assemble this
product.
Always follow the manufacturer's recommended mattress size, as per these instructions and
the bunk bed / high bed maximum mattress height marking on the item:
Recommended Mattress Size: 90cm x 190cm (UK Single) with Maximum Depth of 17.0cm
It is necessary to frequently ventilate the room in order to keep the humidity low and to
prevent mold in and around the bed.
Please periodically check all the fixings of the item and re-tighten when necessary.
This item conforms to European Safety Standards - BS EN 747-1: 2012 + A1: 2015.
Page : 6 of 29

Safety Advice
Please take the time to carefully read through the whole of these instructions before you
commence.
Keep these instructions for future reference.
Unpack, inspect and check off all of the contents.
Please dispose of all packaging safely.
Small component parts could choke a child if swallowed.
We strongly recommend that you keep children well away from the work area.
It would be sensible to lay a sheet or blanket on the floor where you intend to work to
avoid scratching this product and to protect your floor.
This product is heavy. Take extreme care when lifting to avoid personal injury or damage
to the product.
Assemble the product as close to its intended final position in the room as possible.
Please check the contents of boxes before attempting to assemble this product. A full
checklist of parts and fittings is given in page 5 of this instruction leaflet.
HANDY HINT: If you keep the hardware in a bowl during assembly you will be less
likely to lose them.
Page : 7 of 29
170.8cm
196.6cm
168.4cm

ASSEMBLY ADVICE
Please take the time to carefully read through these instructions
before you commence.
Keep these instructions for future reference.
We advise that the product is assembled in the room it is intended for.
We advise that you keep the hardware in a bowl during assembly to
avoid losing anything.
We strongly recommend that you keep children away from the work
area.
Small component parts could choke a child if swallowed.
We recommend you use a sheet or blanket to protect both floor and
product through the assembly stages.
This product is heavy, and we recommend a 2 person lift to avoid
personal injury or damage to the product.
Never push or pull the product as this could cause both personal injury
or irreparable damage to product or floor.
We have tried to make this piece of furniture easy to assemble if the
instructions are followed carefully.
In the unlikely event that you have problems with assembling the
product or have missing or damaged parts, please contact your
retailer and we will assist them in rectifying the problem as quickly as
possible.
Please remember we strongly urge you DO NOT use power tools such
as drill or electric screwdrivers as this could cause irreparable damage
to your product and will invalidate your warranty.
Page : 8 of 29

1
WHEN FITTING CAMS
ENSURE STARTING POSITION IS CORRECT
BEFORE YOU INSERT CONNECTING BOLT
TURN CLOCKWISE UNTIL SECURE
WRONG
CORRECT
Page : 9 of 29
03 x4
A
B x 19
D x 44
A x 10
D
01
02 x2
04 x2

2
Page : 10 of 29
05
B x 11
D x 16
D
05
25

3
Page : 11 of 29
4
5 6
F x 8
F x 10 F x 10
Do This Step 2 Times Do This Step 2 Times
x 2
03
03
04
F
F
F
F
02
05
F
F
F
F
F
F
F
F
F
F
F
F
F
F
F
F
F
F
F
F
05

7
Page : 12 of 29
x 3
8
x 3
25
02
01
02

9
Page : 13 of 29
A x 28
06
K x 4
C x 4
K
K
C
K
C
C
C
K
Z1 x 8
Z1
Z1
Z1
Z1
Z1
Z1
Z1
Z1
07
11
19

10
Page : 14 of 29
B x 20
D x 28
08
WHEN FITTING CAMS
ENSURE STARTING POSITION IS CORRECT
BEFORE YOU INSERT CONNECTING BOLT
TURN CLOCKWISE UNTIL SECURE
WRONG
CORRECT
Z1 x 4
Z1
Z1
Z1
Z1
D
18
26
27
28
29

11
Page : 15 of 29
25
12 H x 32
X x 8
x 20
01
07
06
USE PRE - DRILLED
HOLES IN PART 01,25
12.1
12.2
X
HH
H
H
25
01

13
Page : 16 of 29
A x 8
30
Q
14 Q x 10
U x 6
Z x 2
A
A
A
A
A
A
A
A
U
Q
U
Q
U
Q
U
Q
U
Q
U
Q
Q
Q
Q
Z
Z
30

15
Page : 17 of 29
Z2
16
28
Z2 x 8
x 10
11
08
26
Z2
Z2
Z2
Z2
Z2
Z2

17
Page : 18 of 29
18 Z2 x 8
10 x
29
Z2
Z2
Z2
Z2
Z2
Z2
Z2
19
27
18
Z2

19
Page : 19 of 29
20
21
K x 4
E x 9
16 17
E
K
K
T x 4
V x 1
T
16
17
T
T
T
V

22
Page : 20 of 29
23
15
L x 2
N x 6
L
L
N
N
N
N
K x 4
N
N
Z1 x 4
K
K
K
K
Z1
Z1
Z1
Z1
/