Page is loading ...

27" (69CM) ELECTRIC LAUNDRY CENTER
INSTALLATION INSTRUCTIONS
INSTRUCCIONES DE INSTALACION PARA ELCENTRO
DE LAVANDER|A ELI CTRICO DE 27" (69CM)
Table of Contents/indice
WASHER/DRYER SAFETY .............................. 1
INSTALLATION INSTRUCTIONS .................... 2
Tools and Parts ............................................. 2
Alternate Parts ............................................... 2
Location Requirements ................................ 2
Drain System ................................................. 4
Electrical Requirements ................................ 4
Electrical Connection .................................... 6
Venting Requirements ................................. 11
Remove Shipping Strap .............................. 12
Install Leveling Legs .................................... 12
Connect the Drain Hose .............................. 12
Connect the Inlet Hoses .............................. 13
Secure the Drain Hose ................................ 14
Plan Vent System ........................................ 14
Install Vent System ...................................... 15
Level Laundry Center .................................. 15
Connect Vent ............................................... 15
Complete Installation .................................. 16
SERVICE NUMBERS ................. BACK COVER
SEGURIDAD DE LA LAVADORA/SECADORA.. 17
INSTRUCCIONES DE INSTALACION ................ 17
Herramientas y piezas ...................................... 17
Piezas altemativas ............................................ 18
Requisitos de ubicacion .................................. 18
Sistema de desagQe ....................................... 19
Requisitos el_ctricos ......................................... 19
Conexi6n el_ctrica ............................................. 21
Requisitos de ventilacion ................................... 26
Quite el fleje de embalaje ................................... 27
Instalacion de las patas niveladoras .................. 27
Conecte la manguera de desagQe ................... 27
Conecte las mangueras de entrada .................. 28
Fijacion de la manguera de desagLie ................ 29
Planificaci6n del sistema de ventilaci6n ........... 29
Instalacion del sistema de ventilaci6n .............. 30
Como nivelar el centro de lavanderia ............... 31
Conexi6n del ducto de escape ......................... 31
Complete la instalaci6n .................................... 31
NUMEROS DE SERVICIO ......CONTRAPORTADA
WASHER/DRYER SAFETY
Your safety and the safety of others are very important.
We have provided many important safety messages in this manual and on your appliance. Always read and obey all safety
messages.
This is the safety alert symbol.
This symbol alerts you to potential hazards that can kill or hurt you and others.
All safety messages will follow the safety alert symbol and either the word "DANGER" or "WARNING."
These words mean:
You can be killed or seriously injured if you don't immediately
follow instructions.
You can be killed or seriously injured if you don't follow
instructions.
All safety messages will tell you what the potential hazard is, tell you how to reduce the chance of injury, and tell you what can
happen if the instructions are not followed.
8576660

INSTALLATION INSTRUCTIONS
Gather the required tools and parts before starting installation.
Read and follow the instructions provided with any tools listed
here.
Tools needed:
#2 Phillips and flat-blade
screwdriver
Adjustable wrench that
opens to 1" (2.5 cm) or
9/16"open-end wrench (for
adjusting laundry center
feet)
1/4"nut driver or socket
wrench (recommended)
Wire stripper (for direct
wire installations)
Tin snips (for new vent
installations)
• Wood block(for leveling)
• Caulking gun and
compound (for installing
new exhaust vent)
• Level
• Knife
• Vent clamps
• Pliers
• Scissors
• Ruler or measuring tape
Parts supplied:
Remove parts package from the washer basket. Check that all
parts were included.
Parts listed are available from your local Sears store or Sears
Service Center. For further information, please caU
1-800-4-MY-HOME® (1-800-469-4663).
If You Have You Will Need to Buy
Laundry tub or Sump pump system (if not already
standpipe taller than available)
96" (2.4 m)
1" (2.5 cm) diameter 2" (5 cm) diameter to 1" (2.5 cm)
standpipe diameter standpipe adapter, Part
Number 3363920
Overhead sewer Standard 20 gal. (76 L) 34" (86.4 cm)
tall drain tub or utility sink and sump
pump (available from local plumbing
suppliers)
Floor drain Siphon break, Part Number 285320,
additional drain hose, Part Number
285702 and connector kit,
Part Number 285442
Drain hose too short Drain hose, Part Number 285664 and
connector kit, Part Number 285442
Lint clogged drain Drain protector, Part Number 367031
Water faucets 2 longer water fill hoses:
beyond reach of fill 6 ft (1.8 m) Part Number 76314,
hoses 10 ft (3.0 m) Part Number 350008
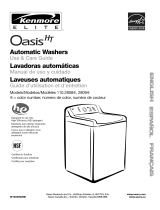
D
A. Water inlet hoses (2)
B. Inlet hose flat washers (4)
C. Front leveling feet with nuts (2)
D. Shipping strap (not in parts bag. See
"Remove Shipping Strap. ")
E.Drain hose
F. Yellow, single wire hose clamp
G. Silver, double-wire hose clamp
Parts needed:
Check local codes, electrical supply and venting, and read
"Electrical Requirements" and "Venting Requirements" before
purchasing parts.
Mobile home installations require metal exhaust system hardware
available for purchase from your local Sears store or Sears
Service Center. For further information, please call
1-800-4-MY-HOME ®(1-800-469-4663).
Explosion Hazard
Keep flammable materials and vapors, such as
gasoline, away from dryer.
Failure to do so can result in death, explosion, or fire.
You will need
• A location that allows for proper exhaust installation. See
"Venting Requirements."
• A separate 30-amp circuit.
• A grounded electrical outlet located within 2 ft (61 cm) of
either side of the laundry center. See "Electrical
Requirements."
• A sturdy floor to support the laundry center weight (laundry
center, water and load) of 500 Ibs (226.8 kg).

• Alevelfloorwithamaximumslopeof1"(2.5cm)underentire
laundrycenter.Clothesmaynottumbleproperlyand
automaticsensorcyclesmaynotoperatecorrectlyiflaundry
centerisnotlevel.Installingoncarpetisnotrecommended.
• Awaterheatersettodeliver120°F(49°C)watertothe
washer.
• Hotandcoldwaterfaucetslocatedwithin4ft(1.2m)ofthe
hotandcoldwaterfillvalves,andwaterpressureof5-100psi
(34.5-689.6kPa).
Thelaundrycentermustnotbeinstalledorstoredinanarea
whereitwillbeexposedtowaterand/orweather.
Donotoperateyourwasherintemperaturesatorbelow32°F
(0°C).Somewatercanremaininthewasherandcancause
damageinlowtemperatures.See"LaundryCenterCare"inthe
LaundryCenterUserInstructionsforwinterizinginformation.
Donotoperateyourdryerattemperaturesbelow45°F(7°C).At
lowertemperatures,thedryermightnotshutoffattheendofan
automaticcycle.Thiscanresultinlongerdryingtimes.
Checkcoderequirements.Somecodeslimit,ordonotpermit,
installationofthelaundrycenteringarages,closets,mobile
homesorsleepingquarters.Contactyourlocalbuilding
inspector.
Installation Clearances
The location must be large enough to allow the dryer door to
open fully.
Laundry Center Dimensions
71%"
1181.9 cm)
27"
(68.6 cm)
*Most installations require a minimum 51/2'' (14 cm) clearance
behind the dryer for the exhaust vent with elbow. See "Venting
Requirements."
Minimum installation spacing for recessed area or closet
installation
The following dimensions shown are for the minimum spacings
allowed.
• Additional spacing should be considered for ease of
installation and servicing.
• Additional clearances might be required for wall, door and
floor moldings.
• For closet installation, with a door, minimum ventilation
openings in the top and bottom of the door are required.
Louvered doors with equivalent ventilation openings are
acceptable.
• Rear clearance may be 1" (2.5 cm) when house exhaust
system is lined up directly with dryer exhaust.
A
m
m
o°°oO
II I
B
l
÷1
(68.6ore)
±
+ 05.2cr.) ]
48in.z -1
(310cm21 I
24in.2-]
(155cm2) I
m
H
27" 31"q 2"1 Is%2"
(2.5cm) (2.5cm) (2.5cm) (81.3cm) (14cm)
C
+
3 _
(7.6crn)
A. Recessed area
B. Side view - closet or confined area
C. Closet door with vents
Mobile Home - Additional Installation Requirements
This laundry center is suitable for mobile home installations.
The installation must conform to the Manufactured Home
Construction and Safety Standard, Title 24 CFR, Part 3280
(formerly the Federal Standard for Mobile Home Construction
and Safety, Title 24, HUD Part 280).
Mobile home installations require:
• Metal exhaust system hardware, which is available for
purchase from your local Sears store or Sears Service Center.
• Special provisions must be made in mobile homes to
introduce outside air into the dryer. The opening (such as a
nearby window) should be at least twice as large as the dryer
exhaust opening.

Thelaundrycentercanbeinstalledusingthestandpipedrain
system(floororwall),thelaundrytubdrainsystem,orthefloor
drainsystem.Selectthedrainhoseinstallationmethodyouneed.
See"AlternateParts."
Standpipe drain system - wall or floor (views A & B)
The standpipe drain requires a minimum diameter standpipe of
2" (5 cm). The minimum carry-away capacity can be no less than
17 gal. (64 L) per minute. A 2" (5 cm) diameter to 1" (2.5 cm)
diameter standpipe adapter kit is available. See "Alternate Parts."
The top of the standpipe must be at least 39" (99 cm) high and no
higher than 96" (2.4 m) from the bottom of the washer.
Laundry tub drain system (view C)
The laundry tub needs a minimum 20 gal. (76 L) capacity. The top
of the laundry tub must be at least 34" (86.4 cm) above the floor
and no higher than 96" (2.4 m) from the bottom of the washer.
Floor drain system (view D)
The floor drain system requires a siphon break that may be
purchased separately. See "Alternate Parts."
The siphon break must be a minimum of 28" (71 cm) from the
bottom of the washer. Additional hoses might be needed.
D
It is your responsibility
• To contact a qualified electrical installer.
• To be sure that the electrical connection is adequate and in
conformance with the National Electrical Code, ANSI/NFPA
70-latest edition and all local codes and ordinances.
A copy of the above code standards can be obtained from:
National Fire Protection Association, One Batterymarch Park,
Quincy, MA 02269.
• To supply the required 3 or 4 wire, single phase, 120/240 volt,
60 Hz., AC only electrical supply (or 3 or 4 wire, 120/208 volt
electrical supply, if specified on the serial/rating plate) on a
separate 30-amp circuit, fused on both sides of the line. A
time-delay fuse or circuit breaker is recommended. Connect
to an individual branch circuit. Do not have a fuse in the
neutral or grounding circuit.
• Do not use an extension cord.
• If codes permit and a separate ground wire is used, it is
recommended that a qualified electrician determine that the
ground path is adequate.
Electrical Connection
To properly install your laundry center, you must determine the
type of electrical connection you will be using and follow the
instructions provided for it here.
• This dryer is manufactured ready to install with a 3-wire
electrical supply connection. The neutral ground wire is
permanently connected to the neutral conductor (white wire)
within the dryer. If the dryer is installed with a 4-wire electrical
supply connection, the neutral ground wire must be removed
from the external ground connector (green screw), and
secured under the neutral terminal (center or white wire) of
the terminal block. When the neutral ground wire is secured
under the neutral terminal (center or white wire) of the
terminal block, the dryer cabinet is isolated from the neutral
conductor.
• If local codes do not permit the connection of a neutral
ground wire to the neutral wire, see "Optional 3-wire
connection" section.
• Use a 4-wire conductor cord when the dryer is installed in a
mobile home or an area where local codes do not permit
grounding through the neutral.
If using a power supply cord:
• Use a UL listed power supply cord kit marked for use with
clothes dryers. The kit should contain:
• A UL listed 30-amp power supply cord, rated 120/240 volt
minimum. The cord should be type SRD or SRDT and be at
least 4 ft (1.22 m) long. The wires that connect to the dryer
must end in ring terminals or spade terminals with upturned
ends.
• A UL listed strain relief.

If your outlet looks like this:
4-wire receptacle (!4-30R)
Then choose a 4-wire power supply cord with ring or spade
terminals and UL listed strain relief. The 4-wire power supply
cord, at least 4 ft (1.22 m) long, must have four 10-gauge copper
wires and match a 4-wire receptacle of NEMA Type 14-30R. The
ground wire (ground conductor) may be either green or bare. The
neutral conductor must be identified by a white cover.
If your outlet looks like this:
3-wire receptacle (10-30R)
Then choose a 3-wire power supply cord with ring or spade
terminals and UL listed strain relief. The 3-wire power supply
cord, at least 4 ft (1.22 m) long, must have three 10-gauge copper
wires and match a 3-wire receptacle of NEMA Type 10-30R.
If connecting by direct wire:
Power supply cable must match power supply (4-wire or 3-wire)
and be:
• Flexible armored cable or nonmetallic sheathed copper cable
(with ground wire), protected with flexible metallic conduit. All
current-carrying wires must be insulated.
• 10-gauge solid copper wire. (Do not use aluminum.)
• At least 5 ft (1.52 m) long.
GROUNDING INSTRUCTIONS
[] For a grounded, cord-connected washer/dryer:
This washer/dryer must be grounded. In the event of
malfunction or breakdown, grounding will reduce the risk of
electric shock by providing a path of least resistance for
electric current. This washer/dryer uses a cord having an
equipment-grounding conductor and a grounding plug. The
plug must be plugged into an appropriate outlet that is
properly installed and grounded in accordance with all local
codes and ordinances.
[] For a permanently connected washer/dryer:
This washer/dryer must be connected to a grounded metal,
permanent wiring system, or an equipment-grounding
conductor must be run with the circuit conductors and
connected to the equipment-grounding terminal or lead on
the washer/dryer.
WARNING: Improper connection of the equipment-
grounding conductor can result in a risk of electric shock.
Check with a qualified electrician or service representative or
personnel if you are in doubt as to whether the washer/dryer
is properly grounded. Do not modify the plug on the power
supply cord: if it will not fit the outlet, have a proper outlet
installed by a qualified electrician.
SAVE THESE INSTRUCTIONS

PowerSupplyCord DirectWire
FireHazard
Usea new UL listed 30 amp power supply cord.
Use a UL listed strain relief.
Disconnect power before making electrical connections.
Connect neutral wire (white or center wire) to center
terminal (silver).
Ground wire (green or bare wire) must be connected to
green ground connector.
Connect remaining 2 supply wires to remaining
2 terminals (gold).
Securely tighten all electrical connections.
Failure to do so can result in death, fire, or
electrical shock.
Fire Hazard
Use 10 gauge solid copper wire.
Use a UL listed strain relief.
Disconnect power before making electrical connections.
Connect neutral wire (white or center wire) to center
terminal (silver).
Ground wire (green or bare wire) must be connected to
green ground connector.
Connect remaining 2 supply wires to remaining
2 terminals (gold).
Securely tighten all electrical connections.
Failure to do so can result in death, fire, or
electrical shock.
1. Disconnect power. 3.
2. Remove the hold-down screw and terminal block cover.
A •
E D
A. Center, silver-colored terminal block screw
B. Hold-down screw
C. Terminal block cover
D. Neutral ground wire
E. External ground conductor screw
B
C
Install strain relief.
Style 1: Power supply cord strain relief
Remove the screws from a 3/4"(1.9 cm) UL listed strain relief
(UL marking on strain relief), Put the tabs of the two clamp
sections into the hole below the terminal block opening so
that one tab is pointing up and the other is pointing down,
and hold in place. Tighten strain relief screws just enough to
hold the two clamp sections together.
............._............................. B
=_ ......................... C
A. Strain relief tab pointing up
B. Hole below terminal block opening
C. Clamp section
D. Strain relief tab pointing down

4.
Put power supply cord through the strain relief. Be sure that
the wire insulation on the power supply cord is inside the
strain relief. The strain relief should have a tight fit with the
dryer cabinet and be in a horizontal position. Do not further
tighten strain relief screws at this point.
Style 2: Direct wire strain relief
Unscrew the removable conduit connector and any screws
from a3/4"(1.9 cm) UL listed strain relief (UL marking on strain
relief). Put the threaded section of the strain relief through the
hole below the terminal block opening. Reaching inside the
terminal block opening, screw the removable conduit
connector onto the strain relief threads.
............................__ ...................B
A. Removable conduit connector
B. Hole below terminal block opening
C. Strainrelief threads
Put direct wire cable through the strain relief. The strain relief
should have a tight fit with the dryer cabinet and be in a
horizontal position. Tighten strain relief screw against the
direct wire cable.
Now complete installation following instructions for your type
of electrical connection:
4-wire (recommended)
3-wire (if 4-wire is not available)
Electrical Connection Options
If your home has: And you will be Go to Section
connecting to:
4-wire receptacle A UL listed, 4-wire connection:
(NEMA Type 14-30R) 120/240-volt Power supply cord
minimum,
30-amp, dryer
power supply
cord*
4-wire direct A fused 4-wire connection:
disconnect or Direct Wire
circuit breaker
box*
(12.7 cm)
3-wire receptacle A UL listed,
(NEMA type 10-30R) 120/240-volt
minimum,
30-amp, dryer
power supply
cord*
3-wire connection:
Power supply cord
3-wire direct A fused 3-wire connection:
disconnect or Direct Wire
circuit breaker
box*
*If local codes do not permit the connection of a frame-grounding
conductor to the neutral wire, go to "Optional 3-wire connection"
section.
4-wire connection: Power supply cord
IMPORTANT: A 4-wire connection is required for all mobile
homes and where local codes do not permit the use of 3-wire
connections.
C D E G
A.4-wire receptacle (NEMAtype 14-30R)
B.4-prong plug
C. Groundprong
D. Neutralprong
E.Spade terminals with upturned ends
F. _" (1.9cm) UL listed strain relief
G.Ringterminals

1=
2.
3=
Remove center, silver-colored terminal block screw.
Remove neutral ground wire from external ground conductor
screw. Connect neutral ground wire and the neutral wire
(white or center wire) of power supply cord under center,
silver-colored terminal block screw. Tighten screw.
A B
J
A. Neutral ground wire
B. Center silver-colored terminal block screw
C. External ground conductor screw - Dotted line shows
position of NEUTRAL ground wire before being moved
to center silver-colored terminal block screw
D. Neutral wire (white or center)
E. _" (1.9 cm) UL listed strain relief
Connect ground wire (green or bare) of power supply cord to
external ground conductor screw. Tighten screw.
D
C ............. J=
F
A. External ground conductor screw
B. Ground wire (green or bare) of power supply cord
C. Neutral ground wire
D. Center silver-colored terminal block screw
E. Neutral wire (white or center)
F. 3/4, (1.9 cm) UL listed strain relief
4. Connect the other wires to outer terminal block screws.
Tighten screws.
5. Tighten strain relief screws.
6. Insert tab of terminal block cover into slot of dryer rear panel.
Secure cover with hold-down screw.
7. You have completed your electrical connection. Now go to
"Venting Requirements."
4-wire connection: Direct Wire
IMPORTANT: A 4-wire connection is required for mobile homes
and where local codes do not permit the use of 3-wire
connections.
Direct wire cable must have 5 ft (1.52 m) of extra length so
laundry center can be moved if needed.
Strip 5" (12.7 cm) of outer covering from end of cable, leaving
bare ground wire at 5" (12.7 cm). Cut 11/2'' (3.8 cm) from
3 remaining wires. Strip insulation back 1" (2.5 cm). Shape ends
of wires into a hook shape.
When connecting to the terminal block, place the hooked end of
the wire under the screw of the terminal block (hook facing right),
squeeze hooked end together and tighten screw, as shown.
1=
2.
Remove center, silver-colored terminal block screw.
Remove neutral ground wire from external ground conductor
screw. Connect neutral ground wire and place the hooked
end (hook facing right) of the neutral wire (white or center
wire) of direct wire cable under the center screw of the
terminal block. Squeeze hooked ends together. Tighten
screw.
A B
C
A. Neutral ground wire
B. Center silver-colored terminal block screw
C. External ground conductor screw - Dotted line shows
position of NEUTRAL ground wire before being moved to
center silver-colored terminal block screw
D. Neutral wire (white or center wire)
E.3/4"(!.9 cm) UL listed strain relief

3,
4=
Connect ground wire (green or bare) of direct wire cable to
external ground conductor screw. Tighten screw.
C
B
E
A. External ground conductor screw
B. Ground wire (green or bare) of power supply cord
C. Neutral ground wire
D. Center silver-colored terminal block screw
E. Neutral wire (white or center)
F. s/4"(1.9 cm) UL listed strain relief
Place the hooked ends of the other power supply cable wires
under the outer terminal block screws (hooks facing right).
Squeeze hooked ends together. Tighten screws.
!! !!
5. Tighten strain relief screw.
6. Insert tab of terminal block cover into slot of dryer rear panel.
Secure cover with hold-down screw.
7. You have completed your electrical connection. Now go to
"Venting Requirements."
3-wire connection: Power supply cord
Use where local codes permit connecting cabinet-ground
conductor to neutral wire.
A ......
C
A.3-wire receptacle (NEMA type !0-30R)
B.3-wire plug
C.Ground prong
D.Spade terminalswith upturned ends
E._" (1.9cm) ULlisted strainrelief
E Ring terminals
G.Neutral (white or center wire)
E
G F
1=
2.
Loosen or remove center, silver-colored terminal block screw.
Connect neutral wire (white or center wire) of power supply
cord to the center, silver-colored terminal screw of the
terminal block. Tighten screw.
C
J
J ..................................b
.......E
A. External ground conductor screw
B. Neutral ground wire
C. Center silver-colored terminal block screw
D. Neutral wire (white or center wire)
E. _" (1.9 cm) UL listed strain relief
3. Connect the other wires to outer terminal block screws.
Tighten screws.
4. Tighten strain relief screws.
5. Insert tab of terminal block cover into slot of dryer rear panel.
Secure cover with hold-down screw.
6. You have completed your electrical connection. Now go to
"Venting Requirements."

3-wire connection: Direct Wire
Use where local codes permit connecting cabinet-ground
conductor to neutral wire.
Direct wire cable must have 5 ft (1.52 m) of extra length so
laundry center can be moved if needed.
Strip 31/2'' (8.9 cm) of outer covering from end of cable. Strip
insulation back 1" (2.5 cm). If using 3-wire cable with ground
wire, cut bare wire even with outer covering. Shape ends of wires
into a hook shape.
When connecting to the terminal block, place the hooked end of
the wire under the screw of the terminal block (hook facing right),
squeeze hooked end together and tighten screw, as shown.
1,
2.
Loosen or remove center, silver-colored terminal block screw.
Place the hooked end of the neutral wire (white or center wire)
of direct wire cable under the center screw of terminal block
(hook facing right). Squeeze hooked end together. Tighten
screw.
C
B _¸.
A. External ground conductor screw
B. Neutral ground wire
C. Center silver-colored terminal block screw
D. Neutral wire (white or center wire)
E. _" (!.9 cm) UL listed strain relief
3. Place the hooked ends of the other power supply cable wires
under the outer terminal block screws (hooks facing right).
Squeeze hooked ends together. Tighten screws.
!! !!
4. Tighten strain relief screw.
5. Insert tab of terminal block cover into slot of dryer rear panel.
Secure cover with hold-down screw.
6. You have completed your electrical connection. Now go to
"Venting Requirements."
Optional 3-wire connection
Use for direct wire or power supply cord where local codes
do not permit connecting cabinet-ground conductor to
neutral wire.
1. Remove center, silver-colored terminal block screw.
2. Remove neutral ground wire from external ground conductor
screw. Connect neutral ground wire and the neutral wire
(white or center wire) of power supply cord/cable under
center, silver-colored terminal block screw. Tighten screw.
3,
A. Externalground conductor screw
B.Neutral ground wire
C. Neutral wire (whiteor center wire)
D.Grounding path determined bya qualified electrician
E. _" (1.9cm) UL Iisted strain relief
Connect the other wires to outer terminal block screws.
Tighten screws.
!! !!
4. Tighten strain relief screws.
5. Insert tab of terminal block cover into slot of dryer rear panel.
Secure cover with hold-down screw.
6. Connect a separate copper ground wire from the external
ground conductor screw to an adequate ground.
10

Fire Hazard
Use a heavy metal vent.
Do not use a plastic vent.
Do not use a metal foil vent.
Failure to follow these instructions can result in death
or fire.
Flexible metal vent
• Flexible metal vents are acceptable only if accessible for
cleaning.
• Flexible metal vent must be fully extended and supported
when the dryer is in its final position.
• Remove excess flexible metal vent to avoid sagging and
kinking that may result in reduced airflow and poor
performance.
• Do not install flexible metal vent in enclosed walls, ceilings or
floors.
Elbows
45° elbows provide better airflow than 90° elbows.
WARNING: To reduce the risk of fire, this laundry center
MUST BE EXHAUSTED OUTDOORS.
IMPORTANT: Observe all governing codes and ordinances.
The dryer exhaust must not be connected into any gas vent,
chimney, wall, ceiling, or a concealed space of a building.
If using an existing vent system
Clamps
• Clean lint from the entire length of the system and make sure •
exhaust hood is not plugged with lint.
• Replace any plastic or metal foil vent with rigid or flexible
heavy metal vent.
• Review Vent system chart. Modify existing vent system if
necessary to achieve the best drying performance.
If this is a new vent system
Vent material
• Use a heavy metal vent. Do not use plastic or metal foil vent.
• 4" (10.2 cm) heavy metal exhaust vent and clamps must be
used. DURASAFF Mventing products are recommended.
4" (10.2cm) heavymetal exhaust vent
DURASAFE TM vent products can be purchased from your
dealer. For further information, please call
1-800-4-MY-HOME ®(1-800-469-4663) or visit our website at
www.sears.com.
Rigid metal vent
• For best drying performance, rigid metal vents are
recommended.
• Rigid metal vent is recommended to avoid crushing and
kinking.
Good Better
Use clamps to seal all joints.
Exhaust vent must not be connected or secured with screws
or other fastening devices that extend into the interior of the
duct. Do not use duct tape.
Clamp
Exhaust
Recommended hood styles are shown here.
B
1_4,,--_" I
(10.2 cm)
A. Louvered hood style
B.Box hood style
The angled hood style (shown here) is acceptable.
4"
(10.2 cm)__
_._ 21/2 .'
(6.4 cm)
• An exhaust hood should cap the vent to keep rodents and
insects from entering the home.
11

• Exhaust hood must be at least 12" (30.5 cm) from the ground
or any object that may be in the path of the exhaust (such as
flowers, rocks or bushes, snow line, etc.).
• Do not use an exhaust hood with a magnetic latch.
Improper venting can cause moisture and lint to collect
indoors, which may result in:
[] Moisture damage to woodwork, furniture, paint,
wallpaper, carpets, etc.
[] Housecleaning problems and health problems.
Excessive Weight Hazard
Use two or more people to move and install
washer/dryer.
Failure to do so can result in back or other injury.
To avoid floor damage, set laundry center onto cardboard before
moving across floor. Move laundry center close to its final
location.
1. Do not cut yellow strap. Pull yellow strap firmly, until
completely removed from laundry center. There should be
2 cotter pins on the end of the shipping strap. Remove hang
tag and pin from vent pipe.
2. Tilt the laundry center forward. Move each of the 2 rear legs in
an up-down motion to check the self-adjusting leveling legs
for free movement. This is required for proper leveling. Gently
lower the laundry center to the floor.
3. Cut the shipping strap about 16" (40.6 cm) from the plug end.
Look for the words "CUT HERE." Discard end with cotter
pins. You will use the remaining piece of shipping strap to
secure the drain hose.
...........@@
Install the front leveling feet
1. Prop up the front of the laundry center about 4" (10.2 cm)
with a wood block or similar object. The block needs to
support the weight of the laundry center.
2. Screw the Iocknut onto each foot to within 1" (2.5 cm) of the
base.
3=
4=
1"
(2.5 cm)
Screw the feet into the correct holes at the front corner of the
laundry center until the nuts touch the washer.
NOTE: Do not tighten the nuts until the laundry center is level,
Tilt the laundry center back and remove the wood block.
Gently lower the laundry center to the floor.
Proper connection of the drain hose protects your floors from
damage due to water leakage, To keep the drain hose from
coming off or leaking, it must be installed according to the
following instructions:
IMPORTANT: To ensure proper installation, this procedure must
be followed exactly.
1. Check the drain hose to see whether it is the proper length.
2. Wet the inside of the straight end of the drain hose with tap
water.
IMPORTANT: Do not use any lubricant other than water.
3. Squeeze ears of the silver, double-wire clamp with pliers to
open. Place clamp over the straight end of the drain hose
_A"(6.4 mm) from the end.
(6.4 mm)
4. Open clamp. Twist hose back and forth while pushing onto
drain connector on the side of the laundry center. Continue
until hose contacts the ribbed stops on the cabinet.
5. Place clamp over the area marked "CLAMR" Release clamp.
12

For laundry tub or standpipe drain systems
1. Open the yellow single-wire clamp and slide over the hooked
end of the drain hose to secure the rubber and corrugated
sections together.
A. Hooked end
B. Drain hose
2. Put hooked end of drain hose into laundry tub or standpipe.
Rotate hook to eliminate kinks.
To keep drain water from going back into the washer:
• Do not straighten hooked end of the drain hose and force
excess drain hose into standpipe. Hose should be secure but
loose enough to provide a gap for air.
• Do not lay excess hose on the bottom of the laundry tub.
For use with floor drain
Remove the drain hose hook from the corrugated drain hose. You
may need additional parts. See Floor drain under "Alternate
Parts."
Insert a new flat washer (supplied) into each end of the inlet
hoses. Firmly seat the washers in the couplings.
A B
A. Coupling
B. Washer
Connect the inlet hoses to the water faucets
Make sure the washer basket is empty.
1. Attach the hose labeled hot to the hot water faucet. Screw on
coupling by hand until it is seated on the washer.
2. Attach the hose labeled cold to the cold water faucet. Screw
on coupling by hand until it is seated on the washer.
3. Using pliers, tighten the couplings with an additional two-
thirds turn.
NOTE: Do not overtighten or use tape or sealants on the valve.
Damage to the valves can result.
Clear the water lines
• Run water through both faucets and inlet hoses, into a
laundry tub, drainpipe or bucket to get rid of particles in the
water lines that might clog the inlet valve screens.
• Check the temperature of the water to make sure that the hot
water hose is connected to the hot water faucet and that the
cold water hose is connected to the cold water faucet.
Connect the inlet hoses to the washer
1. Attach the hot water hose to the bottom inlet valve. Attaching
the hot water hose first makes it easier to tighten connection
with pliers.
2. Screw on coupling by hand until it is seated on the washer.
3. Using pliers, tighten the couplings with an additional two-
thirds turn.
NOTE: Do not overtighten or use tape or sealants on the valve.
Damage to the valves can result.
A. Cold water inlet valve (top)
B. Hot water inlet valve (bottom)
4. Attach the cold water hose to the top inlet valve.
5. Screw on coupling by hand until it is seated on the washer.
6. Using pliers, tighten the couplings with an additional two-
thirds turn.
NOTE: Do not overtighten or use tape or sealants on the valve.
Damage to the valves can result.
If you are working in a closet or recessed area
Move the laundry center into its final position and remove
cardboard from under laundry center. Remove the access panel
by removing 3 Phillips-head screws and one bumper, located at
the top of the access panel. Set panel, screws, and bumper
aside. Complete hookup of water hoses. Replace access panel
upon completion of laundry center installation.
J
Check for leaks
• Turn on the water faucets and check for leaks. A small
amount of water might enter the washer. You will drain this
water later.
NOTE: Replace inlet hoses after 5 years of use to reduce the risk
of hose failure. Record hose installation or replacement dates for
future reference.
• If you connect only one water hose, you must cap off the
remaining water inlet port.
• Periodically inspect and replace hoses if bulges, kinks, cuts,
wear, or leaks are found.
• The apparatus must be connected to the water faucets using
the new hoses. Do not use old hoses.
13

1=
2.
3=
Move the laundry center to its final location and remove any
cardboard used to move the laundry center.
Locate the remaining piece of shipping strap. See "Remove
Shipping Strap."
Shipping strap
Wrap the drain hose to the laundry tub leg or standpipe with
the shipping strap (A or B below). Push fastener into the
nearest hole in the shipping strap. See illustration above.
If the water faucets and the drain standpipe are recessed, put
the hooked end of the drain hose in the standpipe. Tightly
wrap the shipping strap around the water inlet hoses and the
drain hose (C above). Push fastener into the nearest hole in
the shipping strap. See illustration above.
Choose your exhaust installation type
Recommended exhaust installations
Typicalinstallations vent the dryer from the rear of the laundry
center.Other installations are possible.
N
H -D
A
H
c ................. .........H
Ih I
A. Dryer E.Elbow
B. Rigid metal or E Clamps
flexible metal vent G. E/bow
C. Clamps H. Exhaust hood
D. Wall
Optional exhaust installations
This laundry center can be converted to exhaust out the right or
left side. To convert the laundry center, use Side Exhaust Kit Part
Number 279823. Ifyour laundry center was previously exhausted
from the right or left side, it can be converted to rear exhaust by
using standard offset connections. To cover the hole in the side,
one of the following plugs can be added:
692790 (white)
3979370 (graphite)
3977784 (biscuit)
Follow the instructions in the kit to install. Kits are available from
your local Sears store or Sears Service Center.
i i
B C
A. Standard rear offset exhaust installation
B. Rear exhaust for offset close clearance connection
C. Left or right side exhaust installation
Alternate installations for close clearances
Venting systems come in many varieties. Select the type best for
your installation. Three close-clearance installations are shown.
Refer to the manufacturer's instructions provided with the vent
system.
A. Loop system with standard elbows
B. Loop system with one offset and one standard elbow
C. Vent system with one periscope (2" [5 cm] clearance)
NOTE: The following kits for close clearance alternate
installations are available for purchase. To order, please call
1-800-4-MY-HOME ®(1-800-469-4663).
• Over-the-Top Installation:
Part Number 26-49900
Periscope Installation (For use with dryer vent to wall vent
mismatch):
Part Number 26-49901 - Less than 5" (12.7 cm) mismatch
Part Number 26-49908 - 5" (12.7 cm) to 18" (45.7 cm)
mismatch
Part Number 26-49904 - 18" (45.7 cm) to 29" (73.7 cm)
mismatch
Part Number 26-49905 - 29" (73.7 cm) to 50" (127 cm)
mismatch
14

Special provisions for mobile home installations
The exhaust vent must be securely fastened to a noncombustible
portion of the mobile home structure and must not terminate
beneath the mobile home. Terminate the exhaust vent outside.
Determine vent path
• Select the route that will provide the straightest and most
direct path outdoors.
• Plan the installation to use the fewest number of elbows and
turns.
• When using elbows or making turns, allow as much room as
possible.
• Bend vent gradually to avoid kinking.
• Use the fewest 90 ° turns possible.
Determine vent length and elbows needed for best
drying performance
• Use the Vent system chart below to determine type of vent
material and hood combinations acceptable to use.
NOTE: Do not use vent runs longer than those specified in
the Vent system chart. Exhaust systems longer than those
specified will:
• Shorten the life of the dryer.
• Reduce performance, resulting in longer drying times and
increased energy usage.
The Vent system chart provides venting requirements that will
help to achieve the best drying performance.
Vent system chart
NOTE: Side exhaust installations adds a 90° turn inside the
laundry center. To determine maximum exhaust length, add one
90° turn to the chart.
Number of Type of Vent Box or Angled
90° turns Louvered hoods
or elbows hoods
0 Rigid metal 37 ft (11.3 m) 35 ft (10.7 m)
Flexible metal 25 ft (7.6 m) 20 ft (6.1 m)
1 Rigid metal 32 ft (9.7 m) 27 ft (8.2 m)
Flexible metal 21 ft (6.4 m) 16 ft (4.9 m)
2 Rigid metal 24 ft (7.3 m) 19 ft (5.8 m)
Flexible metal 15 ft (4.6 m) 10 ft (3.0 m)
1. Install exhaust hood. Use caulking compound to seal exterior
wall opening around exhaust hood.
2. Connect vent to exhaust hood. Vent must fit inside exhaust
hood. Secure vent to exhaust hood with 4" (10.2 cm) clamp.
3. Run vent to dryer location. Use the straightest path possible.
See "Determine vent path" in "Plan Vent System." Avoid 90°
turns. Use clamps to seal all joints. Do not use duct tape,
screws or other fastening devices that extend into the interior
of the vent to secure vent.
Properly leveling your laundry center avoids excessive noise and
vibration.
1. Check the levelness of the laundry center by placing a level
on the top edge of the washer, first side to side, then front to
back.
2. If the laundry center is not level, prop up the front with the
wood block and adjust the feet up or down as necessary.
Remove wood block.
3. Tilt the laundry center forward until the rear of the laundry
center is at least 4" (10.2 cm) off the floor. You may hear the
self-adjusting rear feet click into place. Lower the laundry
center to the floor. Check the levelness of the laundry center
with a level as shown above.
If laundry center will not level, recheck rear leveling legs for
free movement as described in the "Install Leveling Legs"
section. Repeat until the laundry center is level.
NOTE: It may be necessary to level the laundry center again
after it is moved into its final position.
4. After the laundry center is in the final location and level, use
an adjustable or open-end wrench to turn the nuts on the
front feet tightly against the washer cabinet.
If the nuts are not tight against the washer cabinet, the
laundry center may vibrate.
1. Using a 4" (10.2 cm) clamp, connect vent to exhaust outlet in
laundry center. If connecting to existing vent, make sure the
vent is clean. The vent must fit over the exhaust outlet and
inside the exhaust hood. Make sure the vent is secured to
exhaust hood with a 4" (10.2 cm) clamp.
2. Move laundry center into its final position. Do not crush or
kink vent. Make sure laundry center is level.
15

1=
go back through the steps to see which step was skipped.
2. Check that you have all of your tools.
3. Dispose of/recycle all packaging materials. Keep the plastic
foam for use if the laundry center should be transported.
4. Check the laundry center's final location. Be sure the vent is
not crushed or kinked.
5. Check that the laundry center is level and front leveling feet
are tight. See "Level Laundry Center."
6. For power supply cord installations, plug into an outlet. For
direct wire installation, turn on power.
7. Check that the water faucets are on.
8. Check for leaks around faucets and inlet hoses.
9. Remove the blue protective film on the console and any tape
remaining on the laundry center.
10. Read the Laundry Center User Instructions.
11. Wipe the dryer drum interior thoroughly with a damp cloth to
remove any dust.
12. To test the washer, measure 1/2the normal recommended
amount of detergent and pour it into the washer. Close the lid.
Select HEAVY DUTY and pull out the Cycle Control knob.
Allow the washer to complete one whole cycle.
Check that all parts are now installed. If there is an extra part, 13. Totest the dryer, set the dryer on a full heat cycle (not an air
cycle) for 20 minutes and start the dryer.
If the dryer will not start, check the following:
• Controls are set in a running or "On" position.
• Start button has been firmly pushed.
• Laundry center is plugged into a grounded outlet and/or
electrical supply is on.
• Household fuse is intact and tight, or circuit breaker has
not tripped.
• Dryer door is closed.
14. When the dryer has been running for 5 minutes, open the
dryer door and feel for heat.
If you do not feel heat, turn the dryer off and check the
following:
• There may be 2 household fuses or circuit breakers for
the dryer. Check to make sure both fuses are intact and
tight, or that both circuit breakers have not tripped. If
there is still no heat, contact a qualified technician.
NOTE: You may notice a burning odor when dryer is first heated.
This odor is common when the heating element is first used. The
odor will go away.
16

INSTRUCCIONES DE INSTALACION PARA EL CENTRO
DE LAVANDERIA ELI CTRICO DE 27 PULG. (69CM)
SEGURIDAD DE LA LAVADORNSECADORA
Su seguridad y la seguridad de los demas es muy importante.
Hemos incluido muchos mensajes importantes de seguridad en este manual yen su electrodomestico. Lea y obedezca siempre
todos los mensajes de seguridad.
Este es el sfmbolo de advertencia de seguridad.
Este sfmbolo le llama la atencion sobre peligros potenciales que pueden ocasionar la muerte o una lesion a
usted y a los demas.
Todos los mensajes de seguridad iran a continuaci6n del simbolo de advertencia de seguridad y de la palabra
"PELIGRO" o "ADVERTENCIA". Estas palabras significan:
Si no sigue las instrucciones de inmediato, usted puede
morir o sufrir una lesion grave.
Si no sigue las instrucciones, usted puede morir o sufrir
una lesion grave.
Todos los mensajes de seguridad le diran el peligro potencial, le diran c6mo reducir las posibilidades de sufrir una lesi6n y Io que
puede suceder si no se siguen las instrucciones.
INSTRUCCIONES DE INSTALACION
ReOna las herramientas y piezas necesarias antes de comenzar
la instalaci6n. Lea y siga las instrucciones provistas con
cualquiera de las herramientas enlistadas aqui.
Herramientas necesarias:
• Destornillador Phillips #2
y de cabeza plana
• Llave detuercas
ajustable que se abra a
1" (2,5 cm) o una Ilave de
extremo abierto de %6"
(para regular las patas del
centro de lavanderia)
• Llave paratuercas de
1/4"0 Ilave de cubo
(recommended)
• Pelacables (instalaciones
de cableado directo)
• Tijeras de lata
(instalaciones del nuevo
ducto de escape)
• Bloque de madera (para
nivelar)
• Pistola y masilla para
calafateo (para instalar el
nuevo ducto de escape)
• Nivel
• Cuchillo
• Abrazaderas para ducto
• Alicates
• Tijeras
• Regla 0 cinta para medir
Piezas suministradas:
Retire el paquete de piezas de la canasta de la lavadora.
Verifique que esten todas las piezas.
B
D
A. Mangueras de entrada de agua (2)
B.Arandelas planas de la manguera de entrada (4)
C. Patas niveladoras delanteras con tuercas (2)
D. Fleje de embalaje (no est# en la belsa de piezas.
Vea "Quite el fleje de embalaje".)
E. Manguera de desagOe
F Abrazadera amarilla de manguera, unifllar
G. Abrazadera plateada de manguera, de doble hflo
Piezas necesarias:
Verifique los c6digos locales, el suministro electrico y la
ventilaci6n, y lea "Requisitos electricos" y "Requisites de
ventilaci6n" antes de comprar las piezas.
Las instalaciones en casas rodantes necesitan articulos de
ferreteria para sistemas de ventilaci6n de metal que se pueden
comprar en su tienda Sears o en el centro de servicio tecnico
Sears de su Iocalidad. Para mas informaci6n, Ilame por favor al
1-800-4-MY-HOME ®(1-800-469-4663).
17

Las piezas aqu[ enumeradas se pueden adquirir en la tienda
Sears o en el Centro de Servicio Sears de su Iocalidad. Para mas
informaci6n, Ilame por favor al 1-800-4-MY-HOME ®
(1-800-469-4663).
Si tiene Necesitara adquirir
Un lavadero o
tubo vertical a una
altura mayor de
96" (2,4 m)
Sistema de bomba de sumidero (si ya
no esta disponible)
Tubo vertical de
1" (2,5 cm) de
diametro
Adaptador de tubo vertical de 2" (5 cm)
a 1" (2,5 cm) de diametro, pieza
n0mero 3363920
Una alcantarilla
suspendida
Un tanque de desagQe normal o un
lavadero de uso general de 20 gal, (76 L)
de capacidad y 34" (86,4 cm) de altura y
una bomba de sumidero (en venta en
establecimientos de fontaneria locales)
Un desag(_e por el
piso
Desviaci6n del sif6n, pieza
No. 285320; manguera de desagOe
adicional, pieza n0mero 285702; y juego
de conectores, pieza n0mero 285442
Una manguera de Manguera de desagQe, pieza
desagQe muy n0mero 285664 y juego de conectores,
corta pieza n0mero 285442
Desag0e
obstruido pot
pelusa
Protector de desagQe, pieza
n0mero 367031
Grifos del agua
fuera del alcance
de las mangueras
de Ilenado
2 mangueras de Ilenado de agua mas
largas:
de 6 pies (1,8 m) pieza n0mero 76314,
de 10 pies (3,0 m) pieza n0mero 350008
Peligro de E×plosi6n
Mantenga los materiales y vapores inflamables,
tales como la gasolina, alejadoe de la secadora.
No seguir estae instruceiones puede ocasionar
la muerte, explosi6n o incendio.
Usted necesitar&
• Una ubicaci6n que permita una instalaci6n adecuada del
ducto de escape, Consulte "Requisitos de ventilaci6n".
• Un circuito separado de 30 amperios.
• Un contacto con conexi6n a tierra ubicado a unos 2 pies
(61 cm) de cualquiera de los lados del centro de lavanderia,
Vea "Requisitos electricos".
Un piso resistente que sostenga el peso del centro de
lavanderia (el centro de lavanderia, el agua y la carga) de
500 Ibs (226,8 kgs).
Un piso nivelado con un declive maximo de 1" (2,5 cm)
debajo del centro de lavanderfa completo. La ropa quizas no
rote adecuadamente y los ciclos del sensor automatico
posiblemente no funcionen debidamente si el centro de
lavanderia no esta nivelado. No se recomienda la instalaci6n
sobre una alfombra.
• Un calentador de agua ajustado para suministrar agua de
120°F (49°C) a la lavadora,
• Grifos de agua fria y caliente ubicados, cuando mucho, a
4 pies (1,2 m) de las valvulas de Ilenado de agua frfa y
caliente y la presi6n del agua debera ser de 5-100 Ibs/pulg. _
(34,5-689,6 kPa).
No debe instalarse ni guardarse el centro de lavanderia en un
Area en donde este expuesto al agua y/o a la intemperie.
No haga funcionar su lavadora a temperaturas iguales o
inferiores a 32°F (0°C). El agua que quede en la lavadora puede
ocasionar daSos a bajas temperaturas. Vea la secci6n "Cuidado
del centro de lavanderfa" para saber c6mo acondicionarla para el
invierno,
No haga funcionar su secadora a temperaturas inferiores a 45°F
(7°C). A temperaturas inferiores, es posible que la secadora no se
apague al final de un ciclo automatico. Esto puede resultar en
tiempos de secado mas largos.
Verifique los requisitos de los c6digos. Algunos c6digos limitan, o
no permiten, la instalaci6n del centro de lavanderia en garajes,
cl6sets, casas rodantes o en dormitorios. P6ngase en contacto
con el inspector de construcciones de su Iocalidad.
Espacios para la instalacibn
La ubicaci6n debe ser Io suficientemente grande para poder abrir
completamente la puerta de la secadora.
Dimensiones del centro de lavanderia
71%"
(181,9 cm)
27"
(68,6 cm)
*La mayoria de las instalaciones requieren un espacio libre
minimo de 51/2'' (14 cm) detras de la secadora para acomodar el
ducto de escape con codo, Vea "Requisitos de ventilaci6n".
Espacio minimo para la instalaci6n en Areas empotradas o
en clbsets
Las siguientes dimensiones ilustradas son para el espacio
minimo permitido.
• Debe considerarse el espacio adicional para facilitar la
instalaci6n y el servicio tecnico,
• Se podrfan necesitar espacios libres adicionales para las
molduras de la pared, de la puerta y del piso.
18

• Para la instalaci6n en cl6set, con una puerta, se requieren
aberturas de ventilaci6n minimas en la parte superior e
inferior de la puerta. Se aceptan puertas tipo persianas con
aberturas de ventilaci6n equivalentes.
• Cuando el sistema de ventilaci6n de la casa esta alineado
directamente con la ventilaci6n de la secadora, el espacio de
atras puede ser de 1" (2,5 cm).
A
m
m
m
o°°oO
II I
m
÷ HI<-
l" 27" 1"
(2,5cm) (68,6cm)
1" 32" 51/2"
(2,Scrn)(2,Bern)(81,3cm)(14crn)
L 6 _
_- (16,2 cm)
48puFg._
(310 crn2)
24 pulg.2-
(155cm2)
C
A. Lugar empotrado
B. Vista lateral - cldset o/ugar confinado
C. Puerta del cldset con oriflcios de ventilacidn
_(7,6cm)
Requisitos de instalaci6n adicionales para las casas
rodantes
Este centre de lavanderfa es apropiado para instalaciones en
casas rodantes. La instalaci6n debe ajustarse al Estandar de
seguridad y construcci6n de casas fabricadas, Titulo 24 CFR,
Parte 3280 (anteriormente conocido como Estandar federal para
la seguridad y construcci6n de casas rodantes, Titulo 24, HUD
Parte 280).
Las instalaciones en casas rodantes necesitan:
• Artfculos de ferreterfa para sistemas de ventilaci6n de metal
que se pueden comprar en su tienda Sears o en el centre de
servicio tecnico Sears de su Iocalidad.
Se deben tomar medidas especiales en el caso de casas
rodantes para introducir el aire del exterior en la secadora. La
abertura (como la de una ventana adyacente) debera ser per
Io menos el doble de tamar3o que la abertura de ventilaci6n
de la secadora.
Se puede instalar el centro de lavanderJa usando el sistema de
desag0e de tubo vertical (piso o pared), el sistema de desag0e
en un lavadero o el sistema de desag0e en el piso. Elija el
sistema de instalaci6n de la manguera que necesite. Vea "Piezas
alternativas".
Sistema de desagiJe de tubo vertical - piso o pared
(ilustraciones A y B)
El sistema de desag0e de tube vertical requiere de un tube
vertical con un diametro mfnimo de 2" (5 cm). La capacidad
minima de desalojo no puede ser menor de 17 gal. (64 L) per
minuto. Se dispone de un juego de adaptador para tube vertical
de 2" (5 cm) a 1" (2,5 cm) de diametro. Vea "Piezas alternativas".
La parte superior del tube vertical debera estar a 39" (99 cm) de
altura cuando menos y no podra estar a mas de 96" (2,4 m)
desde la base de la lavadora.
A
Sistema de desagi.ie en un lavadero (ilustracibn C)
El lavadero debe tener una capacidad minima de 20 gal. (76 L).
La parte superior del lavadero debe estar a 34" (86,4 cm) de
altura cuando menos sobre el piso y no podra estar a mas de
96" (2,4 m) de la base de la lavadora.
Sistema de desagi_e en el piso (ilustraci6n D)
El sistema de desagOe en el piso requiere de una desviaci6n del
sif6n que se puede comprar por separado. Vea "Piezas
alternativas".
La desviaci6n del sif6n debera estar a 28" (71 cm) cuando menos
de la base de la lavadora. Quizas se necesiten mangueras
adicionales.
D
Usted es responsable de
• Ponerse en contacto con un instalador electrico calificado.
Asegurarse de que la conexi6n electrica sea adecuada y de
conformidad con el C6digo Nacional Electrico, ANSl/NFPA
70 - 01tima edici6n y con todos los c6digos y ordenanzas
locales.
Usted puede obtener una copia de todas las normas arriba
indicadas en: National Fire Protection Association, One
Batterymarch Park, Quincy, MA 02269.
Proveer el suministro electrico requerido de 3 6 4 alambres,
monofasico, de 120/240 voltios, 60 Hz, CA solamente (o un
suministro electrico de 3 6 4 alambres, de 120/208 voltios, si
se especifica en la placa indicadora de corriente/de la serie)
en un circuito separado de 30 amperios, protegido con
fusibles en ambos lados de la Ifnea. Se recomienda un fusible
retardador o un cortacircuitos. Conectela a un circuito
derivado individual. No tenga un fusible en el circuito neutro o
de conexi6n a tierra.
19

• No use un cable electrico de extensi6n.
Si los c6digos Io permiten y se emplea un alambre de
conexi6n a tierra separado, es recomendable que un
electricista calificado determine si la trayectoria de conexidn
a tierra es adecuada.
Conexibn el_ctrica
Para instalar su centro de lavanderia adecuadamente, usted
debe determinar el tipo de conexi6n el_ctrica que va a usar y
seguir las instrucciones que aqui se proveen para el case.
• Esta secadora ha side manufacturada lista para ser instalada
en una conexi6n de suministro de energ(a electrica de 3 hues.
El hilo verde de puesta a tierra del gabinete esta
permanentemente conectado al conductor neutral (cable
blanco) dentro de la secadora. Si la secadora esta instalada
con una conexidn de suministro electrico de 4 hilos, el hilo
verde de puesta a tierra del gabinete se debe quitar del
conector de puesta a tierra exterior (tornillo verde) y ajustar
debajo del terminal neutral (cable central o blanco) del bloque
de terminal. Cuando el hilo verde de puesta a tierra del
gabinete este ajustado debajo del terminal neutral (cable
central o blanco) del bloque de terminal, el gabinete de la
secadora queda aislado del conductor neutral.
• Si los cddigos locales no permiten la conexi6n de un
conector para conexidn atierra del equipo al alambre neutro,
vea la secci6n "Conexi6n opcional de 3 hilos".
• Use un cable conductor de 4 alambres cuando se instale la
secadora en una casa rodante o un Area donde los cddigos
locales no permiten la conexi6n a tierra mediante el alambre
neutro.
Si emplea un cable de suministro el_ctrico:
• Use un juego que este en la lista de UL para cable de
suministro electrico que este marcado para ser usado en
secadoras de ropa. El juego debera contener:
• Un cable de suministro electrico de 30 amperios que este en
la lista de UL, con 120/240 voltios minimo. El cable debera
ser del tipo SRD o SRDT y debera tener un largo de por Io
menos 4 pies (1,22 m). Los hilos que conectan con la
secadora deberan terminar en terminales de anillo o de
horquilla con los extremos hacia arriba.
• Un protector de cables que este en la lista de UL
Si el contacto de pared luce como este:
Contacto de 4 alambres (!4-30t:?)
Entonces elija un cable de suministro electrico de 4 alambres con
terminales de anillo o de horquilla y con protector de cables que
este en la lista de UL. El cable de suministro de corriente de
4 hilos, de per Io menos 4 pies (1,22 m) de largo, debe tener
4 hilos de cobre de calibre 10 y encajar en un tomacorriente para
4 hilos de Tipo NEMA 14-30R. El hilo de puesta a tierra
(conductor de puesta a tierra) puede ser verde o desnudo. El
conductor neutral debe ser identificado con una cubierta blanca.
Si el contacto de pared luce come este:
Contacto de 3 hilos (10-30t:?)
Entonces elija un cable de suministro electrico de 3 alambres con
terminales de anillo o de horquilla y con protector de cables que
este en la lista de UL El cable de suministro de corriente de
3 hilos, de por Io menos 4 pies (1,22 m) de largo, debe tener
3 hilos de cobre de calibre 10 y encajar en un tomacorriente para
3 hilos de Tipo NEMA 10-30R.
Si hace la conexibn con cableado directo:
El cable de suministro electrico debe ser igual al del suministro
electrico (de 4 alambres o de 3 alambres) y debe ser:
• Cable blindado flexible o cable de cobre forrado no metalico
(con alambre puesto a tierra), protegido con un conducto
metalico flexible. Todos los alambres conductores de
corriente deben estar aislados.
• Alambre de cobre s61ido de calibre 10. (No utilice aluminio.)
• Tener por Io menos 5 pies (1,52 m) de Iongitud.
(NSTRUCCNONES PARA LA CONEXI6N A TIERRA
[] Para la conexidn de una lavadora/secadora mediante
cable electrico conectado a tierra:
Esta lavadora/secadora debe estar conectada a tierra. En el
caso de funcionamiento defectuoso o aver(a, la conexidn a
tierra reducir_ el riesgo de cheque electrico al proporcionar
una via de menor resistencia para la corriente electrica. Esta
lavadora/secadora usa un cable que cuenta con un conductor
para la conexi6n a tierra del equipo y un enchufe de conexi6n
a tierra. El enchufe debe conectarse en un contacto apropiado,
que este debidamente instalado y conectado a tierra de
acuerdo con todos los c6digos y ordenanzas locales.
[] Para la conexi6n permanente de una lavadora/secadora:
Esta lavadora/secadora debe estar conectada a un sistema
de cableado de metal permanente, conectado a tierra, o se
debe tender un conducto para la conexidn a tierra del equipo
con los conductores de circuito y conectado al terminal de
tierra del equipo o al conductor de suministro de la lavadora/
la secadora.
ADVERTENCIA: La conexidn indebida del conductor
para la conexidn a tierra del equipo puede ocasionar un riesgo
de cheque electrico. Verifique con un electricista,
representante o personal de servicio tecnico calificado para
asegurarse de que la conexidn a tierra de la lavadora/la
secadora sea apropiada. No modifique el enchufe que viene
con el cable electrico. Si no encaja en el contacto, contrate un
electricista calificado para que instale un contacto adecuado.
GUARDE ESTAS INSTRUCCIONES
2O
/