Page is loading ...

Multi-Functional Rice Cooker
Arrocera Multifuncional
Cuiseur à Riz Multifonction
B07T82P735, B07T82NC5N, B07TDCSL8B, B07TB6T8J1

English . . . . . . . . . . . . . . . . . . . . . . . . . . . . . . . . . 4
Español . . . . . . . . . . . . . . . . . . . . . . . . . . . . . . . 17
Français . . . . . . . . . . . . . . . . . . . . . . . . . . . . . . . 30

3
A (1 x)
B (1 x) C (1 x)
D (1 x) E (1 x) F (1 x)

4
EN
IMPORTANT SAFEGUARDS
Read these instructions carefully and retain them for future
use. If this product is passed to a third party, then these
instructions must be included.
When using electrical appliances, basic safety precautions should always
be followed to reduce the risk of fire, electric shock, and/or injury to
persons including the following:
WARNING
Risk of burns! Spilled food can cause serious burns.
Keep appliance and cord away from children. Never drape cord over
edge of counter, never use outlet below counter, and never use with an
extension cord.
CAUTION
Risk of electric shock! Cook only in removable container.
CAUTION
Risk of burns! This appliance is not intended for deep
frying foods.
CAUTION
Risk of burns! Do not touch the steam valve on the lid
of the product as hot steam evaporates.
CAUTION
Risk of burns! Be careful when opening the lid as hot
steam evaporates
• Read all instructions.
• Close supervision is necessary when the appliance is used by or near
children.
• Do not touch hot surfaces. Use handles or knobs.
• Extreme caution must be used when moving an appliance containing
hot oil or other hot liquids.
• Unplug from outlet when not in use and before cleaning. Allow to
cool before putting on or taking off parts, and before cleaning the
appliance.
• To protect against electric shock, do not place cord, plugs, or
appliance in water or other liquid.
• Do not let cord hang over edge of table or counter, or touch hot
surfaces.
• Do not operate any appliance with a damaged cord or plug or after
the appliance malfunctions, or has been damaged in any manner.
Return the appliance to an authorized service facility for examination,
repair or adjustment.
• Do not use outdoors.
• Do not place on or near a hot gas or electric burner, or in a heated
oven.

5
EN
• The use of an accessory not evaluated for use with the product may
cause injuries.
• To disconnect, turn any control to “off”, then remove plug from wall
outlet.
• Do not immerse in water.
• Intended for countertop use only.
• A short power-supply cord is used to reduce the risk resulting from it
being grabbed by children, becoming entangled in, or tripping over a
longer cord.
• Do not use the handle to move the cooker when any food is in it.
• This product is for household use only.
• Do not use appliance for other than intended use.
• This appliance has a polarized plug (one blade is wider than the
other). To reduce the risk of electric shock, this plug will fit outlet only
one way. If the plug does not fit fully in the outlet, reverse the plug.
If it still does not fit, contact a qualified electrician. Do not modify the
plug in any way.
WARNING
Spilled food can cause serious burns.
Keep appliance and cord away from children.
NEVER:
• Drape cord over edge of counter.
• Use outlet below counter.
• Use with an extension cord.
SAVE THESE INSTRUCTIONS

6
EN
Intended Use
• This product is intended to be used to cook rice and various other
kinds of food. It can be used in preset modes or with individual
settings for time and temperature.
• This product is intended for household use only. It is not intended for
commercial use.
• This product is intended to be used in dry indoor areas only.
• No liability will be accepted for damages resulting from improper use
or non-compliance with these instructions.
Before First Use
• Check the product for transport damages.
• Clean the product before first use.
• Before connecting the product to the power supply, check that the
power supply voltage and current rating corresponds with the power
supply details shown on the product rating label.
DANGER
Risk of suffocation! Keep any packaging materials away
from children – these materials are a potential source of danger, e.g.
suffocation.
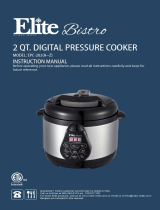
Delivery Content
A Main unit D Measuring cup
B Cooking pot E Soup ladle
C Steam attachment F Serving spatula

7
EN
Product Description
G Lid K Water tray
H Pot lid L Handle
I Temperature sensor M Supply cord
J Steam valve (on the lid) N Lid release
G
H
I
J
K
L
M
N

8
EN
TIMER
TEMP
Brown Rice
Quinoa
F
TEMP
WARM
CANCEL
MENU
START
White Rice
Steam
Browning
/Saute
Slow Cook
Manual
Soup
Stew
Oatmeal
Pasta
Defrost
Quick
Rice
°
O TIMER/TEMP button T WARM/CANCEL button
P +/– buttons U START button
Q Temperature indicator V MENU button
R Display W Quick select buttons
S Program indicators
Operation
NOTICE
Risk of product damage! Before placing the cooking
pot(B) into the product, check that it is dry and clean. A wet cooking pot
may damage the product.
NOTICE
Risk of product damage! Never fill the cooking pot (B)
above the maxmarking on its inside.
Assembling the cooking pot/steam attachment
• Press the lid release (N) to open the lid (G).
• Insert the cooking pot (B) and tightly press it down.
• Insert the steam attachment (C) into the cooking pot (B).
O Q R S T U
VW
P

9
EN
Switching on/off
• Place the product on an even and stable surface.
• Connect the plug to a socket outlet.
• Entering the standby mode: Tap the START button (U).
• Switching the product off: Tap the START button (U) while the
product is in standby mode.
• After use: Disconnect the product from the power supply.
Start cooking
• Enter the standby mode.
• Select the desired program by tapping the MENU button(V) or
a quick select button(W). While tapping the MENU button, the
selected program is indicated by the program indicators(S).
• If needed, change the cooking time by tapping the +/– buttons(P).
• Tap the START button (U) to start cooking.
• A running circle is shown on the display (R) as long as the cooking
temperature is not reached.
• When the cooking temperature is reached, a countdown on the
display (R) shows the remaining cooking time.
• Cancel: Tap the WARM/CANCEL button (T).
Delayed cooking
A timer can be set up to 24hours before cooking should be completed
(except in Manual, Browning/ Saute Defrost and Quick Rice programs).
Setting the timer:
• After the desired program is set, do not start cooking by tapping
the START button (U). Tap instead the TIMER/TEMP button (O).
Anindicator lights up above it.
• Tap the +/– buttons (P) to select the time period when the cooking
should be completed. The time can be set in hourly increments.
• Tap the START button (U) to start the timer.
• The remaining time until the cooking will be finished is shown on the
display (R).

10
EN
Cooking programs
Programs selectable by tapping the MENU button (V).
Program
Cooking time
(default)
Time
increments
Additional
information
Brown Rice /
Quinoa
Approx. 80 min
(not adjustable)
Refer to the “cooking
examples”.
White Rice Approx. 55 min
(not adjustable)
Refer to the “cooking
examples”.
Steam
5 to 30 min
(5 min)
1 min
The food is steam
cooked in the steam
attachment.
Slow Cook
2 to 10 h
(2 h)
1 h
The cooking
temperature is 201°F
(94 °C).
Manual
1 min to 4 h
(1 min)
10 min
The available cooking
temperature is 95°F
(35°C) to 275°F
(135°C).
When the cooking
time is longer
than 2hours, the
maximum available
temperature is 230°F
(110°C).
Refer to the “cooking
examples”.
Soup / Stew 2 to 4 h
(2 h)
1 h
Oatmeal Approx. 40 min
(not adjustable)
Pasta 10 to 35 min
(10 min)
1 min
Refer to the “cooking
examples”.

11
EN
Programs selectable by tapping the quick select buttons (W).
Program
Cooking time
(default)
Time
increments
Additional
information
Browning/
Saute
Approx. 60 min
(not adjustable)
Refer to the “cooking
examples”.
Defrost
10 to 15 min
(5 min)
1 min
The defrosting
temperature is 149°F
(65°C).
Quick Rice Approx. 45 min
(not adjustable)
Refer to the “cooking
examples”.
Cooking examples
Brown Rice, White Rice, Quick Rice
Refer to the rice scale on the inside of the cooking pot (B) to use
the correct amount of water. 1 scale level of water is sufficient for
1measurement cup (D) of rice.
Example: For cooking 4 measurement cups of rice the water should
reach level 4 on the rice scale.
Pasta
Refer to the rice scale on the inside of the cooking pot (B) to use the
correct amount of water. 2scale levels of water are sufficient for 100g of
pasta.
Example: For cooking 400g of pasta, the water should reach level 8on
the rice scale.
NOTICE
For better results, stir the pasta during the first 1–2minutes
to prevent it from sticking together.

12
EN
Sauté
Refer to the rice scale on the inside of the cooking pot (B) to use the
correct amount of water.
Ingredient
Filling level (scale levels)
1 2 3
Olive oil 1.4 fl.oz (40 ml) 2 fl.oz (60 ml) 2.7 fl.oz (80 ml)
Jasmine rice 1measurement
cup
(5.3 oz / 150 g)
2measurement
cups
(10.6 oz / 300 g)
1measurement
cups
(15.9 oz / 450 g)
Onion 1/3 piece 1/2 piece 1 piece
Bell pepper 1/3 piece 1/2 piece 1 piece
Salt 0.4 oz (10 g) 0.8 oz (20 g) 1 oz (30 g)
Ketchup 2 oz (60 g) 4 oz (120 g) 6 oz (180 g)
• Start the program (see “Start cooking”).
• Preheat the olive oil for 5 minutes. Let the lid (G) open during this time.
• Add the jasmine rice. Stir fry until the rice turns the rice turn golden or
yellowish.
• Add the remaining ingredients and stir fry until the desired frying level
is reached.
• Fill the cooking pot (B) with water or broth to the appropriate level.
• Close the lid (G) and wait until the program is finished.
Manual
• Tap the MENU button (V) until Manual program indicator(S) lights up.
• Tap the +/– buttons (P) to select the desired cooking time.
• Tap the TIMER/TEMP button(O) to confirm.
• Tap the +/– buttons (P) to select the desired cooking temperature.
• Tap the START button(U) to start cooking.

13
EN
Keep warm function
After a program is finished, the keep warm function automatically
switches on (except in Browning/ Saute and Defrostprograms).
While the keep warm function is activated, appears on the display(R).
The indicator of the WARM/CANCEL button(T) lights up.
The keep warm function runs for up to 12hours. Afterwards, the product
switches to standby mode.
To activate the keep warm function manually, tap the WARM/CANCEL
button(T) while the product is in standby mode.
Cleaning
WARNING
Risk of electric shock! To prevent electric shock,
unplug the product before cleaning.
WARNING
Risk of electric shock! During cleaning do not
immerse the electrical parts of the product in water or other liquids.
Never hold the product under running water.
• Let the product cool down to room temperature before cleaning.
• Before reassembling, dry all parts after cleaning.
• Never use corrosive detergents, wire brushes, abrasive scourers,
metal or sharp utensils to clean the product.
Housing
• To clean the housing, wipe with a soft, slightly moist cloth.
Cooking pot, steam attachment and utensils
• To clean the cooking pot(B), the steam attachment(C) and the
utensils(D, E, F), rinse them in warm water with a mild dishwashing
detergent.
• The cooking pot(B), the steam attachment(C) and the utensils(D, E,
F), are suitable for the dishwasher (top rack only).

14
EN
Pot lid
• Press both brackets at the edge and remove the pot lid (H).
• Clean the pot lid (H). If needed, use a mild detergent.
• Insert the pot lid (H) into the lid (G). Carefully push it in until both
brackets lock firmly.
Steam valve
NOTICE
The steam valve (J) should be cleaned frequently to ensure
smooth venting.
• Gently pull the steam valve(J) out of the lid(G).
• Rotate the inner part of the steam valve (J) in an anti-clockwise
direction and detach.
1
2
1
1
2
3

15
EN
• Rinse the steam valve (J) under fresh water.
• Dry the steam valve (J).
• If needed, reattach the sealing ring into place.
• Assemble the steam valve (J). Rotate the inner part of the steam valve
in a clockwise direction.
• Gently push the steam valve (J) back into the lid (G).
Storage
• Store the product in its original packaging in a dry area. Keep away
from children and pets.
Maintenance
• Any other servicing than mentioned in this manual should be
performed by an authorized service representative.
4
5
6
Sealing ring
7

16
EN
Specifications
B07T82P735, B07T82NC5N
Rated power: 120 V~, 60Hz
Power consumption: 619W
Capacity: approx. 101.5 fl.oz. (3 L)
Dimensions (D x H x W): approx. 14.5 x 10.5 x 8.6"
(368 x 271 x 218mm)
Weight: approx. 7.2 lbs (3.24 kg)
B07TDCSL8B, B07TB6T8J1
Rated power: 120 V~, 60Hz
Power consumption: 875W
Capacity: approx. 170 fl.oz. (5 L)
Dimensions (D x H x W): approx. 15.4 x 10.8 x 10.5"
(391 x 275 x 267mm)
Weight: approx. 9 lb (4.1 kg)
Feedback and Help
Love it? Hate it? Let us know with a customer review.
AmazonBasics is committed to delivering customer-driven products
that live up to your high standards. We encourage you to write a review
sharing your experiences with the product.
amazon.com/review/review‑your‑purchases#
amazon.com/gp/help/customer/contact‑us

amazon.com/AmazonBasics
V01-08/19
MADE IN CHINA
HECHO EN CHINA
FABRIQUÉ EN CHINE
/