Page is loading ...

METRA. The World’s best kits.
™
metraonline.com1-800-221-0932
© COPYRIGHT 2015 METRA ELECTRONICS CORPORATION
REV. 9/22/2015 INST95-6528B
CAUTION: Metra recommends disconnecting the
negative battery terminal before beginning any
installation. All accessories, switches, and especially
air bag indicator lights must be plugged in before
reconnecting the battery or cycling the ignition.
NOTE: Refer to the instructions included with the
aftermarket radio.
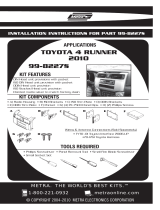
Installation instructions for part 95-6528B
• ISO Double DIN radio provision
• Painted matte black
• A) Radio trim panel • B) Radio brackets • C) Radio trim panel retainers • D) (4) #8 x 3/8” Phillips screws
KIT FEATURES
KIT COMPONENTS
WIRING & ANTENNA CONNECTIONS (sold separately)
Wiring Harness: • XSVI-6502-NAV • CHTO-01
Antenna Adapter: • 40-CR10
• Phillips screwdriver • Panel removal tool
• Socket wrench • Cutting tool/file
TOOLS REQUIRED
Dodge Ram 1500 2006-2008
2500/3500 2006-2009
2500/3500
chassis cab 2006-2010
95-6528B
A
C
B
D
Dash Disassembly
– Without center console ......................................... 2
– With mini console................................................. 3
– With full console .................................................. 4
Kit Assembly
– ISO Double DIN radio provision ............................. 5
Table of Contents

95-6528B
Dash Disassembly
(without center console)
1. Open cup holder and remove (2)
Phillips screws facing up on front
edge of radio/climate control panel.
(Figure A)
2. Unclip and remove entire panel
surrounding radio and climate
controls, including A/C vents.
(Figure B)
3. Remove (4) 7mm screws securing
radio. Unplug and remove radio.
Continue to kit assembly
(Figure B)
(Figure A)
2

95-6528B
Dash Disassembly
(with mini console)
3
1. If vehicle has floor shifter, remove
shifter knob. Then remove center
console inserts, if present.
(Figure A)
2. Remove screws securing the rear
center console to the floor panel.
Lift up on the rear center console
to clear the gear shift lever, if
present. (Figure B)
3. Remove screws securing the front
center console to the floor panel.
Unclip and remove the front center
console. (Figure C)
4. Remove (2) Phillips head screws
at bottom of dash. Unsnap and
remove lower panel.
5. Remove (2) Phillips screws facing
up on front edge of radio/climate
control panel. (Figure D)
6. Unclip and remove entire panel
surrounding radio and climate
controls, including A/C vents.
(Figure E)
7. Remove (4) 7mm screws securing
radio to dash and remove radio.
Continue to kit assembly
(Figure A)
(Figure D)
(Figure B)
(Figure E)
(Figure C)

95-6528B
4
(Figure A) (Figure C)
(Figure D)(Figure B)
1. If vehicle has floor shifter, remove
shifter knob.
2. Unsnap and remove console front
top cover (closest to the dash).
(Figure A)
3. Remove (2) 8mm screws from
under console cover (previously
removed). Remove front section of
console. (Figure B)
4. Loosen (2) 8mm screws at bottom
of dash. Unsnap lower panel.
5. Remove (2) Phillips screws facing
up on front edge of radio/climate
control panel. (Figure C)
6. Unclip and remove entire panel
surrounding radio and climate
controls, including A/C vents.
(Figure D)
7. Remove (4) 7mm screws securing
radio to dash and remove radio.
Continue to kit assembly
Dash Disassembly
(with full console)

95-6528B
5
Kit Assembly
ISO Double DIN radio provision
1. Cut or file the factory radio panel
to make room for the new DDIN
radio. Cut the section between the
pocket and radio openings, and file
1/8” from the sides of the opening.
(Figure A)
2. Snap the radio trim panel over the
front of the factory radio panel (the
snaps will be at the top of the radio
opening). (Figure B)
3. Install the included retainers with
the #8 x 3/8” screws from the
back of the factory panel to hold
the trim panel and factory panel
together. (Figure B)
4. Attach the radio brackets to the
radio using the screws supplied
with the radio. (Figure C)
5. Locate the factory wiring harness
and antenna plug in the dash and
make all necessary connections
to the radio. Metra recommends
using the proper mating adapter
from Metra or AXXESS. Re-connect
the negative battery terminal and
test the radio for proper operation.
6. Reassemble the dash in reverse
order of disassembly.
(Figure A) (Figure C)
(Figure B)
Remove
shaded
area

METRA. The World’s best kits.
™
metraonline.com1-800-221-0932
© COPYRIGHT 2015 METRA ELECTRONICS CORPORATION
REV. 9/22/2015 INST95-6528B
KNOWLEDGE IS POWER
Enhance your installation and fabrication skills by
enrolling in the most recognized and respected
mobile electronics school in our industry.
Log onto www.installerinstitute.com or call
800-354-6782 for more information and take steps
toward a better tomorrow.
Metra recommends MECP
certified technicians
Installation instructions for part 95-6528B

INSTRUCCIONES DE INSTALACIÓN PARA LA PIEZA 95-6528B
METRA. The World’s best kits.
™
metraonline.com1-800-221-0932
© COPYRIGHT 2015 METRA ELECTRONICS CORPORATION
REV. 9/22/2015 INST95-6528B
KNOWLEDGE IS POWER
Enhance your installation and fabrication skills by
enrolling in the most recognized and respected
mobile electronics school in our industry.
Log onto www.installerinstitute.com or call
800-354-6782 for more information and take steps
toward a better tomorrow.
Metra recomienda técnicos
con certificación del Programa
de Certificación en Electrónica
Móvil (Mobile Electronics
Certification Program, MECP).
EL CONOCIMIENTO ES PODER
Mejore sus habilidades de instalación y fabricación
inscribiéndose en la escuela de dispositivos electrónicos
móviles más reconocida y respetada de nuestra industria.
Regístrese en www.installerinstitute.com o llame al
800-354-6782 para obtener más información y avance
hacia un futuro mejor.
IMPORTANTE
Si tiene dificultades con la instalación de este
producto, llame a nuestra línea de soporte técnico
al 1-800-253-TECH. Antes de hacerlo, revise las
instrucciones por segunda vez y asegúrese de que
la instalación se haya realizado exactamente como
se indica en las instrucciones. Por favor tenga el
vehículo desarmado y listo para ejecutar los pasos
de resolución de problemas antes de llamar.
/