Page is loading ...

Rev. 09.03.13
INSTALLATION INSTRUCTIONS
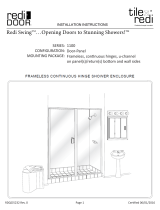
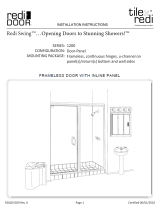
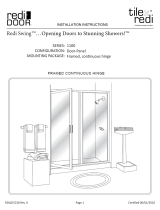
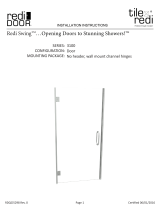
DESIGNER SERIES FRAMELESS
Shower Height Swing Door With In-Line Panel
Model: L2271

MAINTENANCE: Two primary materials are used to manufacture your new Aquatic enclosure: tempered
glass and anodized aluminum. To assure a long lasting finish on the enclosure, wipe it down with a towel after
each use. Never use a scouring agent to clean the aluminum.
For occasional, more concentrated cleaning efforts, we find that Lysol Non -Abrasive Bathroom Cleaner
works extremely well. Be sure that any over spray falling on the aluminum frame is rinsed thoroughly and
dr
ied. Many over-the-counter cleaners, if applied to the aluminum and left on, will harm the metal finish and
cause permanent damage, even though their directions indicate safe use on shower doors.
INSTALLATION NOTES: Unpack your unit carefully and inspect for freight damage. Lay out and identify
all parts using the instruction sheets as a reference.
Before discarding the carton, check to see that no small
hardware parts have fallen to the bottom of the box. If any parts are damaged or missing, refer to the
descriptions noted in the instructions when contacting your dealer for replacements.
Handle the glass panels carefully and protect the edges.
Please wear safety glasses whenever drilling or cutting. When drilling hol
es in the ceramic tile or
marble, use a
center punch and hammer to carefully break the surface glaze so the drill can start without skidding.
To install your Aquatic Shower Door you will need the following: tape measure, level, #2 Phillips screwdriver,
drill, 1/8” and 3/16” drill bits, hacksaw, pencil, and caulking (clear silicone recommended).
Optional tools include a miter box for cutting parts to length, files, center punch, and masking tape.
NOTE: Tempered glass cannot be cut.
Although safety tempered glass is very resistant to breakage, the
glass can still break if unequal pressure is placed on it during
installation. Use caution. In addition, the sharp corners of the
panels can damage tile and floor surfaces, so it is best to handle
the glass panels carefully and protect the edges.
Page 2 of 9

A.
B.
C.
D.
E.
F.
G.
H.
I.
Q.
R.
S.
1 - 1/2 Moon Dam Strip
2 - Wall Jambs
6 - Plastic Wall Anchors
6 - Truss Head Screws
1 - Header
2 - Magnetic Latch
10 - SCR24 Self Taping Screws
2 - Hinge Jamb
2 - Door Rail
1 - Snap-in Fill
2 - Door Panels
2 - Plastic Door Deflectors
T.
U.
V.
W.
HANDLE PARTS
J&K.
L.
M.
N.
O.
P.
1 - Aquatic Decal
2 - Magnets
2 - Vinyl Seals
1 - Strike Vinyl
2 each - SC1417 Interior & Exterior Handle
8 - SC4584 Metal Washers
8 - SC4585 Large Clear Discs
8 - SC4586 Small Clear Discs
4 - SC4587 Glass Hole Sleeves
4 - SC1588 Stud Screws
E
C
D
B
D
C
B
A
F
G
G
H
H
I
I
Q
R
R
S
T
V
W
U
V
S
O
N
P
K
L
M
J
Y.
2 - Latch Vinyls
Y
Y
Parts List
Page 3 of 9

For tile or marble walls, drill six 3/16” diameter holes
and insert the plastic wall anchors [C]. Attachments to
fiberglass or acrylic units can be made in two ways. If
reinforcement is built into the wall of the unit, drill six
1/8” holes to install mounting screws directly into the
reinforcement. If walls are not reinforced, drill six
3/16” holes and install plastic wall anchors or toggle
bolts (toggle bolts not supplied by Aquatic ).
1
Find your center point of your threshold and mark it
with a pencil, this will help you as you continue to
instal your showerdoor.
NOTE: Center Line - is a term that is used to determine
where you will install your unit on the threshold.
Center Line
Using a level on the wall jambs [B], plumb the jambs
and mark the hole locations on the wall. Remove the jambs
and drill for hardware.
2
Wall Jamb
Wall Anchors
Truss Head
Screws
Wall
Threshold
Mark your center line positions on your threshold and
also at the base of your wall
Center point
Measure the wall-to-wall opening at the top of
the wall jambs [B] and cut the header [E ] to fit the
exact opening. Using a 1/8” drill bit, drill the interior
face of the header on both ends as shown.
MEASURE AT TOP
OF WALL JAMB
”8/3
HEADER
.AID ”8/1
”4/1
INTERIOR
EXTERIOR
3
Page 4 of 9

4
Slide the hinge jamb of the door panel assembly [H]
over the mounted wall jamb [B] so that the door will open
outward.
Adjust the door panel assembly so there is a 5/16” clearance
between the edge of the hinge jamb and the wall.
IMPORTANT: Use a level to make sure the door is plumb
CHECK: The door glass should be 1/16” from the center
point that was shown in step #2.
Wall
Jamb
Hinge
Jamb
Panel
Interior
5/16”
Hinge
Jamb
Panel
Screw
Wall
Jamb
5
Inside the shower enclosure, drill two 1/8” holes
through the hinge jamb and into the wall jamb [B] 3/8”
to 3/4” from the wall and approximately 1” vertically
from each end of the hinge jamb. Drill a third hole
centered between the first two. Attach the door panel
assembly permanently with three #6 x 3/8” pan head
screws [G].
HINT: INSTALLING THE HANDLE BEFORE YOU INTALL THE PANEL
WILL GIVE YOU A BETTER HANDLEING OF THE DOOR PANEL
6
Before installing the 2nd door panel, find the strike jamb
[W] and install in on the first panel. This will protect the edge
of the glass when aligning the 2nd door panel.
Wall
Jamb
Hinge
Jamb
Panel
Strike jamb
Page 5 of 9

INTERIOR
EXTERIOR
SNAP-N-FILL
Wall
Jamb
Hinge
Jamb
Panel
Interior
5/16”
7
When installing the 2nd panel slide the hinge jamb of
the door panel assembly (H) over the mounted wall jamb
(B) so the door will open outward while holding the panel,
install the snap-n-fill (J) into the header. This will allow
you to adjust the 2nd door.
IMPORTANT: The snap-n-fill (J) should come with 2
magnets and 2 vinyl seals (O) already in place. If not you
must put them in before installing the snap-n-fill into the
header
NOTE: If the snap-n-fill is not cut to size. Use this
formula
#1 panel glass size + #2 panel glass size + 1 7/8 =
(snap-n-fill)
Vinyl seal
8
Pull the top of the hinge jamb (H) tight
with the snap-n-fill (J) use a level to make sure
the door panel is plumb.
Allign the 2nd door panel with the 1st door
panel leaving a 1/8” clearance between the
two panel panels.
1/8”
Page 6 of 9

9
ONCE THE TWO DOORS ARE ALIGNED, REPEAT STEP #5
(AS SEEN BELOW)
Hinge
Jamb
Panel
Screw
Wall
Jamb
Inside the shower enclosure, drill two 1/8” holes
through the hinge jamb and into the wall jamb [B] 3/8”
to 3/4” from the wall and approximately 1” vertically
from each end of the hinge jamb. Drill a third hole
centered between the first two. Attach the door panel
assembly permanently with three #6 x 3/8” pan head
screws [G].
10
Slide the magnetic latch (N) onto the door
panel close the door and align the latch with the
magnet in the snap-n-fill. Use a pencil or tape and
mark the location of the latch on the door.
Place the vinyl material onto the door between the
mark and carefully drive the door latch onto the panel
trim excess vinyl material off with utility knife.
NOTE: Never use a metal hammer when installing
door latches
INTERIOR
EXTERIOR
Page 7 of 9

11
12
OPTIONAL VINYL FOR INSTALLATION
The h-jamb (P) vinyl found in step #6 is a optional seal.
13
OPTIONAL BOTTOM SEAL FOR INSTALLATION
The 1/2 moon dam strip (A) This dam strip is placed
between the hinge jambs and helps prevent water
leakage.
To Install: Measure the distance between the hinge
jambs and cut the dam strips to the exact opening.
Use silicone to adhere to the threshold.
Important: The placement of the dam strip
is very important!
Make sure to place the inside lip of the dam strip
on the center line
Centerline
Centerline
Dam Strip
Vinyl Sweep
Panel
Page 8 of 9

14
mark the opposite side even with the door edge cut
15
Jamb
Panel
shower curb and the hinge jamb
Page 9 of 9
/