Episode IC-6 Installation guide
- Category
- Loudspeakers
- Type
- Installation guide
This manual is also suitable for
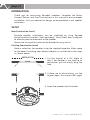
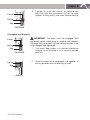
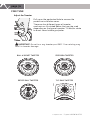
Episode IC-6 In-Ceiling Speakers deliver high-quality audio performance with its 6.5-inch woofer and 1-inch pivoting silk dome tweeter coupled with a sealed enclosure design. It features a paintable grille and bezel for a seamless integration into your home décor. With its wide frequency response of 40Hz to 20kHz and 87dB sensitivity, the Episode IC-6 is ideal for background music, whole-house audio systems, and home theaters.
Episode IC-6 In-Ceiling Speakers deliver high-quality audio performance with its 6.5-inch woofer and 1-inch pivoting silk dome tweeter coupled with a sealed enclosure design. It features a paintable grille and bezel for a seamless integration into your home décor. With its wide frequency response of 40Hz to 20kHz and 87dB sensitivity, the Episode IC-6 is ideal for background music, whole-house audio systems, and home theaters.


-
 1
1
-
 2
2
-
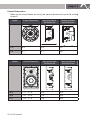 3
3
-
 4
4
-
 5
5
-
 6
6
-
 7
7
-
 8
8


Episode IC-6 Installation guide
- Category
- Loudspeakers
- Type
- Installation guide
- This manual is also suitable for
Episode IC-6 In-Ceiling Speakers deliver high-quality audio performance with its 6.5-inch woofer and 1-inch pivoting silk dome tweeter coupled with a sealed enclosure design. It features a paintable grille and bezel for a seamless integration into your home décor. With its wide frequency response of 40Hz to 20kHz and 87dB sensitivity, the Episode IC-6 is ideal for background music, whole-house audio systems, and home theaters.
Ask a question and I''ll find the answer in the document
Finding information in a document is now easier with AI
Related papers
-
Episode ESS-1700T-IW-6 Owner's manual
-
Episode ES-350T-IC-6 Installation guide
-
Episode ES-700-ICSURR-6 Owner's manual
-
Episode IW-8 Installation guide
-
-
-
-
-
Episode ES-700-IC-8 Owner's manual
-
Other documents
-
SunBrite ES-AW-SNDBR-M-BLK Owner's manual
-
Control4 All User guide
-
Strong SM-RBX-14-WH Owner's manual
-
-
-
-
-
-
Niles Directed Soundfield DS6.5 User manual
-
Niles Audio DS8.3 User manual