POWER BOARD ASSEMBLY
P/N 0558038315, 0558038323, 0558038346, 0558038347, 0558038379, 0558038380
Before installation:
1. Disconnect input power to machine.
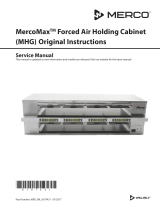
2. Verify position of dip switches.
Settings:
1. Verify SW1 - 1,2 dip switches are in the “closed” position for proper operation.
0558008405 09/2009
open
1 2
R90
Voltage Divider Trimpot
(mechanized versions)
Note:
If the parent machine is a mechanized version, refer to instruction manual for the
voltage divider adjustment.
Important Note:
This replacement pc board may have 10-32 (ne) studs for TB-8 and J18.
Earlier PowerCut machines and replacement pc boards have 10-24 (course) studs.
Carefully hand thread existing nuts removed from PowerCut to determine if chang-
ing to 10-32 (ne) nut is necessary. If yes, then use supplied 10-32 (ne) nuts.
J18 stud
TB-8 stud
/