Page is loading ...

DP400TP
Temp / Process Indicator
TM
User’s Guide
Shop online at
omega.com
e-mail: [email protected]
For latest product manuals:
www.omegamanual.info

The information contained in this document is believed to be correct, but OMEGA accepts no liability for any errors it
contains, and reserves the right to alter specifications without notice.
Servicing North America:
U.S.A. Omega Engineering, Inc.
Headquarters: Toll-Free: 1-800-826-6342 (USA & Canada only)
Customer Service: 1-800-622-2378 (USA & Canada only)
Engineering Service: 1-800-872-9436 (USA & Canada only)
Tel: (203) 359-1660 Fax: (203) 359-7700
e-mail: in[email protected]
For Other Locations Visit omega.com/worldwide
omega.com [email protected]

User manual - DP400TP- 3
Table of contents
1 Safety guidelines ....................................................................................................................5
2 Model identification ..............................................................................................................5
3 Technical Data ........................................................................................................................6
3.1 General data ..................................................................................................................6
4 Hardware data ........................................................................................................................6
4.1 Software data ................................................................................................................7
5 Dimensions and Installation ...............................................................................................8
6 Electrical wirings ....................................................................................................................8
6.1 Wiring diagram .............................................................................................................9
7 Display and Key Functions .................................................................................................13
7.1 Keys .................................................................................................................................13
7.2 Display ...........................................................................................................................13
8 Controller Functions ............................................................................................................15
8.1 DP-USB-CARD (optional) ..........................................................................................15
8.2 Modifying alarm thresholds ....................................................................................15
8.3 Latch on function ...................................................................................................... 16
8.4 Digital input functions ..............................................................................................17
8.5 Peak values .................................................................................................................. 18
8.6 Totalizer function....................................................................................................... 18
8.7 Sum function ...............................................................................................................19
8.8 Customizable linear input ........................................................................................19
8.9 Alarm Intervention Modes ...................................................................................... 20
8.10 Datalogger .................................................................................................................. 22
9 Serial communication ....................................................................................................... 23
10 Configuration ....................................................................................................................... 27
10.1 Modifying configuration parameters .................................................................. 27
10.2 Loading default values............................................................................................. 27
11 Table of configuration parameters ................................................................................ 28
11.1 Analog input ............................................................................................................... 28
11.2 V/I custom .................................................................................................................... 32
11.3 Alarm 1 ......................................................................................................................... 36

4 - DP400TP - User manual
11.4 Alarm 2 ......................................................................................................................... 38
11.5 Display .......................................................................................................................... 40
11.6 Digital input 1 ............................................................................................................. 41
11.7 Digital input 2 ............................................................................................................. 42
11.8 Graphic ......................................................................................................................... 42
11.9 Analog output in mA ................................................................................................ 43
11.10 Analog output in Volt ............................................................................................... 44
11.11 Comunication port .................................................................................................... 45

User manual - DP400TP- 5
Introduction
Thanks for choosing an Omega device.
DP400TP is an indicator/panel meter for acquisition and retransmission of
processes, also with a fast transient. It is provided with relay outputs for
alarm purpose, analog outputs for retransmission of process/setpoints and
programmable digital inputs.
Available in standard format 96x48mm, the device can be configured both for
horizontal and vertical mounting.
This distinctive feature is the intuitive multilingual interface and a
128x64 pixel
graphical OLED display (monochrome yellow)
.
Visualization options include bar graph and process trend with programmable
sampling time. Software features include mathematical functions related to
processing value like Totalizer and Sum.
Serial connectivity relies on RS485 and Modbus-RTU protocol.
1 Safety guidelines
Read carefully the safety guidelines and programming instructions contained in
this manual before using/connecting the device. Disconnect power supply
before proceeding to hardware settings or electrical wirings.
Only qualified personnel should be allowed to use the device and/or service
it and in accordance with technical data and environmental conditions listed
in this manual. Do not dispose electric tools together with household waste
material.
In observance European Directive 2002/96/EC on waste electrical and electronic
equipment and its implementation in accordance with national law, electric
tools that have reached the end of their life must be collected separately and
returned to an environmentally compatible recycling facility.
2 Model identification
Model 24..230 Vac/Vdc +/-15% 50/60 Hz – 8 VA
DP400TP
2 relays 2 A + 1 out V + 1 out mA + 2D.I. + RS485 +
OLED + Rfid

6 - DP400TP - User manual
3 Technical Data
3.1 General data
Display 2.42” monochrome (yellow) OLED graphical display
Operating
temperature
Temperature 0-40 °C - Humidity 35..95 uR%
Sealing IP54 front panel (with gasket) - IP20 box and terminals
Material Box: polycarbonate V0
Weight Approx. 165 g
4 Hardware data
Power supply
Extended power supply
24..230 Vac/Vdc ±15% 50/60
Hz
Consumption: 8 VA.
Analog input
AN1 Configurable via
software.
Thermocouple type K, S,
R, J, T, E, N, B. Automatic
compensation of cold
junction from 0..50 °C.
Thermoresistance: PT100,
PT500, PT1000, Ni100, PTC1K,
NTC10K (β 3435K).
Input V/I (linear): 0-10 V,
0-20, 4-20 mA, 0-60 mV.
Potentiometer input: 6 KΩ,
150 KΩ.
Tolerance (25 °C)
+/-0.2% ±1 digit (F.s.) for
thermocouple, thermoresi-
stance and V / mA.
Cold junction accuracy 0.1
°C/°C.
Impedance:
0-10 V: Ri>110 KΩ
0-20 mA: Ri<5 Ω
4-20 mA: Ri<5 Ω
0-60 mV: Ri>1 MΩ
Relay outputs 2 Relays
Contacts 2 A - 250 V~.
Resistive charge.
Analog output
1 tension
Linear 0..10 Volt.
1 current
Configurable as output
0..20mA or 4..20mA.
All 16bit +/-0.2% (F.s.)

User manual - DP400TP- 7
4.1 Software data
Regulation
algorithms
ON/OFF with hysteresis
Alarm mode
Absolute / Threshold, Band with instantaneous/delayed/
retentive action/by digital input activation, Sensor failure /
Activation the serial line
Sum Function
By digital input or by keyboard it is possible to sum
different process measurements over time
Totalizer Function
Visualization of instant process value and total value since
last reset
Trend
visualization
Trend visualization up to 59 samples, with selectable time
basis 1 to 3600s
Analog
retransmission
Process values / Setpoints
Digital
transmission
Process values / Setpoint / Parameters via RS485
Latch-on function
Semi-automatic setting of limits/ calibration values for
analog input
Data logging
function
Selectable time basis 1s to 3600s, tot. memory 2.5k words
Text menus English/Italian/Deutsch/French/Spanish

8 - DP400TP - User manual
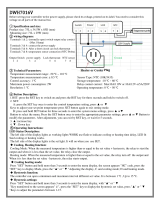
5 Dimensions and Installation
45 x 91 mm
Front panel cut-out
Memory Card
48 mm
5
10
2÷15 mm
Suggested thickness
USB
(optional)
DP-USB-CARD
6 Electrical wirings
Although this controller has been designed to resist noises in an industrial
environment, please notice the following safety guidelines:
• Separate control lines from the power wires.
• Avoid the proximity of remote control switches, electromagnetic meters,
powerful engines.
• Avoid the proximity of power groups, especially those with phase control.
For permanently connected equipment:
• supply wiring must be ≥18 Awg with cables suitable for temperatures > 70 ° C;
• for requirements about any external switch or circuit-breaker see EN 61010-1
par. 6.11.3.1 and about external overcurrent protection devices see EN
61010-1 par. 9.6.2; the switch or circuit-breaker must be near the equipment.

User manual - DP400TP- 9
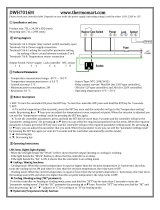
6.1 Wiring diagram
+
-
T C
18
12
1711
1610
159
14
8
13
7
R S 4 8 5
P T C
N T C
P T 10 0 -N I 1 00
V /I
+
-
+
-
0V
A O1
0/4. . .20 m A
+
-
+
-
A O2
0. . .10 V
S U P P LY
24 . . .2 3 0 V
A C /D C
6
5
4
3
2
1
Q 1
2A 2 30 V
R e s i s t i v e
1/8 H P
Q 2
2A 2 30 V
R e s i s t i v e
1/8 H P
+2 4V dc
D I . 1
D I . 2
6.1.a Power supply
5
SUPPLY
24..230V
AC/DC
6
Switching supply with extended range 24..230 Vac/dc
±15% 50/60Hz – 8 VA (galvanic isolated)
6.1.b AN1 analog imput
13
AI1 TC
14
For thermocouples K, S, R, J, T, E, N, B.
• Comply with polarity.
• For possible extensions, use a compensated wire
and terminals suitable for the thermocouples used
(compensated).
• When shielded cable is used, it should be grounded at
one side only.

10 - DP400TP - User manual
13
AI1
14
PT/Ni100
Shield/Schermo
White/Bianco
Red/Rosso
Red/Rosso
15
For thermoresistances PT100, NI100.
• For the three-wire connection use wires with the same
section.
• For the two-wire connection short-circuit terminals 14
and 15.
• When shielded cable is used, it should be grounded at
one side only.
13
14
Red/Rosso
White/Bianco
Red/Rosso
15
13
AI1
15
PTC/NTC
Shield/Schermo
For thermoresistances NTC, PTC, PT500, PT1000 and
linear potentiometers.
When shielded cable is used, it should be grounded at
one side only to avoid ground loop currents.
13
V/I
+24Vdc
14
10
Shield/Schermo
For linear signals V / mA.
• Comply with polarity.
• When shielded cable is used, it should be grounded at
one side only.
6.1.c Example of connection for linear input Volt and mA
PRESSURE TRANSMITTER /
SENSORE DI PRESSIONE
P :0...100mbar
Pmax :3bar
T :0..70°C
OUT : 4...20mA
IN :9...33V DC
14
13
10
B
C
A
4..20mA
For linear signals 0/4..20 mA with three-wire sensor.
Comply with polarity:
A= Sensor output (+)
B= Sensor ground (-)
C= Sensor power supply (+24 Vdc / 35mA)

User manual - DP400TP- 11
External supply /
Alimentazione esterna
P :0...100mbar
Pmax :3bar
T :0..70°C
OUT : 4...20mA
IN :9...33V DC
PRESSURE TRANSMITTER /
SENSORE DI PRESSIONE
14
13
A
B
4...20mA
For linear signals 0/4..20 mA with external power of
sensor.
Comply with polarity:
A= Sensor output (+)
B= Sensor ground (-)
P :0...100mbar
Pmax :3bar
T :0..70°C
OUT : 4...20mA
IN :9...33V DC
10
14
C
A
PRESSURE TRANSMITTER /
SENSORE DI PRESSIONE
4..20mA
For linear signals 0/4..20 mA with two-wire sensor.
Comply with polarity:
A= Sensor output
C= Sensor power supply (+24 Vdc / 35mA)
6.1.d Serial input
16
RS485
17
18
Shield/Schermo
RS485 Modbus RTU communication
6.1.e Relay Q1 output
3
Q1
2A
230V
1/8Hp
4
Capacity:
2 A / 250 V~ for resistive loads.
NB: see picture below
6.1.f Relay Q2 output
1
Q2
2A
230V
1/8Hp
2
Capacity:
2A/250 V~ for resistive loads.
NB: see picture below

12 - DP400TP - User manual
Electrical endurance Q1 / Q2.
2 A, 250 Vac, resistive load, 10
5
operations.
20/2 A, 250 Vac, cosφ = 0.3, 10
5
operations.
6.1.g mA / Volt output
7
AO1
0/4..20mA
8
Pins 7-8: linear output in mA configurable using
parameters as retransmission of process or alarm setpoints
(see par. 112-116).
8
AO2
0..10V
9
Pins 8-9: linear output in Volt configurable using
parameters as retransmission of process or alarm setpoints
(vedi par. 119-123).
6.1.h Digital Input 1
10
11
+24Vdc
DI1
(PnP)
PNP digital input
Digital input according to parameter 95
Short-circuit pins 10 and 11 to activate the digital
input 1

User manual - DP400TP- 13
6.1.i Digital input 2
10
12
+24Vdc
DI2
(PnP)
PNP digital input
Digital input according to parameter 100
Short-circuit pins 10 and 12 to activate the digital
input 2
7 Display and Key Functions
7.1 Keys
Process
Graphic
Peak values
Keys are multifunction: in correspondence
of each key its meaning is displayed.
If no description is shown, press a key,
to visualize it. Some menus will be only
displayed when activated.
7. 2 Display
It visualizes the process, the setpoints, and all configuration parameters. The
programming/ operation interface with text menus in 5 languages makes the
navigation intuitive.
Sel
‹
‹
English
Italian o
Deutsch
Français
Español
At first starting, display shows the language
selection.

14 - DP400TP - User manual
°C
25.6
Q1 COM
Q2
This page displays the process, the relays
status and the serial communication (if
available).
°C
Q1
Q2
25.6
This page displays the process, the relays
status and a graph representing the process
trend.
Bar
Q2
4.998
Q1
Bar
Q2
4.998
Q1
This page displays the process and its
graphic representation as bar graph.

User manual - DP400TP- 15
8 Controller Functions
8.1 DP-USB-CARD (optional)
Parameters and setpoint values can be duplicated from one controller to
another using the DP-USB-CARD.
Insert DP-USB-CARD when the controller is off. On activation, after startup, the
display visualizes “Load data” and “Esc” in correspondence of the relative keys
(only if the correct values are saved in the DP-USB-CARD). Pressing “Load data”
the controller loads the new values. Pressing “Esc” the device keeps the old
values.
Updating DP-USB-CARD.
To update the DP-USB-CARD values, follow the procedure described
on the first mode, pressing “Esc” so as not to load the parameters
on the controller. Enter configuration and change at least one parameter. Exit
configuration. Changes are stored automatically.
8.2 Modifying alarm thresholds
Selecting one or more absolute/ band alarms, it is possible to modify
the intervention thresholds directly by the user menu, without entering
configuration.
AL . 1
°C
°C
0006.0
AL . 2
100.0
Sel
‹
‹
Press “Setpoint” to enter the thresholds
modification.
For the modification procedure refer to the following table:
Press Display Do
1
“Sel”
Selects the setpoint to be
modified.
Press
n
e
m
to modify the
value. Pressing
it is
possible to modify digit per
digit.

16 - DP400TP - User manual
Press Display Do
2
“Sel”
Selects the next setpoint
(if active), otherwise go to
point 3.
See point 1.
3
“Sel”
n
and
m
disappear Press “Esc” to exit procedure.
8.3 Latch on function
For the use with input Potentiometers max.6 kohm and Pot.max.150 kohm and
with linear input (0..10 V, 0..60 mV, 0/4..20 mA), it is possible to associate the start
value of the scale (par. 4 Lower limit V/I) to the minimum position of the sensor
and the value of end scale (par. 5 Upper limit V/I) to the maximum position of
the sensor.
Bar
0.000
Esc
0
Latch on
0.006
mA
Input
‹
‹
To use the LATCH ON function: enter
configuration, select Setting on par. 8 Latch
on and press “Sel” (DP400TP shows the page
in the picture).
For the calibration procedure refer to the following table:
Press Display Do
3
n
Set the value to maximum.
To exit standard procedure
press “Esc”.
For zero settings place the
sensor on the zero point
1
Place the sensor on minimum
operating value (associated
with Lower limit V/I).
2
m
Set the value on minimum.
Place the sensor on maximum
operating value (associated
with Upper limit V/I).
4
“0” Set the virtual zero value. Press “Esc” to exit procedure.

User manual - DP400TP- 17
Max
Min Zero
8.4 Digital input functions
On the DP400TP model, digital inputs can be enabled by confi guring the par. 95
Digital input 1 and the par. 100 Digital Input 2.
• Run: allows the action of relays and linear output.
• Hold: locks the conversion.
• Tare zero (AI): selects to zero the process value (tare function).
• Alarm reset: if one or more alarms are selected with manual reset and alarm
conditions are no longer present, closing the digital input it is possible to
restore the alarm output.
• Totalizer reset: if the totalizer function is active, using the digital input it is
possible to reset the counter.
• Peaks reset: min. peak/max. peak/peak-to-peak values are reset.
• Sum total: if the sum function is active, using the digital input it is possible to
increase the “sum” counter as indicated by the process value.
• Sum reset: if the sum function is active, using the digital input it is possible to
reset the “sum” counter.
• Confi g. lock: if the digital input is active it is not possible to enter confi guration
or to modify the setpoints.
Selecting Digital input 1 or Digital input 2 on the alarm parameters, the
related relays will activate together with the digital input; functions selected on
parameters 95 and 100 will continue to work.
To store the value in EEPROM, see parameter 11 Store.

18 - DP400TP - User manual
8.5 Peak values
Maximum
25.6 kg
Minimum
15.7 kg
Peak-Peak
9.9 kg
Esc
Rst
The DP400TP is provided with a page for
the visualization of peak values: max. peak,
min. peak and peak-to-peak of analog input.
Keeping pressed “Rst” it is possible to reset
the visualized values.
8.6 Totalizer function
The totalizer function, which can be enabled by par. 9 Totalizer, performs an
instant measurement of the process and sums it on a time basis to the previously
totalized value.
m
3
/h
1178.9
Esc
Rst
Process
2301.4
Total izer
On the dedicated page, it is possible to see
the instant process value and the totalized
value: keeping pressed “Rst” it is possible to
reset this value.
Ex.: if a sensor 4..20mA with F.s. 9000m
3
/hour is connected, it is necessary to
select Hour on par. 9 Totalizer. The device will increase the totalized value
considering the m
3
flowing each second (2.5m
3
).
To store the value in EEPROM, see parameter 11 Store.

User manual - DP400TP- 19
8.7 Sum function
The sum function, which can be enabled by par. 10 Sum function allows to
increase a counter adding the process value on command. It is an application
typical for weighing systems and allows to know the total weight value.
kg
100.07
Esc
Rst
Tar
+
Process
4703.29 kg
Sum
Press “Sum Function” to enter the function
page. Pressing “+” the Process value is
added to the counter. It is possible to reset
the total value keeping pressed “Rst” and to
fix “tare zero” of the process pressing “Tar.”
Functions tare, sum and reset can also be managed by digital input if enabled on
par. 95 Digital Input 1 and par. 100 Digital Input 2.
To store the value in EEPROM, see parameter 11 Store.
8.8 Customizable linear input
Selecting 16 steps on par. 17 V/I custom and connecting a linear sensor it is
possible to customize the linear input for a max. of 16 steps. On parameters
xx-Input value it is necessary to enter the value of the input to which the value
selected on the corresponding parameter xx-Custom value will be related.
Example: sensor 0-10V.
01-Input value => 0.000V 01-Custom value=>0mBar
02-Input value => 2.000V 02-Custom value=>100mBar
03-Input value => 5.000V 03-Custom value=>500mBar
04-Input value => 10.000V 04-Custom value=>1000mBar
At each value in volt (input) it is related a value in mBar (customized): if the sensor
supplies 2V the device visualizes 100mBar, if it supplies 5V the device visualizes
500mBar. For intermediate tension values the value in mBar is calculated linearly
between the entered values containing it: 1V = 50mBar, 3.5V=300mBar and
7V=700mBar.

20 - DP400TP - User manual
8.9 Alarm Intervention Modes
8.9.a Absolute alarm (absolute selection)
1
Alarm Spv
Pv
O
On On
O
Hysteresis
par. > 0
Time
Alarm
output
Absolute alarm and hysteresis value
greater than “0” (Par. 58 hysteresis
> 0).
N.B. The example refers to alarm 1;
the function can also be enabled for
alarms 2
2
Alarm Spv
O
On On
O
Hysteresis
par. < 0
Time
Alarm
output
Absolute alarm and hysteresis value
less than “0” (Par. 58 hysteresis < 0).
N.B. The example refers to alarm 1;
the function can also be enabled for
alarms 2.
8.9.b Band alarm (band selection)
1
Pv
Dev. Spv
Dev. Spv
O O
On On On
Hysteresis
par. > 0
Time
Alarm
output
Dev. Spv
Dev. Spv
Band alarm and hysteresis value
greater than “0” (Par. 58 hysteresis
> 0).
N.B. The example refers to alarm 1;
the function can also be enabled for
alarms 2.
/