
RECOMMENDED TOOLS: (Sold Separately)
° GILA
®
Window Film Application Solution
° Squeegee or squeegee card
° Utility knife with break-away blades (for
cutting vinyl film)
° Single-edged razor blade (for cleaning the glass)
° Ruler or tape measure
° Low lint or lint-free cloth (paper coffee filters are a great alternative)
° GILA Edging Tool (a ruler, credit card, or wallpapertrimming guide will
suffice)
BEFORE YOU BEGIN:
GILA residential window film should only be applied as directed:
• Apply to the INSIDE surface of standard 1/8” single-pane windows or
exterior removable storm panes.
• Apply to the INSIDE surface of FLAT plastic or Plexiglas windows
• Apply to the OUTSIDE surface of sealed dual-pane windows or win-
dows with interior storm panes.
Applying static-cling vinyl film (“the film”) is a simple process, with only a
few basic steps. However, patience and preparation are very important.
Before starting the project, please read the instructions completely and
carefully, perhaps using a small piece of film to practice the steps before
you actually apply the film to a window. Start with smaller windows
before applying film to larger windows, such as patio doors, which may
require two people. Our website (www.gilafilms.com) features compre-
hensive consumer support materials, including answers to frequently
asked questions, technical information, and instructional videos.
PREPARATION
A. GILA Window Film Application Solution is ready to use. Do not dilute
or mix with water. This solution (“the Solution”) will serve as a lubricant
for the squeegee during glass cleaning, film application, and future clean-
ing. CAUTION: Do not use any household glass cleaner containing
ammonia or vinegar to clean the glass or film; such cleaners can damage
the vinyl film. However, extremely greasy or smoke-covered windows
may need to be cleaned first with glass cleaner then rinsed thoroughly
with the Solution.
B. Plan to use several single-edge utility razor blades to clean the win-
dow.A small utility knife with breakaway blades is the best tool for trim-
ming the film. NOTE: Vinyl film can dull a blade edge quickly, and a dull
blade can tear vinyl. Plan to use a new blade after every 10 feet of vinyl
that you cut.
C. A rubber squeegee is necessary to press the vinyl onto the window
without creases and to remove the Solution from under the film.We rec-
ommend a squeegee between 4” to 5” wide, preferably with a flexible
blade and solid handle.
D. Use low lint or lint free towels (paper coffee filters are a great alter-
native), not paper towels, to clean the windows and absorb squeegeed
water.
E.The patented GILA Edging Tool is recommended for trimming the film
once applied to the glass. If the Edging Tool is not available, the edge of a
ruler, credit card, or a wallpaper-trimming guide will suffice.
SPECIAL POINTS TO REMEMBER:
• Apply film to cool or shaded windows when glass temperature is
between 45-90°F. (For best results, do not apply film in direct sunlight
or during freezing weather.)
• During application, keep the window and the film thoroughly saturated,
and use a flexible rubber squeegee to position the film.(A rigid or hard-
edged tool can scratch the film easily.)
• Work in a dust-free area to prevent debris sticking to the film and being
trapped against the window.Turn off fans.
• If bubbles appear at any time, simply peel the film away from window,
wet the glass and film, and reapply.
• The longevity of the film depends upon exposure to the elements, han-
dling, care, and frequency of removal and reapplication.
• If you plan to remove and reapply the film, keep the paper liner sheet
inside the film package for future storage.
APPLICATION:
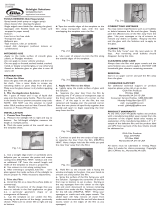
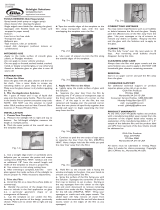
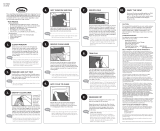
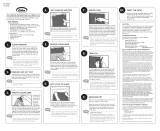
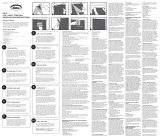
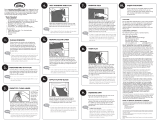
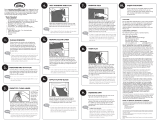
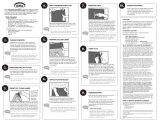
1. MEASURE THE WINDOW & CUT FILM
Carefully measure the dimensions of the window before cutting the film.
Unroll the film on a clean, flat surface. We recommend pre-cutting the
film to minimize waste.You have two cutting options: (1) Precut the film
to exact dimensions of the exposed glass surface less 1/16” on all four
sides, or (2) Cut the film at least 1” larger than the glass on all four sides
(the excess will be trimmed once film is applied to glass). Either way, try
to use at least one of the factory straight edges.
2. CLEAN THE WINDOW
Generously spray the window with the Solution, then use a razor blade
to remove any stubborn dirt or paint. Use special care cleaning the cor-
ners. Re-wet the window, then squeegee downward.Wipe off accumulat-
ed dirt from the window gasket with a soft low lint or lint free cloth or
paper coffee filters. Repeat process until the glass is clean. If possible, also
clean the outside of the window to ensure total clarity.
3. WET THE WINDOW
Generously spray the Solution onto the surface of the window until
beads of the Solution run down the glass. If the window becomes dry,
rewet it completely before applying the film.
4. REMOVE THE WHITE PAPER LINER
Using your fingers, separate the white paper liner from the film. DO
NOT allow the liner to get wet while still attached to the film.
5. APPLY THE FILM TO THE GLASS
Be sure the window is dripping wet: too much Solution is better than not
enough. Apply the film to the wet glass. Start at the top of the window,
then allow the film to gently lay down onto the glass. Use your hands to
smooth out any wrinkles.
6. SPRAY THE OUTSIDE SURFACE OF THE FILM AND
SQUEEGEE INTO PLACE
Spray the entire surface of the film facing you with the Solution to lubri-
cate its surface. Lightly squeegee the centerline of the film from top to
bottom to set the film into place. Starting at the top of the window,
squeegee from the center to the right side and work downward, leaving
a 2” perimeter around the edges unsqueegeed. Repeat this process on
the left side. If you need to remove large air pockets, rewet the top of
the film and squeegee again. If the squeegee drags, respray the Solution
on the top of the film.
7. TRIM EDGES OF FILM AND SQUEEGEE DRY
Use a sharp razor blade or utility knife and Edging Tool to trim a 1/16”
gap around the four perimeter edges of the film.This gap is essential for
the proper thermal expansion of the glass and permits you to completely
squeegee the water and air from under the film. Rewet the entire film sur-
face and squeegee again per direction in Step 6. Press very firmly to
remove all of the Solution. Rewet the top of the film as needed. Use
absorbent low lint or lint-free towels or paper coffee filters to absorb
water from around the edges of the film.Any remaining small water bub-
bles should evaporate over the next six to 10 days.
CLEANING AND CARE
Always clean the film with the same Solution and squeegee you used to
apply it. Use a low lint or lint free cloth for drying.To avoid scratching the
film, DO NOT USE ammonia, vinegar, glass cleaners, or paper towels dur-
ing cleaning.
REMOVAL AND STORAGE
While the film is still on the glass, align the paper liner to match the shape
of the film. Then press the top edge of the liner onto the film. Gently
press the liner smoothly against the film from top to bottom. Peel the top
edge of the film away from the window, then carefully roll the vinyl and
liner TOGETHER down the window. Store the film rolled inside its car-
ton in a cool, dry place. NOTE: When re-applied, the vinyl may look
slightly smaller.The vinyl did not shrink. Firm squeegeeing during re-appli-
cation will make the vinyl properly fit the window.
CONSUMER SUPPORT
For additional technical support or product inquiries,please write, call, or
go on-line:
GILA Film Products
P.O. Box 5068
Martinsville,VA 24115 USA
Consumer Service Hotline, 1-800-528-4481
Monday-Friday, 8am-5pm EST.
web: www.gilafilms.com
e-mail: gilahelp@cpfilms.com
PRODUCT WARRANTY
At any time, GILA will gladly replace any product with a manufacturing
defect upon receipt from the consumer of the original dated sales
receipt, an explanation of the manufacturing defect, a 4” x 4” sample of
the defective film, and the product label and UPC from top back of the
box. Claims should be addressed to:
GILA Film Products
Dept. DIY/WAR
P.O. Box 5068
Martinsville,VA 24115 USA
All claims must be submitted in writing. Please allow 3-4 weeks for claims
processing. PVC vinyl is recyclable. GILA and Glare Control are regis-
tered trademarks of CPFilms Inc. Copyright 2006 CPFilms Inc.,
Martinsville,VA USA.
HERRAMIENTAS RECOMEDADAS: (Se venden por separado)
° Solución para aplicar la película para ventanas GILA®
° Escurridor (haragán)
° Cuchillo para uso general con cuchillas con navaja desprendible (para
cortar la película de vinilo)
° Cuchilla de corte de precisión (para limpiar el vidrio)
° Regla o cinta métrica
° Trapo que no deja pelusas o que deja pocas (los filtros de papel para
café son una excelente alternativa)
° Herramienta para recortado GILA (una regla, tarjeta de crédito, o
regla con nivel serán suficiente)
ANTES DE COMENZAR:
La película para ventanas residenciales GILA solo debe aplicarse de
acuerdo con las instrucciones:
• Aplíquela en la superficie INTERNA de un panel simple de 1/8" (3,2
mm) para ventanas o los paneles contra tormenta removibles para exte-
riores.
• Aplique en la superficie INTERNA de plástico LISO o ventanas Plexiglás
• Aplique en la superficie EXTERNA de ventanas de doble panel selladas
o ventanas con paneles contra tormentas internos.
Aplicar la película de vinilo adherente (de ahora en mas denominada "la
película") es un proceso sencillo, sólo debe seguir unos básicos pasos. Sin
embargo, es muy importante ser paciente y preparase con antelación.
Antes de comenzar el proyecto, por favor lea las instrucciones cuida-
dosamente. Quizás es bueno usar un pedacito de película para practicar
los pasos a seguir antes de realizar el trabajo en la ventana. Comience
con ventanas pequeñas antes de aplicar la película en ventanas más
grandes como las puertas de patios, ya que puede requerir la ayuda de
otra persona. Nuestro sitio de Internet (www.gilafilms) presenta una
amplia serie de materiales de apoyo como por ejemplo:respuestas a pre-
guntas comunes, información técnica, y videos de instrucción.
ELABORACION
A. La solución GILA para aplicar la película para ventanas viene lista
para ser usada. No diluya o mezcle con agua. Esta solución (de ahora
en mas denominada "la solución") actuará como lubricante para el
escurridor durante la aplicación de la película y limpiezas futuras. PELI-
GRO: Para limpiar el vidrio o la película, no utilice ningún limpiador para
vidrios de uso doméstico que contenga amoníaco o vinagre ya que
dichos limpiadores pueden dañar la película de vinilo. Sin embargo, las
ventanas extremadamente grasosas o cubiertas con humo puede que
necesiten limpiarse primero con un limpiador de vidrio y luego enjua-
garse cuidadosamente con la Solución.
B. Planee utilizar varias cuchillas de corte de precisión para limpiar la
ventana. Un pequeño cuchillo para uso general con cuchillas con nava-
ja desprendible es la mejor herramienta para cortar la película. NOTA:
La película de vinilo puede desafilar rápidamente la cuchilla y una
cuchilla desafilada puede rasgar el vinilo. Planee usar una cuchilla nueva
cada 10 pies (304,8 cm) de vinilo que corte.
C. Se necesita un escurridor para presionar el vinilo en la ventana sin
arrugarlo y para remover la Solución debajo de la película.
Recomendamos un escurridor de 4" a 5" (10,2 cm a 12,7 cm) de ancho,
preferentemente con una escobilla flexible y un mango sólido.
D. Utilice trapos que no dejan pelusas o dejan muy pocas (los filtros de
papel para café son una excelente alternativa) para limpiar las ventanas y
absorba el agua con el escurridor. No use papel absorbente de cocina.
E. Recomendamos que use la herramienta para recortado GILA paten-
tada para cortar la película una vez aplicada en el vidrio. Si no tiene una
herramienta para recortado, podrá usar el borde de una regla, tarjeta de
crédito, o regla con nivel.
PUNTOS ESPECIFICOS PARA RECORDAR:
Aplique la película en ventanas que estén frías o a la sombra cuando la
temperatura del vidrio sea entre 7°C - 32° C (45-90° F). (Para mejores
resultados, no aplique la película directamente a la luz del sol o durante
temperaturas bajo cero.).
• Durante su aplicación, mantenga la ventana y la película
completamente saturadas, y utilice un escurridor de goma flexible para
colocar la película. (Una herramienta rígida o de borde rígido puede ral-
lar la película fácilmente.)
• Trabaje en un área sin polvo para prevenir que los residuos se adhieran
en la película y queden atrapados en la ventana.Apague los ventiladores.
• Si se producen burbujas en algún momento, simplemente despegue la
película de la ventana, humedezca el vidrio y la película, y aplíquela nue-
vamente.
• La longevidad de la película depende de la exposición de los elementos,
manutención, mantenimiento y la frecuencia con la que la remueve y
vuelve a aplicarla.
• Si planea remover y volver a aplicar la película, mantenga el forro de
papel dentro del paquete de la película para depósitos futuros.
APLICACION
1. MIDA LA VENTANA Y CORTE LA PELICULA
Cuidadosamente mida las dimensiones de la ventana antes de cortar la
película. Desenrolle la película en una superficie plana y limpia. Le
recomendamos precortar la película a fin de minimizar desperdicios.
Tiene dos opciones para cortar: (1) Precortar la película con las dimen-
siones exactas de la superficie del vidrio menos 1/16" (1,6 mm) en los
cuatro lados, o (2) corte la película 1" (2,5 cm) más grande que el vidrio
en los cuatro lados (luego recorte el excedente una vez que aplique la
película en el vidrio). Cualquiera sea la manera que utilice, trate de usar
al menos uno de los bordes lineales de fábrica.
2. LIMPIE LA VENTANA
Rocíe la ventana con la Solución, luego utilice una cuchilla para remover
los restos de pintura o suciedad. Sea muy cuidadoso al limpiar las
esquinas. Humedezca nuevamente la ventana, luego escurra hacia abajo.
Limpie la suciedad acumulada de la junta de la ventana con un trapo que
no deje pelusa o con filtros de papel para café. Repita el proceso hasta
que el vidrio quede limpio. Si es posible, también limpie la parte externa
de la ventana para asegurar claridad total.
3. HUMEDEZCA LA VENTANA TOTALMENTE
Rocíe abundantemente con la Solución en la superficie de la ventana
hasta que las gotas de la Solución chorreen por el vidrio. Si se seca la
ventana, humedézcala nuevamente antes de aplicar la película.
4. REMUEVA EL FORRO DE PAPEL BLANCO
Utilice sus dedos para separar el forro de papel blanco de la película NO
permita que el forro se humedezca si todavía esta adjunto a la película.
HI0604
(1/06)
CAUTION: Tinted motor vehicle windows must comply with state
and local laws. Dark tinting may reduce visibility outside during poor
lighting conditions. Use care to avoid accidents. For product informa-
tion, call 1-800-528-4481. For a copy of your state’s tint laws for
motor vehicles, visit our website or write to:
GILA Film Products
PO Box 5068
Martinsville,VA 24115 USA
APPLICATION
INSTRUCTIONS
PELIGRO: Las ventanas polarizadas deben cumplir con lo
estipulado en las leyes locales y estatales. El tinte oscuro
puede que reduzca la visibilidad externa en días grises. Sea
cuidadoso, evite accidentes. Para información sobre el produc-
to, llame al 1-800-528-4481. Si desea una copia de las leyes de
tinte para vehículos motorizados en su estado, visite nuestro
sitio en Internet o escriba a::
GILA Film Products
PO Box 5068
Martinsville,VA 24115 USA
INSTRUCCIONES
PARA LA
APLICACION
Page is loading ...
-
 1
1
-
 2
2
Gila CS78 User manual
- Type
- User manual
Ask a question and I''ll find the answer in the document
Finding information in a document is now easier with AI
in other languages
- français: Gila CS78 Manuel utilisateur
- español: Gila CS78 Manual de usuario
Related papers
-
 Gila 50214887 Installation guide
-
 Gila 50196566 Installation guide
-
 Gila 50167647 User manual
-
 Gila 50167647 Installation guide
-
 Gila 50167279 User manual
-
 Gila 50167279 Installation guide
-
 Gila 50188236 User manual
-
 Gila 50188236 Installation guide
-
 Gila 50188238 User manual
-
 Gila 50188238 Installation guide
Other documents
-
 Crearreda CR-68401 Installation guide
-
 Instant Mosaic 20-101 Installation guide
-
 Duck 286215 Installation guide
-
 rabbitgoo FBA_A018-45-02 Installation guide
-
 rabbitgoo FBA_A004-45-02 Installation guide
-
 HIDBEA VC-TJ32-60200-65 User manual
-
 Best Home Fashion WINDOW_FILM-36-GEO User manual
-
 Frost King V73/3H Installation guide
-
 Window Whirl Total Blackout Window Film: 100% Light Blocking, Room Darkening Static Cling - No Residue Film for Privacy, Home Security, and Day Sleep - Easy Removal UV Prevention Treatment (17.5 x 80 inches) User guide
-
 BuyDecorativeFilm SPARKGLD47049 Measurement Guide


