Page is loading ...

Professional Fans Owner’s Manual
misting & non-misting
HydroMistUSA.com

HydroMist
™
a division of Flame Technologies, Inc.
P.O. Box 1776
Cedar Park, TX 78630
Call: 512-225-0923
Email: orders@hydromistusa.com
http://www.HydroMistUSA.com
©2018 HydroMist. All rights reserved.
Updated 01/25/18.
The purpose of this document is to be informative,
and as such is not guaranteed to be error-free.
HydroMist takes steps to ensure that our information
is correct and as error-free as is reasonable. Please
let us know if you believe you found a typo or error.

HydroMist
HydroMistUSA.com
3
Contents
What’s In the Box ............................................4
Warnings . . . . . . . . . . . . . . . . . . . . . . . . . . . . . . . . . . . . . . . . . . . . . . . . . . 4
Assembly ..................................................5
Operation..................................................7
Tilting ..................................................7
Oscillation ...............................................7
Speed Control (control on fan motor) ............................7
Speed Control (in-line cord control)..............................7
Replacement Parts—18" Fan Head ................................8
Replacement Parts—24" Fan Head ................................9
Winterizing Instructions for Misting Fan Heads.......................10
HydroMist One (1) Year Limited Warranty ..........................10
Available Professional Fan Models ...............................11

HydroMist
HydroMistUSA.com
4
What’s In the Box
QTY DESCRIPTION
1
Fan Only ~or~
Fan with Misting Ring and Hose Adapter (only with misting fans)
5 or 8 Misting Nozzles (only with misting fans); 5 for 18" and 8 for 24"
1 Wall Mounting Bracket
2 Fan Bracket Screws
4 sets Concrete Sleeve Anchor with Nut, Lock Washer and Washer
2 sets Plastic Wall Anchor with Screw (only with fans that have in-line cord control)
1 Owner’s Manual
Wall mounting bracket, fan shroud (not grills), fan motor, oscillating knob and fan
motor control knob (if control is on fan motor) should all be either black or white, not
mixed. 18" fan blades are also color coordinated.
Warnings
Read and follow all instructions before operating fan. Do not use fan if any
parts are damaged or missing. Do not bend blades.
Do not expose the fans to water from a high-pressure cleaner (pressure
washer). Doing so could lead to electrical shock or damage to the motor.
Always disconnect fan from power outlet before cleaning, moving or
repositioning.
To clean, simply wipe down with soapy water & gently rinse with a hose.
Dry fan before reconnecting to power outlet.
Never insert ngers or any other objects through grills while fan is operating.
Do not operate mist in freezing weather conditions. Misting components must
be winterized to prevent damage.
Fan not intended to be hung upside down. Doing so may cause the fan
oscillator to malfunction and possibly break.
Motor bearings are sealed and do not require additional lubrication.

HydroMist
HydroMistUSA.com
5
Assembly
Wall brackets and concrete sleeve anchors are supplied with all fan models.
Lag screws for wood are not included. User is responsible for determining
feasibility of wall material for appropriately securing the bracket. Sleeve
anchors may cause certain materials, such as brick & sandstone, to crack.
User is responsible for obtaining other means of anchoring the bracket,
where concrete is not used. If drywall is involved, a stud must be used for at
least two of the anchor points (both left or both right). Bear in mind that the
fans weigh about 30 lbs. each.
The following instructions apply only to concrete installation.
Hammer, powerful drill, 10 mm masonry bit, 12 mm wrench and pencil are
required. Level optional.
B
A
D
E
C
1. Before tapping holes or performing other assembly, survey area where
the fan is to be mounted. A minimum of 3 meters (9.8 feet) is required
between the oor and center of the fan. Be sure the fan has plenty of
room to oscillate without hitting objects and is not too close to a pathway.
2. Hold the wall bracket
[
E
]
to chosen mounting position and mark center
of each hole with a pencil. Use of a level is recommended.

HydroMist
HydroMistUSA.com
6
3. Using a 10 mm masonry bit, drill 45 mm (a bit more than 1¾ inches)
deep holes into the wall at marked anchor points.
4. Thread anchors
[
D
]
onto the wall bracket [E] so that all washers and nuts
are in front of it and sleeves are behind it.
5. Place the bracket and anchor assembly onto the pre-drilled holes and
align anchors to the drilled holes.
6. Hammer the anchors each a little at a time to drive all four completely
into the drilled holes, and anchor is ush against wall.
7. Use a 12 mm wrench to tighten anchor nuts
[
C
]
onto each bolt. It is
normal and necessary that bolts will draw out a bit while tightening.
8. Place the fan onto wall mount and secure it with (2) included bracket
screws
[
B
]
using a #2 Phillips screwdriver.
NOTICE! When securing power cables on outdoor installations, loop them
below and back up to the power outlet. This makes any moisture collection on
the cable drip to the oor instead of into the outlet.

HydroMist
HydroMistUSA.com
7
Operation
Tilting
Make sure fan is unplugged from power outlet and properly secured to a
mounting bracket. Firmly move fan head to desired position. Tilt mechanism
clicks at predened angles for solid hold.
Oscillation
Press down on the oscillation knob (top of fan motor) to make the fan oscillate.
Pull up on the oscillation knob to make the fan stop oscillating.
Speed Control (control on fan motor)
Turn knob on side of the fan motor to set the desired fan speed. 0, 1, 2, 3
designates Off, Low, Medium, High respectively.
Speed Control (in-line cord control)
Turn knob on the in-line cable control to set the desired fan speed. 0, 1, 2,
3 designates Off, Low, Medium, High respectively.

HydroMist
HydroMistUSA.com
8
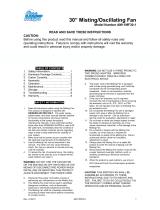
Replacement Parts—18" Fan Head
3
5*
6
9
8*
7*
1
2
4
ITEM QTY DESCRIPTION PART NO.
1 1 18" Front Guard F10-10-055
2 12 Front Guard Screws F10-10-056
3 white 1 18" Fan Blade F10-10-057
3 black 1 18” Fan Blade F10-10-061
4 1 Set Screw for 18" Fan Blade F10-10-058
5 white 1 18" White Shroud F10-10-078
5 black 1 18" Black Shroud F10-10-077
6 2 Wall Bracket Screw F10-10-060
7 white 1 White Wall Bracket F10-10-059
7 black 1 Black Wall Bracket F10-10-062
8 white 1 White Oscillating Knob F10-10-053
8 black 1 Black Oscillating Knob F10-10-063
9 1 Oscillating Knob Screw F10-10-054

HydroMist
HydroMistUSA.com
9
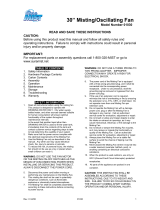
Replacement Parts—24" Fan Head
1
2
4
3
5*
6
9
8*
7*
ITEM QTY DESCRIPTION PART NO.
1 1 24" Front Guard F10-10-064
2 12 Front Guard Screws F10-10-056
3 1 24" Fan Blade F10-10-066
4 1 Set Screw for 24" Fan Blade F10-10-065
5 white 1 24" White Shroud F10-10-080
5 black 1 24" Black Shroud F10-10-079
6 2 Wall Bracket Screw F10-10-060
7 white 1 White Wall Bracket F10-10-059
7 black 1 Black Wall Bracket F10-10-062
8 white 1 White Oscillating Knob F10-10-053
8 black 1 Black Oscillating Knob F10-10-063
9 1 Oscillating Knob Screw F10-10-054

HydroMist
HydroMistUSA.com
10
Winterizing Instructions for Misting Fan Heads
1. Remove all nozzles from fan ring. This allows the nylon hose and rings to
completely drain, which prevents breakage due to freezing.
2. Clean the nozzles with 50/50 diluted vinegar and warm water. Do not
use harsh chemicals they will harm the o-rings.
3. Store nozzles in a small container or baggie to prevent them from
collecting dust while not in use.
4. For harsh winter weather conditions, cover or store the fan heads to
prevent them from becoming damaged.
HydroMist One (1) Year Limited Warranty
All HydroMist products are warranted for a period of one (1) year for defects
in workmanship and materials under normal use and service. This warranty is
extended solely to the original purchaser. In order to initiate this warranty, the
product registration form must be completed and sent to HydroMist, along
with a copy of the purchase invoice, within 30 days of purchase.
In General: If a HydroMist product fails because of defect in material or
workmanship under normal use and maintenance within one year from date
of purchase, we will, at our option and after inspection, repair or replace the
defective product.
About your Warranty: Fan products, like all mechanical devices, need
periodic parts and service to perform well. Normal use and service means
not to operate in excess of recommended maximum speeds, pressures,
temperatures or using uids not recommended or compatible with component
materials.

HydroMist
HydroMistUSA.com
11
Available Professional Fan Models
PART NO. DESCRIPTION
F10-01-006 24" Black Misting Fan Head with 8 Nozzles, Corded Control
F10-01-007 24" White Misting Fan Head with 8 Nozzles, Corded Control
F10-01-016 24" Black Misting Fan Head with 8 Nozzles, In-Line Control
F10-01-017 24" White Misting Fan Head with 8 Nozzles, In-Line Control
F10-01-011 18" Black Misting Fan Head with 5 Nozzles, Corded Control
F10-01-012 18" White Misting Fan Head with 5 Nozzles, Corded Control
F10-01-015 18" Black Misting Fan Head with 5 Nozzles, In-Line Control
F10-01-013 18" White Misting Fan Head with 5 Nozzles, In-Line Control
F10-14-006 24" Black Fan Head, Corded Control
F10-14-007 24" White Fan Head, Corded Control
F10-14-016 24" Black Fan Head, In-Line Control
F10-14-017 24" White Fan Head, In-Line Control
F10-14-011 18" Black Fan Head, Corded Control
F10-14-012 18" White Fan Head, Corded Control
F10-14-015 18" Black Fan Head, In-Line Control
F10-14-013 18" White Fan Head, In-Line Control

/