GenStone EACBOCL Installation guide

Type
Installation guide

This manual is also suitable for

GenStone products are designed to provide a realisc
look of brick. Although installaon of GenStone is
much easier than tradional masonry applicaons,
proper installaon requires good planning and
preparaon. Each applicaon varies, therefore
we recommend you read this enre guide before
beginning your project. When calculang the amount
of GenStone needed for your project, remember that
you will need addional pieces for unique cuts, such
RECOMMENDED TOOLS
OPTIONAL TOOLS
Hand Saw
Ulity Knife
Tape Measure
Caulking Gun for a 10 oz Tube
1.625” Non-Corrosive Deck Screws
2.5” Non Corrosive Deck Screw (for Ledger)
Screw Driver Bits
Drill
Framing Square
Level
Sandpaper
as gables, end walls, or areas around windows. A
minimum of a 5% addional product is recommended
for mely compleon of your job. Keep in mind,
your le over product can be used in otherareas
of your project to. It is also recommended that
addional panels be purchased and scrap pieces be
kept in case a repair is needed. Observe and Obey
All Safety Rules and Recommendaons set forth by
Tool Manufacturers and Local, State, and Federal
Authories for Any Building Codes Applicable.
BRICK PRODUCT TO WOOD
Exterior Installaons Interior Installaons
Marker
Gloves
Safety Goggles/Glasses
Table Saw
Compound Miter Saw
Jig Saw
Power Sander
Rubber Mallet
Make sure to use adequate sealants and/
or nishes when joining other products and
around penetraons, windows, or doors.
GenStone Color Matched Caulking should be
used between the shiplap edges to adhere
panels together ensuring a good seal. GenStone
Color Matched Touch-Up Paint should be used
anywhere custom cuts are made.
GenStone products are designed to be applied to a
variety of substrates. Regardless of the substrate,
the surface should be clean and free of debris. The
posive shiplap edge always goes to the top side. As
you layout your wall, you will t your GenStone panels
to the building, which will rarely be square or true.
This will require small modicaons to the panels
(especially on your rst/boom row and corners).
These adjustments can be made by trimming with
a ulity knife or by using sandpaper to ensure an
accurate installaon.
GenStone panels require very lile maintenance and should be cleaned
using warm water and mild soap. Water pressure from a garden hose
and the use of a so bristle brush is sucient. Do not use a pressure
washer, parculate or sand blasng device, or harsh chemicals. GenStone
Panels have a clear coat sealant applied during the manufacturing
process that should be reapplied every 5 years. Aquaseal Wet Look
by Monochem is what was originally used. This must is a water based
solvent free sealant apply by manufacturers’ instrucons.
IMPORTANT STEPS TO CONSIDER
PREPARATION
MAINTENANCE AND CLEANING
When using a circular or hand saw, it is best to measure and mark on the at (back) side of the panel. Use a level
or straight edge, pencil or marker, and a tape measure to mark the cut line. If you plan to use a table saw, it would
be beer to mark a point on the panel surface and use the at side down on the table. All exposed cut edges
should be sealed with GenStone Color Matched Touch-Up Paint.
Aer marking your panels, you are ready to cut. To use a
circular saw, you will need to protect the face of the panel
as you hold it in place on a smooth at table. Placing the
panel at side down works best when using a table saw. For
cung smaller pieces, a compound miter saw is best, but a
hand saw or jig saw will also work. For applicaons requiring
cut outs such as hose bibs, electrical plates, or lights, mark
from the back and then cut out using a keyhole saw, jig saw,
or a hole saw on a drill. The manufacturing process leaves
minor blemishes at the edge of the panels. These are easily
corrected by trimming with a ulity knife or sanding.
When installing a corner piece, mark a vercal line on both sides
of the corner far enough away from the actual corner so they are
visible for reference while test ng. Starng at the most logical
corner, test t and trim the rst corner for the best overall t on
both sides of the bend. Corners have a posive edge that goes to
the top, and will always need some minor adjustments. This may
require shaving minimal amounts from the back side of the panel.
Be cauous not to reduce the thickness too much. For corners
that are not 90°, as well as inside corners, mitering is an opon.
These areas can be lightly sanded and sealed with GenStone Color
Matched Caulking and Touch-Up Paint.
MEASURING AND MARKING
CUTTING AND MEASURING
90° CORNERS
Some installaons may require a new
negave shiplap edge to be cut into a
piece. This can be done with a table saw,
router or router table, or if neither are
available, a circular saw preferably with
a guide. Use a panel to determine the
height (on the table saw) or depth (with a
circular saw) to set the blade. This should
be equal to the horizontal cut of the
shiplap edge (approximately 1”). Once
the blade is set, make the cut, then reset
the height or depth to match the depth
cut of the shiplap edge (approximately
1/2”) eecvely cung a rectangle of
material out of the corner. A router or
router table can also be used to remove
this material leaving the new negave
shiplap edge.
The screw used for shoong through the ledger will be longer than the screws used for panel installaons in
order to provide good bite into the substrate. We recommend 2.5” screws. To install a piece of ledger, apply
adhesive to the back of the ledger and to the top of the posive shiplap edge of the panel that is already
aached to the substrate. Then t the negave shiplap edge of the ledger down onto the posive edge of the
panel. Proceed by placing screws at an angle through the face of the ledger at both ends, counter sinking the
screw 1/8”. Connue by shoong the longer screws in the center of the ledger through the face, countersinking
1/8”. Once installaon is complete, GenStone Color Matched Caulking should be used to cover any line
between ledgers and to ll all screw holes. Use GenStone Color Matched Touch-Up Paint to blend colors.
Measure the gap from le to right. Measure from grey to grey. Do not measure the ngers. This respresents
the overall panel length that should be cut. When cung a panel to t, you will want to use the factory edges
on each of the end and cut what needs to be removed from the middle of the panel. Be sure when making your
cut to cut in a place that will be cung through the bricks not the mortar. Mark your panel on the back side and
cut to size. Once you have your panel cut down to the correct lengths, install to you substrate. Paint all exposed
foam with GenStone Color Matched Touch-Up Paint. Install as previously directed.
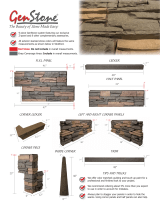
NEGATIVE SHIPLAP EDGES
LEDGERS
FITTING PIECES TO FILL IN THE GAPS
.5”
22.25”
22.25”
Surfaces must be clean, frost-free, and free of oil, grease, or any other contaminants. Avoid contact with alcohol
and solvent cleaners while curing. For the best results, apply a thin bead of caulking, not to exceed 1/2” in
thickness, to the positve shiplap edge and behind each of the nger tabs. Fill screw holes with GenStone Color
Matched Caulking. Some stones will be a dierent color than the ller. Use GenStone Color Matched Touch-
Up Paint to blend the area to the correct color. Recommended installaon tempuratures are 40° - 100° F. The
curing process can take up to 2 weeks.
GenStone Trim or J-channel is recommended around all openings. Secure panel deep enough to protect edge
and cover exposed edges with GenStone Color Matched Touch-Up Paint.
Minor damage to GenStone products can be repaired by painng over the damaged area with GenStone Color
Matched Touch Up Paint. GenStone Color Matched Caulking or an exterior grade ller can be used on larger
areas needing repair. Blend the area with GenStone Color Match Touch-Up Paint to match exisng color.
CAULKING
WINDOWS, DOORS, & ROOF LINES
REPAIRING MINOR DAMAGE
  • Page 1 1
  • Page 2 2
  • Page 3 3
  • Page 4 4
  • Page 5 5

GenStone EACBOCL Installation guide

Type
Installation guide
This manual is also suitable for

Ask a question and I''ll find the answer in the document

Finding information in a document is now easier with AI