iLuv TimeShaker 5Q Wow User manual
- Category
- Alarm clocks
- Type
- User manual

English
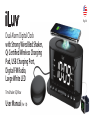
TimeShaker 5Q Wow
(Ver 1.0)
User Manual
Dual Alarm Digital Clock
with Strong Wired Bed Shaker,
Qi Certied Wireless Charging
Pad, USB Charging Port,
Digital FM Radio,
Large White LED

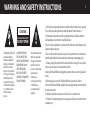
WARNING AND SAFETY INSTRUCTIONS
The lightning ash with
arrowhead symbol,
within an equilateral
triangle, is intended to
alert the user to the
presence of un-insulat-
ed “dangerous voltage”
within the product’s
enclosure that may be
of sucient magnitude
to constitute a risk of
electric shock to
persons.
CAUTION TO REDUCE
THE RISK OF ELECTRIC
SHOCK, DO NOT REMOVE
COVER OR BACK. NO
USERSERVICEABLE
PARTS INSIDE. REFER
SERVICING TO QUALIFIED
SERVICE PERSONEL.
The exclamation point
within an equilateral
triangle is intended to
alert the user to the
presence of important
operating and
maintenance
(servicing) instructions
in the literature
accompanying the
appliance.
CAUTION
RISK OF ELECTRIC SHOCK
DO NOT OPEN
!
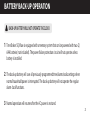
1. All the safety and operating instructions should be read before the product is operated
2. The safety and operating instructions should be retained for future reference.
3. All warnings on the product and in the operating instructions should be adhered to.
4. All operating and use instructions should be followed.
5. Use of controls or adjustments or performance other than those specied may result in
hazardous radiation exposure.
6. Do not use this product near water or expose to rain to prevent re or shock hazard, i.e.
bathtub, washbowl, kitchen sink, laundry tub, wet basement, or swimming pool, etc.
7. Cleaning – Unplug this product from the wall outlet before cleaning. Do not use liquid
cleaners or aerosol cleaners. Clean only with a dry cloth.
8. Unplug TimeShaker 5Q Wow during lightning storms or when unused for long periods
of time.
9. When main plug is connected, TimeShaker 5Q Wow is operational. In order to
disconnect TimeShaker 5Q Wow completely, the main plug should be disconnected from
the main socket outlet.
10. Battery should not be exposed to excessive heat, such as sunshine or re.
11. If battery is incorrectly replaced, it may cause explosion. Replace only with the same or
equivalent type.
2

User Manual
iLuv
PM
SHAKER
AL 1
SHAKER
BUZZER
RADIO
BUZZER
RADIO
AL 2
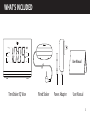
TimeShaker 5Q Wow Power AdapterWired Shaker User Manual
WHAT’S INCLUDED
3

3 4 5 6 71 2
SNOOZE
SLEEP/DIMMERTIME HOUR MIN
PRESET
RADIO/AL OFF
TUN TUN VOLVOL
AL 2AL 1
Wireless Charge
8
iLuv
PM
SHAKER
AL 1
SHAKER
BUZZER
RADIO
BUZZER
RADIO
AL 2
9
10
11
12
13
14
15
16
Top
Front
TIME/PRESET
HOUR/TUN-
MIN/TUN+
SNOOZE/SLEEP/DIMMER
ALARM 1/VOLUME-
ALARM 2/VOLUME+
POWER/RADIO/ALARM OFF
WIRELESS CHARGING PAD
PM INDICATOR
ALARM 1 INDICATOR (SHAKER)
ALARM 1 INDICATOR (BUZZER)
ALARM 1 INDICATOR (RADIO)
WIRELESS CHARGING INDICATOR
ALARM 2 INDICATOR (SHAKER)
ALARM 2 INDICATOR (BUZZER)
ALARM 2 INDICATOR (RADIO)
1
2
3
4
5
6
7
8
9
10
11
12
14
13
16
15
OVERVIEW OF THE PRODUCT
4

USB CHARGINGDC 5V/3ASHAKER
eS ria l No.:1 FE000 0 1
22
TimeShaker 5Q Wow
Jumbo Display Alarm Clock Speaker with
Wireless Charging Station, FM Radio, and Bed Shaker
Model : TimeShaker 5Q Wow
Power : DC 5V 3A
Backup Battery : 2 x AAA
FCC ID : KHKQI1110
iLuv Creative Technology
Designed in New York
2019 2117 18
Back
Bottom
SPEAKER
FM RADIO ANTENNA
SHAKER PORT JACK
DC POWER JACK
USB CHARGING PORT
BATTERY COMPARTMENT COVER
17
18
19
20
21
22
5

2019 2117 18
USB CHARGINGDC 5V/3ASHAKER
1
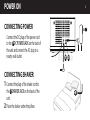
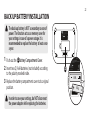
CONNECTING POWER
POWER ON
Connect the DC plug of the power cord
to the DC POWER JACK on the back of
the unit and connect the AC plug to a
nearby wall outlet.
20
Connect the plug of the shaker cord to
the SHAKER JACK on the back of the
unit.
2
Place the shaker under the pillow.
19
CONNECTING SHAKER
6

3 4 5 6 71 2
8
SNOOZE
SLEEP/DIMMERTIME HOUR MIN
PRESET
RADIO/AL OFF
TUN TUN VOLVOL
AL 2AL 1
Wireless Charge
9
10
11
12
13
14
15
16
iLuv
PM
SHAKER
AL 1
SHAKER
BUZZER
RADIO
BUZZER
RADIO
AL 2
1
To set the clock time, connect the power when the
unit is o or press & HOLD [TIME] to enter the
TIME SETUP mode. Once in the TIME SETUP mode
the display will start blinking.
2
Press [HOUR] to advance to the current hour. The
PM INDICATOR will light when the time is
advanced to the PM time.
(Press & HOLD to fast adjust)
3
Press [MIN] to advance to the current minute.
(Press & HOLD to fast adjust)
4
Press [TIME] to exit the TIME SETUP mode.
SET CLOCK TIME
The default time is set to 12:00AM
1
2
9
3
1
7

3 4 5 6 71 2
SNOOZE
SLEEP/DIMMERTIME HOUR MIN
PRESET
RADIO/AL OFF
TUN TUN VOLVOL
AL 2AL 1
Wireless Charge
8
9
10
11
12
13
14
15
16
iLuv
PM
SHAKER
AL 1
SHAKER
BUZZER
RADIO
BUZZER
RADIO
AL 2
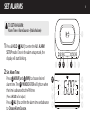
Press & HOLD [AL 1] to enter the
AL1
ALARM
SETUP
mode. Once in the alarm setup mode, the
display will start blinking.
Press
[HOUR]
and
[MIN]
to choose desired
alarm time. The
PM INDICATOR
will light on when
the time is advanced to the PM time.
(Press & HOLD to fast adjust)
Press
[AL 1]
to conrm the alarm time and advance
to
Choose Alarm Source.
Set Alarm Time:
TO SET AN ALARM:
Alarm Time > Alarm Source > (Radio Volume)
1
SET ALARMS
5
2
2
3
9
5
8

3 4 5 6 71 2
SNOOZE
SLEEP/DIMMERTIME HOUR MIN
PRESET
RADIO/AL OFF
TUN TUN VOLVOL
AL 2AL 1
Wireless Charge
8
9
10
11
12
13
14
15
16
iLuv
PM
SHAKER
AL 1
SHAKER
BUZZER
RADIO
BUZZER
RADIO
AL 2
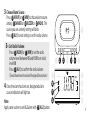
Press
[HOUR]
or
[MIN]
to set the radio
volume level between
V5
and
V15
from initial
level
V8
.
Press
[AL 1]
to conrm the radio volume.
Set Radio Volume:
3
-1
2
3
5
Press
[HOUR]
or
[MIN]
to choose alarm source
among
SHAKER or BUZZER
or
RADIO. The
source you are currently setting will blink.
Press
[AL1]
to exit setting or set the radio volume.
Note:
Apply same routine to set AL2 alarm with [AL 2] button.
Once the alarm has been set, designated alarm
source indication will light on.
(Tuned channel on the radio will be played for an alarm.)
4
Choose Alarm Source :3
2
10
5
1211
3
6
9

3 4 5 6 71 2
SNOOZE
SLEEP/DIMMERTIME HOUR MIN
PRESET
RADIO/AL OFF
TUN TUN VOLVOL
AL 2AL 1
Wireless Charge
8
9
10
11
12
13
14
15
16
iLuv
PM
SHAKER
AL 1
SHAKER
BUZZER
RADIO
BUZZER
RADIO
AL 2
Alarms can be Enabled/Disabled by pressing
[AL1]
or
[AL2]
. When either Alarm 1 or
Alarm 2 is enabled with one of alarm options,
corresponding
Shaker
,
Buzzer
or
Radio
indicator
will light on. Indicators won't light on if an alarm is
disabled.
Note.
Shaker
works only when properly connected
to the unit.
Please make sure if any of Alarm 1 or Alarm 2
is disabled by turning each one o, specied
alarm sound or vibration won't be played at
the alarm time. It should be turned on again
to be enabled.
ENABLE/DISABLE ALARM
5
6
10

3 4 5 6 71 2
SNOOZE
SLEEP/DIMMERTIME HOUR MIN
PRESET
RADIO/AL OFF
TUN TUN VOLVOL
AL 2AL 1
Wireless Charge
8
9
10
11
12
13
14
15
16
iLuv
PM
SHAKER
AL 1
SHAKER
BUZZER
RADIO
BUZZER
RADIO
AL 2
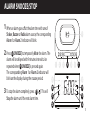
When an alarm goes o at the alarm time with one of
Shaker, Buzzer or Radio alarm source, the corresponding
Alarm 1 or Alarm 2 indicator will blink.
1
To stop the alarm completely, press [ ]. This will
Stop
the alarm until the next alarm time.
3
2
ALARM SNOOZE/STOP
7
Press [SNOOZE] to temporarily Mute the alarm. The
alarm will be delayed with 9 minutes interval to be
repeated when [SNOOZE] is pressed again.
The corresponding Alarm 1 or Alarm 2 indicator will
blink on the display during the snooze period.
4
4
11

3 4 5 6 71 2
SNOOZE
SLEEP/DIMMERTIME HOUR MIN
PRESET
RADIO/AL OFF
TUN TUN VOLVOL
AL 2AL 1
Wireless Charge
8
9
10
11
12
13
14
15
16
iLuv
PM
SHAKER
AL 1
SHAKER
BUZZER
RADIO
BUZZER
RADIO
AL 2
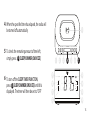
The Sleep Timer Function allows you to set to stop
the radio after the specied time has elapsed.
Press [SLEEP/DIMMER/SNOOZE] to set the timer
(in minutes):
10, 20, 30, 40, 50, 60, 70, 80, 90 and 00(o).
To activate the
SLEEP TIMER FUNCTION
,
press [ /RADIO/AL OFF] to turn on the radio.
2
Once selected, wait 3 seconds to allow the sleep
timer starts.
3
1
7
4
SLEEP TIMER FUNCTION
12

3 4 5 6 71 2
SNOOZE
SLEEP/DIMMERTIME HOUR MIN
PRESET
RADIO/AL OFF
TUN TUN VOLVOL
AL 2AL 1
Wireless Charge
8
9
10
11
12
13
14
15
16
iLuv
PM
SHAKER
AL 1
SHAKER
BUZZER
RADIO
BUZZER
RADIO
AL 2
4
When the specied time has elapsed, the radio will
be turned o automatically.
5
To check the remaining amount of time left,
simply
press
[SLEEP/DIMMER/SNOOZE]
.
6
To turn o the SLEEP TIMER FUNCTION,
press
[SLEEP/DIMMER/SNOOZE]
until 00 is
displayed. The timer will then be set to "OFF"
4
4
13

3 4 5 6 71 2
SNOOZE
SLEEP/DIMMERTIME HOUR MIN
PRESET
RADIO/AL OFF
TUN TUN VOLVOL
AL 2AL 1
Wireless Charge
8
9
10
11
12
13
14
15
16
iLuv
PM
SHAKER
AL 1
SHAKER
BUZZER
RADIO
BUZZER
RADIO
AL 2
Press [ /RADIO /AL OFF] to turn the radio on.
To adjust the radio frequency, press [TUN-] and
[TUN+] respectively.
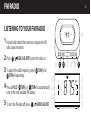
LISTENING TO YOUR FM RADIO
Unravel and extend the antenna to improve the FM
radio signal reception.
1
2
3
4
Press & HOLD [TUN-] or [TUN+] to automatically
tune to the next available FM station.
5
To turn the FM radio o, press [ /RADIO /AL OFF].
7
7
2
3
2 3
FM RADIO
14

3 4 5 6 71 2
SNOOZE
SLEEP/DIMMERTIME HOUR MIN
PRESET
RADIO/AL OFF
TUN TUN VOLVOL
AL 2AL 1
Wireless Charge
8
9
10
11
12
13
14
15
16
iLuv
PM
SHAKER
AL 1
SHAKER
BUZZER
RADIO
BUZZER
RADIO
AL 2
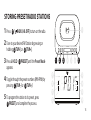
STORING PRESET RADIO STATIONS
2
Tune to your desired FM Station by pressing or
holding [TUN-] or [TUN+].
3
Press & HOLD [PRESET] until the Preset Mode
appears.
5
To program the station to its preset, press
[PRESET] and complete the process.
1
Press [ /RADIO /AL OFF] to turn on the radio.
7
2
1
1
3
4
Toggle through the preset numbers (P01-P10) by
pressing [TUN-] or [TUN+].
2 3
15

3 4 5 6 71 2
SNOOZE
SLEEP/DIMMERTIME HOUR MIN
PRESET
RADIO/AL OFF
TUN TUN VOLVOL
AL 2AL 1
Wireless Charge
8
9
10
11
12
13
14
15
16
iLuv
PM
SHAKER
AL 1
SHAKER
BUZZER
RADIO
BUZZER
RADIO
AL 2
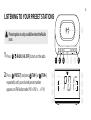
LISTENING TO YOUR PRESET STATIONS
1
Press [ /RADIO /AL OFF] to turn on the radio.
2
Press [PRESET]
and press [TUN-] or [TUN+]
repeatedly until your desired preset number
appears on FM Radio mode: P01 > P02 > ... > P10
7
1 2 3
Preset option is only available when the Radio
is on.
16

9
10
11
12
13
14
15
16
iLuv
PM
SHAKER
AL 1
SHAKER
BUZZER
RADIO
BUZZER
RADIO
AL 2
3 4 5 6 71 2
SNOOZE
SLEEP/DIMMERTIME HOUR MIN
PRESET
RADIO/AL OFF
TUN TUN VOLVOL
AL 2AL 1
Wireless Charge
8
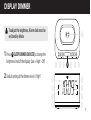
Press [SLEEP/DIMMER/SNOOZE] to change the
brightness level of the display: (Low > High > O)
1
Default setting of the dimmer level is “High”
2
4
DISPLAY DIMMER
To adjust the brightness, Alarm clock must be
on Stand-by Mode.
17

2019 2117 18
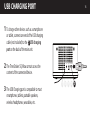
USB CHARGINGDC 5V/3ASHAKER
USB CHARGING PORT
1
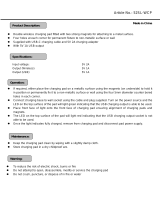
To charge other devices such as a smartphone
or tablet, connect one end of the USB charging
cable (not included) to the USB charging
port on the back of the main unit.
3
The USB Charging port is compatible to most
smartphones, tablets, portable speakers,
wireless headphones, wearables, etc.
2
The TimeShaker 5Q Wow cannot access the
content of the connected device.
21
18

3 4 5 6 71 2
SNOOZE
SLEEP/DIMMERTIME HOUR MIN
PRESET
RADIO/AL OFF
TUN TUN VOLVOL
AL 2AL 1
Wireless Charge
8
Place your Qi enabled smartphone on the center of
the
Wireless charging pad
.
For best connectivity, align your phone with the
alarm clock.
Compatible Products for Wireless Charging:
iPhone XS/XS Max/XR/X, iPhone 8/8 Plus, AirPods 2;
Samsung Galaxy S10/9/8/7/6 series, Note 9/8/7/5 series;
LG V35/V30 series, G7/G6 series; Google Pixel 3/3XL,
Nexus6/5/4; and other Qi enabled smartphones/tablets
and accessories.
USING QI WIRELESS CHARGING
8
IT IS SUGGESTED TO CHARGE YOUR PHONE WITH A WIRED CABLE INSTEAD OF A WIRELESS CHARGER DURING
PHONE SOFTWARE UPDATE. OTHERWISE, CHARGE YOUR PHONE FULLY BEFORE THE PHONE SOFTWARE UPDATE.
PMA wireless charging system is not supported.
19

9
10
11
12
13
14
15
16
iLuv
PM
SHAKER
AL 1
SHAKER
BUZZER
RADIO
BUZZER
RADIO
AL 2
3 4 5 6 71 2
SNOOZE
SLEEP/DIMMERTIME HOUR MIN
PRESET
RADIO/AL OFF
TUN TUN VOLVOL
AL 2AL 1
Wireless Charge
8
- Check if your device supports Qi wireless charging
- Place mobile device in center of the Wireless
charging pad
- Remove any protective cases containing magnets,
metal, or materials thicker than 0.12" (3mm)
Wireless Charging Indicator light is displayed on
the right top corner of the product display.
Refer to the Light status indicators below:
WIRELESS CHARGE INDICATOR
13
8
O
: Stand-by Mode
1
Solid Blue
: Charging
Blinking Red
: Abnormal
*If the charging indicator blinks red:
2
3
20
Page is loading ...
Page is loading ...
Page is loading ...
Page is loading ...
-
 1
1
-
 2
2
-
 3
3
-
 4
4
-
 5
5
-
 6
6
-
 7
7
-
 8
8
-
 9
9
-
 10
10
-
 11
11
-
 12
12
-
 13
13
-
 14
14
-
 15
15
-
 16
16
-
 17
17
-
 18
18
-
 19
19
-
 20
20
-
 21
21
-
 22
22
-
 23
23
-
 24
24


iLuv TimeShaker 5Q Wow User manual
- Category
- Alarm clocks
- Type
- User manual
Ask a question and I''ll find the answer in the document
Finding information in a document is now easier with AI
Related papers
-
iLuv TimeShaker Super Quick start guide
-
-
-
-
-
-
iLuv iMM190 User manual
-
iLuv iMM178 Owner's manual
-
iLuv Vibro Classic Specification
-
Other documents
-
Soundmaster UR965 Datasheet
-
 AmazonBasics B07DQYFCXM User manual
-
 BUFFBEE RS5 10W Fast Wireless Charger User manual
-
Soundmaster UR8900WS Datasheet
-
Grundig Sonoclock 600 User manual
-
 Astro Tool 52SL-WCP Light USB-C Dual wireless User manual
-
Craig CR41804 Owner's manual
-
Leader Premiums AB0331 User manual
-
Denver CR-422 User manual
-
 Dongguan Tyjin Electronics C 053 QI Dual Fast Wireless Charger User manual


