Page is loading ...

- 1 -
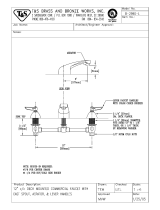
SPOUT BASE
3
Fig. A.
Fig. B.
1
2
4
7
8
12 Blue Stripe (COLD)
12 Red Stripe
(HOT)
10
13a
13a
10
13
10a
11
5
6
14
Product names listed herein are trademarks of AS America, Inc.
© AS America, Inc. 2018
RECOMMENDED TOOLS
1
M965956 (6/18)
INSTALL SPOUT
STUDIO
®
S
DUAL CONTROL WIDESPREAD
LAVATORY FAUCET
INSTALLATION
INSTRUCTIONS
7105857
7105877
Flat Head Screwdriver
Adjustable Wrench Tubing CutterSlip Jaw Pliers
Certied to comply with ANSI A112.18.1M
CAUTION
Turn off hot and cold water
supplies before begining.
1A
INSTALL VALVE BODIES
Fig. A.
• Insert SHANK (1) and HOSE (2) through center hole, making sure
SEAL WASHER (3) is properly seated in spout base.
• From below, push GASKET (5) with RETAINING WASHER (6) onto MOUNTING
STUD (4). Secure faucet with MOUNTING NUT (14), pushing faucet to back of
sink, so SUPPLIES (3) rests against mounting hole.
• Align and center SPOUT. Tighten LOCKNUT (5).
Hex Wrench
Fig. B.
• Place SEAL WASHER (7) under HANDLE BASE (8)
and make sure it sits properly inside the groove of
the deck adapter.
• Remove LOCKNUT (9) and RUBBER WASHER
(10), FRICTION WASHER (10a) from SIDE VALVE
SHANKS (11).
• Insert Hot and Cold SIDE VALVE HOSES (12),
FLEXIBLE SUPPLIES (13a) into mounting holes
making sure the SEAL WASHERS (7) are
properly seated in each HANDLE BASE (8).
• Assemble SPACER (13) RUBBER WASHER (10),
FRICTION WASHER (11a) and thread LOCKNUT
(10a) onto each SIDE VALVE SHANK (11) from
underside of sink or mounting surface.
NOTE: SPACER (13) not needed for deck
thickness larger then 3-1/4".
• Align and center SIDE VALVES. Tighten
LOCKNUTS (9).
Thank you for selecting American Standard...
the benchmark of fine quality for over 140 years.
To ensure that your installation proceeds smoothly-please read
these instructions carefully before you begin.

- 2 -
M965956 (6/18)
HOT
COLD
1
3
3a
4
2
Blue Stripe
(C0LD)
Red Stripe (HOT)
“P” TRAP
WASTE
OUTLET
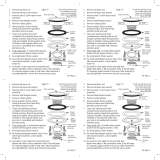
• Connect FLEXIBLE SUPPLIES (1, 2) directly to wall supplies.
Connection on tting supplies are 3/8" compression.
Connect FLEXIBLE SUPPLY (1) (Marked with a Red Band) to the
Left wall supply and FLEXIBLE SUPPLY (2) (Marked with a Blue
Band) to Right wall supply.
• Connect the VALVE HOSES (3, 3a) to SPOUT TEE (4).
Use adjustable wrench to tighten connections.
Do not over tighten.
• Faucet supplies are 20" long from faucet base.
Note: If additional supply length is required, installer must
purchase additional parts separately.
Important: If SUPPLY HOSES (1, 2) are to long, loop as
illustrated to avoid kinking.
• Connect 1-1/4" O.D. tail piece on POP-UP DRAIN to
waste outlet.
4 5
6
FLANGE GASKET AND POP-UP KNOB CHECK OPERATION OF POP-UP
• Check DRAIN FLANGE in SINK to ensure that
FOAM GASKET (3) is fully compressed and not visible.
FOAM
GASKET
NOT VISIBLE
DRAIN
FLANGE
2 3
INSTALL DRAIN FROM BELOW FIXTURE
• Install DRAIN (1) by dropping it from the top of the sink.
• From under side of SINK install GASKET (2) and
MOUNTING NUT (3).
Note: Plumber’s putty or caulk is recommended.
• Thread TAIL PIECE NUT (1) clockwise onto
DRAIN BODY (2).
DRAIN
OUTLET
REAR OF SINK
1
2
3
1
2
1
• Operate DRAIN STOPPER (1) to verify that it opens
and closes.
MAKE WATER SUPPLY AND WASTE CONNECTIONS

- 3 -
7
M965956 (6/18)
• Operate DRAIN STOPPER (1) to verify that it opens
and closes.
SERVICE
CARE INSTRUCTIONS:
DO: SIMPLY RINSE THE PRODUCT CLEAN WITH CLEAR WATER. DRY WITH A SOFT COTTON FLANNEL CLOTH.
DO NOT: DO NOT CLEAN THE PRODUCT WITH SOAPS, ACID, POLISH, ABRASIVES, HARSH CLEANERS, OR A
CLOTH WITH A COARSE SURFACE.
90˚
90˚
2
6
3
1
4
5
8
7
5
Change Direction of the Handle
• Turn valves to OFF position.
• Turn off water supplies.
• Pull HANDLE (1) “UP” rmly to release from ESCUTCHEON (6).
• Remove SCREW (3) and pull off PLASTIC INSERT (2).
• Remove CARTRIDGE NUT (8).
• Remove RETAINING O-RING (4).
• Lift and turn STOP WASHER (5) 90˚. Replace RETAINING
O-RING (4).
• Re-install HANDLE ASSEMBLY.
To Change Cartridge:
• Remove HANDLE (1), ADAPTER (2), SCREW (3) and CARTRIDGE
NUT (8) via steps above.
• Remove cartridge by pulling upward on stem.
Aerator Clean Out
• AERATOR may accumulate dirt causing distorted and reduced
water ow. Remove AERATOR by using the edge of a coin
and rinse to clear any debris.
• If spout drips, operate handles several times from OFF to ON
position. Do not force - handles turn only 90˚.

- 4 -- 4 -
M965956 (6/18)
STUDIO
®
S
DUAL CONTROL WIDESPREAD
LAVATORY FAUCET
HOT LINE FOR HELP
For toll-free information and answers to your questions, call:
1 (800) 442-1902
Mon. - Fri. 8:00 a.m. to 8:00 p.m. EST
Saturday 10:00 a.m. to 4:00 p.m. EST
IN CANADA 1-800-387-0369
(TORONTO 1-905-306-1093)
Weekdays 8:00 a.m. to 7:00 p.m. EST
IN MEXICO 01-800-839-1200
M962492-0070A
MOUNTING KIT
M918462-0070A
CABLE ADAPTER
M961634-0070A
VALVE
MOUNTING KIT
M970233-YYY0A
LEVER HANDLE
(7105.871)
M964055-0070A
SCREW & ADAPTER
KIT
M911116-0070A
SPACER VALVE
M964005-0070A
CARTRIDGE
M904521-0070A
T-CONNECTOR
M923840-0070A
AERATOR
M970246-YYY0A
ESCUTCHEON
M953456-YYY0A
DRAIN ASSEMBLY
M970272-YYY0A
HANDLE KIT
(7105.851)
MODEL NUMBERS
7105857
7105877
Replace the “YYY” with
appropriate finish code
POLISHED CHROME 002
BRUSHED NICKEL 295
MATTE BLACK 243
/