Eucatex of North America
2500 Northwinds Parkway, Suite 685
Alpharetta, Georgia 30004
(678)-624-0160
Fax (678)-624-0621
www.eucatex.com.br
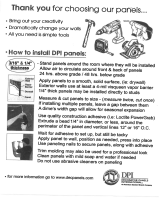
Cutting Panels
If measured floor-to-ceiling height is 8’ or less, subtract ½” from this measurement to allow ¼” expansion
clearance on top and bottom. Transfer these measurements to panels for cutting. If using a handsaw or table saw,
mark and cut the panels face up. If using a portable circular saw or sabre saw, mark and cut panels face down. Cut-
outs for door and window sections, electrical switches and outlets or heat registers require careful measurements.
Many a good paneling job has been ruined by inaccurate cutting for outlet boxes or heat registers. One method is to
mark the outlet box with chalk. Then, place the properly cut panel on the wall and tap at the outlet location. This
will transfer an image to the back of the panel and indicate the area for cutting. A ¼” gap around this area will
provide room for spacing and adjustment – the faceplate will cover up the extra space. On an existing wall, adjust
the outlet box to meet panel thickness. Unscrew at the top and bottom, wedge a small paneling scrap at screw
locations, and tighten.
Adhesive Application
Adhesive application may be used to apply Hardboard requiring both adhesive and nails.
Adhesive may be used to apply paneling directly to studs or over existing walls as long as the surface is level, sound
and clean. Once the panel is fitted, apply beads of adhesive with a caulking gun in a continuous strip along the top,
bottom and both sides of the panel. On intermediate studs, apply beads 3’ long and 6’ apart. Over solid backing,
apply adhesive in a zigzag pattern between studs. Some supplemental nailing will be necessary to hold the panel in
place until the adhesive sets. Be sure to read the adhesive manufacturer’s instructions carefully prior to installation,
since instructions may vary. Use a hammer and padded wood block (or rubber mallet) to set the glued panel in
position.