
MC9500-K
1
2
1
2
1
2
1
2
2
1
8
4
7
1
2
15
20
24
13
14
17
19
21
18
23
5
9
12
10
11
3
16
22
6
23
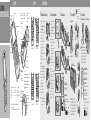
KEYPADS
3 Insert the Battery
GETTING STARTED
9 Decode LED
10 Receiver
11 Battery Status LED
12 WAN Radio Status
LED
6 Microphone
7 Scan Button
8 Touch Screen
(with screen protector)
1 Up/Down Volume Button
2 Scan Button
3 Function Keys
4 Power Button
5 Keypad
Note 1: To warm boot the MC9500-K, press and hold the Power button
for five(5) seconds.
To cold boot the MC9500-K, press and hold the 1, 9 and Power button.
13 Speaker
14 Camera and Flash
15 Interface Connector
16 Stylus
17 Scan Exit Window
(see Data Capture Options)
21 Headset Connector
22 Handstrap
23 Battery Release Buttons
24 Battery
18 IrDA Window
19 Action Button
20 Scan Button
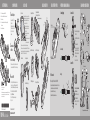
QUICK START GUIDE
1 SIM Card Installation (GSM Only)
LED Notifications
1. Press the Power button to suspend the
device.
2. On the PowerKey Action screen, tap
Safe Battery Swap.
3. Wait for red Decode LED to turn on and
then turn off.
4. Unhook handstrap.
5. Press battery release buttons and
remove battery.
6. Remove SIM cover using the top
end of the stylus.
7. Slide SIM card holder to the left.
8. Lift card holder.
9. Insert SIM card into SIM holder.
NOTE :
The proper position of the SIM card—the card
connector (i.e., gold area) should be facing
down with the beveled edge facing up.
10. Lower the SIM card holder down.
11. Slide SIM card holder to the right to lock
into place.
12. Reinstall SIM cover.
13. Reinstall battery.
14. Connect handstrap.
15. Warm boot the device.
NOTE: For detailed information on SIM card
installation, refer to the MC9500
Integrator Guide.
Battery Status:
Decode:
Slow blinking amber: Healthy battery charging
Slow blinking red: unhealthy battery charging
Solid green: Fully charged healthy battery
Solid red: Fully charged unhealthy battery
Fast blinking amber: Charging error
Red: Scanning active
Green: Good decode
Red (after Power button
press): Safe to remove
battery
WAN Radio Status:
Flashing green:
WAN activity
5 Charge the Battery
Four Slot Battery ChargerSingle Slot Spare Battery Charger
Four Bay Cradle
4 Charge the MC9500-K
Single Bay Cradle
MC9500-K Battery Status LED
Telephony Numeric
Alpha Numeric Alpha Primary
Calculator Numeric
2 microSD Card Installation
1. Press the Power button to suspend
the MC9500-K.
2. On the PowerKey Action screen, tap
Safe Battery Swap.
3. Wait for red Decode LED to turn on and
then turn off.
4. Unhook the handstrap.
5. Press the battery release buttons and
remove the battery.
6. Remove the SD card cover using the
top end of the stylus.
7. Slide the microSD card door to
the left to unlock.
8. Lift the door.
9. Place the microSD card onto the
contacts.
NOTE :
The proper position of the microSD card —
the card connector (i.e., gold area) should
be facing down as shown.
10. Lower the microSD card door.
11. Slide door to the right
to lock into place.
12. Reinstall the SD card cover.
13. Reinstall the battery.
14. Reconnect the handstrap.
15. Warm boot the MC9500-K.
Battery Status
Decode
WAN Radio
Status
Press the Battery Status button.
Charge Level Indicator displays approximate
battery level.
Battery Indications
Charge Level Indicator
Battery Status Button
Fully
Charged
Partially
Charged
Un-
healthy
Charge Level Indicator displays approximate
battery level.
Battery Indications
Fully
Charged
Partially
Charged
Un-
healthy
Charge Level Indicator
Battery Status Button
Battery Status Indicator
Battery Status LED (in charger)
Slow Blinking Amber = Healthy battery charging
Slow Blinking Red = Unhealthy battery charging
Solid Green = Healthy battery fully charged
Solid Red = Unhealthy battery fully charged
Fast blinking Amber = Charging error
Battery Status LED
Solid Green = Healthy battery
Solid Red = Unhealthy battery
Slow Blinking Amber = Healthy battery charging
Slow Blinking Red = Unhealthy battery charging
Solid Green = Healthy battery fully charged
Solid Red = Unhealthy battery fully charged
Fast Blinking Amber = Charging error
It is recommended that this
product be charged for 24
hours before the first use to
ensure that the internal
battery is fully charged.
Stand-alone Mode
Press the Battery Status button.
FEATURES
Battery Status LED
Install
Remove
Install
Remove

Zebra Technologies Corporation
http://www.zebra.com/mc9500
Lincolnshire, IL U.S.A.
Magnetic Stripe Reader
Exit Window
OPTIMUM SCANNING AND IMAGING
ERGONOMIC CONSIDERATIONSACCESSORIESBATTERY REMOVAL
Laser Scanning
Scanning/Imaging
AVOID EXTREME
WRIST ANGLES
DATA CAPTURE OPTIONS
GPS Information
Screen Protector
Zebra recommends the use of a screen protector to
minimize wear and tear. Screen protectors enhance
the usability and durability of touch screen
displays. Benefits include:
• Protection from scratches and gouges
• Durable writing and touch surface
with tactile feel
• Abrasion and chemical resistance
• Glare reduction
• Keeping the device’s screen looking
like new
• Quick and easy installation.
An initial screen protector is already applied to your MC9500-K. Contact your
local account manager or Zebra for more information and purchasing details.
Part number: KT-122010-01R Screen Protector 3/pk.
Not using a screen protector can affect your warranty coverage.
MC9500-K
Quick Start Guide
Imaging
Zebra and the Zebra head graphic are registered trademarks of ZIH Corp. The Symbol logo is
a registered trademark of Symbol Technologies, Inc., a Zebra Technologies company.
© 2015 Symbol Technologies, Inc.
72-118504-06 Rev. A
—
February 2015
• Acquiring satellite signals may take a few minutes. It is best to be
outside and have a clear, unobstructed view of the sky.
• Obtain a satellite fix before moving.
• Shutdown GPS application when not in use.
Camera Lens
When using the GPS feature of the MC9500-K:
Laser scanner or Imager
Camera Decode
Camera Photo
1. Launch a bar code reading application on
the MC9500-K.
2. Position the MC9500-K toward the bar
code.
3. Press the Scan button.
4. In the image window align the red
target over the bar code. When the
MC9500-K decodes the bar code the
target turns green.
5. Release the Scan button.
1. Tap Start > Programs > Pictures &
Videos > Camera.
2. Point the MC9500-K at an object.
3. Press the Enter button.
4. Hold MC9500-K still until “Shutter
Sound” is heard.
CABLE CONNECTION
Single Bay USB Cradle
USB/Charging Cable
Four Bay Charge Only Cradle
Four Slot Battery ChargerSingle Slot Battery Charger
Vehicle Cradle
Auto-Charge Cable
Vehicle Battery Charger
AVOID BENDING
AVOID REACHING
Taking breaks and task rotation recommended
High Scanning
Use a ladder
Low Scanning
Create a Partnership
3
4
Install ActiveSync
®
1
Communicate
with Host
2
Download ActiveSync
®
4.5 or
higher from
http://www.microsoft.com and
follow the instructions to install
ActiveSync onto the host
computer.
COMMUNICATION
Enter Your PIN
After installing the SIM card activate your mobile service
connection. In most cases, SIM cards are preset with a PIN
(Personal Identity Number), provided by your service provider.
1. Press the Power button to turn on the MC9596-K.
2. Tap Start > Phone.
3. Enter the PIN from your service provider.
4. Tap Enter.
Follow the
on-screen ActiveSync instructions to establish a
connection between the MC9500-K and the host computer.
Alternate left and
right knees
Alternate left and
right hands
1. Press Power button to suspend the MC9500-K.
2. Wait for the red Decode LED to turn on and then turn off.
3. Unhook handstrap.
4. Press the two battery release latches. The battery ejects slightly
from the device.
5. Remove battery from device.
Four Bay Ethernet Cradle
Release Button
For more information visit:
(shown with optional guide cups)
-
 1
1
-
 2
2


Zebra MC9500-K - Win Mobile 6.1 806 MHz Quick start guide
- Type
- Quick start guide
- This manual is also suitable for
Ask a question and I''ll find the answer in the document
Finding information in a document is now easier with AI
Related papers
-
Zebra MC9500-K User guide
-
 ZIH MC9500-K Owner's manual
-
-
-
Zebra BTRY-KT-2R5X-MC7XR User manual
-
Motorola KT-122010-01R Datasheet
-
Zebra MC3100 Owner's manual
-
Zebra MC9596-KDABAE00000 User manual
-
-

Other documents
-
Motorola MC9500-K - Win Mobile 6.1 806 MHz Quick start guide
-
-
Yarvik SAC020 Datasheet
-
-
-
-
 Sophisticated Circuits PowerKey Pro 600 User manual
-
-
-
