Page is loading ...

INSTALLATION MANUAL
MODEL #100376
WET WEATHER GENERATOR COVER
3,000-10,000 WATT MODELS
Assembled in USA - REV 20181108 Champion Power Equipment, Inc., Santa Fe Springs, CA USA
SAVE THESE INSTRUCTIONS. This manual contains important safety precautions which should be read and
understood before operating the product. Failure to do so could result in serious injury. This manual should
remain with the product.
Specifications, descriptions and illustrations in this manual are as accurate as known at the time of publication,
but are subject to change without notice.
GenTent
Covered By

100376 - WET WEATHER GENERATOR COVER TABLE OF CONTENTS
2
TABLE OF CONTENTS
Introduction .................................... 3
Safety Definitions............................... 3
Important Product Safety ....................... 4
Package Contents .............................. 6
Assembly ....................................... 7
Installation Overview ............................. 7
Install StormShield Clamps on Generator Frame ....... 7
Champion StormShield Easy Adjustment Guide ...... 10
Install StormShield Frame on the StormShield Clamps 11
Secure StormShield Canopy Over StormShield Frame . 12
Select and Install Electrical Skirt .................. 12
Important StormShield Usage Tips ................. 13
Accessories and Spares ....................... 14
Register Your Product –
Activate Your Warranty ........................ 15
Warranty ...................................... 16
Warranty Qualifications .......................... 16
Repair/Replacement Warranty .................... 16
Do Not Return The Unit To The Place Of Purchase .... 16
Warranty Exclusions ............................. 16
Limits of Implied Warranty and Consequential Damage 16
Contact Information ............................. 16

100376 - WET WEATHER GENERATOR COVER INTRODUCTION
3
INTRODUCTION
Every effort has been made to ensure the accuracy and
completeness of the information in this manual at the
time of publication, and we reserve the right to change,
alter and/or improve the product and this document at
any time without prior notice.
We highly value how our products are designed,
manufactured, operated, and serviced as well as
providing safety to the operator and those around
the generator. Therefore, it is IMPORTANT to review
this product manual and other product materials
thoroughly and be fully aware and knowledgeable of
the assembly, operation, dangers and maintenance of
the product before use. Fully familiarize yourself, and
make sure others who plan on operating the product
fully familiarize themselves too, with the proper safety
and operation procedures before each use. Please
always exercise common sense and always err on the
side of caution when operating the product to ensure no
accident, property damage, or injury occurs.
When contacting about parts and/or service, you will
need to supply the complete model and serial numbers
of your product. Transcribe the information found on
your product’s nameplate label to the table.
CUSTOMER SUPPORT
781-334-8368
MODEL NUMBER
100376
SERIAL NUMBER
DATE OF PURCHASE
PURCHASE LOCATION
SAFETY DEFINITIONS
The purpose of safety symbols is to attract your
attention to possible dangers. The safety symbols,
and their explanations, deserve your careful attention
and understanding. The safety warnings do not by
themselves eliminate any danger. The instructions
or warnings they give are not substitutes for proper
accident prevention measures.
DANGER
DANGER indicates a hazardous situation which,
if not avoided, will result in death or serious injury.
WARNING
WARNING indicates a hazardous situation which, if
not avoided, could result in death or serious injury.
CAUTION
CAUTION indicates a hazardous situation which,
if not avoided, could result in minor or moderate
injury.
NOTICE
NOTICE indicates information considered important,
but not hazard-related (e.g., messages relating to
property damage).

100376 - WET WEATHER GENERATOR COVER IMPORTANT PRODUCT SAFETY
4
IMPORTANT PRODUCT SAFETY
WARNING
Always shut generator off before any fueling or
maintenance procedures.
WARNING
Running engines produce heat. Severe burns can
occur on contact. Combustible material can catch
fire on contact.
DO NOT touch hot surfaces. Avoid contact with
hot exhaust gases. Allow equipment to cool before
touching. Maintain at least 3 ft. (91.4 cm) of
clearance on all sides to ensure adequate cooling.
Maintain at least 5 ft. (1.5 m) of clearance from
combustible materials.
WARNING
NEVER position the refueling door on the same side
of the generator as the exhaust muffler. Spilled
gasoline can result in fire.
DANGER
Generator exhaust contains carbon monoxide, a
colorless, odorless, poison gas. Breathing carbon
monoxide will cause nausea, dizziness, fainting or
death. If you start to feel dizzy or weak, get to fresh
air immediately.
Operate generator outdoors only in a well ventilated
area.
DO NOT operate the generator inside any building,
including garages, basements, crawlspaces and
sheds, enclosure or compartment, including the
generator compartment of a recreational vehicle.
DO NOT allow exhaust fumes to enter a confined
area through windows, doors, vents or other
openings.
DANGER CARBON MONOXIDE: using a generator
indoors CAN KILL YOU IN MINUTES.
WARNING
NEVER block or cover the generator exhaust
muffler in any way. StormShield canopy must be
installed above generator exhaust muffler. Install
StormShield electrical skirts such that they cannot
block exhaust in any way. Keep the StormShield
canopy at least 6 inches away from direct contact
with the exhaust.
WARNING
ALWAYS install included washer between the knob
and the clamp base AND between the bolt head
and clamp base. Tightening the knob without
using the washer VOIDS the WARRANTY as it risks
breakage.
WARNING
NEVER use the StormShield on a generator
whose muffler is openly exposed at the top of the
generator. These generators are disqualified and
VOID the WARRANTY of the StormShield.
CAUTION
Over tightening clamps should be avoided.
Two turns after the knob seats to the washer/clamp
is enough.
If you notice the mouth of the clamp pulling away
from the frame, the clamping strength has been
reduced and the knob should be loosened.
CAUTION
Always grasp fiberglass rods firmly during
installation to avoid the whipping motion that can
occur when a bent fiberglass rod is mistakenly
released.

100376 - WET WEATHER GENERATOR COVER IMPORTANT PRODUCT SAFETY
5
CAUTION
Avoid using your portable generator in hurricane
force winds above 70mph. (112.7 km/h)
NOTICE
Should StormShield cover block pull starter, it is
advisable to release the elastic straps on the pull
starter side and temporarily move StormShield
canopy out of the way.
NOTICE
When using StormShield during snow storms, it
is recommended to periodically brush away any
accumulation that blocks the top vent.
NOTICE
Should generator handle cause significant
stretching of the elastic straps when extended,
it is advisable to release the elastics straps on
the handle side of the generator before extending
generator handles.

100376 - WET WEATHER GENERATOR COVER PACKAGE CONTENTS
6
PACKAGE CONTENTS
Your StormShield Wet Weather Generator Cover ships with the following parts:
Product and Safety Manual ....................................... 1
StormShield Canopy .................................................. 1
Omnifit Side Electrical Apron (std opaque) ................. 1
Central Connector with Vent Rod ............................... 1
40 in. (101.6 cm) Fiberglass Frame Rods ................... 4
StormShield Clamp Main Body .................................. 4
StormShield Clamp Telescoping Rod ......................... 4
Self Locking StormShield Clamp Knobs ..................... 4
StormShield Clamp Washers ..................................... 8
1/4 -20 x 1.25 in. (1/4-20 x 3.2 cm)
Stainless Steel Carriage Bolts ................................... 4
StormShield Clamp Rubber Sleeves ........................... 4
Telescoping Rod Set Pins .......................................... 4

100376 - WET WEATHER GENERATOR COVER ASSEMBLY
7
ASSEMBLY
Installation Overview
The Storm Shield 100376 installs in three easy steps:
Strap it: Install 4 clamps and set the telescoping rod
length.
Frame it: Install frame rod to the center connector, then
into the correct hole in the telescoping rod and repeat.
Cover it: Slide the StormShield canopy over the frame
and secure by sliding the elastic straps over and behind
the clamp telescoping rod.
NOTICE
In some cases adaptation of the portable generator
frame is required to create a proper mounting
point for the StormShield clamps. Most Champion
branded portable generators do not need
adaptation. Should you need to adapt your frame,
adaption kits are available separately at
781-334-8368.
1. One corner needs to be adapted because:
1a. A muffler heat shield or other panel
is connected to a frame member that
otherwise blocks the StormShield clamp
from attaching directly to the proper
location.
2. Four corners need to be adapted because:
2a. The portable generator uses a square
tubular frame that must be adapted to
the round openings of the StormShield
clamps.
2b. The portable generator is a very small
frame and requires length and width
extension (see Clamp Adjustment tables
on page 10).
2c. Certain small Champion generators
whose frame perimeter (length and
width not including wheels or handles) is
between 75 in. (190.5 cm) and 80 in.
(203.2 cm) fall into the small frame
category.
Once the StormShield is installed, it can be left in place
during generator storage or easily removed and stored
separately. Should you wish to store the generator with
the StormShield attached, we recommend releasing the
elastic straps in order to keep them fresh and ready.
Install StormShield Clamps on
Generator Frame
1.) Determine whether the Rubber Sleeves are
required
The StormShield Clamp kit includes 4 rubber sleeve
adapters meant for use on frame diameters less than 1.5
in. If you do not know the diameter of your frame, wrap
a slit of paper or string around the frame tube, marking
where the beginning and end cross. Lay it on the “Frame
Diameter Tool” to determine if the rubber sleeves should
be used.
2.) Assemble Clamp Parts
WARNING
ALWAYS install included washer between the knob
and the clamp base AND between the bolt head
and clamp base. Tightening the knob without
using the washer VOIDS the WARRANTY as it risks
breakage.
NOTICE
It is very important that washers always be used
between the knob and clamp body as well as
between the bolt and the clamp body.
1. Slide telescoping rods into clamp bodies.
2. Install set pins through clamp bodies and
telescoping rods.
3. Install washer on bolt and bolt through one end
and into clamp.
4. Loosely install washer and self-locking knob onto
carriage bolt.

100376 - WET WEATHER GENERATOR COVER ASSEMBLY
8
Frame Diameter Tool
YES
NO
3.) Install Clamp on Generator Frame (or Frame
Adapter)
The top edge of the first clamp should be installed below
the electrical panel on your generator at the lower of
these two measurements:
1. 9 in. (22.9 cm) below where the gas tank meets
the frame, or
2. Directly below the electrical panel
NOTICE
The goal is for the bottom of the main canopy to
be at or slightly below where the tank connects to
the frame; this way water can’t get on the tank and
trickle toward the outlets. Further, the top of the
clamp should be located under the bottom of the
lowest electrical outlet -- the electrical protection
skirt will cover at least to the top of the clamp.
2a. For frames less than 1.5 in. (3.8 cm): slide
rubber sleeve over frame member. Preferably
position the rubber sleeve opening to face
outward toward clamp opening (Fig. 3-A).
(The rubber sleeve opening can face away
from the clamp opening if this is not possible).
2b. Push clamp opening straight onto frame
opening (Fig. 3-A). The clamp will pop over
the frame. If rubber sleeve used, slide clamp
up and over (Fig. 3-B). Do not over extend the
mouth of the clamp!
2c. Position clamp diagonally from sides of the
generator frame (Fig. 3-C).
2d. Tighten knob, centered on washer until clamp
is firmly in place. This usually requires only
2 full turns once the knob/washer seat to
the clamp body. Note that clamp strength
is reduced by over-tightening as the clamp
mouth pulls away from the frame. In this
case, slightly release the tension on the knob.
2e. Repeat procedure on remaining three sides;
position clamps at generally the same height.
TIP: For 1.5 in. (3.8 cm) frames, apply electrical tape
to the frame where the clamp will connect for added
grip. Contact support for other options should you
need more grip on 1.5 in. (3.8 cm) frames.

100376 - WET WEATHER GENERATOR COVER ASSEMBLY
9
Figure 3A
Figure 3B
Figure 3C

100376 - WET WEATHER GENERATOR COVER ASSEMBLY
10
Champion StormShield Easy Adjustment Guide
23 23.5 24 24.5 25 25.5 26 26.5 27 27.5 28 28.5 29 29.5 30 30.5 31 31.5 32
22.5 3 3 3 3 3 2 2 2 2 1 1 1 1 0 0 0 0
22 4 3 3 3 3 3 2 2 2 2 1 1 1 1 0 0 0
21.5 4 4 3 3 3 3 2 2 2 2 1 1 1 1 0 0 0 0
21 4 4 4 3 3 3 3 2 2 2 2 1 1 1 1 0 0 0 0
20.5 4 4 4 4 3 3 3 3 2 2 2 2 1 1 1 1 0 0 0
20 4 4 4 4 4 3 3 3 3 2 2 2 2 1 1 1 0 0 0
19.5 4 4 4 4 4 3 3 3 3 2 2 2 2 1 1 1 1 0 0
19 4 4 4 4 4 4 3 3 3 3 2 2 2 2 1 1 1 1 0
18.5 4 4 4 4 4 4 4 3 3 3 3 2 2 2 2 1 1 1 0
18 4 4 4 4 4 4 4 4 3 3 3 2 2 2 2 1 1 1 1
17.5 4 4 4 4 4 4 4 4 3 3 3 3 2 2 2 2 1 1 1
17 4 4 4 4 4 4 4 4 4 3 3 3 3 2 2 2 1 1 1
16.5 SMALL 4 4 4 4 4 4 4 4 4 3 3 3 2 2 2 2 1 1
16
SMALL SMALL
4 4 4 4 4 4 4 4 3 3 3 3 2 2 2 1 1
Frame Length (inches)
Setting Notes:
0: Use inside frame rod slot on Storm Shield clamp telescoping rod
Small: Requires frame extension using GTU Frame Adapter
Generator size beyond StormShield fit specification
Frame Width
(inches)

100376 - WET WEATHER GENERATOR COVER ASSEMBLY
11
4.) Set Rod Adjustment Pin
1. Reference Easy Adjustment Guide (previous page)
for StormShield.
2. Measure length and width of generator frame to
the outside of the frame members.
3. Find corresponding pin setting number in Easy
Adjustment Guide.
4. Set the telescoping rod location (Fig. 4A and 4B)
based on the setting number from the Easy
Adjustment Guide and install set pin to secure.
NOTICE
a. Rod location for setting 0 and 1 are the same
(Fig. 4-A). Use the inside frame rod hole for
setting 0 and the outside frame rod hole for
settings 1-4.
b. SMALL indicates that the use of a Four corner
frame extension kit is required. The four
corner frame extension kit is available directly
from GenTent® Safety Canopies.
0 1
Figure 4A
2
3
4
Figure 4B
Install StormShield Frame on the
StormShield Clamps
1. Position Central Connector with centered vent rod
up (Fig. 5-A).
2. Position Central Connector so that short side
and long side align with generator short and long
sides, respectively.
NOTICE
Each frame rod goes into the Central Connector
hole first and then into the corresponding clamp
hole.
3. Insert a fiberglass frame rod into Central
Connector hole until it stops (Fig. 5-A).
Figure 5A
4. Insert other end of the fiberglass rod fully into the
correct clamp hole of the corresponding clamp
(Fig. 5-B).
5. Insert second fiberglass rod fully into the opposite
hole in the Central Connector.
6. Grasping the end of this fiberglass rod, bend
toward the opposite side clamp and insert fully
into the correct hole (Fig. 5-B).
CAUTION
Hold rod with two hands as shown; Fiberglass rod
will be under tension, do not release!
7. Repeat for final two fiberglass rods (Fig. 5-C).
8. Recheck clamps; they should be firmly in place
and may exhibit a slight upward lean.

100376 - WET WEATHER GENERATOR COVER ASSEMBLY
12
Figure 5B
Figure 5C
Secure StormShield Canopy Over
StormShield Frame
1. Position StormShield canopy over the frame.
Be certain that the fueling door is not on the same
side as the generator exhaust (Fig. 6-A).
2. Slide StormShield canopy over the frame so that
all four corners are generally equal and level
(Fig. 6-A).
3. Center StormShield canopy such that Vent Rod is
centered under the top cap (Fig. 6-A).
4. Slide one corner elastic over the corresponding
clamp telescoping rod and set it under the clamp
body, behind the set pin (Fig. 6-B).
5. Repeat on opposite corner, then on the remaining
two corners. Recheck and adjust canopy if
necessary.
6. Adjust clamps left to right as necessary so that
Cover seams generally match the frame rods.
7. Recheck clamps; they should be firmly in place
and may exhibit a slight upward lean.
Figure 6A
Figure 6B

100376 - WET WEATHER GENERATOR COVER ASSEMBLY
13
Select and Install Electrical Skirt
1. The electrical apron fits over the generator
electrical panel. Simply center the apron on the
panel and press it on. The apron can be adjusted
to the left or right in order that it stays a minimum
4 inches away from the exhaust. Never block the
exhaust!
2. Flip the over flap down and over the electrical skirt
(Fig. 6-C).
Figure 6C
NOTICE
The intent of the electrical skirt is to cover the
electrical outlets in the front and about 6 in.
(15.2 cm) around the adjacent sides. Do not cover
other parts of your generator with the electrical
skirts, especially the exhaust area!
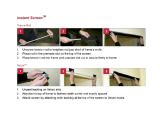
Important StormShield Usage Tips
Proper Door Sealing Tip
The GenTent StormBracer® door wraps around the
adjacent sides of the StormShield much like the skirts,
forming a brace against storms. Each time you close the
door, the Velcro® must be wrapped around the side and
pressed firmly back in place. If this is not done, holes
may exist between the pieces of Velcro which can allow
water to seep in.
In practice, the best way to achieve this is to close the
door, then follow this procedure:
1. Align the door properly so that the side Velcro and
lower Velcro are aligned as closely as possible and
are touching.
2. Then starting at the top corner of the door pinch
canopy around the frame rods and slide your hand
to the bottom while pinching.
3. Repeat on the other side
4. Check the door sides to see if you can see any
gaps in the Velcro sealing. Should there be any
gaps, repeat the pinching procedure.
NOTICE
Pull the door down and connect the bottom Velcro
first, then use the pinch & slide technique above to
secure the sides. The bottom edge should cover the
under flap stitching!

100376 - WET WEATHER GENERATOR COVER ACCESSORIES AND SPARES
14
ACCESSORIES AND SPARES

REGISTER YOUR PRODUCT – ACTIVATE YOUR WARRANTY
Complete your registration online at www.gentent.com/RegStormShield or fill out this card and mail it with a copy of
your purchase receipt to:
GenTent Safety Canopies
Attn: Champion Power Equipment Storm Shield Product Registration
44 Gile Rd
Nottingham, NH 03290
Your Information:
Name:
E-Mail Address:
Address:
City:
State/Province:
Country:
Zip/Postal Code:
Phone Number:
Purchase Information:
Champion Power Equipment Storm Shield
Purchase Date:
/
/
(MM/DD/YYYY)
Where did you purchase your Champion Storm Shield?
The Storm Shield be used on:
Generator Make:
Generator Model:
In addition to activating your product warranty, registering allows us to keep in contact with you from time to time
with important product updates, generator safety tips and special offerings for registered customers. Please note we
never share your contact information.

100376 - WET WEATHER GENERATOR COVER WARRANTY
16
WARRANTY
GenTent Safety Canopies
1 Year Limited Warranty
Warranty Qualifications
GenTent Safety Canopies (GSC) will register this warranty upon
receipt of your Warranty Registration Card and a copy of your sales
receipt from one of GSC’s retail locations as proof of purchase.
Please submit your warranty registration and your proof of purchase
within ten (10) days of the date of purchase.
Repair/Replacement Warranty
GSC warrants to the original purchaser that the mechanical and
electrical components will be free of defects in material and
workmanship for a period of one year (parts and labor) from
the original date of purchase and 90 days (parts and labor) for
commercial and industrial use. Transportation charges on product
submitted for repair or replacement under this warranty are the sole
responsibility of the purchaser. This warranty only applies to the
original purchaser and is not transferable.
Do Not Return The Unit To The Place Of Purchase
Contact GenTent Safety Canopies Technical Service and GSC
will troubleshoot any issue via phone or e-mail. If the problem is
not corrected by this method, GSC will, at its option, authorize
evaluation, repair or replacement of the defective part or component.
GSC will provide you with a case number for warranty service.
Please keep it for future reference. Repairs or replacements without
prior authorization, or at an unauthorized repair facility, will not be
covered by this warranty.
Warranty Exclusions
This warranty does not cover the following repairs and equipment:
Normal Wear
Products with mechanical and electrical components need periodic
parts and service to perform well. This warranty does not cover
repair when normal use has exhausted the life of a part or the
equipment as a whole.
Installation, Use and Maintenance
This warranty will not apply to parts and/or labor if the product is
deemed to have been misused, neglected, involved in an accident,
abused, loaded beyond the product’s limits, modified, installed
improperly or connected incorrectly to any electrical component.
Normal maintenance is not covered by this warranty and is not
required to be performed at a facility or by a person authorized by
GSC.
Other Exclusions
This warranty excludes:
– Cosmetic defects such as paint, decals, or discoloration, etc.
– Punctures from sharp or falling objects
Limits of Implied Warranty and Consequential
Damage
GenTent Safety Canopies disclaims any obligation to cover any
loss of time, use of this product, freight, or any incidental or
consequential claim by anyone from using this product. THIS
WARRANTY IS IN LIEU OF ALL OTHER WARRANTIES, EXPRESS
OR IMPLIED, INCLUDING WARRANTIES OF MERCHANTABILITY OR
FITNESS FOR A PARTICULAR PURPOSE.
A unit provided as an exchange will be subject to the warranty of the
original unit. The length of the warranty governing the exchanged
unit will remain calculated by reference to the purchase date of the
original unit.
This warranty gives you certain legal rights which may change from
state to state or province to province. Your state or province may
also have other rights you may be entitled to that are not listed within
this warranty.
Contact Information
Address
GenTent Safety Canopies LLC.
44 Gile Rd.
Nottingham, NH 03290 USA
www.gentent.com
Customer Service
781-334-8368
service@gentent.com
/