Page is loading ...

.Sw*.
ltro
rot
oLA
\ii*t"
TALK.l^Bour
Two-Way Radio
User's
Guide
KEM-PK14190-67
EM1000 Series
For More lnlormation
F0r further information.
you
may call
Motorola
at
l-800-638-5'119
(U.S.
and
Canada),
or e-mail
us
at
giantintl@callcentetcom
or
visil
us
on
the Internet at ww.motorola.com.
lmportant Information on
Sale and
Elficient 0petation
nead fhis Intomation Belore Using Your fladio.
The information
provided
in this
docum€nt
supersedes the
gensral
safety intormation
in
user
guides published pri0rt0
December 1,2002.
Transmit and Rsceive Procedure
Your
tlvo-way
radio
contains
a transmitter and a receivel To control
your
exposure
and
ensure compliance
with the
general population/
uncontrolled envir0nment exposure limits, always adhere t0 the
following
procedure:
.
Transmit
no
more
than
50% of the time.
.
To receive calls, release the PTT button.
.
To
transmit
{talk},
press
the Push to
Talk
{PTT)
button.
Transmitting
500/0
of
the time,
or less, is
important because the radio
generates
measurable RF energy exposure only when transmitting
(in
terns
of measurinq standards compliance).
Exposure
lo
Radio
Freqrency Energy
Y0ur Motorola two-way
radio
complies
with
the
following
RF energy
exposure standards and
guidelines:
'
United States Federal Comm[nications Commission, Code
ot
Federal
Begulations;
47CFR
part
2 sub-part J.
.
American National Standards
Institute
{ANSI}/lnstitute
of
Electrical and Electronic Engineers
(IEEE)
C95.
1-1992.
.
Institute 0f Electrical
and
Electronics
Engineers
{IEEE}
C95.
1-1999 Edition.
.
lnternational Commission on Non-lonizinq Radiation Protection
0cNlRP)
r998.
.
Ministry of Health
(Canada)
Safety
Code 6. Limits of Human
Exposure
to
fiadiofrequency
Electromagnetic Fields
in the
Frequency Bange
from 3 KHz
to
300 GHz,
1999.
.
Australian Communications Auth0rity Radiocommunicati0ns
{Electromagnetic
Radiation-Human Exposure) Standard, 2003.
.
ANATEL
ANNEX to Besolution
No.
303 of July 2, 2002
"Regulation
of
limitation
of
exp0sure to electrical, magnetic and electromagnetic
fields in the radio
frequency
range between 9 KHz and
300GHz" and
"Attachmenl
to resolution #303 from July 2, 2002".
To ensure optimal
radio
performance
and make stre human
exp0sure to radio frequency electromagnetic energy is within the
guidelioes
set lorth in the above
standards,
always adhere to the
following
procedures.
Ponable Radio operation
and
EME Exposure
Antenna Care
Use only the supplied or an approved replacement antenna.
Unauth0rized anlennas, modilications, 0r attachments could
damage the
radio
and may violate FCC regulations.
Do
N0T hold
the
antenna when the radio is
"lN
USE." Holdino the
antenna atfects its eftective ranqe.
Body-Worn 0peration
To
maintain
c0mpliances
with
FCC/Health Canada RF exposure
guidelines
if
you
wear a radio on
your
body when transnritting
always
place
the
radio in a Motorola-supplied or approved
clip
holder,
holster, case
or body harness for this
product.
Use 0f non-
Motor0la-approved accessories
may
exceed FCC/Health
Canada
RF
exposure
guidelines.
lf
you
do not use
one 0f the Motorola-supplied 0r approved b0dy'
worn accessories and
are not using
the
radio held in
the normal use
position,
ensure
the radio
and its antenna are at least 1 inch
(2.5
cm)
fron
your
body when
transmitting.
Data 0peration
lf applicable, when using
any data
teature of
the radio with or
withoul an accessory cable,
position
the radio
and
its antenna at
least one inch
(2.5
cm)
lrom the
body.
Approved
Accessories
For a list of approved Motorola accessorjes, visit our Web site at
www.motorola-com.
Electromagnetic Interference/Compatibility
Note:
Nearly every
electronic device is susceptible t0
electromagnetic interference
(EMl)
if inadequately shielded,
designed or otherwise
confiqured lor
electroma0netic compatibility.
This
device complies
with
Pan 1 5 of
the
FCC Rules. 0peration is
subject
to
the
foll0wing
two conditions:
1. This device maV not cause harmlul
jnterference;
and
2.
This
device must accept any interference
received, including
intederence
that mav cause undesired
operatior.
Facilities
T0 avoid
electromagnetic interterence
and/or compatibility
conflicts,
turn off
vour
radio in any facility where
posted
notices
tnstruct
you
10 do
so. Hospitals or
health care facilities
may be using equrpment
lhat is
sensitive t0 external BF
enerqy
Aircraft
When instructed to do s0,
turn off
your
radio when
onboard an
aircraft. Any use of a radio must be
in accordance
with applicable
regulations
per
airline crew
instructions.
Medical
Devices
-
Pacenakers
The Advanced
Medical Technology
Association rec0mmends
that a
minimum
separati0n of 6 inches
(15
cm) be maintained between a
handheld wireless radio and
a
pacemaker.
These recommendations
are consist€nt
with
the
independent research by and
recommendations of
the
U.S.
Fo0d and Drug Administratioo.
Peoole
with
oacemakers
should:
.
ALWAYS
keep the radio more than 6 inches
{'15
cm) from their
pacemaker
when the radio is turned 0N,
.
Not
carry the radio in the breast
pocket.
.
Use the
ear
opposite the
pacemaker
to
minimize the
potential
for interference,
.
Turn
the radio 0FF immediately if
there
is
any reason to suspect
that
int€rferenc€ is taking
place.
Medical
Devices
-
Hearing Aids
Some digital wireless radios
may
interfere
with some hearing
aids.
ln ths event ol such interference,
you
may want to consult
your
hearlng aid manufacturer to
discuss alternatives.
Medical Devices
-
other
lf
you
use any other
personal
medical
device, consult the
manufacturer
0t
your
device t0 determine il it is adequately
shielded
fr0m RF energy.
Your
physician
may
be
able
to assist
you
in
obtaining this information.
Salety
and
General
Use While Driving
Check the laws and regulations regarding the
use of radios in
the
area where
you
drive, and always obey
them. lI
you
do use
your
radio while
driving,
please:
.
Give full attention
to drivinq and t0 the road.
.
Use
hands-lree operalion,
if
available,
.
Pull
off the road
and
park
before making
or answering
a call if
driving
conditions so require.
The use
of a two-way
radio while engaged
in activities requiring
c0ncentration
may cause distraction
0r otherwise
impair
y0ur
abilitv
to safely
participate
in such activities.
Always use
technology
safely.
Do not
plac€
a
portable
radio in the
area over an air
bag or in the
air bag
deployment area. Air bags inflate
with
great
force.
lf a
portable
radio is
placed
in the air bag
deployment area and
the air
bag inflates,
the radio may
be
propelled
with
great
force and cause
serious injury to occupants 0f
the vehicle.
P ote nti a
lly
E xp
I osi
v e
Atm
os
p
h e r e
s
Turn
off
your
radio
prior
to
entering
any area with a
potentially
expl0sive atmosphere. 0nly
radio
types
that are especjally
qualified
should be used in such areas
as
"lntrinsically
Safe."
Do not remove,
install or charge batteries in
such
areas.
Sparks in
a
potentially
explosive
atmosphere can cause an
explosion or fire resulting
in
bodily injury or even death.
'iu

Note: The areas
with
potentially
explosive
atmospheres
referred to
above include
fueling areas
such
as below decks on
boats,
fu€l
or
chemical transfer
or
storage
facilities, areas
where the air contains
chemicals
or
particles
isuch
as
grain,
dust or
metal
powders)
and
any other area
where
you
would
normally be
advised to turn
off
Vour
vehicle
engine. Areas
with
potenrially
explosive atmospheres
are
ofterbut
not alwavs-oosted.
Blasting
Caps and Areas
To
avoid
possible
interference
with blasting operations.
turn off
your
radio
when
you
are
near electrical
blasting caps,
in a blasting
area,
0r
in
are6s
posted
"Turn
off two-way radios."
0bey all signs and
instructions.
0perational
Cantions
Antennas
Do
nol use any
portable
radio
lhat has a
damaged antenna.
lf a
dama0ed antenna
comes into
contact with
Vour
skin, a
minor burn
can
result.
Bafteries
All batteries can
cause
property
damage
and/or bodily injury such as
burns if
a
conductive
material-like
jewelry,
keys or
beaded chains-
tolch exposed
termimals.
The c0nductive
material may complete
an
electrical circuit
{short
circuit)
and become
quite
h0t. Exercise care
in
handlioq any charged
banery,
particularly
when
placing
it inside
a
pocket, purse
or other c0ntainer
with
nretal objects.
Exercise care when
removing
NiMH or AA batteries,
D0 not use
sharp
or c0nductive t0ols
t0 remove either ol
these batleries.
B
attety C
h a rger
S af ety I t1
stru c lio n s:
Save these
lnstiuctions
1. Do not expose
the charqer
t0 rain
or
snow.
2. D0 not Operate or disassemble
the
charger
if it has received
a
sharp blow, or has been dropped or
damaged in any way.
3.
Never
alter
ihe AC cord or
pluq provided
with
the unit. It tho
plug
will not fit
the
outlet,
have the
proper
outlet installed by a
qualified
electrician. An improper condition
can
resuh in a risk
of electric shock.
4. To reducethe riskof
damagetothe cord orplug,
pullthe plug
rather
than
the cord when
disconnecting the
charger
from the
AC receotacle.
5. To reduce the risk oI electric shock,
unplug the charger from the
outlet before aft€mpting any maintenance
or
cleaning.
6. Use of an
aftachment not recommended or sold by Motorola
may
result
in
a
risk of lire, electric shock or
personal
injury.
7.
Make sure the cord is
located so it will not
be
stepped
on,
tripped over or subiected
to damage or stress.
L An extension cord should
not be
used unless absolutely
necessary. Use of an improper
extension cord could result
in a
risk of a
flre and/or electric
shock. lf an extension cord
must be
used, make sure
that:
.
The
pins
on
the
plug
of the
extension cord are
the same
number, size
and shape
as
those
on the
plug
of
tho
charger
.
The extension cord
is
properly
wired
and in
good
electrical
condition,
.
The extension cord
size
is 18 AWG for lengths
up
to
100 fee!
and 16
AWG l0r lengths up to
150 feet.
9. The supply cord
of
the AC
adaptor cannot
be
replaced.
lf the
cord is damaged,
call customer service at
1-800-638-5119
(U.S.
and Canada) or e-mail us at
giantintl@callcentercom.
Your
Motorola radio
oDerates on General
Mobile Radio Service
{GMRS}
frequencies
and is
subjectto
the
Rules
and Regulations ol
the Federal
Communicalions
Commission
{FCC).
The FCC requires
that
all operators using GMRS
frequ€ncies
obtain a radio license
belore operating their equipment.
To obtain the
FCC
forms,
please
request Form 605
and 159
,
which includes
all of the forms
and
instructions
vou will need.
lf
you
wish to
have th€ d0cument
faxed 0r
mailed,
or
if
you
have
questions, please
use the
lollowing contact inlormation;
You may also visit the
FCCt Web
site at ww.fcc.gov.
Changes or modifications
not expressly approved
by
Motorola may
void the user's
authority
granted
by the FCC to operate
this radio
and should
not be made- To comply
with
FCC requirements,
transminer
adiustments should
be made only
bv or under the
superuision o,
a
person
certilied
as technically
qualified
to
perform
transmitter
maintenance and repairs
in
the
private
land m0bile and
fixed services
as
certitied
by an orqanization
representative 0t the
user of those services.
Beplacement
of any transmitter component
{crystal,
semiconductor, etc,}
not authorized by
the FCC equipment
authorization
for this radio could
violate FCC rules.
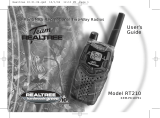
lAF
-
Baftery Meter
9'))
-
Channel Power
I
Indicator
(see
Menu
Options)
|
-
toct
r)
-
tatt Confirmation
''
Tone
(Roger
Beepl
QT
-
Noise Filtering
ON
-
On/Otf
toreach
t9arure
urr
Z
-
Scan
f
-
callrone,
't
KeypadTone
(1Q-
weatherAtert
lygX
-
Hands-Free Use
Without
Accessories
VOX
-
Hands-Free
Use
With
Accessories
Installing tho
Baneries
Each radio can
use
either 1
NiMH
rechargeable battery
pack
or 3
AA
alkaline
batterios and
beeps when the battsries
are
low
Inslalling l{iMH Becftargeablo
Baltsry Pack
{optional
Accessory}
1.
Turn the radio off.
2. With the back of the
radio facing
you,
lift the battery cover latch
uD and
remove the
covef,
3. Semove the battery
pack
lrom the clear
plastic
bag
(Do
oot
disassemble or
unwrap the battery
pack).
4. Ins€nthe
N|MH banery
packwith
the diagram facinq
you.
5.
Eeposition the battery cover
and
press
down to secure.
Installing tho
Three AA Alkaline Batteriss
1.
Turn the radio oft.
2. With the back of the radio
facing
you,
lift the battery cover latch
up and remove the cover
3.
Insert
the three M alkaline batteries
with
+ and
-
polarity
as
shown
inside.
4.
Reposition
the baftery cover and
press
down
to
secure.
Radio Bafiery
Merel
The
radio
battery icon shows the
battery charge level, from full
EB
10
empty
-1.
When
the
radio has one segment'left, the
radio chirps
periodically
or after releasing
O
{Low
Battery Alert}.
Removing the lliMH Battory
Pack
(0ptional
Accessory)
l. Turn the radio ofi.
2.
With the back 0f the
radio facing
you,
lift the battery
latch up
to
release
the
battery cover
and remove the cover
3. Remove rho N|MH battery
pack
by
pulling
the ribbon
aftached to
the radio.
4.
Repositi0n
the
battery cover and
press
down to secure,
Removing the Three AA
Batteries
1.
Turn the
radio off.
2.
Withthe
backof
the radio facing
you,
lift
the batterylatch
upto
release
the
batterv cover and remove me coveL
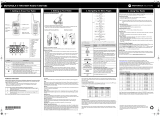
.iiI
A
volume
(9
Push to
Talk
(9
Flashlight Button
Microphone
0)
c"lt tone
eo
Scroll/Weathel
Flashlight LE0
Numbers for Channel,
CallTone
Numbers
for Codes
@
Emergency
Alert
l-ED ltrdicaror
Accessory Jack
@
Menu/Lock
@
Scan/Monitor
Mini-USB
Charging Port
For a lax:
Conlact the
f8x-0n-Demand
system
tor mail service:
Call tfte FGC
forms Hotline
ll
you
have
questions
ahout
the fCC Licenso:
call rhe Fcc
t-202-418,017/
1.800-418-F0nM
(3676)
1.888-CALL-FCC
(225,5322)

3. Gently
renove each battery
by
easing
each battery
out individuallv-
4. Reposition the
baftery cover
and
press
down to secure.
Notes
.
Exercise care
when removing
NiMH
or M batteries. Do
not use
sharp or conductive
tools
to remove either ol
these batteries.
.
Remove
the batteries before
storjng
your
radio for extended
peaiods
0f
time.
Batteries
corrode
over time and
maV
cause
permanent
damage
to
your
radio.
Using the Battery
Charger
{optional
Accossory}
The
battery
charger
provjdes
drop,in
charging convenience
for
NiMH
batteries and
can be
placed
on
any flat surface, such
as a
desk or
workbench.
Charge the
NiMH battery overnight
{at
least 16
hours) beiore
using it
f0r
the
first
time. After the initial charge,
an
empty battery is fully
charqed
within 14 hours.
l. Follow
the steps above to
install a
NiMH Batrery
Pack.
2. Plug
the AC
power
supply cord
into the
jack
on
the
desk
stand.
3. Pluq the
AC
power
supply into a standard
wall outlet.
4.
With
a radio
facin! lorward,
slide it into
one
of
the charging
Dockets.
5. When charging in
the battery
charger, the red light on rhe
charger
base will
glow
conttnu0usly.
Using the mini-tlSB
Charging
Connector
The miniUSB chargiug
connector
is a handy
port
lhat
allows
you
to
conveniently charge
your
NiMH battery
pack.
This is an alternative
t0 charging
your
Nil\4H
batterV
pack
in the Batrery
Charqer
desk
stand using the AC wall adaptor
and especjally
uselul
when used
while
traveling.
A,vailable
nini-U SB c
ha rging optiotis:
(optional
accessories)
L Wall travel charqer
2.
Vehicle
charqer
3 l\,4ini-USB computer cable
lf usinq a computet the
computer
must be turned on.
This
and other accessories
{sold
separatelyl are available for
your
radio. For more inlormation, visit
our
Web site at
ww.m0lor0la.com 0r sh0p.qiantintl.com,
'L
Plug
your
mini-USB
cable 0r charqer into a
power
source as is
appropflare ror
your
accessory,
2,
Pluq the
cable into the nini-USB
pon
on the bottom of
your
radio.
3.
An empty baftery
will
be
tully charged in 14 hours.
4. The LED indicator lightonthe
radiowill
glowto
indicate thatthe
battery is charging.
l{otes
.
The light will remain red after
the
Nil\4H
battery
pack
is fully
cnarge0.
.
When
movinq
belween
hot and cold temperatures, do not
charge
the
NiMH
battery
pack
until rhe
battery temperature
acclimates
{usually
about 20 minutes).
.
For oplimal
battery lite, remove
the radio from the charger within
l6 hours.
Do not store the radio while
connected t0
the
charoer
.
Turn
radio
otf while
charging.
Anachitrg
and
Semoring rhe
Eelt
Clip
l. Aftach belt clip
to
pocket
or belt strap.
2, Align the belt clip
post
with the hole
in
the back
of the radio.
3.
Gently
push
until
the
clip
clicks
in
place.
To Renove
1. Push down onthe
releaselab atthetoD of
rhe
beltclioto
release the
catch.
2. Pull the belt cliD
awav
from
the back 0f the radio.
Turoing
Your
Badio 0n and Ofl
Turn
A
clockwise to turo
the
radio on and counterclockwise to
turn the
radio
off.
l. In the
0N
position,
the radio
chirps and briefly shows all feature
icons
avsilable
on the ,adio.
2. The displsy screen
then shows the current channsl,
code and
all features that are
enabled.
Ssltitrg the Volsme
Press and
hold
@
for three seconds
while rotating
A
until
you
reach a comfonable listening level.
l.
Botate
[I
clockwise to
increase the volume.
2. Rotate
Ll
counterclockwise
to decrease
the
volume.
Do not hold the radio
close
to
vour
ear lI the volume is set to an
uncomfortable
level,
it could hurt
Vour
ear
To communicate,
all
radios
in
your
group
must be set to
the same
channel and lnterferencs Eliminator Cods.
L Totalk,
press
and
hold
@.
2. When
you
are tinished talking, release
O.
For
maximum clarity, hold
the
radio tuvo to three
inches away from
your
mouth
and
speak
directly into the microphone.
D0 n0t cover
the microphone
while talking.
Talk Raogs
Your radio is designed
to maximize
performance
and improve
transmission
range. 0o not use ths
radios closer than
five
feet
€part.
Motritor Button
Pressing and holding
@
for three seconds
allows
you
to listen to
the
volume
level ol the
radio when
you
are
not
receiving.
This allows
you
to
adiust the volume, if
necessary.
you
can also
press (Q
to
check Ior activity on the
current channel
belore
you
talk.
Push to Talk
@
Timeout Imer
To
prevent
accidental transmissions
and save batterv
lile, the radio
emits a continuous
warning tone
aod stops transmitting if you
pr€ss
e)
for
60 continuous
seconds.
Selecting
ths
Chann€l
Your
radio
has 22 channels.
Channels
8-14 are FRS 0.5 wan
only and
all
other
channels are
GMRS
(See
the'Channels
and Frequencies"
table on
overleaf for details).
1. With the
radio
on,
press
O.
When
the radio is on a 0.5
watt
channel,
d'
displays.
When the radio is on
a
1.5
watts
channel,
'1"' displavs. The
currenl channel flashes.
2. Press
@
or
O
and select
an unused or
quiet
channel.
3. Press
@
to sav€ the channel
settjno or
@
to continue
sst up.
Solecting The
Interference
Eliminato.
Code
Interference
Eliminator Codes help minimize interference by
blocking
transmissions
from unknown
sourcas.
your
radio has l2l
lnterference
Eliminator
Codes. C0des
'l
-
38 are the standard aralog
c0des that
appear
on
other FRS/GMRS radios. Codes 39
-
121 are
additional
digital
codes
added for superior interference
protection.
0
is
the off
position,
no
analog
or digital
codes are
onabled.
To setthe code
for a channel:
l. Press
O
untilthe code
startstoflash.
2.
Press
Q
or
O
to selectrhe code.
3. Press
@
t0 save the c0de setting or
O
to continue set up.
You
can set a difterent code for each
channel using this
procedure.
An
extended
press
of
Q
or
Q
allows
you
to
scroll through the
Interference Code
rapidly so
you
can
quickly
reach lhe code
y0u
want.
Note: Vou must
set
the lnterference
Eliminator Cods
to 0
on a radio
that
uses
lnterfe.ence
Eliminator Codes to communicate
with
radios
that do not have Interference Eliminator CodBs. Select 0 for
"no
tone,
no code" and oFF
will
flash
0n
your
radio's display.
Sotting
atrd Tran$mitting Call Tones
Your
radio
can
transmit
ditferent call tones to other radios in
your
group
so
you
can alert them that
you
want to talk. You have 10 call
tones from which
to choose.
To set a call tone:
L With the radio on,
press
@
three
times
until
the
cutrent
eall tone sening
(0
-
l0l
llashes and
@
appears.
2. Press
@
or
Q
to change and hear the call ton€.
3. Press
@
to set the new
call tone or
@
to continue set up,
To transmit
your
call
tone
to
other radios sst to the same channel
and Intederence Eliminator Code as
your
radio,
press
{r
.
Note: Sening the
call
to 0
disables
the call t0ne feature,
Hands-Free
Use
Withoui Accessories
{iVOXl
You can use the
iVoX
fsature lo transmil hands-free withoul
the
need
for any headset accessories. 0nce
iVoX
is turned on, the radio detecls
your
voice and transmits
when
you
speak into th€ internal microphone.
1. Press
@
until
iVoX
appears on the
display.
The currenl
settinq 0n/otf will llash.
2. Press
@or
Otoselect0norOff
3. Press
@
to set or
@
to continue set
up,
Hands-Frco
Use
Wilh
Accesoriss
{
VoX
}
You can transmit hands{ree mor8 reliably
with
the uss 0l optional
headset accessories, 0nce
VOX
is turned on. the radio detects
vour
voice and transmits when
you
speak.
Many
accessories
(sold
separately) are available lor
your
radio. For
more
information, visit our Web site at www,motorola.com or
shop.giantintl.com.
l. Turn
the
radio
otf and
plug
tho VoX accsssory into the
accessory Don.
2. Turn the radio 0n. VoX shows on the display.
3. Adjustthe v0lume appropriatelyby rotating
i!j.
Lowerthe
volume before
placing
the
accessory on
your
head or
in
your
eal
4. To
turn
otl. simply remove accessorr.
ilolo: There is a shon dBlay between the time
you
start talking
and
when
the radio transmits. There
is a short delav before the
transmission is completed.
Continued on back
EMl000
1\r

Setting the Sensitivirv
[evel When
in
VoX o]
iVOX Mode
Adjusting the radio's
setrsitivity level
helps minimize the
possibility
0t unintended
n0ises triggering
a transmission and helps the
radio
pick
up soft
voices.
l.
Press
@
until VOV|VOX
and the level setting
(1-3)
appear on
the disolav.
2. Press
Q
or
Q
to select the
sensitivity level.
3.
Press
@
to set
or
(*)
to continue
set up.
3
=
High Sensiriyiry
for
quiet
environments
2
=
Medium Sensitivily
for nost environments
1
=
Low
Sensitivity for
noisy
environments
Note: When
vou
connect
a
headset,
the radio is automaticallv
set
to
the last chosen sensitivity
level.
0r
Noise
Filtering
The Ol
noise{ilrering feature helps
to ensure uninterrupted
communication with other
Motorola radios that have this feature.
This feature
also
filters
out unwanted transmissions
from other
radios. This is useful in
places
where there is he6vy radio tratfic,
such as am!semeal
parks
or ski resons
l{ote: 0T noise filtering
is not available
when
the
radio is scanning.
To turn At
noise
filtering
on or off:
1. Press
Q)
until
eT displays. The current
setring On/oft will
flash.
2. Press
Q
or
Q
to turn noise filtering 0n or Of{.
3.
Press
@
to
c0nfirm
your
selection or
@
to continue set up.
To
tnnsmit
to a
ndio
that
has
Ar
noise filtering turned on:
1.
Select
the same channel and lnterference
Eliminator Code as
the other radio.
2.
Press
Q)
to send a call tone. This
sllows
your
voice to
pass
through
the
Or
noise lilter on the receiving radio,
3.
Press
@
and speak
normally.
Note: lt
you
skip
step
2, the beginning of
your
message may not be
heard
on
the receiving
radio.
For a
30-second
period,
startinq after
the last transmission, all
transnissions
received on the
selected
channel and code will
pass
through the 0r noise filtel
Keypad
Tonos
You
may enable or disable the speaker
key
tones.
You
will hear the
key
tone each time a bunon is
pushed.
l. Press
@
until
@
appears.
The
curent sefting 0n/0ff will flash.
2.
Press either
Q
or
Q
to turn
0n or off.
3. Press
@
to conlirm
or
@
to continue ser
up.
Nole: When
the
key tone
feature is off, the loll0wing are not disabled:
.
Transmit timeout alert tone
.
Call
tone
.
Low battery alert
tons or
.
The transmitted talk
confirmation tone
Transmitting a
Talk
Cotrtimation Tono
You can set
your
radio
to transmit a unique lone when
you
finish
transmitting. lt is like
saying
"Roger"
or
"over"
to let others
know
you
are tinished talking.
1. With the radio on,
press
@
until the
.))
appears. The
current
settinq
0rV0fJ flashes.
2.
Press
(+)or
Q
toturn0nor0ff.
3. Press
@
to set or
CE
t0
quit
menu mode.
Ene.gency
Alen
Mode
The
Fmergency
Alen function can
be used to signal others in
your
group
of
your
need for immediate
help. All radios in
your
group
using
the same channel and
interference eliminator code
can
receive
the
message. EMl000 series
radios will aulomatically
advance the
speaker volume to
a loud setting
{the
maximum rated 0utput level},
regardless
of the
volume
control
position.
A
unique alerttone will be
€miited trom the receiving
radios and heard by
your
group.
The
alert tone is also emitted
lrom
your
own
radio
sposker to attract
attention
in
your
vicinity.
Any spoken
words
or
incidental
sounds
will
be transmitted to others.
EMl000 series radios will be operating in
an
automalic
"hands
free' emerqency transmission control mode
for a total 0t 30 seconds.
For
the duration ofthe emergency alen,
your
radio will be locked into a transmitting mode and
the
other
EMl000
radios in
your group
will
be
locked into
a
receiving
mode to
help
ensure
the
receipt
of
your
emer0ency
message.
L
Press and hold the Emergency Al€rt button for 3 seconds,
2. An alert signal will be
transmitted for
8 seconds
t0
alefi othsr
receivers.
3. Your voice or incidental sounds
will be transmitted
for 22
seconds.
There is no
need
to continue to
hold the
Emergency
Alert button or use
the PTT button for
your
message to be
tratrsmttted.
4. Atter 30 seconds
your
radio will
return to normal two-way mode.
EMi000 series radios
will automatically return to
the
initial
volume
settinq
as
controlled by the volume knob. Both
the
sender
and the receivBr will again be able to talk
to
each
other
using the
PTT
or VoX
methods of transmission control.
Notei
Badios
other
than
EM1000 series can receive
the
emergency
alerl signal but
will not respond with adiusted volume settings.
controlled transmission
mod€ or unique
alen
tone.
U!ers
of other
radios will hear
a
steady
8 second tone and the 22 second
v0ice
tranSmtsston.
Warning: The
Emergency Alertfeature should only be
used
in the
ev€nt
of
an actual emergency,
Motorola is not responsible
if
there
is no response to the emergency
alen from
the
receiving
group.
Built-itr Flashlight
Press rhe flashlight button
to turn the light on. The switch functions
as a momentary control for the light.
iloto: Turn off the flashlight
when not in use to conserve battery
DOWET
Ksypad Lock
fo avoid accidentally
changing
your
rcdio settings:
1.
Press
@
and hold
until
I
displays.
2. When in lock mode,
you
can turn the radio on
and otf,
adiust
the
volume, receive, transmit,
send a call tone, and monitor
channels. All other functions are
locked.
To unlock the radio,
press
and hold
@
until
g
is no longer
displayed.
Scanning
Channels
Use
scan to search the
22 channels for transmissions from
unknown
parties,
to
find
someone in
y0ur group
who has
accidentally changed channels, or to
quickly
find unused channels
for
your
own use.
There
is a
priority
feature and
2
modes of scanning
{
basic and
advanced
l
to
make vour search nore etfective,
The
basic
scan
mode
uses the channel and
code
combinations tor
each
ol the 22
channels
as
vou
have
set
them
(
or with the detault code value 0f
I
l.
The
"Advanced
Scan"
mode
will scan all channels for any
and
all codes, detBct any code in use, and use that
code value
temporarily lor that
channel.
Priority
is
given
to
the
"homs
channel,"
that is, the channel
{and
Interference Eliminator Code)
your
radio was set t0 when
you
start
the scan. This meansthe initial channel
{and
code sening} is scanned
more often
than the other 2l channels, and
your
radio will respond
quicklyto
any activity occurring on the home
channel
as a
priority.
fo start Scanning:
^
l.
Brielly
press
the
€)
key. The scan z
will appear in the
display, and the radio will be0in
to scroll through the channel
and
code combinations.
2. When the radio detects channel activity
matching the channel
and
code combination, it stops scrolling
aod
you
can
hearthe
transmtsston.
3, To
respond
and
talk
to the
person
transmittrng,
press
O
within
five
seconds
after the end of the transmrssion.
4. The radio will resume scrolling through the channels five
seconds after the end 0t any received activity.
5. To stop scanning, brielly
press
the
@
key.
To statt
Advanced Scanning:
l.
Set
the Interference
Eliminator Code t0
"zero"
or 0FF.
2, Briefly
press
the
@
key. The scan
z
will appear in the
display, and the radio will begin to scroll thr0ugh the chann€ls.
No
Intederence Eliminator
Codes will lilter
what
is heard.
3. When
the radio
detects channel activity with ANY code
{or
N0
code), it stops scrollinq and
you
can hear
the transmission. Any
lnterference Eliminator C0de
thar
may be
in use
by that
party
will be detected and displayed.
To
respond
and
talk to
the
person
ransmitting,
press
@
within
five
seconds ot the end of the transmission. The radio will
transmit
using
the
newlv
detected Interference
Eliminator Code.
The radio will
resume scrolling through the channels
five
seconds atter the end
of any received activity.
6.
To
stop scannjng,
briefly
press
the
@
key.
Scanning Notes:
l. lf
you
press
O
while the radio is scrollinq through inactive
channels,
the
transmission will be on the
"home
channel".
Scanninq will resume five sec0nds after
the end
of
your
transmission. You
may
press
the
@
key to stop scanning
at
any
tine.
2. It the
radio
stops
on
an undesired
transmission,
you
may
immediately resume the scan
by
briefly
pressing
@
or
Q
.
3. lf the
radio repeatedly stops on an undesired
transmission,
you
may
temporarily remove that channel flom
the scan list by
pressing
and holding
@
or
Q
forthree seconds. You
may
remove m0re than
one channel in this way.
4.
T0
restore the removed channel(s)
to
the
scan list, turn the radl0
off and then back on, or exit and re-enter
the scanning mode by
pressino
@
.
5. You cannot remove the home channel from
the scan
list.
6. In Advanced Scan, the detscted codo will only be used
tor one
transnission. You must note the code, exit
scan,
and set
that
detected
code on that
channel
to
permanenlly
use
the
detected
c0de.

Your radio can tune in to
broadcasls
bv the
United States National
0csanic and Atmospheric
Administration
(N0AAl
Weather Radio
and
Envrronment Canada Weatheradr(
You
can listen to
a weather channel
(see 'Weather
Channels and
F equencies" table belowl or
set
your
radio to alert
you
to
emsrgency weather
broadcasts that interrupt routine broadcasts,
When
you
listen to a weather channel,
you
cannot use
your
radio in
scan mode or for two-way
communications.
Both N0AA and Environmont
Canada have
transmitters
located
throughout the United
States and Canada.
respectivelV.
These
transmitters broadcasl
watches, forecasts, and other infotmati0n 24
hours a dav.
Note: NoAA weather
radio stations are assigned to covor specitic
areas and seruice may be
limited. Please
check
wilh
your
local
weather otfice
for frequency and
details.
or visit
www.weathergov/nwr in the
US
or
www.msc.ec.gc.calmsb/weatheradio in Canada
to view the
appropriate
transmitter
for
your
area.
The
use of the
N0AA logo do€s not
provide
an endorsement or
implied
endorsement
by NoAA's NationalWeather Service, nor
does the use of
the Weatheradio logo
provide
an endorsement or
implied endorsement by
Environment
Canada.
Tuming l,Veathcr Channel Beccption 0n and olf
1.
To turn weather reception on,
press
O
and hold lor 3 ssconds.
2, Toturnoff,press
O
orturnthe radiooff andthen
backon.
Sening
the Weather Channel
Y0ur radio receives wealher frequencaes:
L Afterturningweatherr€c€ptron0n,press
O.Thecurrent
channel tlashes.
2. Press
@
or
O
to selectthe
appropriate
channelwith
good
recePtron in
your
area.
3.
Press
@
tosavetheweatherchannel setting.
Ssning the Weather Alort
Your rsdio can be set to respond to NoAA Weather Radio
emelgency messages. A special alarm
t0ne sounds an alert and
turns 0n the weather receiver to
give
Vou
immediate weather and
emergency intormation.
L After
turning
weather recBption on,
press
@
twice. 0n/0tf
displays.
2. Press
@
or
Q
to select 0n/0f1. lf
you
activate Weather Alert
and
return to
two-way mode,
C.Q
will display-
3. Press
@
to save tho
Wsather
Alert setting.
4. Press
@
to returntotwo-way
mode.
As
with two-way
radio reception, weather
channel
reception depends
on
how
close
you
are to a transmitter and whether
you
are indoors or
outdoors.
Because weathef
channels are
transmitted
without codes,
they may contain static
or noise. Weather Alertwill notfunction while
activelytransmifiing
or receiving
in two-way
mode.
Weatter Channels
and Floquoncies
Consumer Two-Way
Badio
Prodrcts
and Accessories
purchased in
$re
ljnited
States or Canada.
what
Does this Waranty
Cover?
Subiect
to
the
exclusions
contained to the
right, Giant International
Ltd. warrants
the lvlotorola
branded cons[mer two-way
radi0s that
operate
via Familv Radio
Service or General Mobile Badio
Service
that
it manufactures
("Products").
the Motorola branded
0r certified
accessories
sold for use
with these Products that it manulactures
{"Accessories"l
to
be free
lrom detects in materials and
workmanship
under normal
consumer usage lor the
period{s)
outlined
below. This limited
warranty is a consumer's exclusive
remedy, and applies as f0llows to new Motorola branded
Products
and
Accessories manufactured
by Giant International
Ltd., and
purchassd
bv
consumers in the United S1ates or Canada,
which are
accompanied
by this written
warranty:
ManufactuJed, distributed or sold by Giant International Ltd.,
otticial
licensee tor this
product.
Motorola, the Stylized M
Logo, and other
Motorola trademarks and
trade dress are owned
by
Motorola,
Inc.
and are
used
under
license
from
Motorola, Inc.
M0T0R0LA
and the
Stylized
M
Logo
ire registered
in
the
US
Patent & Trademark Otfice.
All other
product
or s€rvice nameq are
the
prop€rty
of their
respective owners. @Motorola,
Inc.2008. All rights reserved.
Please contact customer seruice
at 1-800-638-5119 or e-mail
us at
giantintl@callcentercom
f or
questionslcomments,
watranty, supporl
or service relaled to this oroduct.
Weathel
Channel
Frcquency Weather
Channel
Froquoncy
WXI 162.550
MHz
WX7 162.525 MHz
wx2 162.400 MHz
WX8
161.650 MHz
wx3
't62.475
MHz WX9 161.775 MHz
wx4
162.425
MHz
WXIO
161.750 MHz
WX5
162.450 MHz WXI'I
162.000 MHz
WX6
162.500 MHz
Frequency D€scription
Freqoency 0sscription
I 62.5625 MH
GMRS/FRS l2 167.6625 MHz FRS
2
62.5875
MH GMBS/IRS 167.6875 MHz FBS
3
62.6125
MH GMRS/FRS l4 467.7125 Mil? FBS
4 52.6375
MH GMSS/F8S 462.5500 [4Hi GMRS
5
162.6625
MH
GMnS/fns t6
162.5750 MHz
GMRS
162.6875
MHi GMHS/FRS l7 GMRS
7
'62.7125
MHi GMRS/IRS t8
GMRS
8 ,67.5625
t\4Hl FRS 19 462.6500 MH,
GMBS
I
,67.5875
MH, FRS
20
462.6750
MBr GMBS
l0
67.6125 MH: F8S {62.7000
MH? GMRS
ll
'67.6375
MHi
Fis u
162.7250
MH? GMRS

t/1.
Products
Covered
Products
and
Accessories
as
defined
above, unless
otherwise
provided
for below
L
Decorative
Accessories
and
Cases. Decorative
covers
and
cases.
2. Monaural
Headsets.
Ear
buds
and boom
headsets
that
transmit
mono
sound through
a wired
connection.
3.
Gonsumer
Two-Wav
Radio
Accessoties.
4. Products
and Accessories
that
ate Repaired
or
Beplaced.
[ength
of
Coverage
One
(ll
year
from the
date of
purchase
by the
first consumer
purchaser
of the
product
unless
otherwise
orovided
for
below.
1. Limited
lifetime warranty
for
the lifetime
of ownership
by
the
first consumer
ourchaser
of the
oroduct.
2. limited
lifetime warranty
for
the lifetime
of ownership
by
the
first
consumer
purchaser
of
the Droduct.
3. Ninety
(91)
days from the
date of
purchase
by the
first
consumer
ourchaser
of the
product.
4. The balance
ofthe original
warranty or
for ninety
(90)
days from the
date
returned
to the
consumer. whichever
is longer.
Exclusions
Normal
Wear and Tear.
Periodic maintenance,
repair and
replacement
of
parts
due to normal
wear and
tear
are
excluded
from coverage.
Batteries.
0nly batteries
whose fully
charged capacity falls below
80% of their
rated capacity
and batteries that
leak
are covered
by
this
limited
warranty.
Abuse
& Misuse. Defects
or damage
that result from:
(a)
improper
operation,
storage,
misuse or
abuse, accident or
neglect, such as
physical
damage
(cracks,
scratches,
ete.) to
the
surface of the
product
resulting from
misuse;
(b)
contact
with liquid, water, rain,
extreme
humidity
or heavy
perspiration,
sand,
dirt
or
the like,
heat, or
food;
(c)
use
of
the
Products or Accessories
for
commercial
purposes
or subiecting the
Product or Accessory to abnormal usage
0r
conditions;
or
(dl
other
acts which are not the fault of M0torola or
Giant International
Ltd., are excluded
from coverage.
Use of
Non-Motorola branded
Products and Accessories. Defects
0r damage
that result from the
use 0f Non-Motorola branded
or
certified
Products, Accessories, Software or other
peripheral
equipment
are
excluded from
coverage.
Unauthorized
Service
or
Modification.
Defects or damages
fesulting
from service,
testing,
adiustment,
installation,
maintenance,
alteration, or modification
in
any
way by someone
other
than Motorola. Giant International
Ltd. or its authorized
service centers,
are
excluded from coverage.
Altered Products. Products
or
Accessories
with
(al
serial
numbers
0r date tags that have been removed, altered or obliterated;
(b)
broken seals or that show evidence of tampering;
(c)
mismatched
board serial
numbers;
or
(d)
nonconforming or non-Motorola
branded
housings, or
parts,
are excluded
from coverage.
Communication
Services, Defects, damages, or the failure
of
Products
or
Accessories
due
to
any communication service
or
signal
you
may subscribe to or
use
with the Products
or
Accessories
is excluded from coveraoe.
Who
is
covered?
This warranty
extends only
to the first
consumer
purchaser.
and is
not transferable.
What
will GIANT INTERNATI0NAI
LTD. do?
GIANT
INTERNATI0NAL
LTD.,
at its option, will at
no
charge
repair,
teplace or
refund the
purchase price
of any Products or
Accessories
tiat
does not conform to
this warranty. We
may use
functionally equivalent
rec0nditi0ned/
refurbished/
pre-owned
or
new Products,
Accessories
or
parts.
How to obtain
Warranty Service
or 0ther Intormation?
To obtain service
or information,
please
call:
@@
1-800-638-5119
1-800-638-5119
For Accessories,
please
call
the telephone
number designated
above for the
product
with
which they
are
used.
You will receive
instructions
on how to
ship the Products or
Accessories at
your
expense, to
a GIANT INTERNATI0NAL LTD.
Authorized Repair Center.
To
obtain
service,
you
must include:
(a)
a
copy
0fyour receipt,
bill of sale or
other comparable
proof
of
purchase;
(b)
a written
description of the
problem; (c)
the name of
your
service
provider,
if applicable;
(d)
the name and location ofthe
installation facility
(if
applicable)
and, most importantly;
{e)
your
address and telephone
number.
What
0ther Limitations
Are There?
ANY
IMPLIED
WARRANTIES. INCLUDING WITHOUT LIMITATION
THE
IMPLIED
WARRANTIES OF MERCHANTABILITY
AND FITNESS
FOR
A PARTICULAR
PURPOSE, SHALL BE TIMITED T(] THE
DURATION
OF
THIS LIMITED WARRANTY, OTHERWISE THE REPAIR,
REPLACEMENT,
OR
BEFUND AS PBOVIDED UNDER THIS EXPRESS
LIMITED
WARRANTY IS THE EXCLUSIVE
REMEDY
OF THE
CONSUMER,
AND IS PROVIDED IN LIEU OF ALt OTHER
WARRANTIES,
EXPRESS OF IMPLIED. IN NO EVENT SHALL
MOTOROLA
OR GIANT INTERNATIONAL LTD. BE LIABLE. WHEIHER
IN
CONTRACT
OR TORT
{INCLUDING
NEGLIGENCE} FOR DAMAGES
IN
EXCESS OF THE
PURCHASE PRICE
OF
THE PRODUCT OB
ACCESSORY
OR FOR ANY INDIRECT,
INCIDENTAL,
SPECIAL
OH
CONSEOUENTIAL
DAMAGES OF ANY KIND, OR
LOSS OF BEVENUE
OR
PROFITS, LOSS
OF
BUSINESS,
LOSS OF INFORMATION
OR
OTHER
FINANCIAL LOSS
ARISING OUT OF OR IN CONNECTION
WITH
THE
ABILIW OR INABILITY TO
USE
THE PRODUCTS
OR
ACCESSOBIES
TO THE
FULL
EXTENT THESE DAMAGES MAY BE
DISCLAIMED
BY LAW
Some
states and
jurisdictions
do
not allow
the limitation or
exclusion
of incidental
or
consequential
damages, 0r limitation on
the length of an implied warranty, so the above limitations
or
exclusions
may n0t apply to
you.
This warranty
gives
you
specific
legal rights, and
you
may also have
other rights that vary from state
to state or
from one
iurisdiction
to another.
/